

Who this is for
This guide is written for Owner, Admin and Finance.
Before you begin
- Timesheets is in your left menu, under Operations, and Export Payroll works, for roles that include Can view timesheets and Can export payroll timesheets. An Owner or Admin can add them to a role in Configuration > Roles & Permissions. See Roles and permissions basics.
- The timesheets you want in the file are Approved. Only approved timesheets are exported. See Approve timesheets. The general steps for any export are in Export payroll.
- For a file with dollar amounts: Pay Levels is switched on and the pay of every approved timesheet is RESOLVED, and your Employment Hero IDs are entered in Payroll CSV mappings. An Owner or Admin switches Pay Levels on in Account settings > Automation & Capacity Controls > Pay Levels and automatic interpretation, by choosing Enable and then Enable and prepare. The card shows Preparing and then Ready to confirm. Choose Review and confirm, look over the setup on the Pay Levels page and choose I've reviewed the setup: enable interpretation. Pay interpretation works when the card says On. See Pay Levels. A file of approved hours only needs neither.
- You will import the file with Employment Hero's own import. BondiByte does not connect to Employment Hero and does not send the file anywhere.
Steps
The screenshots show a demonstration organisation with made-up names. Your own screens show your organisation's details. Select a screenshot to open it full size.
-
Go to Timesheets > Approved
1 In the left menu, under Operations, choose Timesheets. The Timesheet review screen opens on the last period that has finished.
2 Check the dates under Selected period. They must match the pay period you are paying. To change them, choose Previous, Next, Last completed or Current period.
3 Choose Approved and check that the timesheets you expect are there. Only these go into the file.
Important: The file covers exactly the period under Selected period. You cannot choose other dates for an export.
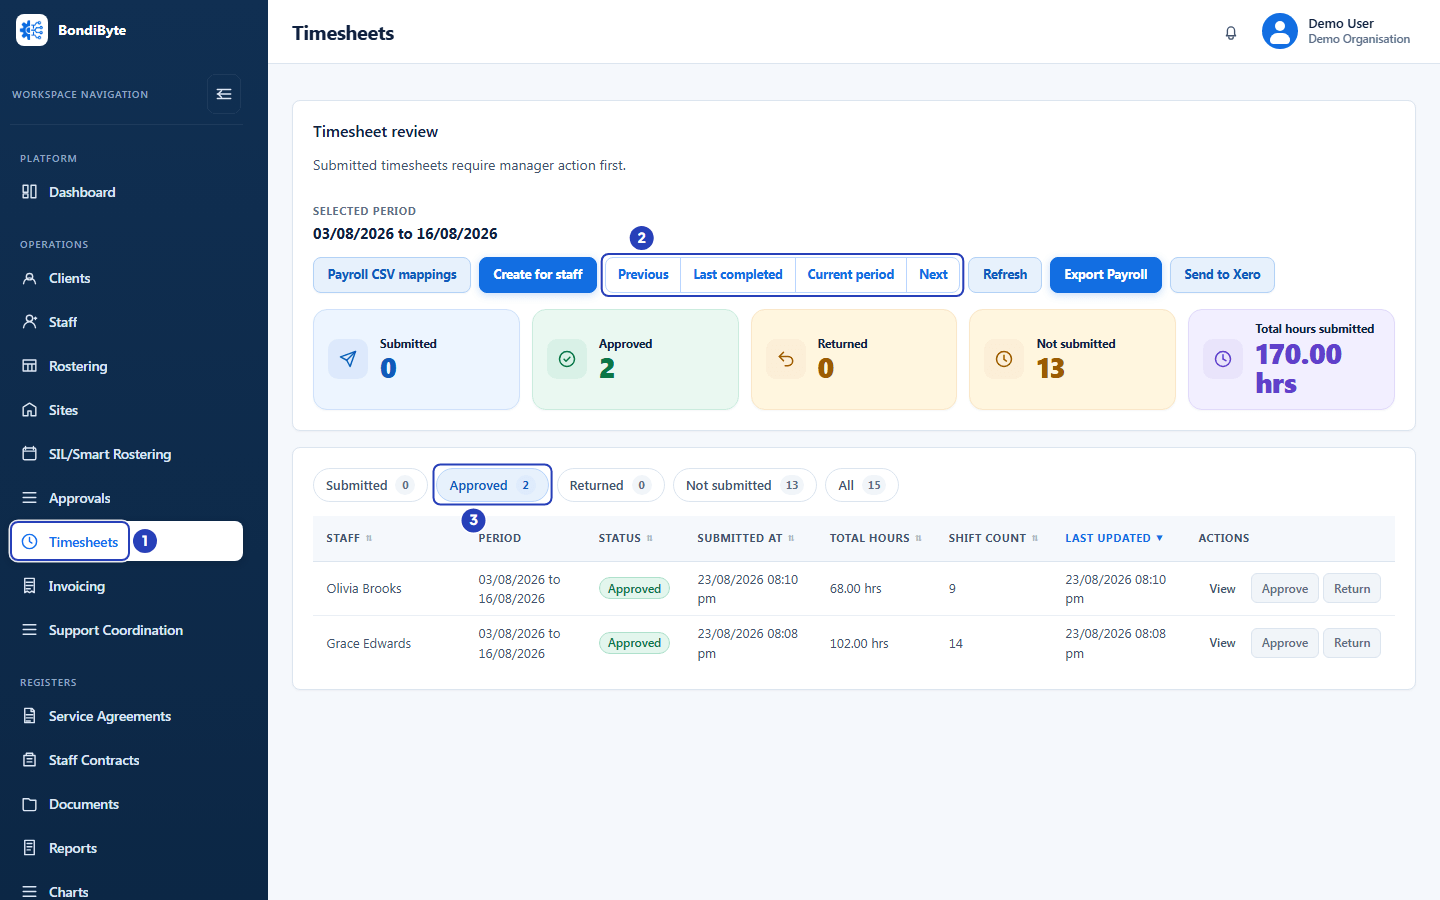
Choose Timesheets in the left menu (1), use the period buttons to reach the pay period (2) and choose Approved (3). -
Enter your Employment Hero IDs if the file will have amounts
Skip this step when you export approved hours only. Choose Payroll CSV mappings at the top of the screen. The Payroll CSV mappings window opens.
1 In CSV format, choose Employment Hero. It starts as MYOB, so you must change it.
2 Choose Staff, Sites or Pay categories to switch lists. Use the search box above the list, for example Search staff, to find a name.
3 In Payroll external ID, type the ID Employment Hero uses for that person, site or pay category. Leave a row blank if it is not needed. Mapping version starts on New mapping version, filled in with your latest saved IDs.
4 Choose Publish new mapping version to save. A message says New mapping version published. Existing saved export batches are unchanged.
5 Choose Close, at the top right or beside Publish new mapping version, to leave the window. It does not close by itself after you publish. Closing without publishing saves nothing.
Fields in step 2 Field What it means Staff The ID Employment Hero uses for each person. It goes in the Employee External ID column of the file. Sites The ID Employment Hero uses for each site or location. It goes in the Location External ID column. Pay categories The ID Employment Hero uses for each kind of pay, for example ordinary hours or a sleepover allowance. It goes in the Pay Category External ID column. Payroll external ID Up to 200 characters of plain text. It cannot start with =, +, - or @. A blank row is left unmapped. Important: A file with amounts needs an ID for every person, site and pay category in it. If one is missing the export stops with A payroll staff, site or pay-category ID is missing. Complete the CSV mappings before monetary export.
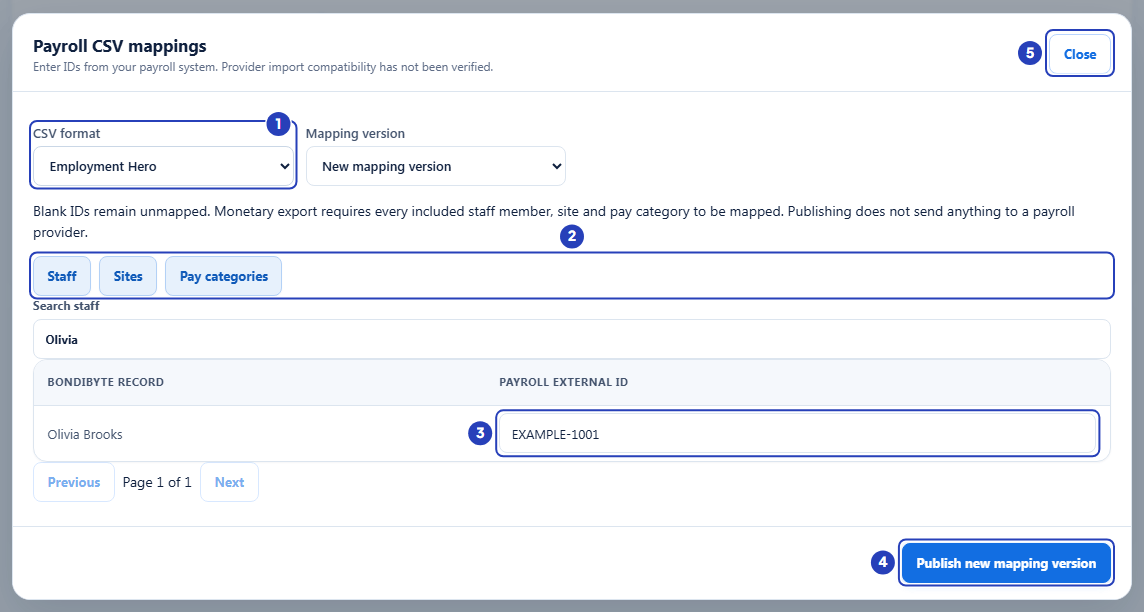
Choose Employment Hero in CSV format (1), choose Staff, Sites or Pay categories (2), type the ID (3), choose Publish new mapping version (4) and choose Close (5). -
Choose Export Payroll > Employment Hero
Choose Export Payroll at the top of the screen. A window titled Choose payroll export format opens.
1 Decide about Export approved hours only (leave all monetary totals blank). Leave it unticked for a file with dollar amounts. Tick it for a file of hours only, which needs no Employment Hero IDs and has an empty Total column.
2 Choose Employment Hero. The file is made and your browser downloads it. A message says Preparing payroll export... and then Payroll export downloaded.
Fields in step 3 Field What it means Export approved hours only (leave all monetary totals blank) Tick box, not ticked the first time you open the window. The tick stays as you left it until you leave the Timesheets screen, so check it each time. Ticked: hours only, with no amounts and no Employment Hero IDs needed. Unticked: each row has the approved dollar amount, and the export is refused if any amount is unresolved or an ID is missing. Employment Hero Makes the file in the Employment Hero layout and downloads it. The file is called employment-hero-timesheets- followed by the first and last dates of the period, for example employment-hero-timesheets-2026-08-03-to-2026-08-16.csv. Warning: There is no preview. Choosing Employment Hero makes the file and downloads it at once. Check the period and the tick box first.
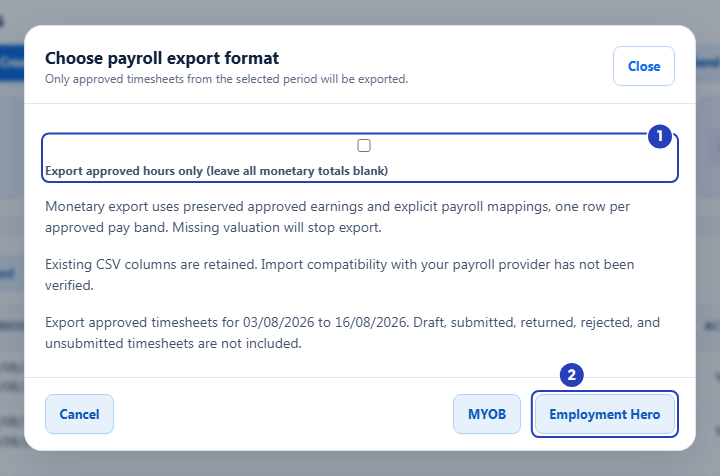
Decide about approved hours only (1), then choose Employment Hero (2). -
Read the columns of the file
1 Open the downloaded file in a spreadsheet. The first row holds the column headings. Each following row is one part of a shift that is paid in one way. A sleepover, for example, takes more than one row: the hours before it, the sleepover allowance and the hours after it.
2 Check the columns against the table below. The file always has these thirteen columns, in this order. Three of them are always empty.
3 Check that the people, dates, times and hours match your approved timesheets before you go on.
Fields in step 4 Field What it means Employee External ID With amounts: the Payroll external ID you entered for the person. Hours only: the person's sign-in name or email address, because no IDs are used. Employee Name The person's first and last name. Date The day the work was done, written year, month, day, for example 2026-08-05. Start Time When that part of the shift starts, in 24-hour time, as rostered at the site, for example 17:00. End Time When that part of the shift ends, in 24-hour time, for example 22:00. Break Start Time Always empty. BondiByte does not put break times in this file. Break End Time Always empty. Units The hours for that row, for example 8 or 1.5. For an allowance paid per unit, such as a sleepover allowance, it is the number of units, for example 1. Location External ID With amounts: the ID you entered for the site. Hours only: the site's code, as shown for the site in BondiByte. Work Type External ID Always empty. Pay Category External ID With amounts: the ID you entered for the pay category. Hours only: the pay item code from your Pay Levels, which is the code shown beside each name in Pay categories. If the pay for that line is not resolved, a short code for the part of the shift instead, for example STANDARD. Comments The staff member's notes and the reason they gave for changing hours, joined by a vertical bar when there are both. Blank when there are none. Total With amounts: the dollar amount for that row, to two decimal places. Hours only: blank. Note: The window says Existing CSV columns are retained. The columns above are the layout BondiByte keeps for Employment Hero. They do not change from one export to the next.
-
Take the file into Employment Hero
1 Take the file to Employment Hero and import it with the import your Employment Hero product offers for this kind of data. If you are not sure which, ask Employment Hero or your payroll adviser. BondiByte does not do this step for you and does not connect to Employment Hero.
2 Before you import, compare the column headings with what your Employment Hero import asks for. The window says Import compatibility with your payroll provider has not been verified.
3 Try the import with one person or a short period first. When the result is what you expect, import the rest.
Important: BondiByte prepares the file and does not check how Employment Hero will read it. Import only the file you need. Importing two files for the same period would pay the same hours twice.
What happens next
The file is on your computer. BondiByte keeps a saved copy of each export, and you can get exactly the same file again with Download the same saved batch again when you open Export Payroll again for the same period without leaving the Timesheets screen.
The approved timesheets do not change when you export. Nothing is marked as paid.
To make a file for MYOB instead, see Export a MYOB payroll file.
Important notes
Important: Only approved timesheets are exported. A timesheet that is Submitted, Returned, Draft or not submitted at all is left out of the file.
Note: Employment Hero IDs are saved separately from MYOB IDs. Entering IDs for one format does not fill in the other, so change CSV format to Employment Hero before you type.
Good practice
- Enter your Employment Hero IDs in Payroll CSV mappings before the pay run, not on the day. Change CSV format to Employment Hero first, or the IDs are saved for MYOB. A new version applies to the next export only.
- Look at the file in a spreadsheet before you import it. Check one person's total hours against their approved timesheet, and check the start and end times.
- For a first export, tick approved hours only and compare the hours with Employment Hero. Then move on to a file with amounts once your IDs are in.
- Keep the downloaded file with your pay run records, named by period, so you can show what was imported.
Troubleshooting
A message says No approved timesheets were found for the selected period.
Why it happens: No timesheet is approved in the period under Selected period, or the approved ones belong to staff you are not allowed to see.
What to do: Check the dates and the Approved card. Approve the timesheets, or move to the right period.
A message says Approved earnings are incomplete or historically unknown. Resolve the outstanding decisions, or deliberately select approved hours only.
Why it happens: At least one approved timesheet has pay that is not resolved, so a file with dollar amounts cannot be made.
What to do: Resolve the pay if you can, or tick Export approved hours only (leave all monetary totals blank) and choose Employment Hero again.
A message says Configure payroll CSV mappings before exporting monetary earnings.
Why it happens: No Employment Hero IDs have been saved, and a file with amounts needs them. IDs entered while CSV format said MYOB do not count.
What to do: Choose Payroll CSV mappings, change CSV format to Employment Hero, enter your IDs and choose Publish new mapping version, or tick approved hours only.
A message says A payroll staff, site or pay-category ID is missing. Complete the CSV mappings before monetary export.
Why it happens: A person, a site or a kind of pay in the file has no Employment Hero ID saved.
What to do: Open Payroll CSV mappings, check CSV format is Employment Hero, fill the blank rows on Staff, Sites and Pay categories, and publish a new version.
The Employee External ID column holds email addresses, and Total is empty.
Why it happens: You exported approved hours only, which has no Employment Hero IDs and no amounts.
What to do: For a file with IDs and amounts, leave the tick box empty, resolve the pay and enter your Employment Hero IDs first.
Employment Hero does not accept the file, or reads the columns differently.
Why it happens: The window says import compatibility with your payroll provider has not been verified. Your Employment Hero import may expect different headings or values.
What to do: Compare the headings and values in the file with what your Employment Hero import asks for, and ask Employment Hero's support or your payroll adviser which layout it needs.