

Who this is for
This guide is written for Owner, Admin and Finance.
Before you begin
- Timesheets is in your left menu, under Operations, for roles that include Can view timesheets. See Roles and permissions basics.
- Xero Payroll is connected. If it is not, the Send to Xero window only says Connect Xero in Configuration to send timesheets. and shows a Connect Xero link. See Set up Xero Payroll.
- Your staff are matched to their Xero employees, and your hours are matched to Xero earnings rates. People or pay items that are not matched are held when you check. See Map staff to Xero employees and Map earnings rates in Xero.
- The timesheets you want to send are Approved. Only approved timesheets are checked and sent. See Approve timesheets.
- If Pay Levels is on, the pay of each timesheet is resolved. A timesheet whose pay is not resolved is held. See Troubleshoot an unresolved interpretation.
Steps
The screenshots show a demonstration organisation with made-up names. Your own screens show your organisation's details. Select a screenshot to open it full size.
-
Go to Timesheets > Send to Xero
1 In the left menu, under Operations, choose Timesheets. The Timesheet review screen opens on the last period that has finished.
2 Check the Approved card. It counts the approved timesheets in the period under Selected period. Timesheets that are Submitted, Returned or Not submitted are not sent.
3 Choose Send to Xero, beside Export Payroll. A window titled Send to Xero opens.
Note: Send to Xero sends the timesheets to Xero Payroll as draft timesheets. Export Payroll next to it makes a payroll file instead. See Export payroll.
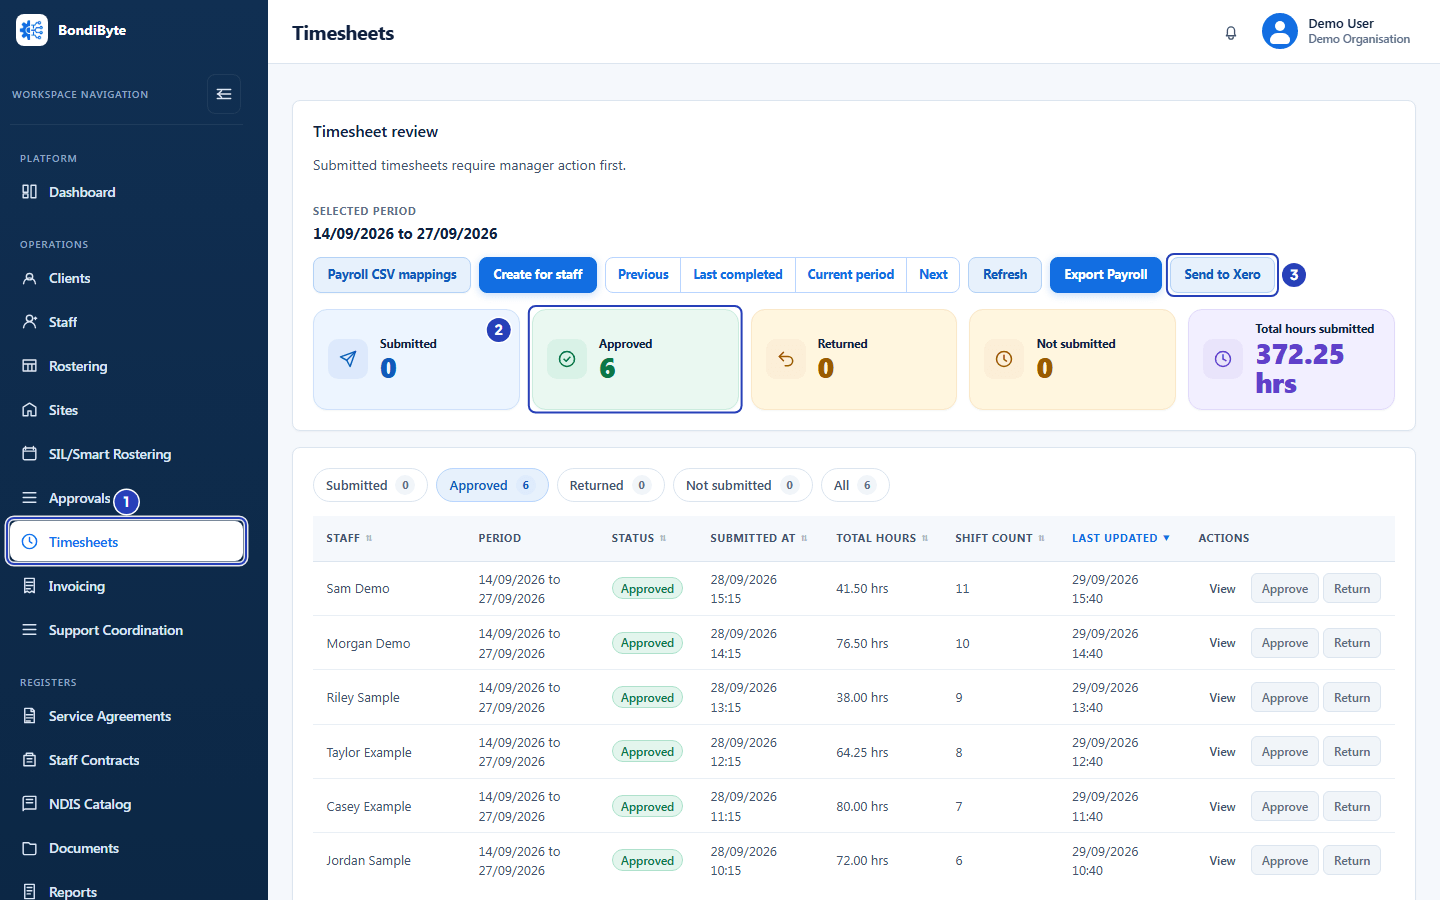
Choose Timesheets (1), check the Approved card (2) and choose Send to Xero (3). -
Choose the fortnight
The window does not use the period on the Timesheets screen. It opens on the current fortnight, so check the dates before you go on.
1 In Period start, check the first day of the period you are paying.
2 In Period end, check the last day. You can type a date or use the calendar.
3 To move a whole period at a time, choose Previous, Current fortnight or Next. The two dates change together, and any earlier check is cleared.
Fields in step 2 Field What it means Period start The first day of the period to check and send. It cannot be after Period end. Period end The last day of the period. It cannot be before Period start. Previous, Current fortnight, Next Step back one period, return to the current period, or step forward one period. A step is as long as the period shown. Important: The period must match one pay period of the employee's payroll calendar in Xero. If it does not, those employees are held. See Map staff to Xero employees.
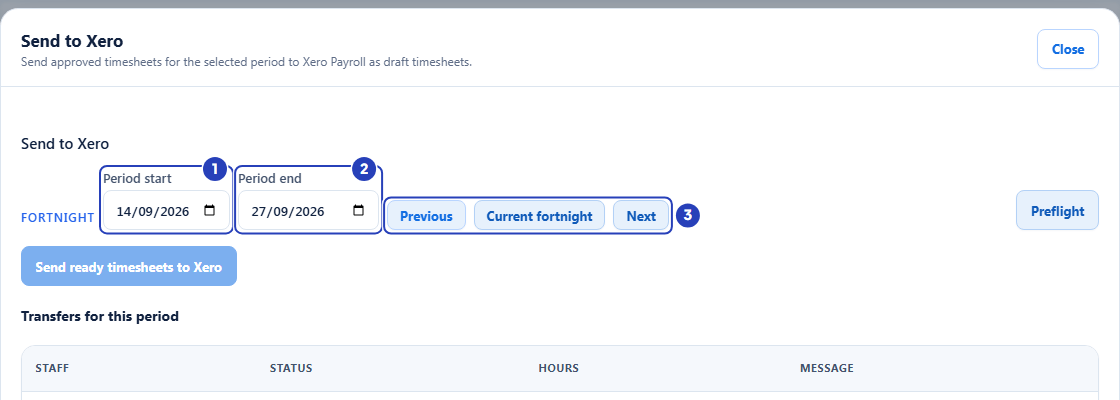
Check Period start (1) and Period end (2), or choose Previous, Current fortnight or Next (3). -
Choose Preflight and read the results
Choose Preflight. The button reads Checking... while BondiByte checks the period. Nothing is sent. Preflight results appears below.
1 In Status, find each person. Ready means their timesheet can be sent. A held person shows Needs mapping, Needs attention or Unresolved. Held people are listed first.
2 For a held person, read Reason. It says what to fix, and for most reasons a link under it goes to the right place.
3 Read the line under the table. It gives the period, the number of approved timesheets, staff and hours, and how many are ready and how many are held. Pay items that need an earnings rate may also be listed above that line, with a Review mappings link.
Fields in step 3 Field What it means Staff The person the timesheet belongs to. Hours Their approved hours in the period. A held person shows a dash. Status Ready, Needs mapping, Needs attention or Unresolved. Reason For a held person, why. For a ready person, a note such as Sent without unit items when pay items counted by the unit were left out. Note: A ready person with a note such as Sent without unit items: Sleepover Allowance x 2 (add in the Xero pay run) will still be sent. Xero timesheets carry hours only, so you add those items in the Xero pay run.
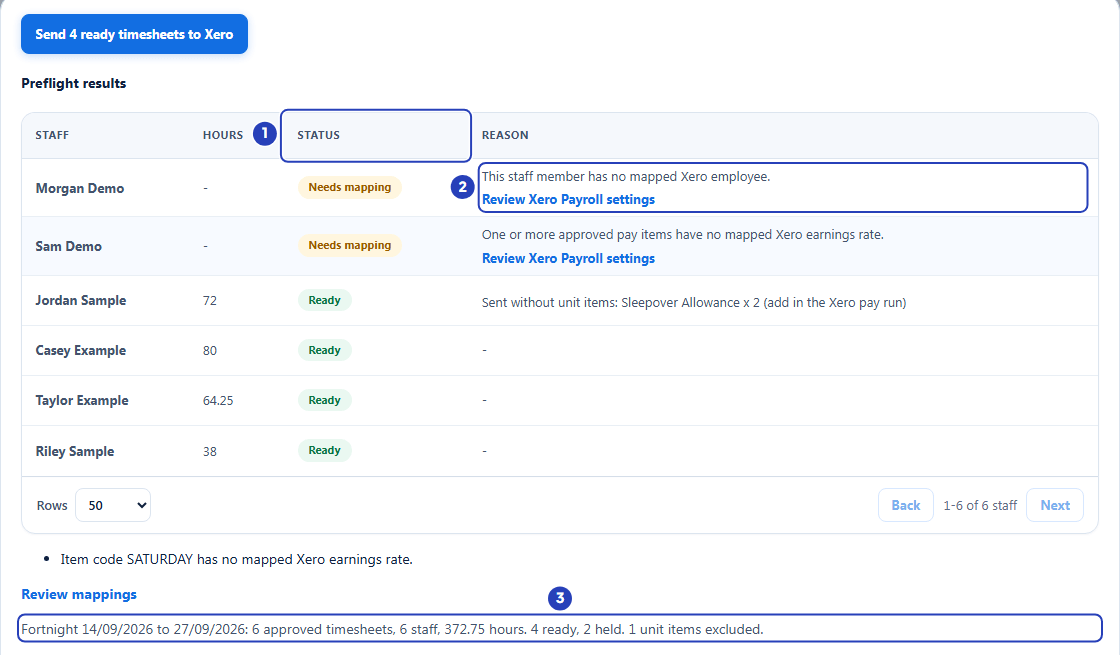
Read Status (1), read the Reason and follow its link for a held person (2) and read the summary line (3). -
Fix anyone who is held
You can send the ready people now and fix the held people afterwards, or fix them first. Each held person is sent only once they are ready.
Choose the link under the reason, such as Review Xero Payroll settings, Review payroll calendars in Configuration or Review Pay Levels, and fix the cause there. Then come back, open Send to Xero again and choose Preflight again.
For what each reason means, see Troubleshoot Xero preflight checks.
-
Send the ready timesheets
1 Choose the button that says how many are ready, such as Send 4 ready timesheets to Xero. It reads Sending... for a moment. It is greyed out until you have run Preflight, and when nobody is ready.
2 A message says Timesheets sent to Xero.
Warning: If anyone is held and nobody is ready, the window says Nothing is ready to send. Fix the holds above and run Preflight again.
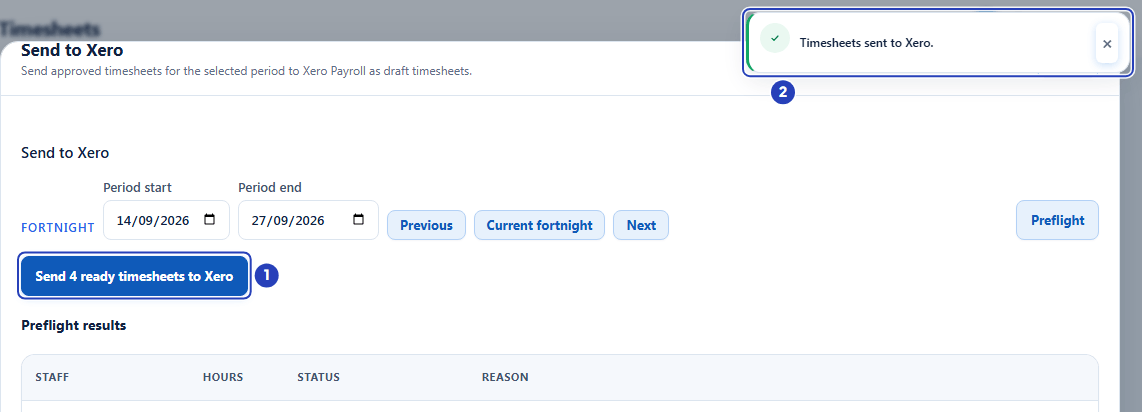
Choose the send button (1). A message confirms Timesheets sent to Xero (2). -
Check Transfers for this period
Scroll down in the window to Transfers for this period. It lists a line for each person who was sent.
1 In Status, follow each person: Ready means waiting to be sent, Sending means it is on its way, and Sent to Xero means the draft timesheet is in Xero. Failed means Xero did not take it.
2 Read Message for a person who is Failed or held. A note under a status, such as Sent without unit items, names pay items to add in the Xero pay run.
While anyone is Ready or Sending, the table refreshes by itself. You can close the window and open it again later to see the latest.
Fields in step 6 Field What it means Staff The person the timesheet was sent for. Status Ready, Sending, Sent to Xero, Failed, Needs mapping, Needs attention or Unresolved. Hours The hours sent. Message Why a person is held or Failed. It shows a dash for a person who was sent. 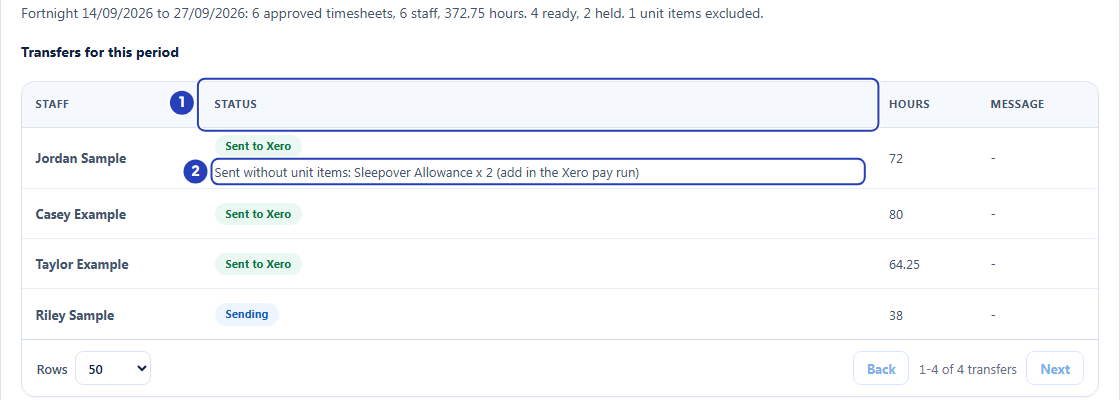
Follow each person in Status (1). A note under a status names items to add in the Xero pay run (2).
What happens next
Each person who shows Sent to Xero now has a draft timesheet in Xero Payroll for the period. Review it and pay it in Xero, which stays the payment authority.
Your approved timesheets in BondiByte do not change when you send. A timesheet that is already in Xero is not sent a second time.
If you change a person's approved hours after their timesheet was sent, the new hours are not sent to Xero. Correct the draft timesheet in Xero yourself.
Items counted by the unit, such as a sleepover allowance, are not sent in the timesheet. Add them in the Xero pay run.
Important notes
Important: Xero Payroll stays the payment authority. BondiByte sends approved hours as draft timesheets and does not pay anyone.
Warning: Preflight sends nothing. Only the button that reads Send followed by the number ready, then ready timesheets to Xero, sends timesheets. Check the period before you send, because the window opens on the current fortnight and not on the period shown on the Timesheets screen.
Good practice
- Check Period start and Period end first. The window opens on the current fortnight, which is usually not the one you just approved.
- Run Preflight before every send, even for a period you have sent before, because new approvals or changes to mappings can change who is ready.
- Fix held people before the pay run, not on the day. A held person is not sent until the cause is fixed.
- After sending, check Transfers for this period until everyone is Sent to Xero.
- Add unit-based items, such as sleepovers, in the Xero pay run. The check names them for each person.
Troubleshooting
I cannot see Send to Xero on the Timesheets screen.
Why it happens: Your role does not include Can export payroll timesheets.
What to do: Ask an Owner or Admin to check your role.
The window says Connect Xero in Configuration to send timesheets.
Why it happens: Xero Payroll is not connected for your organisation.
What to do: Choose the Connect Xero link and follow Set up Xero Payroll.
The window shows a different period from the one I approved.
Why it happens: The window opens on the current fortnight, not on the period shown on the Timesheets screen.
What to do: Choose Previous, or type the dates in Period start and Period end.
Preflight is greyed out.
Why it happens: Period start or Period end is empty.
What to do: Fill in both dates, or choose Current fortnight.
The results table says No approved timesheets and No approved timesheets were found for this period.
Why it happens: Nothing is approved in the dates you chose.
What to do: Check the dates, or approve the timesheets first. See Approve timesheets.
Someone is held, and the Reason column says why.
Why it happens: Their mapping, pay or payroll calendar needs attention.
What to do: Follow the link beside the reason. See Troubleshoot Xero preflight checks.
A note says an employee is on a payroll calendar in Xero that does not match this period.
Why it happens: The period you chose does not match one pay period of that employee's calendar in Xero.
What to do: Choose Review payroll calendars in Configuration and follow the note there.
The send button is greyed out, or the window says Nothing is ready to send. Fix the holds above and run Preflight again.
Why it happens: You have not run Preflight for these dates yet, or nobody is ready.
What to do: Choose Preflight. If everyone is held, fix the reasons shown and run it again.
A person shows Failed in Transfers for this period.
Why it happens: Xero did not take the timesheet. Message says why.
What to do: Read Message and fix the cause where it says. If you cannot tell the cause, contact BondiByte support.