

Who this is for
This guide is written for Owner and Admin.
Before you begin
- Configuration is in your left menu. If it is not, ask an Owner or Admin.
- The week start can be changed only while the cycle is not locked. The cycle is locked while Enable automatic roster periods is on, and while Smart Rostering is on for the organisation or for any site, or an automation template is active. Most organisations have automatic roster periods on, so step 4 shows how to switch it off for the change and back on afterwards. If the cycle is locked, you can still read your week start in steps 1 to 3. See Fortnightly and monthly roster cycles.
- You know which weekday your team rosters from, and what your current roster period starts on. The setting is meant to match your current rostering period.
Steps
The screenshots show a demonstration organisation with made-up names. Your own screens show your organisation's details. Select a screenshot to open it full size.
-
Go to Configuration > Rostering rules > Organisation Settings
In the left menu, choose Configuration, then choose the Rostering rules tile. The Rostering rules page opens, with a row of tabs under its heading.
1 Choose the Organisation Settings tab. It opens on the Roster period automation card.
2 Find the Roster period automation card. It is the first card on the tab, and it holds the settings that decide your roster periods and your week start.
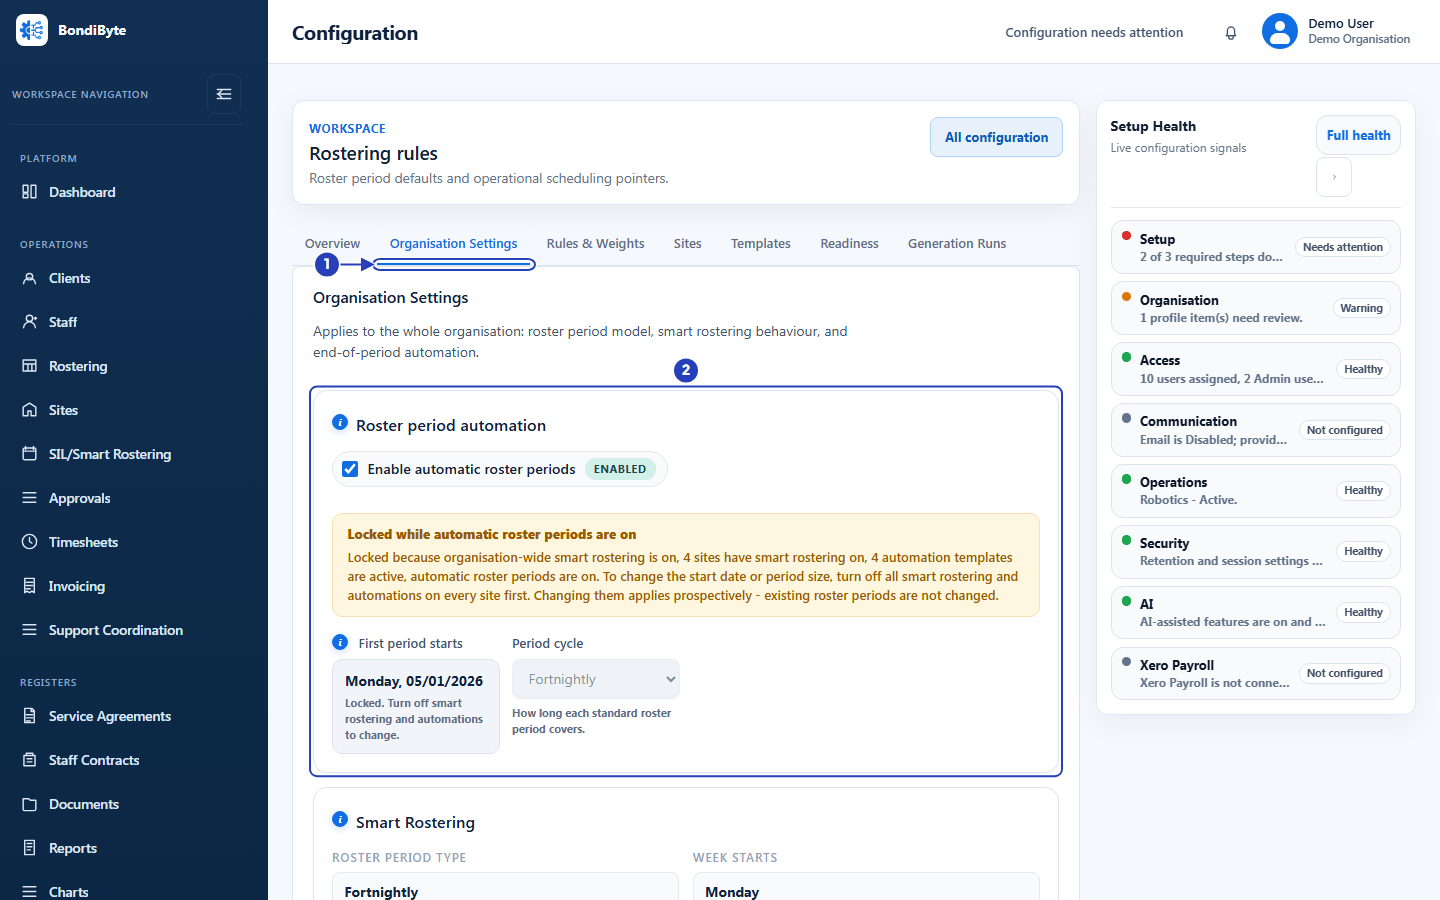
The Rostering rules page. Choose the Organisation Settings tab (1). The Roster period automation card (2) is the first card on the tab. -
Read your current week start and check whether it is locked
1 Look above the date for the notice. If it is an amber notice titled Locked while automatic roster periods are on, the date and Period cycle cannot be changed yet, so go to step 4. If it is a blue box titled Set this to match your current rostering period, the setting is not locked and you can go straight to step 5.
2 Find First period starts. The weekday written in the date, for example Monday, 05/01/2026, is your week start. Every roster period starts on that weekday. While the setting is locked, the date is plain text with this under it: Locked. Turn off automatic roster periods to change. When Smart Rostering or an automation template is also holding the lock, it reads Locked. Turn off smart rostering and automations to change.
3 Find Period cycle. It shows Fortnightly or Monthly, and is greyed out while the setting is locked.
If the notice is amber, read it for the reason. It names what is holding the lock: organisation-wide Smart Rostering, sites that have Smart Rostering on, active automation templates, or automatic roster periods.
Fields in step 2 Field What it means Enable automatic roster periods Tick box with a badge that reads Enabled or Disabled. While it is on, BondiByte creates roster periods for you and the week start is locked. It is on unless someone has switched it off. First period starts The date the first roster period of the cycle starts. Only a Sunday or a Monday can be chosen. The weekday of this date is the week start for your whole organisation. When the setting is locked, it shows as a plain value. Period cycle Fortnightly or Monthly. It sets how long each standard roster period lasts. It is greyed out while the setting is locked. 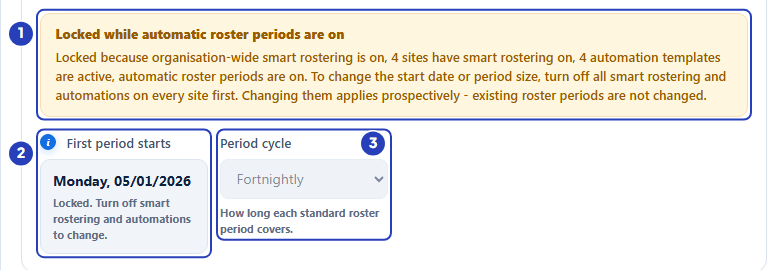
Read the notice (1), then the First period starts date (2). The weekday in the date is your week start. Period cycle (3) is greyed out while the setting is locked. -
Check the week start shown in the Smart Rostering card
Scroll down to the Smart Rostering card, which sits below Roster period automation.
1 Roster period type shows the cycle, Fortnightly or Monthly. It is the same cycle as in the card above, and is read-only here.
2 Week starts shows the weekday of your first period start date. It is read-only here.
3 The line under them says Managed in Roster period settings above. If you need a different week start, change it in Roster period automation, not here.
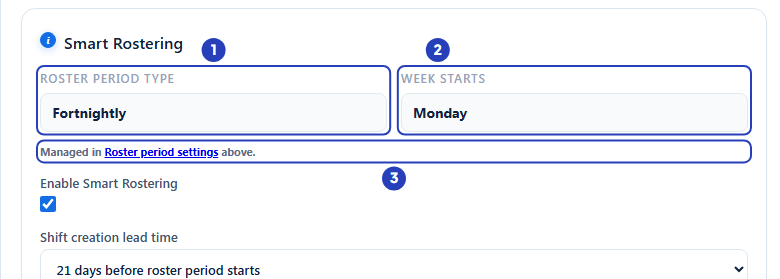
Roster period type (1) and Week starts (2) are read-only. The line under them (3) says the settings are managed in Roster period automation above. -
If the date is locked, switch off automatic roster periods first
Most organisations see the amber notice, because Enable automatic roster periods is on unless someone has switched it off. If the notice is blue, go to step 5.
1 In the Roster period automation card, untick Enable automatic roster periods. The badge changes to Disabled.
2 Choose Save organisation settings at the bottom of the tab and wait for Rostering saved. Save before you change the date. BondiByte checks the lock against the setting you last saved, so unticking the box and changing the date in one save does not work.
3 If the notice also names Smart Rostering (for the organisation or for sites) or automation templates, turn those off too, as it says: turn off all smart rostering and automations on every site first. For each site, choose Disable Smart Rostering on the SIL/Smart Rostering screen. For the organisation, untick Enable Smart Rostering in the Smart Rostering card and save. See the Smart Rostering guide.
4 Open the tab again, or refresh the page. When nothing holds the lock, the notice is blue and titled Set this to match your current rostering period.
Warning: While Enable automatic roster periods is off, BondiByte creates no roster periods and each one has to be created by hand. Switch it back on after you save your new date, at the end of step 7.
-
Choose a Sunday or Monday in First period starts
If First period starts is still locked, go back to step 4. Otherwise:
1 In Type or paste a date, type the date the first period of your cycle starts. If you type a day that is not a Sunday or a Monday, the box answers Choose a Sunday or Monday. If the date does not exist, it answers Enter a valid date.
2 Or use the calendar under it. Its heading names the month. Use Previous month and Next month, the arrows either side of it, to move between months.
3 Choose a day in the calendar. Only Sundays and Mondays can be chosen. The Su and Mo headings are marked in blue, and the other days are faded and cannot be chosen.
4 Look at the key under the calendar. A Sunday or Monday shaded in grey is already covered by a roster period (the key says Already rostered). One day may be outlined, which the key calls First free start. It is the first Sunday or Monday that does not run into an existing period.
5 Read the line under the calendar. It reads, for example, Week starts: Sunday. and shows the weekday of the date you chose, followed by Only Sundays and Mondays are selectable.
6 If you also want to change the length of each period, choose Fortnightly or Monthly in Period cycle.
Important: The weekday of this date becomes the week start for the whole organisation, not only for new periods. Choose a date that matches your current rostering period. Existing roster periods keep their dates.
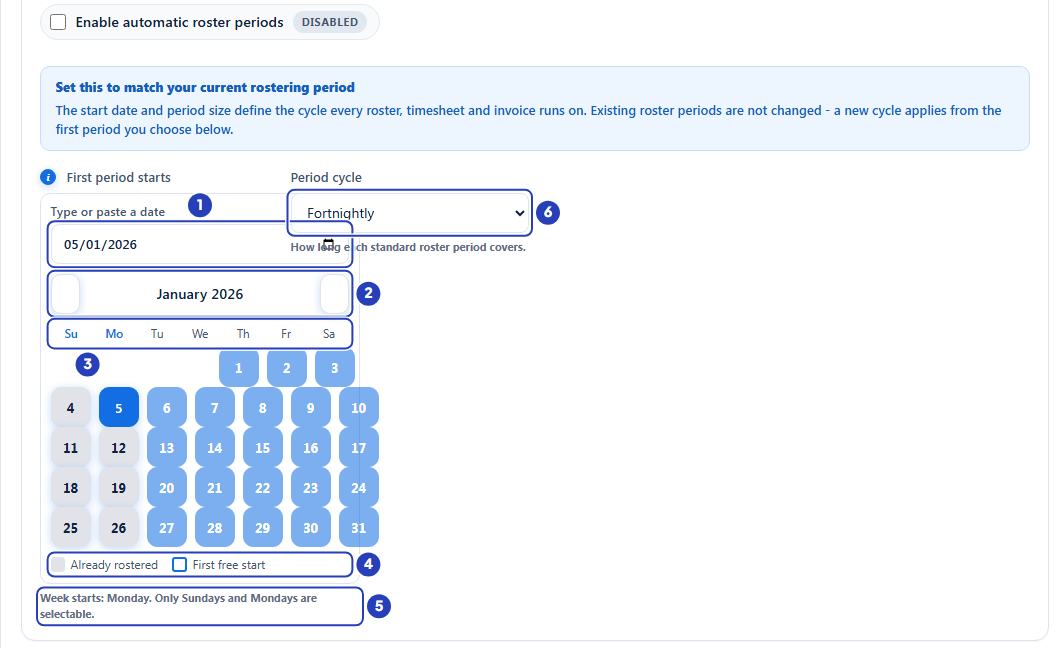
When the cycle is not locked, type a date (1) or use the month arrows (2) and choose a day. Only Sundays and Mondays (3) can be chosen. The key (4) shows days already rostered and the first free start. The line under the calendar (5) names the week start. Period cycle (6) sets the length of each period. -
Read the preview under the card
When your choice differs from what is saved, a preview appears under the card. It may take a moment to appear.
1 Current setup shows the cycle and week start you have now, for example Fortnightly · Monday.
2 New setup shows the cycle and week start you chose, for example Fortnightly · Sunday.
3 Next period shows the dates of the first period the new cycle would create, for example 02/01/2028 to 15/01/2028.
4 Existing roster periods will not be changed. confirms that nothing already on your calendar moves.
5 If your date would leave a gap after your last roster period, a yellow line says Gap in roster coverage, followed by the dates and the number of sites, for example Gap in roster coverage: 26/10/2026 to 01/01/2028 (14 sites).
6 Tick I understand there will be a gap if the gap is what you want. Until you do, Save organisation settings stays greyed out, and pointing at it shows Resolve the roster period overlap, or acknowledge the coverage gap, before saving.
If your date falls inside a period that already exists, the preview says so instead, for example 1 Feb 2026 falls inside an existing period (1 Jan to 31 Dec). The first free start is 2 Jan 2028. A date that would start a period running into an existing one reads A period starting 5 Jan 2026 would run into an existing period (1 Jan to 31 Dec). and ends the same way. In both cases Save organisation settings stays greyed out. Choose the first free start, or a later date. If a roster period already starts on your date, a blue note says A roster period already starts on that date and Your cycle is already set up; no change is needed.
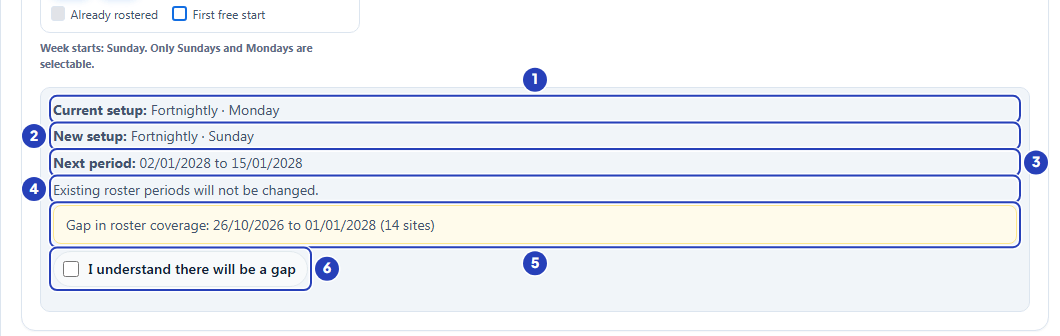
The preview shows the Current setup (1), the New setup (2) and the Next period (3). Existing roster periods will not be changed (4). A gap warning (5) must be acknowledged with the tick box (6) before you can save. -
Choose Save organisation settings and confirm the change
At the bottom of the tab, choose Save organisation settings. Discard, beside it, restores the settings you last saved. When the date or cycle has changed, a box opens before anything is saved.
1 The box is marked High impact change and titled Change the rostering calendar? It says This resets the calendar every automation, timesheet, and invoice cycle runs on. and warns that periods that already exist keep their dates, while all future periods recalculate on the new calendar.
2 A list shows the old and new start date, written year, month, day, and the old and new period size. It ends with The weekday you chose becomes the organisation rostering week start.
3 Choose Download snapshot first if you want a copy of your current settings saved to your computer.
4 Choose Cancel to leave things as they are.
5 Choose Change rostering calendar to continue.
If you already have shifts, a second box, Re-anchor your roster calendar?, may open. Choose Re-anchor calendar only if you want to continue.
A message confirms Rostering saved. Open the tab again to check that Week starts in the Smart Rostering card shows the new week start.
If you switched Enable automatic roster periods off in step 4, tick it again now and choose Save organisation settings again. Until you do, BondiByte creates no roster periods.
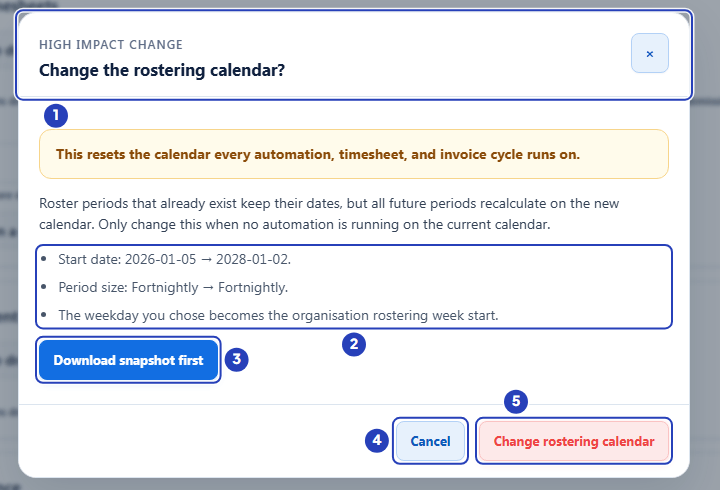
The box is marked High impact change (1). A list (2) shows the old and new start date and period size. Choose Download snapshot first (3) for a copy of your settings, Cancel (4) to stop, or Change rostering calendar (5) to continue. -
Set the SIL/Smart Rostering calendar to the same week start
In the left menu, choose SIL/Smart Rostering, then choose a site in Site/Client. The roster for the current period opens.
1 At the top right of the calendar toolbar, choose the three dots button, More roster actions. A small menu opens.
2 In Week starts, choose Monday or Sunday. The calendar groups its days into weeks from the day you chose.
The screen remembers this choice on the computer you are using. It starts on Monday until you change it. It changes only how the days are grouped on the screen, and does not change your roster periods or your organisation week start.
The Rostering screen is different. It always shows weeks from Monday to Sunday.
Tip: If your week start is Sunday, set Week starts to Sunday on the SIL/Smart Rostering screen. Each roster period then fills whole rows of the calendar.
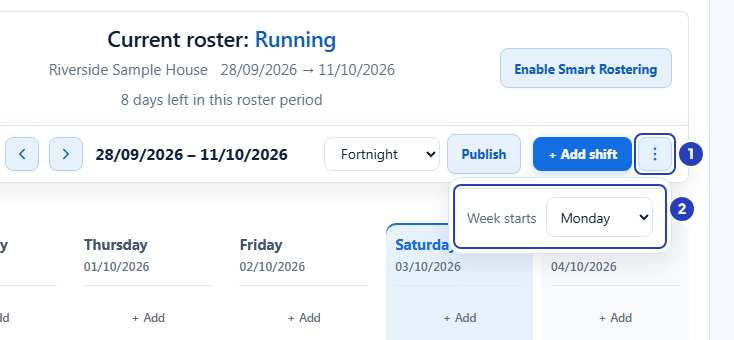
Choose More roster actions, the three dots button (1). In the menu, choose Monday or Sunday in Week starts (2).
What happens next
Every new roster period starts on your week start, and a Monthly period is made of whole weeks beginning on that day. Roster periods that already existed keep their dates.
Timesheets and invoices follow the same cycle, so they also begin on your week start.
The day columns of a Smart Rostering roster template start with your week start. See the Smart Rostering guides for templates.
The Rostering screen is not affected. It always starts its weeks on Monday.
If you switched Enable automatic roster periods off to make the change, BondiByte creates no more roster periods until you tick it again and save.
Important notes
Important: The week start is not a separate setting. It is the weekday of First period starts, so you choose it by choosing a Sunday or Monday date.
Note: The Week starts box in the Smart Rostering card is read-only. It shows the weekday of First period starts and cannot be edited there.
Good practice
- Decide the week start before you add your first site. A new organisation is asked to set its roster period first, and the setting locks once rostering runs.
- Choose the weekday your team already rosters from. If your support workers think of the week as Sunday to Saturday, choose a Sunday.
- After you change the week start, set Week starts on the SIL/Smart Rostering calendar to the same day on every computer that is used for rostering, because that choice is remembered per computer.
- Read Next period in the preview before you save, and check that the first new period starts on the day you expect.
- Plan a week start change for a quiet time. Automatic roster periods have to be off, and Smart Rostering off for the organisation and every site, before the date can be changed.
- Save with Enable automatic roster periods unticked first, then change the date in a second save, then tick Enable automatic roster periods again in a third. Do not skip the last save, or nobody is creating your roster periods.
Troubleshooting
First period starts and Period cycle are greyed out, and a notice says Locked while automatic roster periods are on.
Why it happens: The cycle is locked. The notice names why, for example that Enable automatic roster periods is on, that Smart Rostering is on for the organisation or for some sites, or that automation templates are active.
What to do: Follow step 4. Untick Enable automatic roster periods, save, change the date and cycle, save again, then tick Enable automatic roster periods again and save a third time. If the notice names Smart Rostering or automation templates, turn those off first.
A message says This roster is locked because automation has already run for it. when I save a new date.
Why it happens: BondiByte still counts automatic roster periods, Smart Rostering or an automation template as on. This happens when the date is changed in the same save as unticking Enable automatic roster periods.
What to do: Follow step 4 in order. Save with Enable automatic roster periods unticked first, switch off Smart Rostering where the notice names it, then change the date in a separate save.
Save organisation settings is greyed out after I choose a date.
Why it happens: The preview found that your date falls inside an existing roster period, or leaves a gap after your last period that you have not acknowledged.
What to do: Read the message in the preview. Choose the first free start it names, or a later Sunday or Monday. For a gap you want, tick I understand there will be a gap.
A message says These settings were changed by someone else. Refresh to see the latest before saving.
Why it happens: Another person saved the organisation settings after you opened the page.
What to do: Choose Refresh in the message, check the settings you see, then make your change again.
I changed the date, but Create roster period now appears on the SIL/Smart Rostering screen and no new periods appear.
Why it happens: Enable automatic roster periods is still off, so BondiByte is not creating periods.
What to do: In Configuration > Rostering rules > Organisation Settings, tick Enable automatic roster periods and choose Save organisation settings. See Create and manage roster periods.
I cannot see the Organisation Settings tab, or Configuration is missing from the left menu.
Why it happens: Only an Owner or Admin sees the organisation settings. A Manager sees only the Overview, Sites and Templates tabs.
What to do: Ask an Owner or Admin to make the change, or to check your role.