

Who this is for
This guide is written for Owner, Admin, Manager and Rostering Officer.
Before you begin
- SIL/Smart Rostering is in your left menu. It shows for roles that include Can view roster. An Owner or Admin can add that permission to a role in Configuration > Roles & Permissions.
- A site exists for the house, with its clients and staff attached. See Create a site. A client who rosters on their own can instead have Enable community rostering switched on in their client record, and then appears in the same list.
- Roster periods exist for the site. BondiByte creates them while Enable automatic roster periods is on in Configuration > Rostering rules > Organisation Settings. See Create and manage roster periods.
What SIL rostering is
SIL stands for Supported Independent Living. It is a house where several clients live and a team of workers supports them around the clock. On BondiByte you roster the house, not each client. A shift belongs to the site, a shift can need more than one worker, and the roster runs in roster periods, each a fortnight or a month.
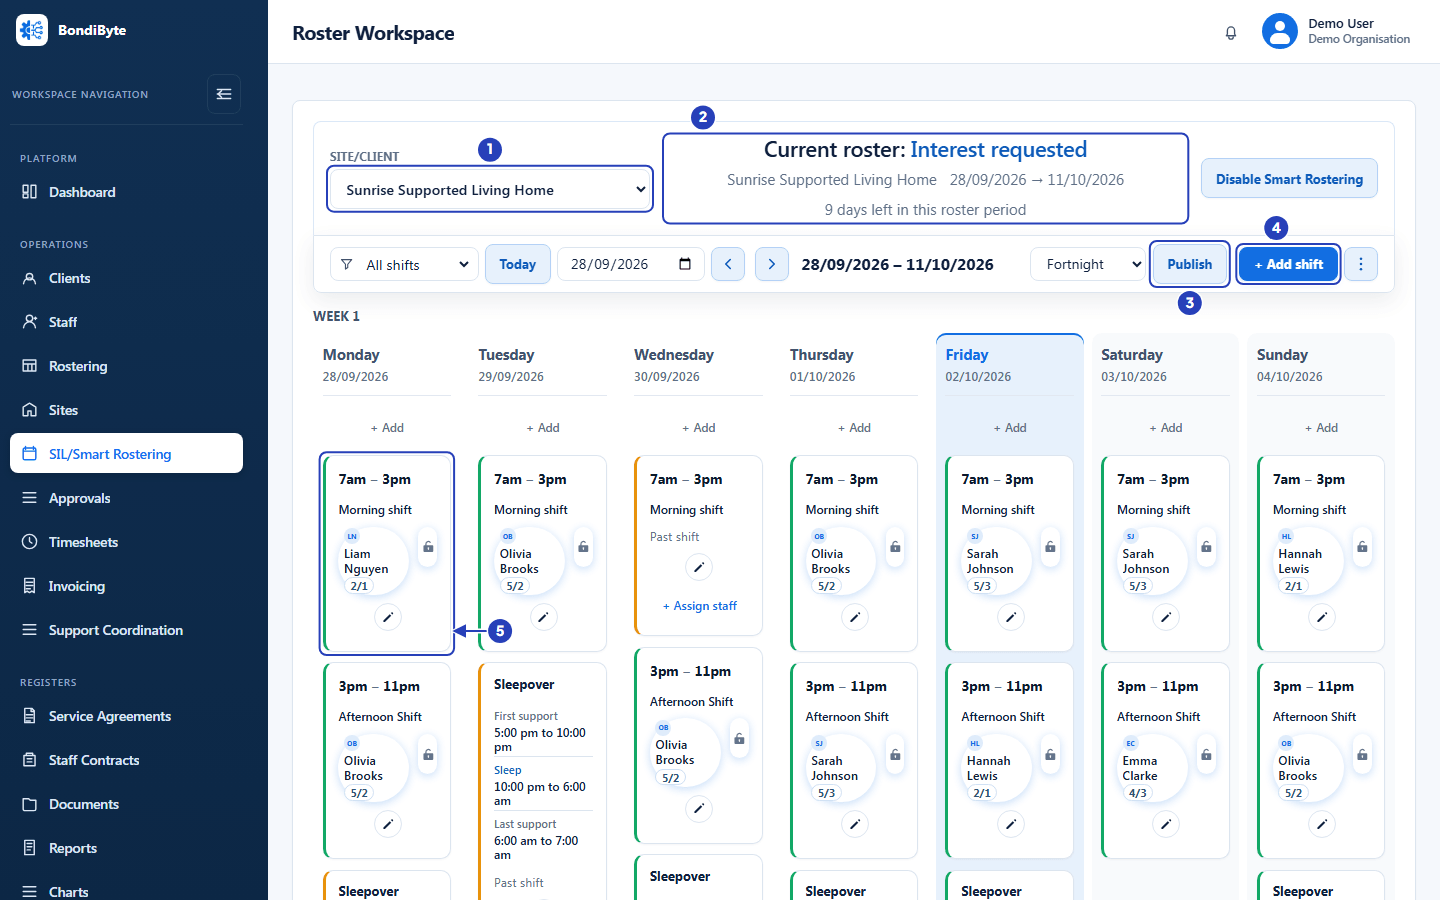
The screen for this is SIL/Smart Rostering in the left menu. Its page is titled Roster Workspace. You choose a site in Site/Client (the list is labelled Site if you have no community rostering clients), and the screen shows that site's roster for the current period.
Which screen is which
Rostering (the Rostering menu item) is the hand-made calendar for clients who are not attached to a site (community clients): you add each shift yourself.
SIL/Smart Rostering (the SIL/Smart Rostering menu item) is for sites (SIL houses): shifts belong to the site, several workers can be on one shift, sleepovers and roster periods apply, and Smart Rostering can build the roster for you.
You can also add and edit shifts by hand on a site roster, as this guide describes.
Shifts at a site
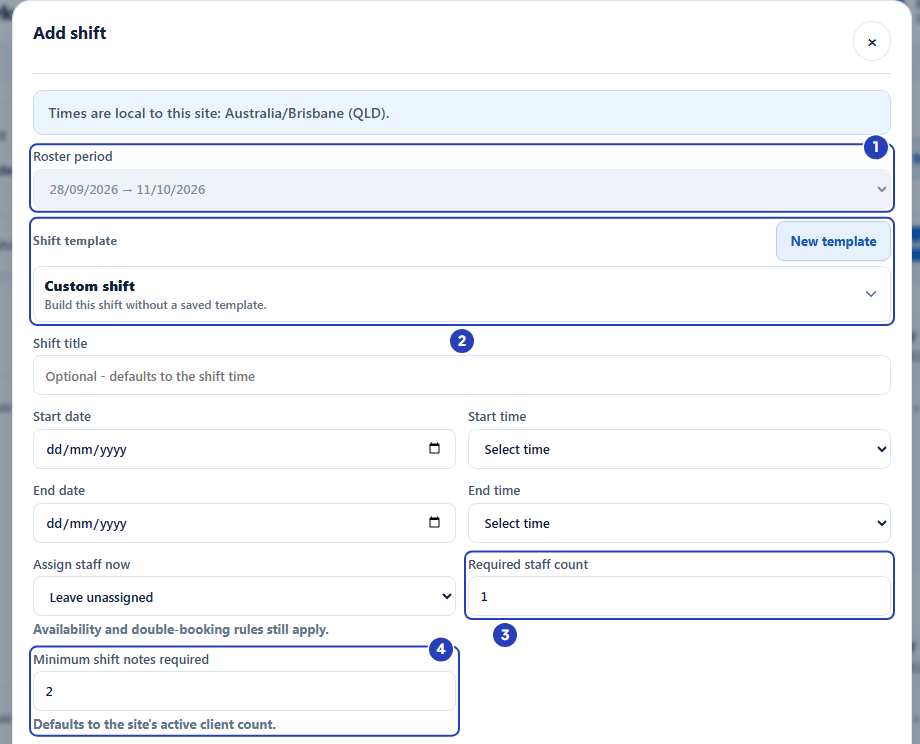
Choose + Add shift at the top right of the roster, or + Add at the top of a day, to open the Add shift window. It opens with the roster period you are looking at already chosen.
Shift template lets you start from a saved pattern, such as a morning shift or a sleepover, or choose Custom shift to build the shift yourself. Shift title is optional. Start date, Start time, End date and End time set when the shift runs, and a shift can cross midnight.
Assign staff now lists the site team first, under Assigned site team, and then Relief / cross-site staff. You can leave the shift unassigned. Availability and double-booking rules still apply.
Required staff count is how many workers the shift needs. It starts at 1.
Repeat this shift creates the shift daily or weekly, so you can build a whole fortnight quickly. It stays available on a site where Smart Rostering is switched on until the site has an active Smart Rostering pattern. Once a pattern is active, the box is greyed out and says Managed by the site's active Smart Rostering pattern. because BondiByte then creates the repeating shifts from that pattern.
People on a shift
A shift card shows the time, the shift title and the people assigned. Beside each person's name are two numbers, such as 5/2: how many weekday shifts and how many weekend shifts that person has in the roster period you are looking at.
When a shift needs more than one worker, a badge such as 1/2 shows how many are assigned out of how many are needed. A shift with nobody on it is amber and shows + Assign staff.
To change who is on a shift, choose the person's name on the card, or the pencil button at the foot of the card. In the list of people you can assign, a note beside each name says Available, or says why not, for example Already booked, On leave, Unavailable, Not on site team or Missing requirements.
The list at the top left of the toolbar, Highlight shifts by fill status, helps you spot gaps. Unfilled highlights shifts with nobody assigned, Understaffed highlights shifts with some but not enough people, and Fully staffed highlights shifts that have enough.
Sleepovers
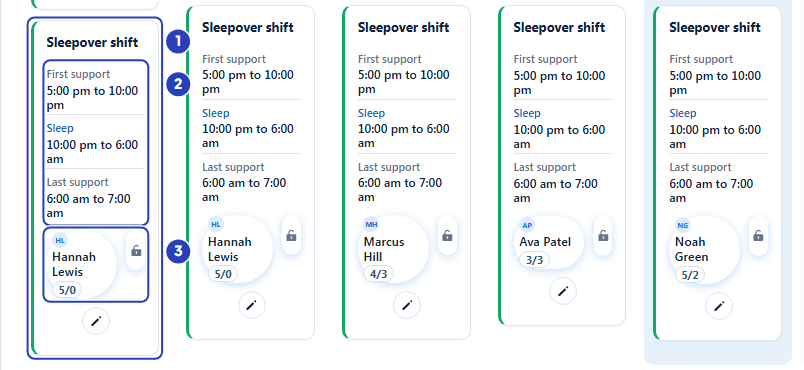
A sleepover is a shift split into three blocks: First support, Sleep and Last support. The worker is active at the start and the end, and sleeps in between. On the roster, a sleepover card lists the three blocks with their times, with the people assigned under them.
You make a sleepover from a shift template. In the Add shift window, choose New template beside Shift template. The Create shift template window has Template name, then Template options, where Sleepover splits the shift into first support, sleep and last support, and Requires break adds a standard 30 minute break. For a sleepover you enter First active support starts, First active support ends, Last active support starts and Last active support ends. The sleep time is worked out between them.
A worker whose record leaves Can work sleepover shifts unticked is not suitable for these shifts. See Create a staff member.
Roster periods and publishing
Every shift at a site sits inside one of the site's roster periods. The heading at the top of the roster names the period, for example Current roster: Running, and the buttons under it move between periods, change the Calendar range (Month, Fortnight, Week or Day) and add shifts.
Publish makes the whole period visible to staff and notifies the people assigned. Once published, the button reads Unpublish. A period that has ended cannot be published. Publishing here covers this site's period only, and is separate from Publish on the Rostering screen.
Where Smart Rostering fits
Smart Rostering is optional, and switched on one site at a time. When it is on for a site, BondiByte builds that site's roster periods by itself, on a schedule, following the site's regular pattern of shifts, and you review the result. You can still add and edit shifts by hand on that site. To start, build the site's first fortnight by hand with Repeat this shift, then choose Select shifts and Create pattern. The padlock beside a person's name, and the menu items Request interest, Run smart rostering, Report and Select shifts under More roster actions, belong to Smart Rostering. The Smart Rostering overview explains them.
Important notes
Tip: Plan a SIL house by hand in this order. Check the period heading, add or check the shift templates, add the shifts, assign people, check the Highlight shifts by fill status list for gaps, then choose Publish.
Good practice
- Make a shift template for each pattern your house repeats, including a sleepover template, so every week's shifts have the same times and titles.
- Set Required staff count to the real number of workers the shift needs. The badge on the card then shows at a glance whether the shift has enough people.
- Check the site name in the heading before you add shifts. Each site has its own periods and its own roster.
Questions and answers
Why is a client not on the Rostering screen?
Clients who live at a site, and clients with Enable community rostering switched on, are rostered on SIL/Smart Rostering. The Rostering screen lists only clients who are not attached to a site.
Why is Repeat this shift greyed out?
The site already has an active Smart Rostering pattern, so BondiByte creates the repeating shifts from that pattern. The window says Managed by the site's active Smart Rostering pattern. To add or remove a single shift later, open the shift and use its Automation pattern section. Until a site has a pattern, Repeat this shift works even when Smart Rostering is switched on.
Can I roster a SIL house without Smart Rostering?
Yes. Add shifts, assign people and publish the period by hand, as this guide describes.
Why can I not publish a roster period?
A period that has already ended cannot be published. For a current or future period, the button also needs Can edit roster period, and it says This roster is not ready to publish yet. when it is greyed out.