

Who this is for
This guide is written for Owner, Admin, Manager and Rostering Officer.
Before you begin
- Smart Rostering is on for the site and the roster period has shifts. BondiByte builds the draft on its planned dates. See How Smart Rostering builds a roster.
- Roster publish notifications is on in Account settings > Automation & Capacity Controls, if you want staff emailed when a roster is published. It is on unless an Owner or Admin switched it off. If it is off, the roster still publishes but nobody is emailed. See Automation Capacity.
- You have looked at the Report for the period. See Review recommendations.
Steps
The screenshots show a demonstration organisation with made-up names. Your own screens show your organisation's details. Select a screenshot to open it full size.
-
Go to SIL/Smart Rostering > choose the site and the roster period
BondiByte builds each roster period as a draft. Until it is published, staff are not sent their assignments and cannot see who is on a shift. Use the Previous period and Next period arrows beside the dates until the heading shows the period you want to finish.
1 In the left menu, choose SIL/Smart Rostering.
2 In Site (called Site/Client if your organisation rosters clients without a site), choose the site.
3 Read the heading above the toolbar. It names the roster and its timing after the colon: Running, Upcoming, Interest requested (staff have been asked which shifts they want), Closed or Cancelled. It does not say whether the roster is published. The button at the right of the toolbar does: Publish means not published yet, Unpublish means published.
4 Look for shifts that still need someone. They have an amber edge and + Assign staff. A shift with all its people has a green edge.
Important: Everything you do on these screens, assigning, replacing and removing people, changes the roster straight away. Staff see none of it until the roster is published.
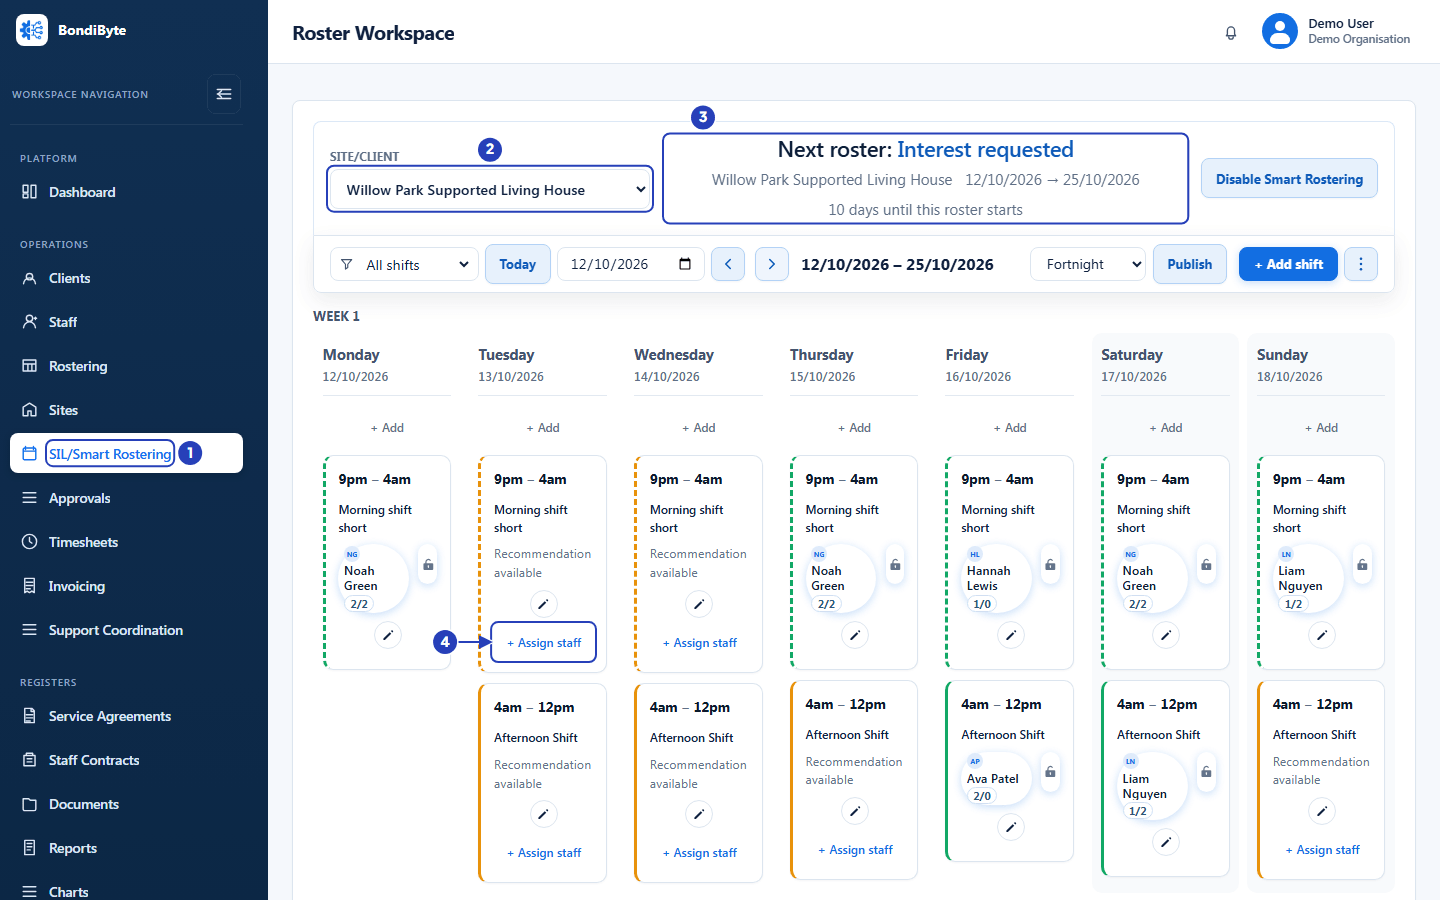
Choose SIL/Smart Rostering (1) and the site (2). Read the heading (3) for the roster and its status. A shift that needs someone has Assign staff (4). -
Choose + Assign staff on a shift that needs someone
A window opens beside the shift, headed Assign staff. If it says Recommendations are being prepared..., wait for it to finish. Review recommendations explains every part of the list.
1 Choose + Assign staff at the bottom of the shift.
2 A person marked Available, in green, has nothing to review. Use Search all staff to find someone by name, then choose the name. There is no confirmation, so check the date and time under Assign staff first.
3 A person with any other status, such as Not on site team or Review, has something to look at first. The next step explains what to do.
When you choose an Available person, a message appears at the top right, for example Jordan Sample assigned to Morning shift short. The person's name appears on the shift, with two numbers after it: the weekday and weekend shifts they now have in this period. The shift's edge turns green when it has all the people it needs.
Warning: If you choose the wrong person, choose their name on the shift, then Remove.
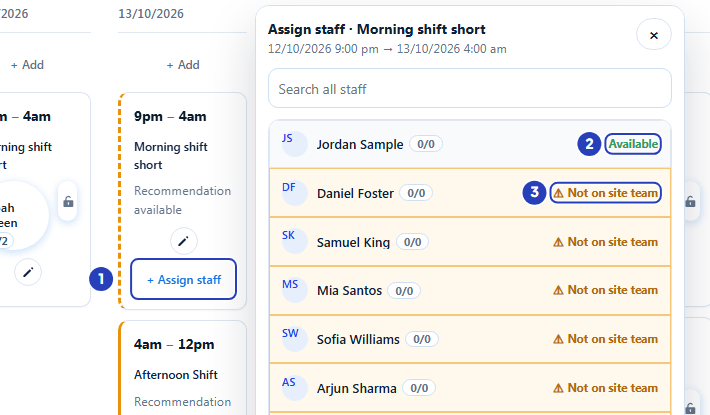
Choose Assign staff on the shift (1). A person marked Available (2) has nothing to review. A person with another status, such as Not on site team (3), needs a look first. -
Choose a person who needs a look
A person marked Not on site team, Review, Missing requirements, Unavailable, On leave or Already booked opens a panel instead of being assigned. Read the reasons before you decide.
1 For a person who is not on the site team, Select relationship lets you choose how they will be linked to the site: Primary Team, Secondary Team, Relief Team, Site Lead or Coordinator / Oversight. Without a choice, the next button stays greyed out.
2 Add to site and assign adds the person to the site's team with that relationship, from the date of the shift, and assigns them. It needs permission to edit sites.
3 Override and assign assigns the person as they are, even though a concern was raised. It is greyed out when the person cannot be assigned at all, for example when they are already booked, unavailable or inactive.
Warning: Override and assign is your decision, not BondiByte's. Read the reasons first. The reason for an override is not asked for, so keep your own note of why.
Note: If your organisation checks staff compliance requirements when rostering, a window called Override compliance block? may open. It names what is missing and asks for an Override reason. Only people with permission to override compliance blocks can continue, and the override is recorded in your organisation's activity log.
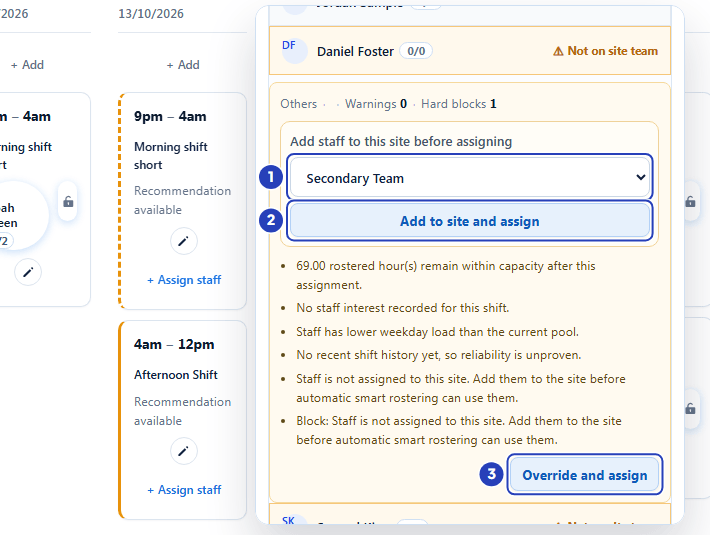
For a person who is not on the site team, choose how to link them (1), then Add to site and assign (2). Override and assign (3) assigns them as they are. -
Change who is on a shift, or remove someone
To replace someone, remove them, or change a shift that already has all its people, choose the person's name on the shift. A window opens headed Edit assignment.
1 The top shows the person's name and status, for example Assigned.
2 Remove takes the person off the shift at once, with no confirmation.
3 Choose someone in the list to replace the person. A person with nothing to review replaces them straight away. Everyone else opens a panel first, with Override and replace, or Add to site and replace for someone who is not on the site team.
After Remove, a message at the top right says Assignment status updated to Removed. The person's name leaves the shift, the shift has an amber edge again and + Assign staff is back.
Fields in step 4 Field What it means Complete Shown only for a shift that ends today or earlier. Marks the person's assignment as completed. Override and replace Takes the current person off the shift and assigns the person you chose, even though a concern was raised. Add to site and replace For a person who is not on the site team. Adds them to the site, takes the current person off and assigns the new person. Warning: Removing a person does not ask you to confirm. Check the name before you choose Remove.
Note: When a shift already has all its people, the others in the list may be marked Review because it is already full. Choose the person you want, read the reasons, then choose Override and replace.
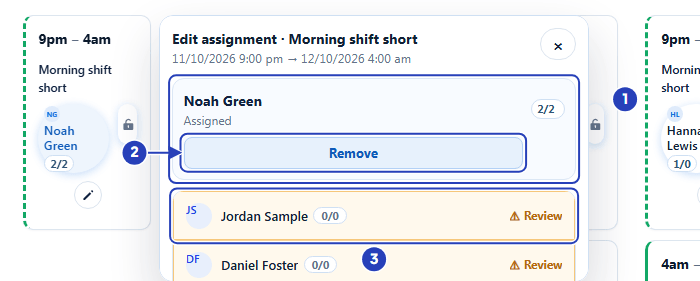
The top of the window shows the person (1) and Remove (2). Choose someone in the list (3) to replace them. -
Lock a person to a repeating shift (optional)
On a site that uses Smart Rostering, each assigned person's name has a padlock beside it. Locking a person tells BondiByte to keep them on this shift in the following roster periods, wherever the rules still allow it. It does not change this roster. Locked people are placed before everyone else when the next period is built.
1 Choose the padlock beside the person's name. The window Lock staff to future shifts? opens. Choose Lock staff to lock them.
2 Choose Cancel to change nothing.
A person who is already locked shows a closed padlock. Choose it to see Remove staff lock?, then Unlock staff.
Fields in step 5 Field What it means Add to pattern and lock staff? Shown when this shift is not in the site's template yet. Add and lock staff adds the shift to future periods and locks the person. It needs permission to manage Smart Rostering settings. Shift position already locked Shown when the shift already has all the locked people it can hold. It offers Replace buttons that swap one locked person for another, and Cancel. 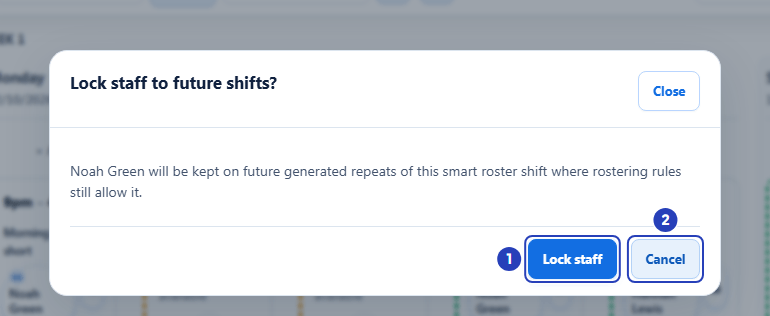
Choose Lock staff (1) to keep the person on this shift in future roster periods, or Cancel (2) to change nothing. -
Check the roster, then publish it if the site does not publish by itself
A site publishes by itself only when Allow auto-publish is on for the site and Require manager review is off for the organisation and the site. Then BondiByte publishes the roster on the planned date of the Publish Task, even if some shifts are still unfilled, so do your review before that date.
Otherwise the roster waits for you. It stays unpublished until you choose Publish. With Remind manager to publish on, the site manager gets a daily reminder.
Publishing does not check for gaps, so look for unfilled shifts first. Use the filter and choose Unfilled or Understaffed, or choose More roster actions > Report.
1 Read the heading to make sure it names the roster you mean.
2 If the button at the right of the toolbar says Publish, choose it. It publishes the whole roster period named in the heading, whichever Calendar range you are looking at. There is no confirmation window. If it says Unpublish, the roster is already published.
A message at the top right says Roster period published. and how many emails were sent, skipped or failed. The button now says Unpublish. The heading keeps showing the roster's timing, for example Upcoming, and does not say Published. To confirm, choose More roster actions > Report. Under Roster status it shows Published and Published to staff.
Fields in step 6 Field What it means Publish Publishes the roster so staff can see their shifts. Greyed out with a tooltip when the period has ended (A roster period that has passed cannot be published.) or is closed or cancelled (This roster is not ready to publish yet.). Important: Publishing emails each person who is assigned a shift on this roster and tells them in the Staff App. Staff only see their shifts in the Staff App once the roster is published.
Note: After a roster is published, adding a person to a shift or removing them tells that person straight away. Make your changes before you publish where you can.
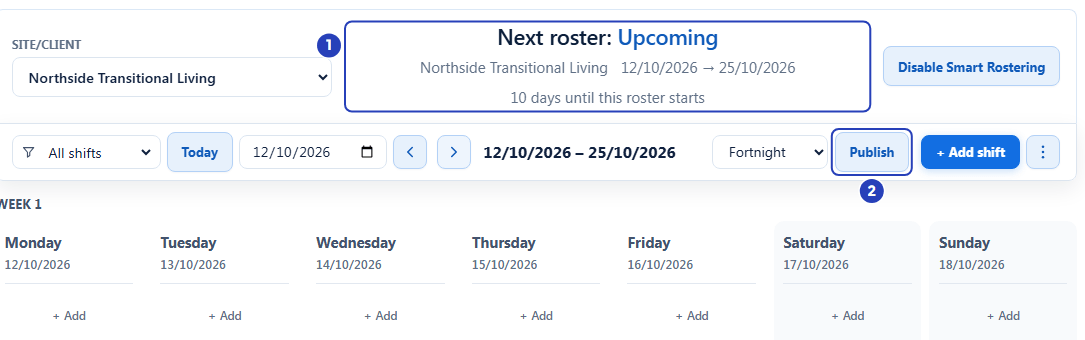
Check the roster in the heading (1), then choose Publish (2). -
Take a published roster back with Unpublish
If a roster went out too early, choose Unpublish. There is no confirmation window.
1 A message says Roster period unpublished and hidden from staff view. The heading still shows the roster's timing.
2 The button says Publish again. In the Report, Roster status shows Draft and Not published yet.
Warning: Unpublishing hides the shifts from staff but does not undo the emails already sent, and publishing again sends them again. Unpublish is not available for a roster period that has ended.
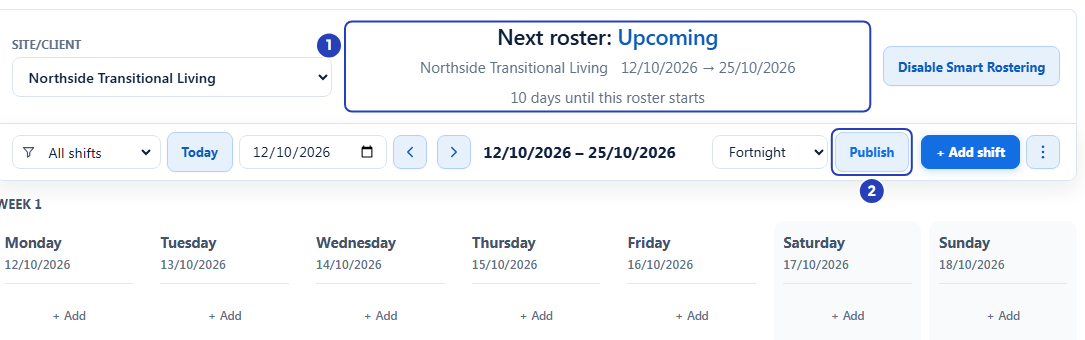
The heading (1) still shows the roster's timing. The button says Publish again (2).
What happens next
Once the roster is published, staff can see their shifts in the Staff App and have been emailed. If you change a shift after that, the person affected is told straight away.
Shifts left unfilled stay open. Fill them from the roster at any time. Publishing does not stop you.
Important notes
Important: Assigning, replacing and removing people changes the roster the moment you choose. There is no confirmation for Available people, Remove, Publish or Unpublish. Check the name, the date and the roster before you click.
Note: Publish on this screen publishes a whole roster period. The Publish button on the Rostering screen is a different tool and works on dates you choose. See Publish a roster.
Good practice
- Fill the gaps first, then publish. Once a roster is published, every change you make to a shift tells the person affected straight away.
- If a person keeps appearing as Not on site team, use Add to site and assign once with the right relationship, instead of Override and assign on every shift.
- Leave Allow auto-publish off for a site until you have checked several of its drafts. When it is on, review each draft before its Publish Task date.
Troubleshooting
A shift has no + Assign staff link.
Why it happens: The shift already has all the people it needs, the shift is cancelled, or your role does not include Can assign staff to shift.
What to do: To change who is on a full shift, choose the person's name on the shift. To use + Assign staff, ask an Owner or Admin to check your role. See Roles and permissions basics.
Override and assign is greyed out.
Why it happens: The person cannot be assigned to this shift at all, for example because they are already booked at that time, have blocked time or are inactive.
What to do: Choose someone else, or fix the cause first. See Review recommendations.
A window called Override compliance block? opens.
Why it happens: Your organisation checks staff compliance requirements when rostering, and the person is missing a required item.
What to do: If you have permission to override compliance blocks, enter an Override reason and choose Override and assign. Otherwise choose someone else, or ask an Owner or Admin to check the person's documents.
The roster was published before I had reviewed it.
Why it happens: The site has Allow auto-publish on and no manager review is required, so BondiByte published it on the planned date.
What to do: Choose Unpublish if you need to hold it back, make your changes, then choose Publish. To stop it happening, tick Require manager review or switch off Allow auto-publish. See Prepare sites for Smart Rostering.
The Publish button is greyed out.
Why it happens: The roster period has ended, or it is closed or cancelled. Hover over the button to read the reason.
What to do: Choose a current or future roster period with the Next period arrow.
I cannot see Publish or Unpublish.
Why it happens: Your role does not include Can edit roster period.
What to do: Ask an Owner or Admin to check your role. See Roles and permissions basics.
Staff say they cannot see their shifts in the Staff App.
Why it happens: The roster has not been published, or it was unpublished. Staff only see the shifts of a published roster.
What to do: Check the button at the right of the toolbar. If it says Publish, choose it. If it says Unpublish, the roster is published, and the staff member may not be assigned to a shift on it.
A message says No staff email recipients were found. after publishing.
Why it happens: Nobody is assigned a shift on the roster, or Roster publish notifications is switched off. People with no contact email are counted as skipped and still get the Staff App notice.
What to do: Check that people are assigned to shifts, and ask an Owner or Admin to check Roster publish notifications in Automation & Capacity Controls.