

Who this is for
This guide is written for Owner, Admin and Manager.
Before you begin
- Smart Rostering is switched on for the organisation and for the site (Enable smart rostering automation for this site on the site's Site settings tab). While it is off for the site, Select shifts is greyed out. See Prepare sites for Smart Rostering.
- One roster period for the site already holds the shifts you want to repeat, and the next roster period exists. If the site is new, build that period by hand first. In the Add shift window, Repeat this shift stays available until the site has an active pattern.
- Read the Smart Rostering overview. A template is also called a pattern.
Steps
The screenshots show a demonstration organisation with made-up names. Your own screens show your organisation's details. Select a screenshot to open it full size.
-
Go to SIL/Smart Rostering > More roster actions > Select shifts
1 In the left menu, choose SIL/Smart Rostering. The Roster Workspace opens.
2 In Site, choose the site. The field is called Site/Client if your organisation rosters clients without a site, as in the picture. Move to the roster period you want to copy from.
3 Choose More roster actions, the three dots at the right of the toolbar, then Select shifts. A bar appears that says Selecting shifts to snapshot into a pattern.
Tick each shift you want in the template, or choose Select all to tick every shift in the period. Then choose Create pattern. The button shows how many shifts you have ticked.
Warning: The button at the top right of the roster says Disable Smart Rostering when the site uses Smart Rostering, and Enable Smart Rostering when it does not. Disable Smart Rostering takes effect straight away, so choose it only if you mean to stop Smart Rostering for the site. Enable Smart Rostering opens the site's settings.
Note: Select shifts appears only when you may manage Smart Rostering, the site has no template yet and the period has shifts. If it is greyed out, Smart Rostering is off for the site: hover over it and it says Enable Smart Rostering for this site before selecting shifts.
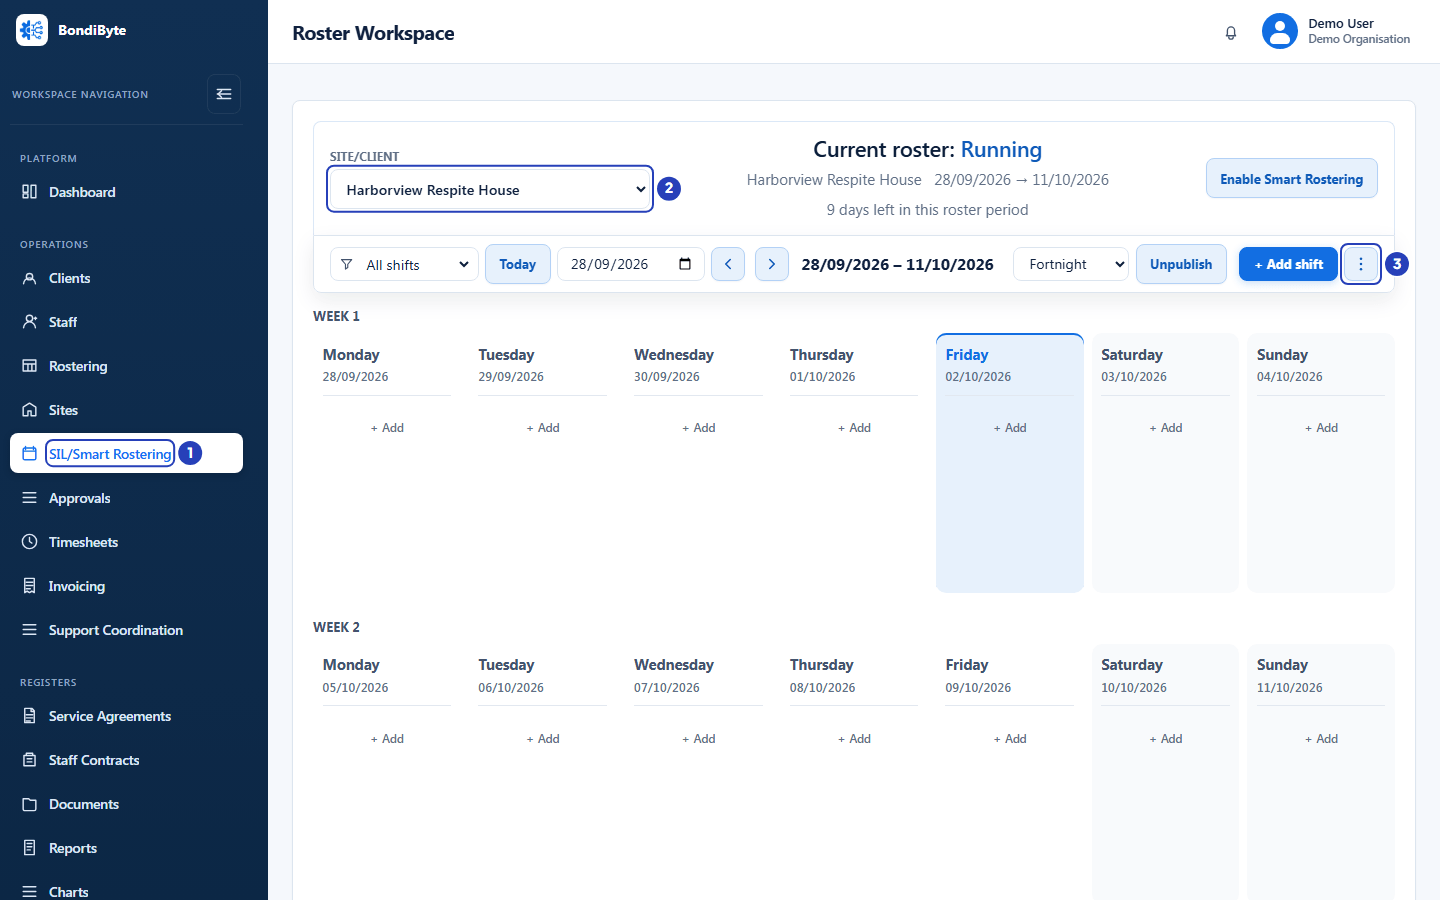
Choose SIL/Smart Rostering (1), choose the site (2) and find More roster actions (3), the three dots in the toolbar. -
Name the template and choose where it starts
The Create Smart Rostering pattern window opens.
1 In Pattern name, type a name.
2 In Automation starts from roster period, choose the first period BondiByte should build by itself. It builds that period and every period after it. Periods that are already fully built are not listed.
3 Tick Save as reusable template if you want to keep the pattern for later, then type a Reusable template name.
4 Choose Create pattern. A message says the pattern is active and ready to run from the next valid roster period.
Important: If some steps for the start period you chose are already due, the window warns that BondiByte may start work straight away. Choose a later period if you are not ready.
Note: All the shifts in a template must come from the same roster period. If the list of periods is empty, the window says to create the next roster period for the site first.
-
Go to Configuration > Rostering rules > Templates
In the left menu, choose Configuration, then the Rostering rules card, then the Templates tab.
1 In Site, choose the site.
2 In Template, choose the pattern. Each entry shows its name, its status, Active for site when it is the template in use, and its number of shifts.
Note: A Manager sees Configuration open straight on the Rostering rules page, with only the Overview, Sites and Templates tabs. Go straight to the Templates tab.
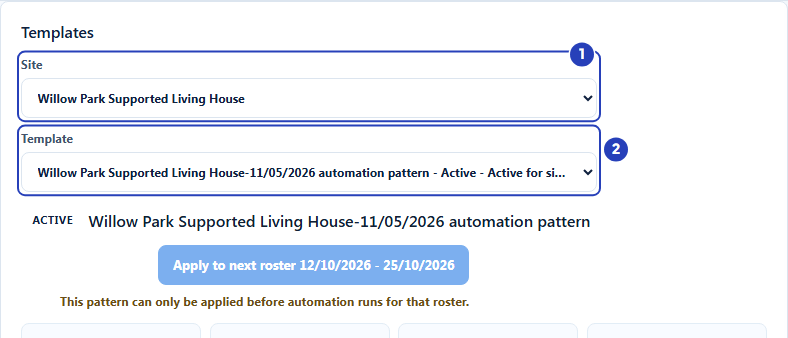
Choose the site (1), then the template (2). -
Read the template
1 The tag and name at the top show the template and its status, for example ACTIVE.
2 Apply to next roster is explained in the last step.
3 The facts show the Site, the Shift count, the Pattern cycle (Fortnightly or Monthly), when it was Created and the Next roster period.
4 The Pattern board shows the repeating shifts. It has no calendar dates. Week 1, Week 2 and any later weeks repeat in each new roster period, and each day is labelled Pattern day 1, 2 and so on.
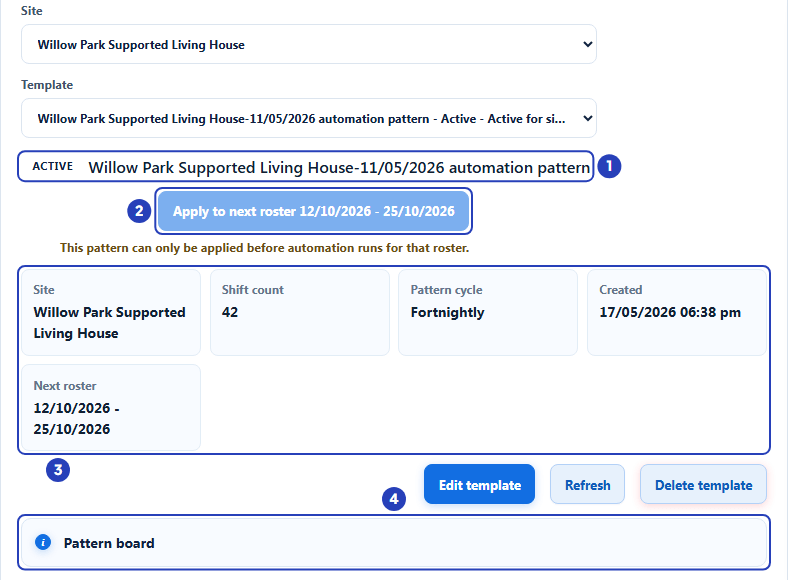
The template name and status (1), the Apply to next roster button (2), the facts (3) and the pattern board (4). -
Turn on editing
1 Choose Edit template. The button changes to Done editing and the board says Editing mode: use the pencil on a shift card to change the template.
2 Choose Add shift on a day to add a shift to that day. A shift named New pattern shift from 09:00 to 17:00 for one staff member is added at once, and you then change it with the pencil.
3 Choose the pencil on a shift card to change that shift.
Warning: Add shift saves straight away. You do not need to choose a Save button, and nothing asks you to confirm.
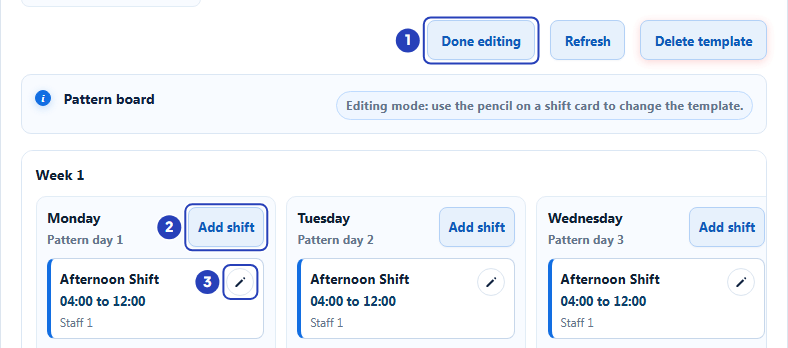
Choose Edit template, which becomes Done editing (1). In editing mode each day has an Add shift button (2) and each shift has a pencil (3). -
Change a shift
A panel opens at the right with a Template shift details section. The times you set here are used when BondiByte creates future shifts for the site. Choose Close at the top of the panel to leave it without changing anything.
1 Change the Title if you want a different name for the shifts BondiByte creates.
2 In Pattern day, choose the week and day, for example Week 1 - Monday.
3 In Required staff, enter how many people the shift needs, from 1 to 200.
4 In Start time, choose the start.
5 In End time, choose the end. End day then says Same day or Next day by itself.
6 Add Notes if you need them.
Fields in step 6 Field What it means Sleepover shifts A sleepover shift shows Sleepover segments instead of a start and end time, with First support starts and First support ends, and Last support starts and Last support ends. The time between them is the sleep. Client invoice line items Optional. Lower in the panel you can choose the agreement line items used when client invoices are made for the shift. 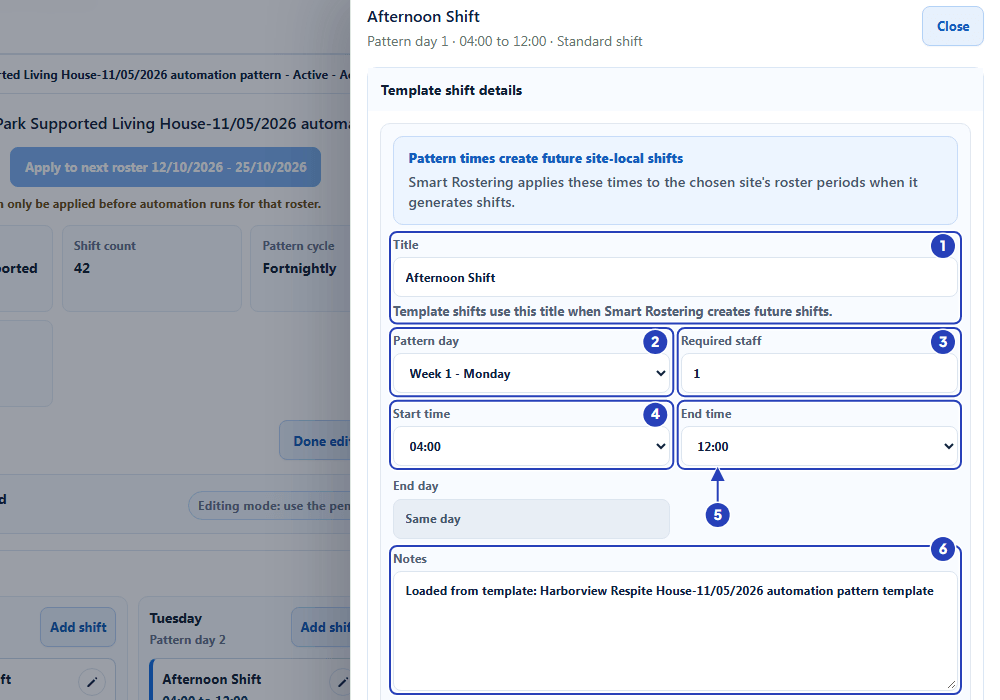
Change the title (1), the pattern day (2), the required staff (3), the start time (4), the end time (5) and the notes (6). -
Save the shift, or remove it
1 Choose Remove shift to take the shift out of the template. BondiByte asks Remove shift from template? and explains that future roster periods will not include it.
2 Choose Cancel to close the panel without saving.
3 Choose Save shift to keep your changes. A message confirms Saved and the shift name. When you have finished, choose Done editing.
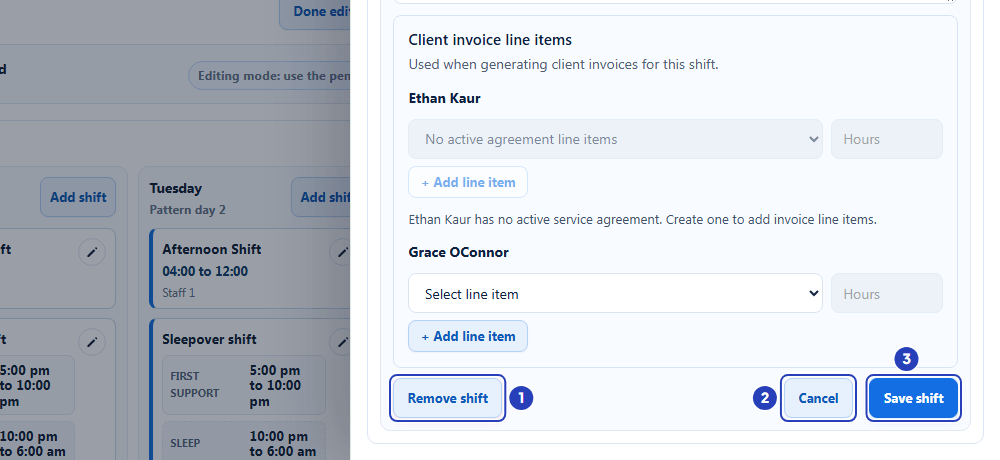
Choose Remove shift (1) to take the shift out of the pattern, Cancel (2) to close without saving, or Save shift (3) to keep your changes. -
Apply the template to the next roster, if you need to
BondiByte normally creates each roster period's shifts from the template on its planned date. Apply to next roster does it now for the next roster period. It works only before BondiByte has built that period.
1 Choose Apply to next roster with the dates shown on the button.
2 In the window Apply template to next roster?, choose Apply template.
3 A message tells you how many shifts were created.
Note: If the button is greyed out, the line under it explains why, for example This pattern can only be applied before automation runs for that roster. The page also says No future roster period is available when the next period does not exist yet.
What happens next
Once a site has an active template, BondiByte uses it to create the shifts of each later roster period, on the timing set in the organisation settings.
Once the pattern is active, Repeat this shift in the Add shift window is greyed out for the site and says Managed by the site's active Smart Rostering pattern. To add or remove one shift later, open that shift on the roster. Its Automation pattern section offers Add shift to future batch or Remove from future batches.
To keep a particular person on a recurring shift, use the padlock beside their name on the roster. See Assign and publish from Smart Rostering.
Next, check the site on the Readiness tab. See Check readiness.
Important notes
Important: A template is a copy of the shifts in one roster period. Every shift you tick is copied, including one-off shifts, and repeats in later periods.
Warning: Delete template removes the template and all its shifts for good. Shifts it has already created stay on their rosters as standalone shifts. If the template is active and Smart Rostering is still on for the site, BondiByte asks you to turn Smart Rostering off for the site first.
Good practice
- Build the template from a typical roster period and tick only the shifts that should repeat.
- Choose Automation starts from roster period carefully. If steps for that period are already due, the window warns you that work may be processed straight away, so pick a later period if you want time to check the template first.
- After you create the template, open it on the Templates tab and read the Pattern board before you rely on it. Check the days, times and number of staff on each shift.
Troubleshooting
Select shifts is greyed out.
Why it happens: Smart Rostering is switched off for the site. Hovering over it says Enable Smart Rostering for this site before selecting shifts.
What to do: Choose Enable Smart Rostering at the top right of the roster. It opens the site's settings with the automation switch already on. Saving or choosing Cancel takes you back to the roster.
I cannot find Select shifts in More roster actions.
Why it happens: The site already has an active template, the period has no shifts, or your role cannot manage Smart Rostering settings.
What to do: Change the existing template on the Templates tab. To add or remove a single shift, use the Automation pattern section of that shift on the roster.
Create pattern is greyed out.
Why it happens: No shift is ticked, or the window is missing a Pattern name, an Automation starts from roster period, or a Reusable template name while Save as reusable template is ticked.
What to do: Tick at least one shift and complete the fields in the window.
The list under Automation starts from roster period is empty.
Why it happens: The window says Create the next roster period for this site before saving an automation pattern.
What to do: Create the next roster period for the site, then start again.
Apply to next roster is greyed out.
Why it happens: BondiByte has already built that roster, or the next roster period does not exist, or the template is not active or has no shifts.
What to do: Read the line under the button for the exact reason. If the roster has been built, change its shifts directly on the roster.
Edit template is greyed out.
Why it happens: A run is in progress, or the template is archived.
What to do: Wait for the run to finish, then try again. An archived template cannot be edited.
Repeat this shift is greyed out in the Add shift window.
Why it happens: The site has an active Smart Rostering pattern. The window says Managed by the site's active Smart Rostering pattern.
What to do: Change the pattern on the Templates tab, or use the Automation pattern section of a single shift.