

Who this is for
This guide is written for Owner, Admin and Manager.
Before you begin
- Enable Smart Rostering is ticked for the organisation. An Owner or Admin does this under Configuration > Rostering rules > Organisation Settings. If Smart Rostering is not available to your organisation, the switches in this guide do not appear. See Smart Rostering organisation settings.
- The site exists, and the staff and clients you want to link to it have records. See Create a staff member.
- Read the Smart Rostering overview. BondiByte rosters only people on the site's team.
Steps
The screenshots show a demonstration organisation with made-up names. Your own screens show your organisation's details. Select a screenshot to open it full size.
-
Go to Configuration > Rostering rules > Sites
1 In the left menu, choose Configuration.
2 Choose the Rostering rules card.
3 Choose the Sites tab. It shows the Site Automation Overview, a list of your active sites. Tick Include inactive sites to see inactive ones too.
For each site, Automation is Yes when Smart Rostering is switched on, Team gives the primary team, the secondary team and relief staff (for example 6 / 2 / 0), Clients is the number of active clients linked to the site, and Readiness says whether the site is set up to be rostered. See Check readiness for what each value means.
Note: A Manager sees Configuration open straight on the Rostering rules page, with only the Overview, Sites and Templates tabs. There is no card to choose, so go straight to the Sites tab.
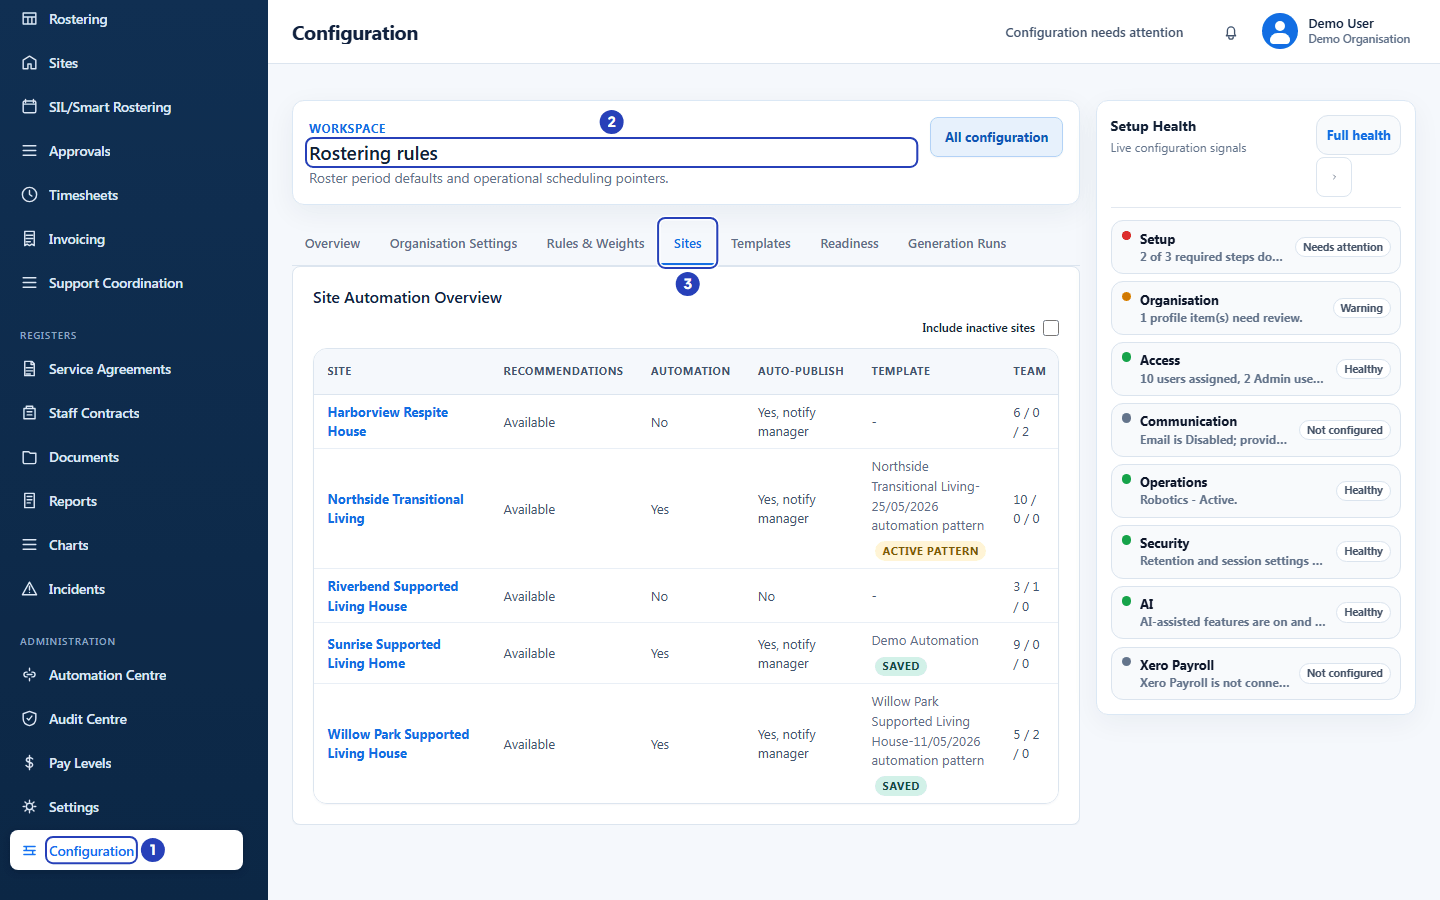
Choose Configuration (1), then the Rostering rules card (2, shown here as the page heading once it is open), then the Sites tab in the row of tabs (3). -
Open the site and turn on Smart Rostering
1 Choose the site's name. The site page opens, and a label under the name says Smart Rostering enabled or Smart Rostering off.
2 Choose the Site settings tab at the right-hand end of the row of tabs.
3 Enable smart recommendations for this site ranks staff when someone assigns people to shifts. It does not build rosters by itself.
4 Switch on Enable smart rostering automation for this site. This is the switch that lets BondiByte build the site's rosters on the automation plan. The Site Automation Behaviour settings appear below it.
Warning: If you switch Enable smart rostering automation for this site off, BondiByte asks Turn off Smart Rostering for this site? Automatic shift creation and assignment stops for the site. Existing shifts and published rosters are not changed, and you can turn it back on at any time.
Note: On the roster (SIL/Smart Rostering), the Enable Smart Rostering button opens these same site settings with the automation switch already on. Nothing is saved until you choose Save, which takes you back to the roster.
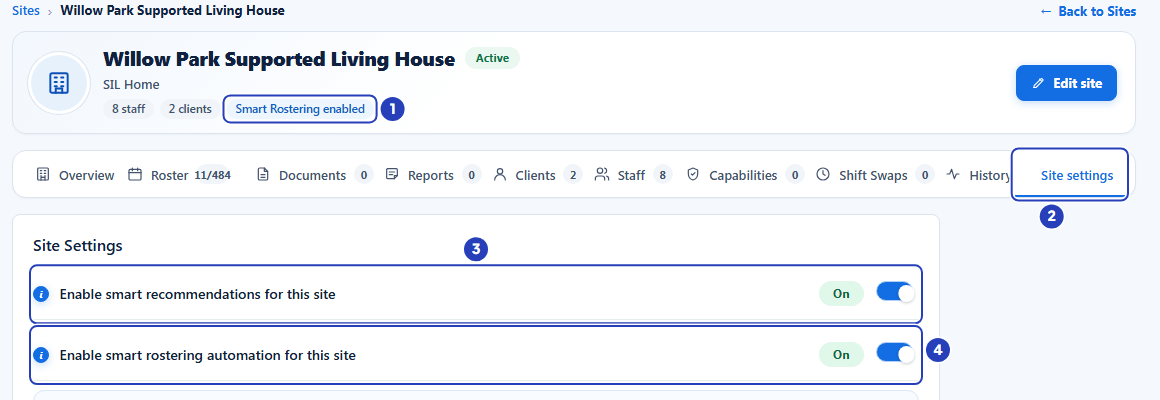
Open the site (1), choose the Site settings tab (2), then check smart recommendations (3) and Smart Rostering automation (4). -
Set the site's staffing and priorities
These settings sit under Site Automation Behaviour. Hover over the small i beside a name for a short explanation.
1 Active template shows the template BondiByte uses for this site. You cannot change it here once the site has one. You create it on the roster. See Build a roster template.
2 Minimum daily staff is the lowest daily staffing the site expects, from 1 to 200. A new site starts at 1.
3 Default staff capacity is the most hours a person should be rostered here in a fortnight, from 0 to 336. A new site starts at 76. A limit on a person's own staff record is used first.
4 Continuity priority: drag right to favour staff who know the site and its clients.
5 Weekend fairness: drag right to share weekend shifts more evenly.
6 Sleepover fairness: drag right to share sleepover shifts more evenly.
7 Active night fairness: drag right to share active night shifts more evenly.
Each slider runs from 0 to 100 and a new site starts every one at 50. You can leave them as they are.
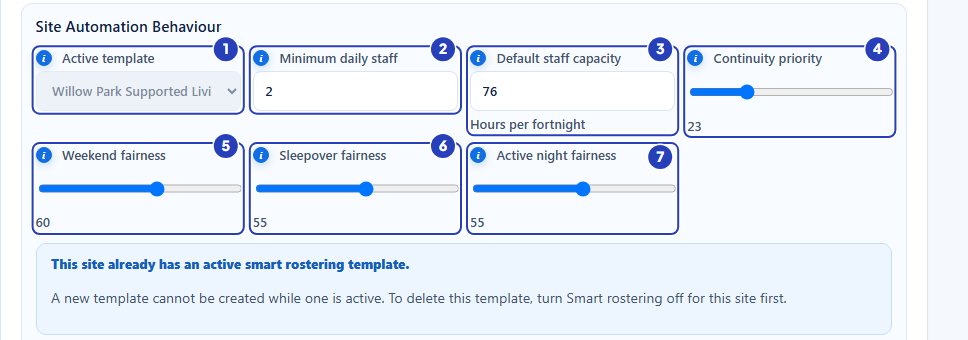
Check the active template (1), then set minimum daily staff (2), default staff capacity (3) and the four priority sliders (4 to 7). -
Choose how the site uses its team
1 Allow double shifts lets a person have more than one same-day shift when the fatigue checks pass. Overlapping shifts stay blocked.
2 Allow secondary team lets secondary team members be considered after the primary team.
3 Allow relief staff lets relief staff be considered if better team matches are not available.
4 Prefer primary team ranks primary team members higher.
5 Prefer secondary before relief ranks secondary team members above relief staff when other checks are similar.
6 Use staff interest collection lets this site's future rosters ask staff which shifts they would like before shifts are assigned. It also needs Allow staff interest on in the organisation settings.
Note: Secondary and relief staff are considered only when the primary team has no capacity left for the shift.
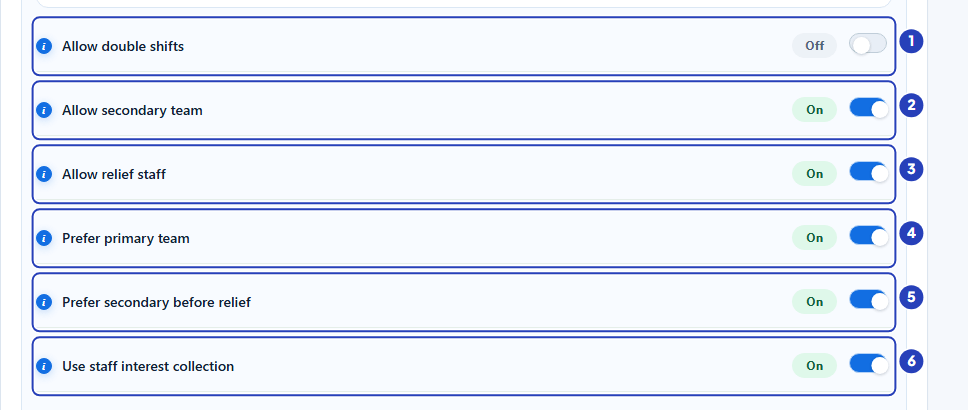
Choose whether to allow double shifts (1), the secondary team (2) and relief staff (3), and the team preferences (4 and 5) and staff interest (6). -
Choose notifications and publishing
1 Notify manager after shifts are created tells the site manager when BondiByte creates the site's shifts.
2 Notify manager after shifts are assigned tells the site manager when the draft roster is built.
3 Allow auto-publish: switch on only if BondiByte may publish this site's roster by itself on the planned date. Switching it on switches Require manager review off for the site. It also needs Require manager review off for the whole organisation.
4 Require manager review: leave on if a manager should publish each roster. Switching it on switches Allow auto-publish off.
While auto-publish is off, Remind manager to publish appears. Switch it on to email the site manager a daily reminder when a roster is built but not published.
Important: A roster that publishes by itself goes to staff even if some shifts are still unfilled. The site manager is told about unfilled shifts when the draft is built. If the organisation requires manager review, this page says Auto-publish is currently blocked at organisation level.
Note: Notifications go to the person chosen under Site manager / Team leader lower on this page. If nobody is chosen, they go to the organisation owners and admins.
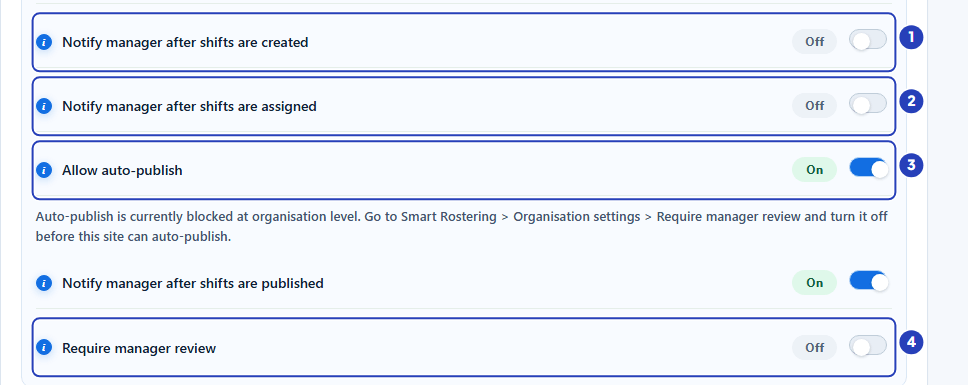
Choose the manager notifications (1 and 2), then auto-publish (3) and manager review (4). -
Choose Save site automation
Check the summary at the bottom of the page. It shows the number of Primary, Secondary and Relief staff and a Readiness tile that reads Ready or Needs review. Open Smart Rostering settings takes you back to the Rostering rules page.
1 Choose Save site automation. A message confirms Site settings saved.
Note: This button also saves the other settings on the page, such as site notifications, shift swaps and clock-in. Check them before you save.
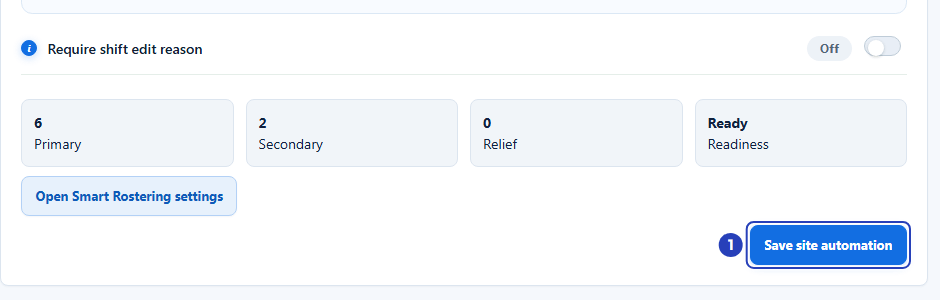
Choose Save site automation (1). -
Add the site team on the Staff tab
Only the people on the site team can be rostered at this site. A site with no team shows Needs attention on the Sites tab. On the site's page, choose the Staff tab, then Assign staff. The Rostering priority column shows each person's place in the team.
1 In Staff, choose the person.
2 In Rostering priority, choose Primary Team, Secondary Team, Relief Team, Site Lead or Coordinator / Oversight.
3 Check Start date. It starts as today. Choose a future date for a planned team change.
4 Add an End date if the person's time on the team will end.
5 Add Notes if you need them.
6 Choose Assign staff.
Note: Site Lead and Coordinator / Oversight are not counted in the Team numbers on the Sites tab, but BondiByte can still recommend people with these roles for shifts at the site. Give someone one of these roles only if they may also work shifts here.
Important: Make sure the site also has at least one active client. Choose the Clients tab and then Assign client if it has none.
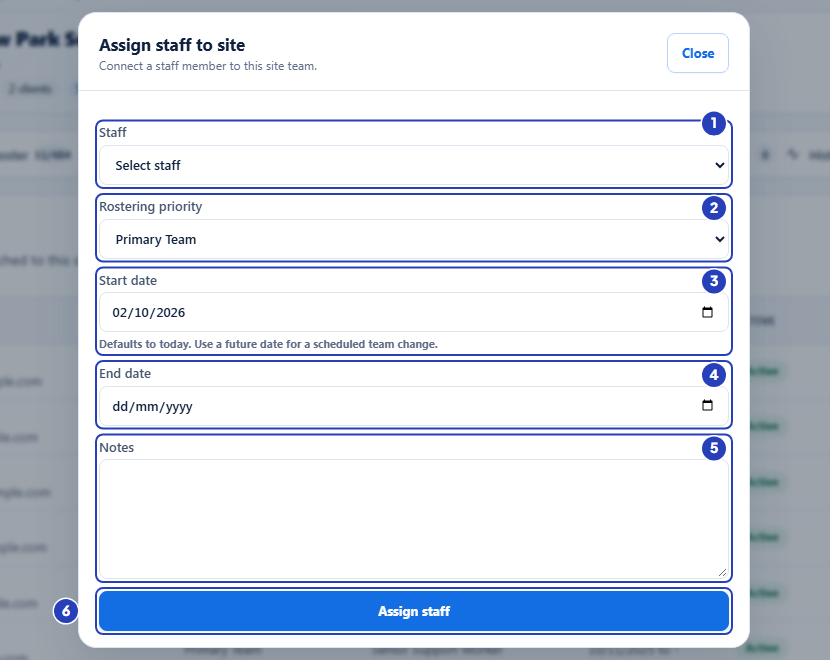
Choose the person (1) and their rostering priority (2), check the start date (3), add an end date (4) and notes (5) if needed, then choose Assign staff (6). -
Add a capability requirement if the site needs one
Choose the Capabilities tab, then Add requirement. The Add capability requirement window opens.
1 In Capability, choose a check, licence, skill or training.
2 In Rostering level, choose Hard blocker or Preferred.
3 Add Notes if you need them.
4 Choose Add requirement.
Note: A Hard blocker excludes staff who do not hold the capability. Preferred only improves their ranking. To add a capability that is not in the list, use Rules & Weights. See Rules and Weights.
Note: For the built-in compliance checks, such as the NDIS Worker Screening Check, the rostering level shows Enforced at organisation level. It is set once for every site in Audit Centre > Settings, not per site.
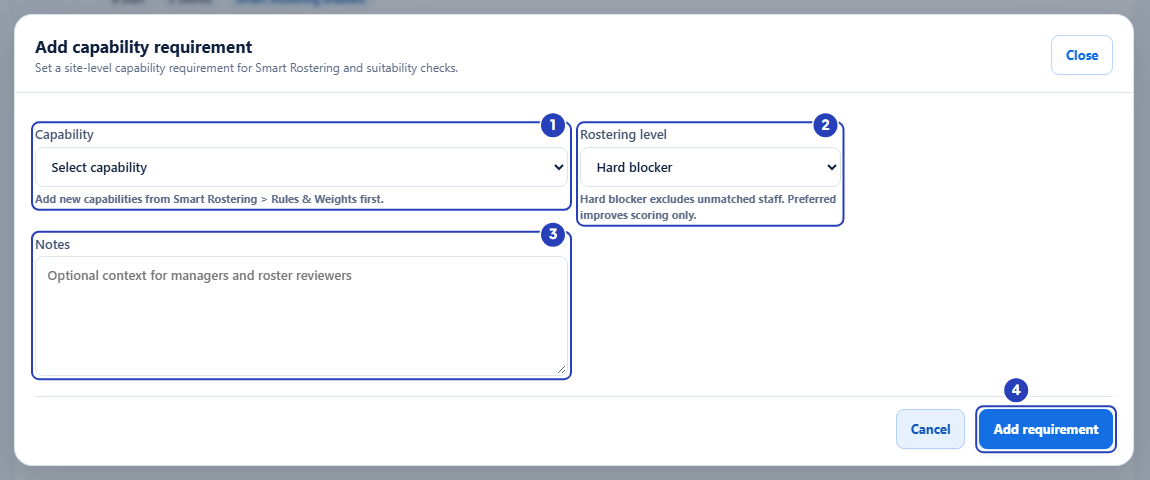
Choose the capability (1) and the rostering level (2), add notes if needed (3), then choose Add requirement (4).
What happens next
The site appears on the Sites tab with its readiness.
Next, give the site a template. Build the site's first fortnight by hand first. Repeat this shift in the Add shift window stays available until the site has an active pattern. See Build a roster template. Once it has one, BondiByte plans the site's roster periods and builds them itself.
Changes to these settings apply the next time BondiByte builds a roster for the site.
Important notes
Important: Turning Smart Rostering off for a site stops automatic shift creation and assignment there. Existing shifts and published rosters are not changed.
Good practice
- Switch on one site at a time. Link its team and clients, build its template and check its first draft roster before you switch on the next site.
- Put the people who normally work at the site in the Primary Team. Use Secondary Team and Relief Team for backup staff.
- Leave Allow auto-publish off for a site until a manager has checked several of its draft rosters.
Troubleshooting
The site shows Needs attention under Readiness.
Why it happens: Automation is on for the site but it has no active client linked, or no one in its team.
What to do: Open the site. Use Assign client on the Clients tab and Assign staff on the Staff tab, then check the Sites tab again.
The page says Auto-publish is currently blocked at organisation level.
Why it happens: Require manager review is switched on for the whole organisation, which stops every site from publishing by itself.
What to do: Leave it on if managers should review rosters. Otherwise an Owner or Admin can switch it off in the organisation settings. See Smart Rostering organisation settings.
A message asks Turn off Smart Rostering for this site?
Why it happens: You switched off Enable smart rostering automation for this site. That stops automatic shift creation and assignment for the site.
What to do: Choose Turn off only if you mean to stop it. Choose Cancel to keep it on.
Active template says No active template.
Why it happens: The site has no template yet. A template is created from the roster, not from this page.
What to do: See Build a roster template.
I cannot see Assign staff or Add requirement.
Why it happens: Your role does not include permission to edit sites, or the site is inactive. For an inactive site the tab says Staff cannot be assigned to an inactive site.
What to do: Ask an Owner or Admin to check your role, or to make the change for you. Reactivate the site first if it is inactive.
Site settings has no Smart Rostering switches.
Why it happens: Smart Rostering is not available to your organisation, which needs an active subscription or trial.
What to do: An Owner or Admin checks Billing & subscription, and contacts BondiByte support if the subscription should be active.
I cannot find a site on the Sites tab.
Why it happens: The tab lists only active sites unless you tick Include inactive sites.
What to do: Tick Include inactive sites. If the site still is not there, check that it exists on the Sites page.