

Who this is for
This guide is written for Owner, Admin and Manager.
Before you begin
- Your roster period is set. An Owner or Admin sets it once in Configuration > Rostering rules, on the Organisation Settings tab, in the Roster period automation card (First period starts and Period cycle). Until it is saved, the Add site button is greyed out for an Owner or Admin. A Manager does not see the greyed-out button; choosing Create shows a message instead (see Troubleshooting).
- You are signed in to BondiByte on a computer. See Sign in to BondiByte.
- You have the site's name, its type (for example a supported living house) and its address.
Steps
The screenshots show a demonstration organisation with made-up names. Your own screens show your organisation's details. Select a screenshot to open it full size.
-
Go to Sites > Add site
1 In the left menu, under Operations, choose Sites. The Site Records list opens.
2 At the top right of the list, choose Add site. The Add site window opens with two sections: Site Details and Address and Timezone Context.
The list shows each site's name with its site code underneath, its type, its address and whether it is active.
Important: If Add site is greyed out and a warning headed Set your roster period first appears above the list, your roster period has not been saved yet. An Owner or Admin sees this warning. See the first item under Before you begin.
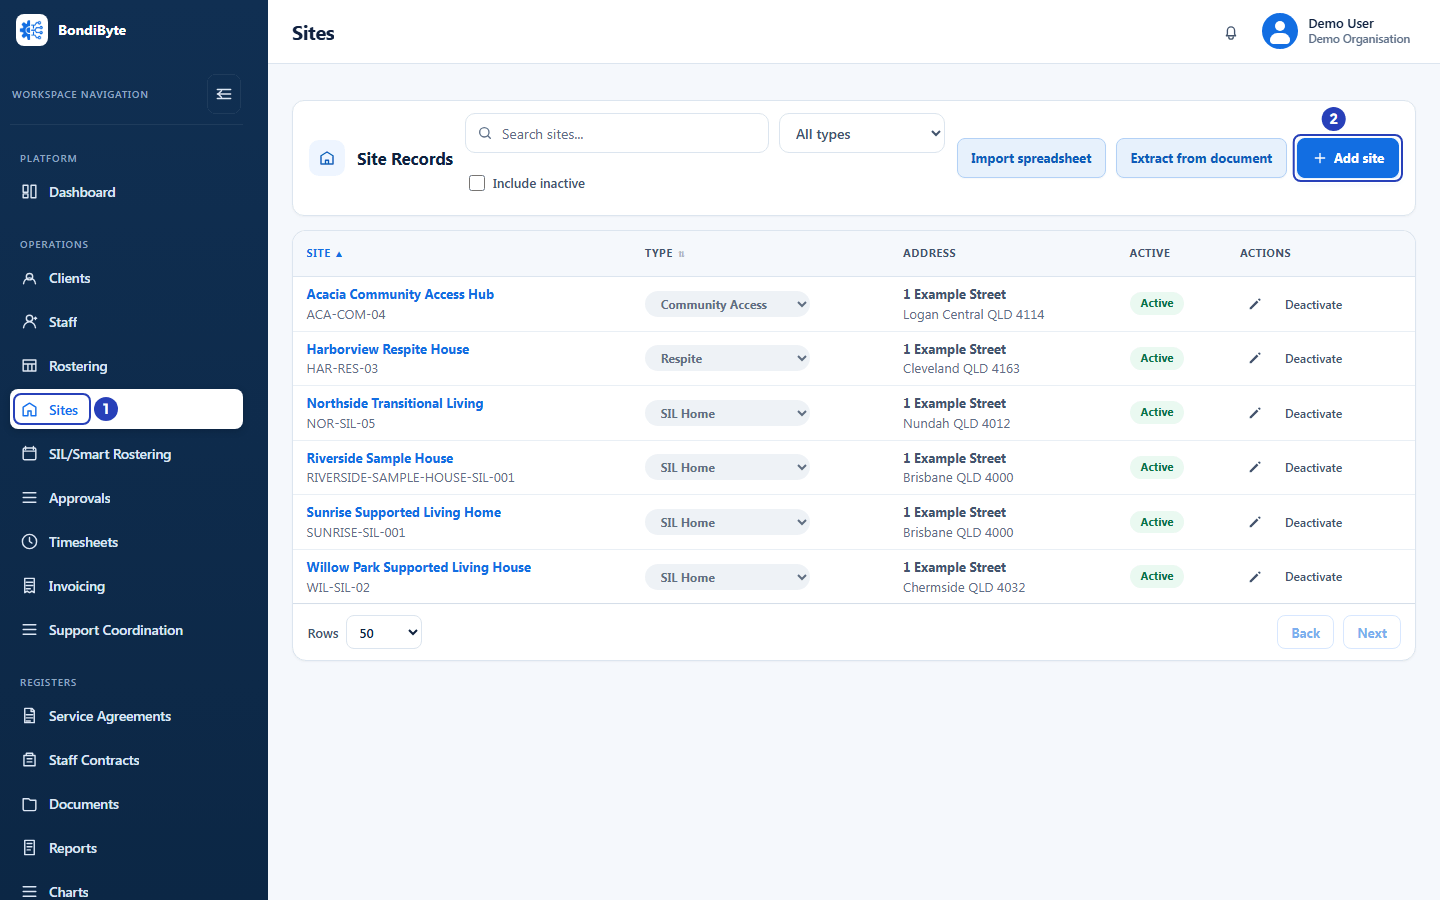
Choose Sites in the left menu (1), then Add site (2). -
Name the site and choose its type
The Site Details section is at the top of the window.
1 In Site name, type the name your team uses for the house or location, for example
Lakeside Sample House. This is the only required field in the whole window.2 In Site type, choose the type that fits the site. It starts as SIL Home.
Fields in step 2 Field What it means Site name Required. The name shown in the Site Records list and wherever you choose a site in BondiByte, such as the linked site on a client or the primary site on a staff member. Two sites may have the same name, so check the list first. Site type Choose SIL Home (a supported independent living house), Respite, Community Access, Office or Other. It starts as SIL Home. The type shows in the Type column, can be used to filter the list, and is part of the site code BondiByte creates. 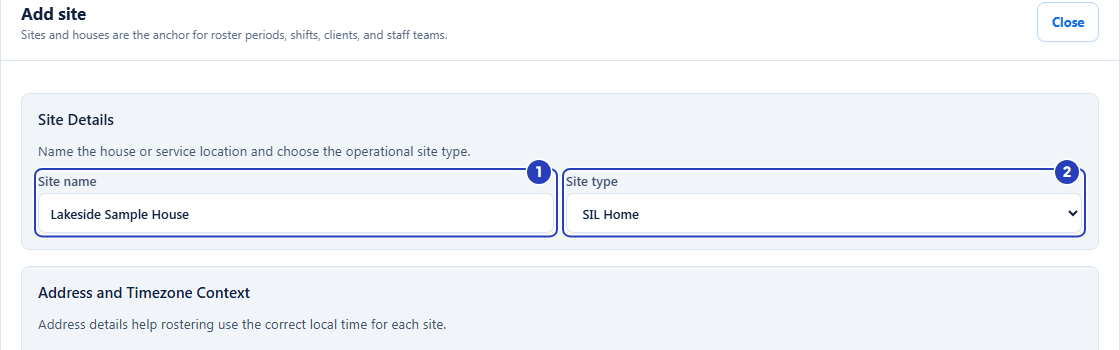
Type the site name (1) and choose the site type (2). -
Enter the address
The Address and Timezone Context section holds the address. The window explains that address details help rostering use the correct local time for each site, so enter the real address.
1 In Address search, start typing an Australian address and choose a suggestion from the list that appears. The address fields below fill in for you. You can also type the address into the fields yourself.
2 In Street address, check or type the street number and name.
3 In Unit / level, type a unit, level or building name if the site has one. Leave it empty if not.
4 In Suburb, check or type the suburb.
5 In State, choose the state or territory. It starts as
QLD, so change it if the site is somewhere else.6 In Postcode, check or type the postcode.
7 In Country, check the country. It starts as
Australia.Fields in step 3 Field What it means Address search Optional. A quick way to fill in the address fields. Nothing in this box is saved by itself; the fields below are what is saved. Street address Optional. Shown in the Address column of the Sites list. Unit / level Optional. For a unit, level or building name. Suburb Optional. Shown under the street address in the Sites list. State Choose ACT, NSW, NT, QLD, SA, TAS, VIC or WA. It starts as QLD. Postcode Optional. Shown with the suburb and state in the Sites list. Country Starts as Australia. You can type a different country.Note: No address field is required, but a site with no address shows a dash in the Address column. Enter at least the suburb, state and postcode.
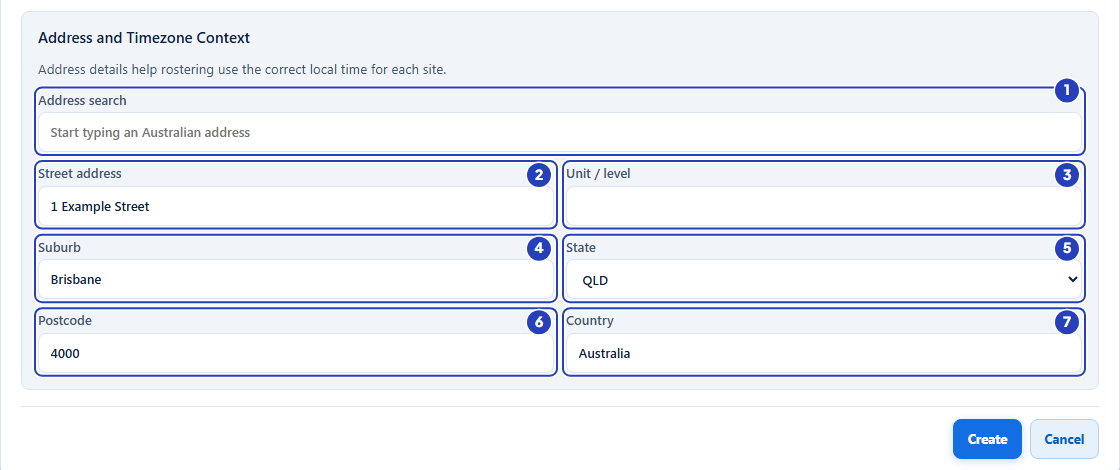
Search for the address (1) or type it into the street address (2), unit or level (3), suburb (4), state (5), postcode (6) and country (7) fields. -
Choose Create
1 Check the details you entered. The buttons stay at the bottom of the window.
2 Choose Create. Choose Cancel instead to close the window without saving.
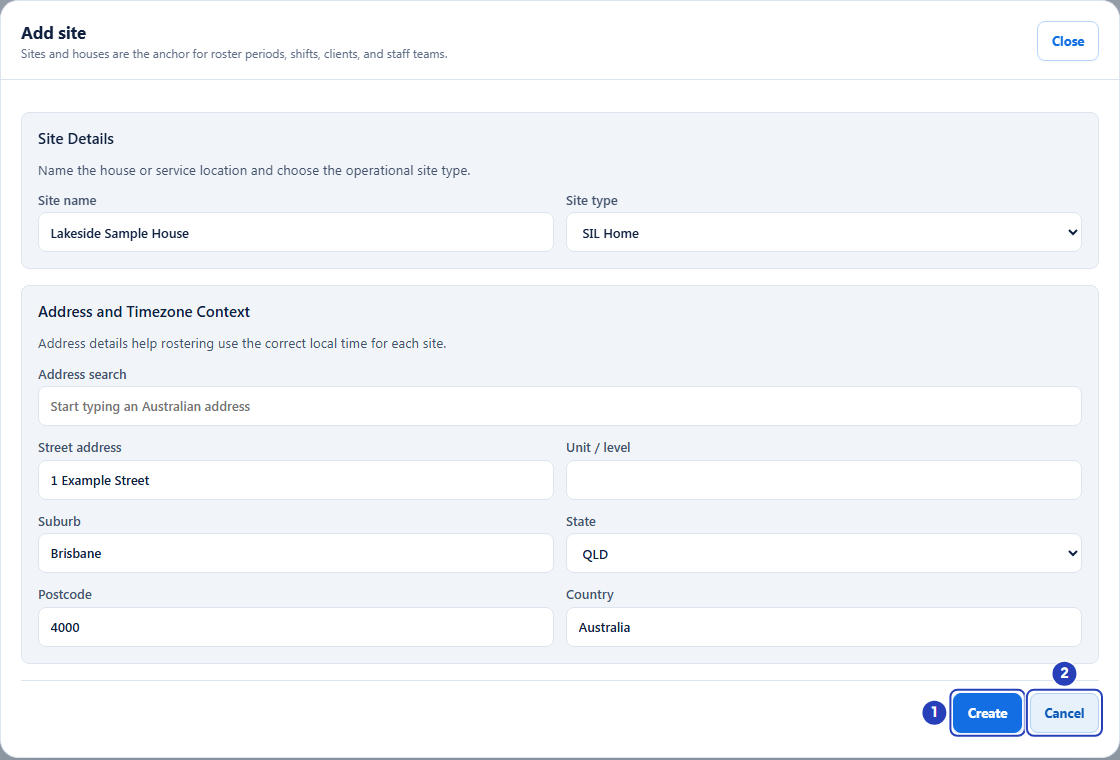
Choose Create (1) to save, or Cancel (2) to close the window without saving. -
Check the new site
1 A message confirms Site record created.
2 The window closes and the new site appears in the Site Records list, with its site code under the name, its type, its address and the label Active.
BondiByte creates the site code for you from the site's name and type. You cannot type your own code, and the code does not change if you rename the site or change its type later.
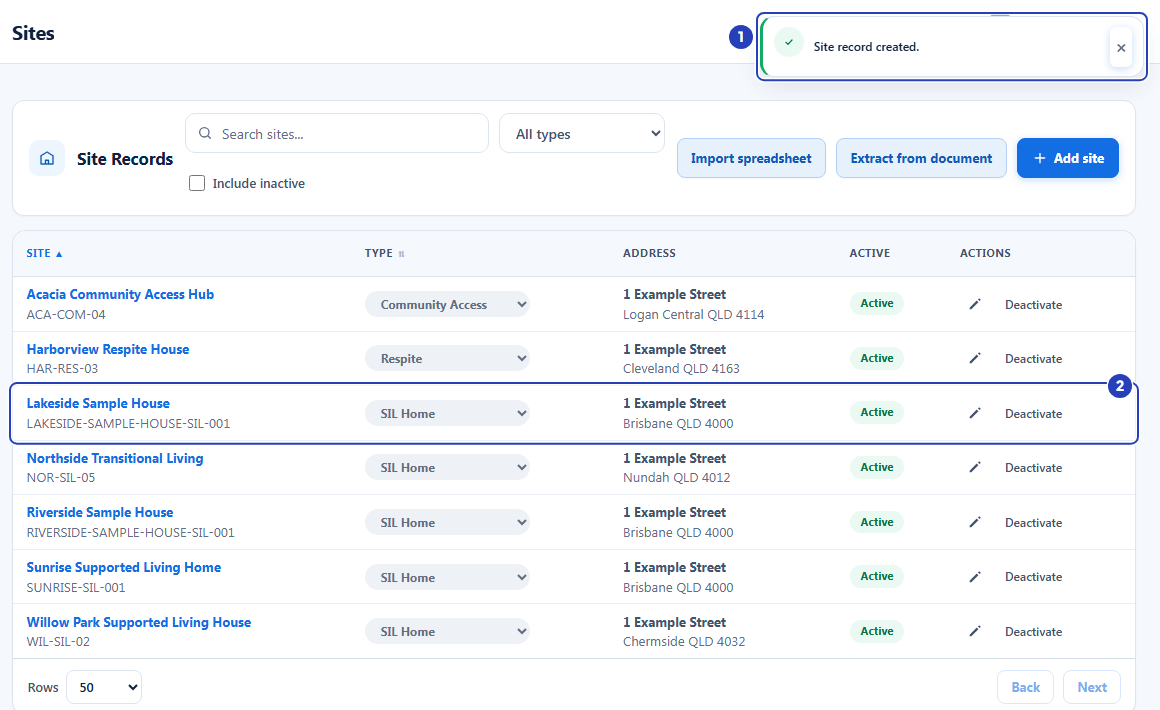
The confirmation message (1) and the new site in the list (2). -
Find, change or deactivate a site from the list
Use the controls on the Site Records list to look after the sites you have created.
1 Type in Search sites... to narrow the list by name.
2 Use the Site type filter to show only one type. It starts on All types.
3 Tick Include inactive to show deactivated sites as well. They are hidden until you tick it.
4 In the Type column, choose a different type from the drop-down on a row. The change is saved straight away and a message confirms Site type updated.
5 Choose the pencil icon in the Actions column to open the Edit site window. It has the same fields as Add site; choose Update to save, and a message confirms Site record updated.
6 Choose Deactivate to switch a site off. It happens straight away, without asking you to confirm, and a message confirms Site record deactivated. The site disappears from the list until you tick Include inactive, where the button becomes Reactivate. Choose it to bring the site back; a message confirms Site record reactivated.
Warning: Move or cancel any upcoming shifts at a site before you deactivate it. If a deactivated site still has upcoming shifts, BondiByte sends the site's manager, or your Owners and Admins, a notification titled Deactivated site still has upcoming shifts.
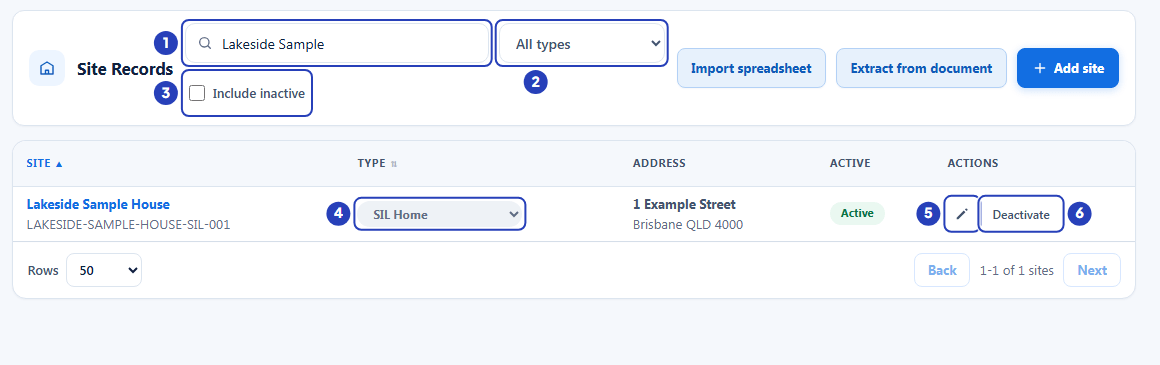
Search (1), filter by type (2), show inactive sites (3), change the type (4), edit (5) or deactivate (6) a site.
What happens next
The site is ready to use. Choose it as the Linked site / house in Edit client, and as the Primary site / house in Edit staff. Add client and Add staff ask for a site only when your own access is limited to certain sites. See Create a client and Create a staff member.
Choose the site's name in the list to open its record. The record has tabs for Overview, Roster, Documents, Reports, Clients, Staff, Capabilities, Shift Swaps, History and Site settings.
A new site shows Smart Rostering off at the top of its record. The Smart Rostering choices for the site are in its Site settings tab.
Important notes
Important: BondiByte does not stop you adding two sites with the same name. Each gets its own site code, so a duplicate is easy to miss. Search the list, with Include inactive ticked, before you add a site.
Note: Some sites in the list are made for you. When a client is set up for community rostering, BondiByte creates a Community Access site named after that client. You do not create these yourself. See Create a client.
Tip: To bring in many sites at once, use Import spreadsheet or Extract from document above the list instead of adding them one by one. They appear only if your role allows imports.
Good practice
- Save your roster period before you add your first site, and check that it matches the fortnight you are rostering now. It locks while automatic roster periods or Smart Rostering are switched on, so set it to match your current fortnight before you start.
- Create your sites before your clients and staff, so you can choose the right site when you add each person.
- Search the Site Records list with Include inactive ticked before you add a site. A deactivated site with the same name is easy to miss, and you can bring it back with Reactivate instead of creating a second one.
- Enter the full address, including suburb, state and postcode. The window says address details help rostering use the correct local time for each site, and State starts as
QLD, so change it for a site in another state. - Choose the Site type with care. It becomes part of the site code, and the code does not change if you change the type later, so a site changed from one type to another keeps a code showing the old type.
- Use the name your team already says out loud, and put a unit or level in Unit / level rather than in the name, so people can find the site by searching.
Troubleshooting
Add site is greyed out and a warning says Set your roster period first.
Why it happens: Your roster period start date and length have not been saved yet. An Owner or Admin sees the greyed-out button and the warning. Pointing at the greyed-out button shows Set your roster period start date first.
What to do: Ask an Owner or Admin to open Configuration > Rostering rules, choose the Organisation Settings tab, set First period starts and Period cycle in the Roster period automation card and save. Then open Sites again.
A message says Roster periods are not configured for this site yet. when I choose Create.
Why it happens: Your roster period has not been saved, and your role cannot see the warning that an Owner or Admin sees.
What to do: Ask an Owner or Admin to save it in Configuration > Rostering rules (see Before you begin), then choose Create again.
I cannot see the Add site button.
Why it happens: Your role does not include the Can create sites permission.
What to do: Ask an Owner or Admin to check your role, or to add the site for you.
I cannot see Sites in the left menu.
Why it happens: Your role does not include the Can view sites permission.
What to do: Ask an Owner or Admin to check your role.
My browser says to fill out this field when I choose Create.
Why it happens: Site name is empty. It is the only required field.
What to do: Type a name in Site name, then choose Create again.
The address I chose from Address search put the wrong state in State.
Why it happens: The suggestion did not include a state that BondiByte recognises, so State can show the first entry in its list (ACT) without a real choice having been made, or it still shows its starting value of QLD.
What to do: Check Street address, Suburb, State and Postcode and correct any that are wrong before you choose Create.
I created a site and cannot find it in the list.
Why it happens: The search box or the Site type filter is narrowing the list, or your access is limited to certain sites.
What to do: Clear Search sites..., set the filter back to All types and tick Include inactive. If you are a manager with access to certain sites only, ask an Owner or Admin to check that you can see the new site.