

Who this is for
This guide is written for Owner and Admin.
Before you begin
- You are signed in to BondiByte on a computer as an Owner or Admin. See Sign in to BondiByte.
- The staff member already has a record that is Active or Staged, with a working Staff contact email that they can open on their phone. See Create a staff member.
- Staff sign in to the BondiByte Staff App on their phone. Ask them to install BondiByte Staff from the App Store (iPhone) or Google Play (Android).
- Your organisation allows password sign-in for staff. If your organisation requires Microsoft single sign-on (Configuration > Login, SSO & User Sync), the Send login details button is greyed out and the note under it says so.
Steps
The screenshots show a demonstration organisation with made-up names. Your own screens show your organisation's details. Select a screenshot to open it full size.
-
Go to Staff > the staff member's name
1 In the left menu, under Operations, choose Staff. The Staff Records list opens.
2 Type the person's name in Search staff..., then choose their name in the list. Their record opens on the Overview tab. Tick Include inactive first if they might have been made inactive.
On the Overview, under At a glance, the Compliance & Access card has a Login access line. It sums up the person's login in one sentence. Its Manage login access link opens the Login access tab used in the next steps.
Tip: You can also email the setup link when you create the person, with Send staff setup email and Create and send invitation in the Add staff window. See Create a staff member.
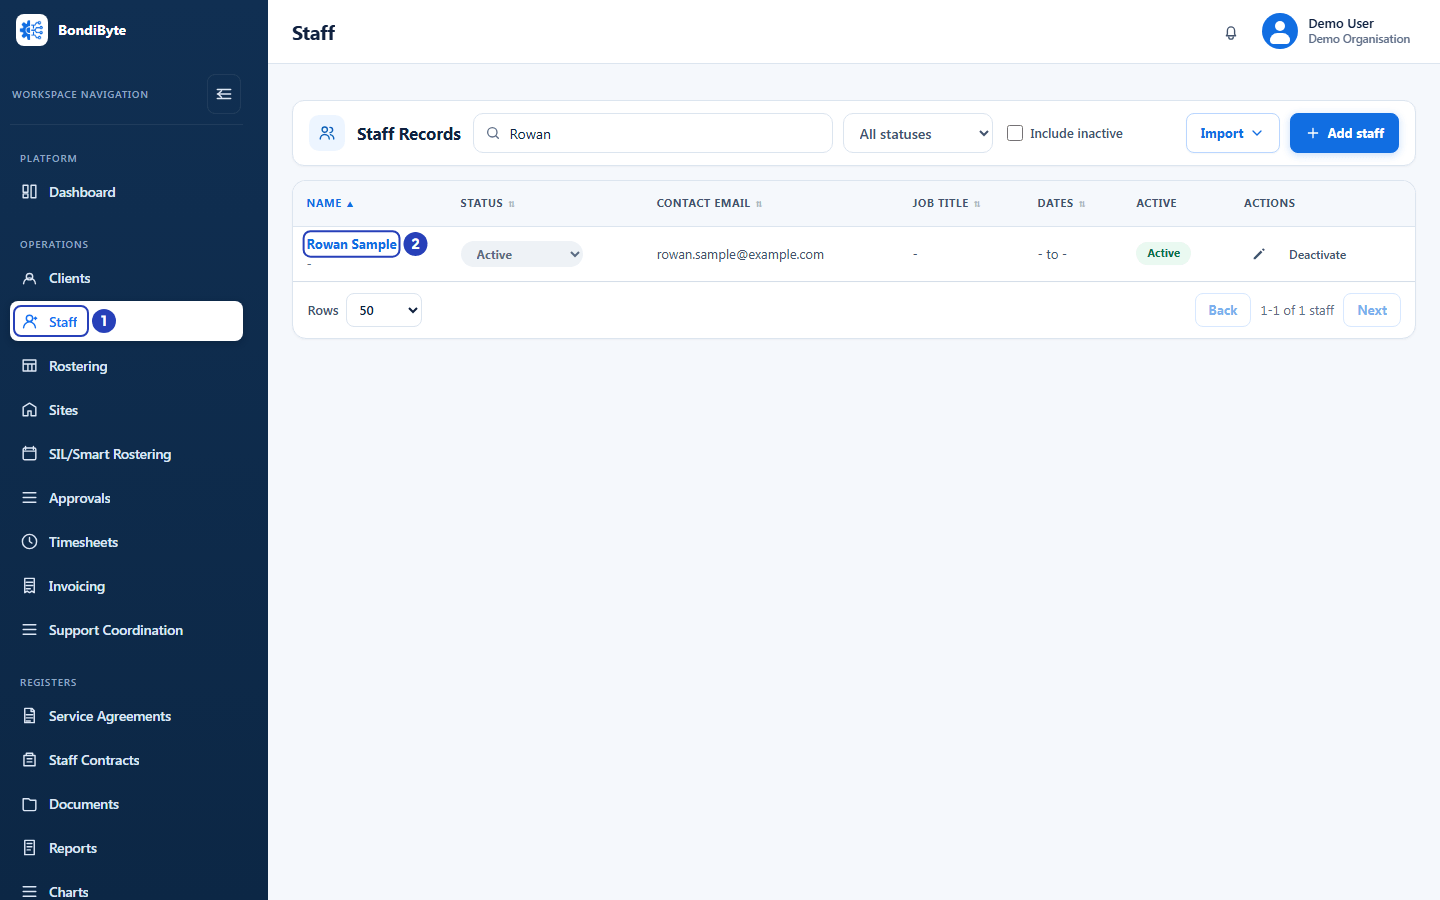
Choose Staff in the left menu (1), then choose the staff member's name (2). -
Choose the Login access tab
1 At the top of the record, choose Login access. The Login Access section opens with a card headed Organisation login account.
Only an Owner or Admin sees this tab, even if another role has been given the Can manage staff login access permission.
Note: The View staff portal button at the top of the record is a separate preview, shown to people with the Can view as staff permission. It does not send anything to the staff member.
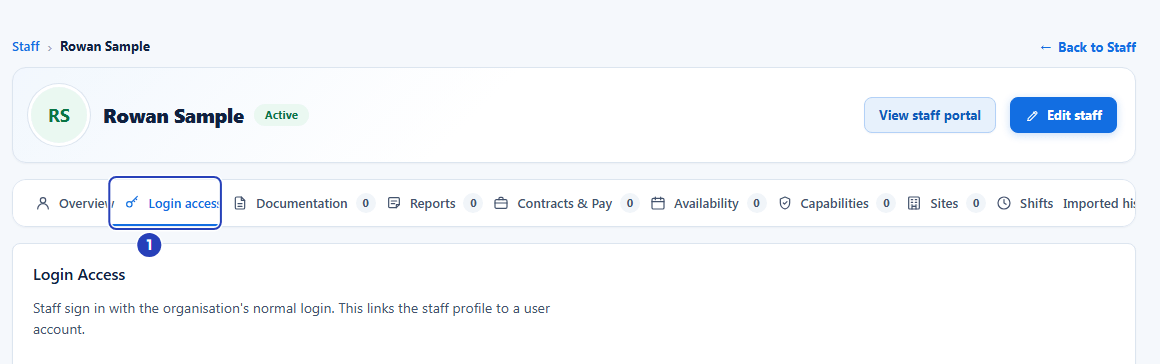
Choose the Login access tab (1) at the top of the staff member's record. -
Check the person's login details
Read the card before you send anything. A person who has never been given a login shows the heading No login account linked.
1 Check the heading, the line under it and the label below that. The heading shows the person's login email once they have one. The line says where their login stands, and adds Signs in as followed by a name if the person signs in with a name other than that email. The label says the same in a word or two.
2 Check Sign-in method. Password means the person signs in with their email and a password.
3 Check Invite status. It reads Not set until login details are sent.
4 Check Last login details sent. A dash means nothing has been sent yet.
5 Check Staff portal access. It reads Not active until the person has an active login and an active staff record, then Active.
6 Under Sign-in details to share, note the Company code. Staff need it only if the same email address is used at more than one organisation.
Fields in step 3 Field What it means Status label No login account, Staged profile (an imported person who has not finished setup), Details just sent (sent in the last two minutes), Invite sent, Password set (the person has a password), Linked & active, Linked (inactive), Single sign-on required, Single sign-on available or Local sign-in allowed. The line above it says the same thing in a sentence. Sign-in method Password, SSO or password (single sign-on is available but not required), SSO required, or Password (local sign-in allowed) for a person who is exempt from required single sign-on. Invite status Invited, Accepted, Suspended, Revoked or Expired. Not set means no login details have been sent. Last login details sent The date and time login details were last sent. A dash means never. Roles Shown once the person has a login. Sending login details gives the person the Staff role, which lets them use the Staff App. Account source Shown only if your organisation uses directory sync. It says how the login was added (Added manually, Directory sync or Microsoft sign-in) and whether a directory account is linked. Sign-in details to share Organisation sign-in link, Staff portal link and Company code, each with a Copy button. The two links are also in the email BondiByte sends. Staff use the Staff App on their phone, so you do not need to send the links. The screenshot for this step leaves the two links out. 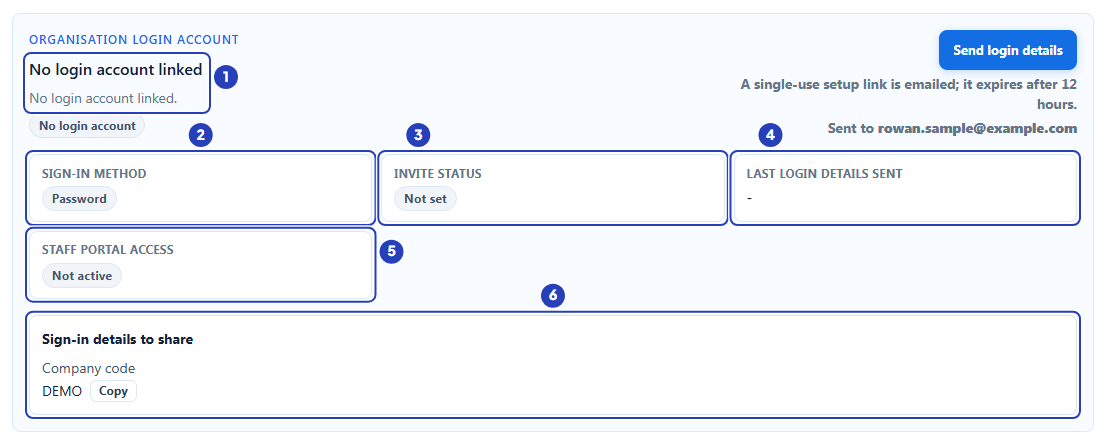
Check the heading and status (1), sign-in method (2), invite status (3), when login details were last sent (4), portal access (5) and the company code (6). -
Choose Send login details
The button is at the top right of the card. The note under it says a single-use setup link is emailed and that it expires after 12 hours.
1 Check Sent to, under the button. It shows the Staff contact email from the person's record, where the login details go. If it is wrong, choose Edit staff at the top of the record and correct it first.
2 Choose Send login details. BondiByte does not ask you to confirm.
If the person has no login yet, BondiByte creates one, gives it the Staff role, and emails the person. The email also includes the organisation sign-in link, company code and sign-in method. You do not need to do anything else first.
Warning: If the person already has a password, sending login details again removes that password and signs them out of any phone where they are signed in. They must use the new link to choose a new password.
Note: You can send login details to a person whose record is Staged. When they finish setting up their login, BondiByte makes their record Active.

Check the Sent to address (1), then choose Send login details (2). -
Check the result
A message confirms Staff login details sent. If it says Staff login details were not sent. Check the organisation's email settings. instead, see Troubleshooting.
1 The label becomes Details just sent and the line above it says Login details sent recently.
2 The heading now shows the person's login email.
3 Roles appears and shows Staff.
4 Last login details sent shows the date and time.
5 The button now reads Sent. For two minutes after a send it reads Available again in a number of minutes, and nobody can send again until it reads Resend login details.
After those two minutes the label Details just sent changes to Invite sent. When the person has set their password it changes to Password set. In an organisation where Microsoft single sign-on is available, the label shows Single sign-on available instead (or Local sign-in allowed for a person who is exempt from single sign-on). Then use Invite status and Last login details sent on this tab to see where the person stands.
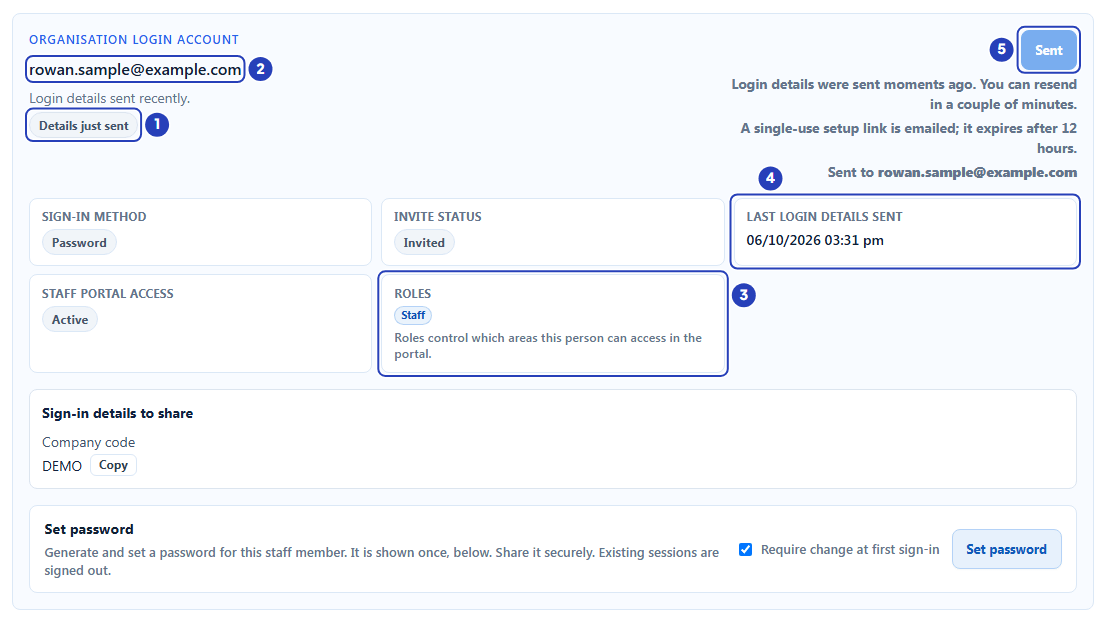
The status label (1), the login email (2), the Staff role (3), the time sent (4) and the button now reading Sent (5). -
Tell the staff member what to expect
The person receives an email. Its subject is Your staff portal access for followed by your organisation's name, and its heading is Staff portal access. It is worth telling the person to look for it, and to check their junk mail.
1 The email lists the Staff member, Sign-in email, Organisation, Company code, Sign-in method (Secure password setup link) and Setup link expiry (12 hours, single use). It also gives the two sign-in web addresses and a support contact.
2 A large button reads Set up sign-in. It opens a page where the person chooses a password.
3 The setup link works once, for 12 hours. If it expires or is used, the person needs you to send login details again.
4 A person who already had a password, or who has signed in before, gets the same email with a panel headed Reset your password and a Reset password button instead of Set up sign-in. Its Reset link expiry row says 10 minutes, so use it right away: a reset link lasts only 10 minutes.
5 For a Staged person, the email adds that completing the login setup activates their staff record.
Important: The email tells the person to keep it private and not to forward the setup link or account details to anyone.
-
The staff member sets a password and signs in to the Staff App
This step is what the staff member does, on their phone. Share it with them.
1 Install BondiByte Staff from the App Store (iPhone) or Google Play (Android), if it is not already installed.
2 Open the email and choose Set up sign-in within 12 hours. If the Staff App is installed, the link may open inside the app. If it opens in the phone's web browser instead, set the password there.
3 The page shows the person's Login email. They type a New password of at least 8 characters, type it again in Confirm password, and choose Set password. The page then says Your login is ready.
4 They open the BondiByte Staff app. The sign-in screen says Sign in with your work email and password. They type Email and Password and choose Sign in. The page's Continue to sign in button is not needed; the Staff App is where they sign in.
5 If the app asks them to choose an organisation, or they choose Signing in to more than one organisation?, they pick their organisation or type the Organisation code. This is the Company code from step 3.
6 If their login uses a second step, the app asks for the 6-digit code from their authenticator app. They type it in Verification code and choose Verify and sign in.
7 The app opens on its home screen, with their shifts, timesheets and tasks. If they forget their password later, Forgot password? on the sign-in screen sends them a reset link.
-
Resend login details if needed
Resend login details when the person did not get the email, the link has expired, or you corrected their email address.
Open the person's Login access tab. Check Sent to under the button first, and correct the email with Edit staff if it is wrong.
1 Choose Resend login details. If the button reads Available again in a number of minutes, wait for it to read Resend login details again.
A new email is sent and any earlier setup link stops working. Tell the person to use the newest email.
Warning: Resending to a person who already has a password removes that password and signs them out. The new email is the Reset your password version, with a Reset password button, and that reset link lasts only 10 minutes. If the person only forgot their password, they can use Forgot password? on the Staff App sign-in screen instead.

For a couple of minutes after a send, the button reads Available again in a number of minutes (1) and cannot be used. -
Or set a password for the person yourself
Use this only for a person who cannot use the emailed link, for example because they cannot reach their email. The emailed link is the usual way, because the person then chooses their own password.
Send login details first, as in step 4. The Set password row appears at the bottom of the card only once the person has an active login account.
1 In the Set password row, leave Require change at first sign-in ticked, as it starts, unless you have a reason to untick it.
2 Choose Set password. BondiByte makes a strong password, sets it on the person's login and signs them out of any phone where they are signed in. A message confirms Password set. The staff member must change it at first sign-in. or, if you unticked the box, Password set.
The password appears once, under the row, after New password (shown once):. Choose Copy to copy it, share it with the person privately, then choose Dismiss. It cannot be shown again. To make a new one, choose Set password again.
Warning: Do not choose Resend login details after you set a password. It removes the password you set and sends a reset link instead.

Leave Require change at first sign-in ticked (1), then choose Set password (2). -
Invite many staff at once with Bulk invite
Bulk invite is for people who are Staged, for example people brought in with Import on the Staff Records list or by your organisation's user sync. People added one at a time with Add staff start as Active, so use Send login details for them, or turn on Send staff setup email when you create them.
1 On the Staff Records list, choose Bulk invite in the toolbar. The button shows how many people can be invited, for example Bulk invite (12). It appears only for people with the Can manage staff login access permission, and only when at least one person is eligible.
2 The Send staff portal invitations window opens. It says: Select staged staff who have never logged in and have not previously been sent login details. It lists each eligible person with their Name, Email and Site.
3 Tick the people you want to invite. Search eligible staff narrows the list. Select all followed by the number of eligible results ticks everyone matching your search, up to 2,000, and Clear selection unticks everyone. A line shows Selected X of Y eligible. People who become eligible later are not added automatically.
4 Choose Send invitations followed by the number selected. Nothing is sent until you do. Cancel closes the window without sending.
5 The window then lists each person with a result: Queued, Accepted by email provider, Delivered, Failed, Skipped, Delivery uncertain or Pending. A line at the top counts how many are queued, accepted, delivered, failed, skipped or uncertain. Accepted by email provider means the email service has taken the message for delivery, not that the person has read it. It says Still processing until every person has a result. You can close the window and check back from Staff Records.
Each invited person gets the same email as in step 6 and signs in as in step 7. When they finish setting up their login, BondiByte makes their record Active.
Fields in step 10 Field What it means Who is eligible A person is listed only if their record is Staged and active, they have a valid Staff contact email, they have never signed in, no password is set for them, no login details have been sent to them before, no delivery to them is in progress or has bounced, and your organisation does not require single sign-on. Note: People who do not appear in the window are not eligible for Bulk invite, for example people who have already been sent login details. Use Resend login details on their own record.
-
Remove a staff member's login access
There is no separate remove button. Making the person Inactive or Terminated switches their login off automatically, and signs them out.
On the Staff Records list, find the person and choose Deactivate on their row. It happens straight away, without asking you to confirm. You can instead choose Inactive or Terminated in the Status drop-down on the row; a message then confirms Staff status updated.
1 A message confirms Staff record deactivated.
2 The Status drop-down on the row now reads Inactive. Tick Include inactive to keep seeing the row, because inactive people are hidden from the list by default.
3 The Deactivate button becomes Reactivate.
If you open the person's record and choose Login access, the line under the heading reads Login account linked but inactive and the label Linked (inactive). You cannot send login details or set a password while the person is inactive.
Warning: Making a person inactive also makes their active staff contracts inactive automatically. Move or reassign their upcoming shifts first.
Important: The login of the last active Owner or Admin cannot be switched off this way. A message says This staff member is linked to the last active Owner/Admin login. Assign another active Owner/Admin before making this staff member inactive or terminated.
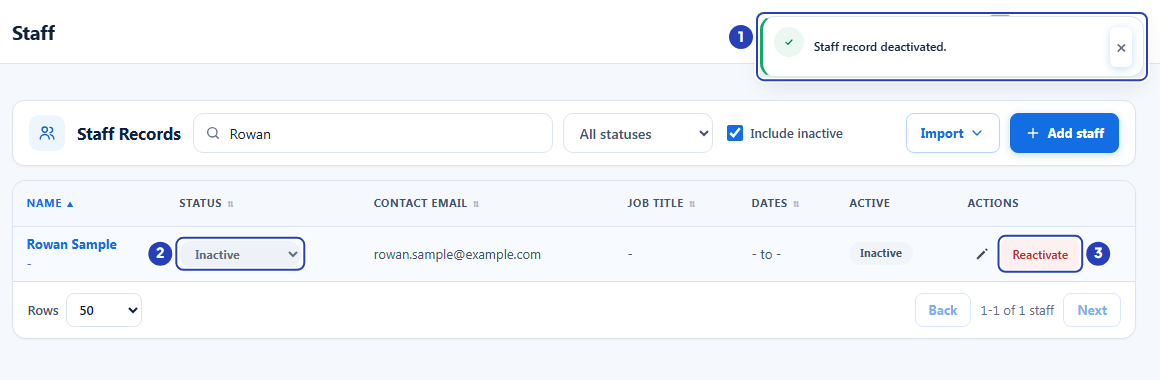
The confirmation message (1) and the person's row now showing Inactive (2) with a Reactivate button (3). -
Give access back to a returning staff member
On the Staff Records list, tick Include inactive, find the person and choose Reactivate. A window headed Reactivate followed by the person's name opens. It says that making a staff member inactive automatically disables their login, and asks you to choose whether to restore it now.
1 Leave Restore login access ticked to switch the login back on. It is ticked when BondiByte can see the login was switched off by making the person inactive, and a line says so. Untick it to reactivate the person but leave the login off.
2 Choose Reactivate staff. A message confirms Staff record reactivated. Choose Cancel instead to close the window without changes.
Reactivating does not send new login details. If the person has forgotten their password, choose Resend login details on their Login access tab.
Fields in step 12 Field What it means Restore login access Tick box, ticked to start with when the login was switched off by making the person inactive. Only an Owner or Admin can change it. If BondiByte cannot tell why the login is off, the box starts unticked and the line says to leave it unticked unless you are sure. If the person has no login, or it is already on, the window says there is nothing to restore. 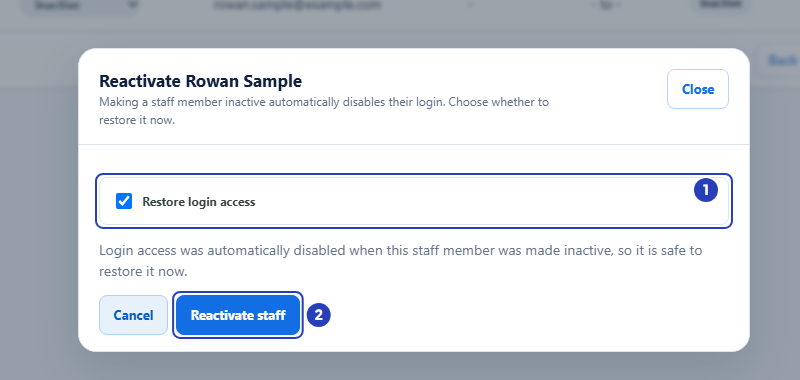
Leave Restore login access ticked (1), then choose Reactivate staff (2).
What happens next
The person signs in to the Staff App with their email and password, and sees their shifts, timesheets and tasks. You can check progress on their Login access tab. Invite sent changes to Password set once they have chosen a password.
If the person was Staged, their first completed login setup makes their record Active, and they can be rostered. See Assign staff to a shift.
Login details are emailed only when you choose Send login details or Resend login details, Send invitations in Bulk invite, or Create and send invitation in the Add staff window. Creating a staff member with Send staff setup email off does not send anything.
Important notes
Important: Login details go to the Staff contact email on the person's record, shown as Sent to under the button. The setup link works once and for 12 hours. A reset link, for a person who already has a password, lasts only 10 minutes. Check the email address before you send, and ask the person to open the email the same day.
Tip: Staff sign in to the Staff App on their phone, not in a web browser. Make sure each person has installed BondiByte Staff before you send their login details.
Good practice
- Check Sent to before you send. The details go only to that address, and a wrong email is the most common reason a person says nothing arrived.
- Tell the person before you send, so they have the Staff App installed and can open the email within the 12 hours the setup link lasts.
- Prefer Send login details to Set password. With the emailed link the person chooses their own password, and you never handle it. Use Set password only when the emailed link is not possible, and share the password privately.
- Check the person's login a day later. If the Login access tab still says Invite sent, the link has probably expired, so resend login details. If your organisation shows Single sign-on available instead, look at Invite status and Last login details sent on that tab.
- Use Bulk invite for people you have imported, and invite them in batches you can follow up. Use Search eligible staff to pick one site's team at a time.
- Tell people who work for two organisations with the same email about the Company code, so they can choose the right organisation in the Staff App.
- Deactivate people as soon as they leave. It switches their login off and ends their staff contracts, and move or reassign their upcoming shifts first.
Troubleshooting
I cannot see the Login access tab.
Why it happens: Only Owners and Admins see it.
What to do: Ask an Owner or Admin to send the login details, or to check your role.
Send login details is greyed out and the note under it says Add a staff email address before sending login details.
Why it happens: The staff record has no Staff contact email.
What to do: Choose Edit staff at the top of the record, type the email address, save, and return to the Login access tab.
The button is greyed out and the note under it says Staff member is inactive.
Why it happens: The person's record is Inactive or Terminated.
What to do: Reactivate the person from the Staff Records list (see step 12), then send login details.
The button reads Available again in a number of minutes and the note says Login details were sent moments ago. You can resend in a couple of minutes.
Why it happens: Login details were sent very recently.
What to do: Wait for the button to read Resend login details, then send again if needed.
The button is greyed out and the note under it says A bulk invitation is already in progress for this staff member.
Why it happens: The person is part of a Bulk invite that has not finished.
What to do: Wait for the Bulk invite to finish, then check the person's Login access tab.
The button is greyed out and the note under it says This staff member signs in with single sign-on, so password login details are not sent.
Why it happens: Your organisation requires staff to sign in with Microsoft single sign-on, so no password setup email is sent.
What to do: Ask an Owner or Admin about your organisation's sign-in settings in Configuration > Login, SSO & User Sync.
A message says Staff login details were not sent. Check the organisation's email settings.
Why it happens: The email could not be sent for your organisation.
What to do: Open Configuration > Email and check the settings. If it keeps happening, contact BondiByte support.
The staff member says the setup page says Setup link needs attention or that the link has expired.
Why it happens: The setup link works once and for 12 hours only (a reset link for 10 minutes), or a newer email has replaced it.
What to do: Choose Resend login details on the Login access tab, and ask the person to use the newest email straight away.
The staff member sees Incorrect email or password. Please try again. in the Staff App.
Why it happens: They typed the wrong email or password, or they have not yet set a password.
What to do: Check that they use the login email shown in the heading of the Login access card, or the name after Signs in as in the line under it. If they forgot their password, ask them to choose Forgot password? on the sign-in screen. If they never set one, resend login details.
The staff member sees Your linked staff profile is inactive. Contact your organisation admin.
Why it happens: Their record is Inactive or Terminated, or their login is switched off.
What to do: Reactivate them from the Staff Records list with Restore login access ticked (see step 12).
The staff member sees Your linked staff profile is staged. Ask your organisation admin to activate it before using the staff portal.
Why it happens: Their record is still Staged. This happens when a password is set for them before they finish the emailed setup.
What to do: Choose Active in the Status drop-down on their row in Staff Records, or ask them to finish the emailed setup, which activates them.
The Staff App says Staff portal access not available.
Why it happens: The person's login does not have the Staff role or is not linked to their staff record.
What to do: Open their Login access tab and check that Roles shows Staff. If it does not, choose Send login details or Resend login details.
The Staff App says Too many attempts. Please wait a moment and try again.
Why it happens: Too many sign-in attempts in a short time.
What to do: Ask the person to wait a few minutes and try again, carefully.
I cannot see Bulk invite on the Staff Records list.
Why it happens: There is no one eligible, or you do not have the Can manage staff login access permission.
What to do: Bulk invite lists only Staged people who have never been sent login details. For anyone else, use Send login details on their own record.