

Who this is for
This guide is written for Owner, Admin, Manager and Coordinator.
Before you begin
- You are signed in to BondiByte on a computer. See Sign in to BondiByte.
- You have the client's first name and last name. Their email address is optional. Everything else is added later.
- If the client will live at, or be supported through, one of your houses or locations, that site already exists and your role can see the site list (a Coordinator cannot; see step 7). See Create a site.
Steps
The screenshots show a demonstration organisation with made-up names. Your own screens show your organisation's details. Select a screenshot to open it full size.
-
Go to Clients > Add client
1 In the left menu, under Operations, choose Clients. The Client Records list opens.
2 At the top right of the list, choose Add client. The Add client window opens. It says Create the client record now. You can complete their profile later.
The list shows each client's name, status, NDIS number, contact details, date of birth and whether they are active.
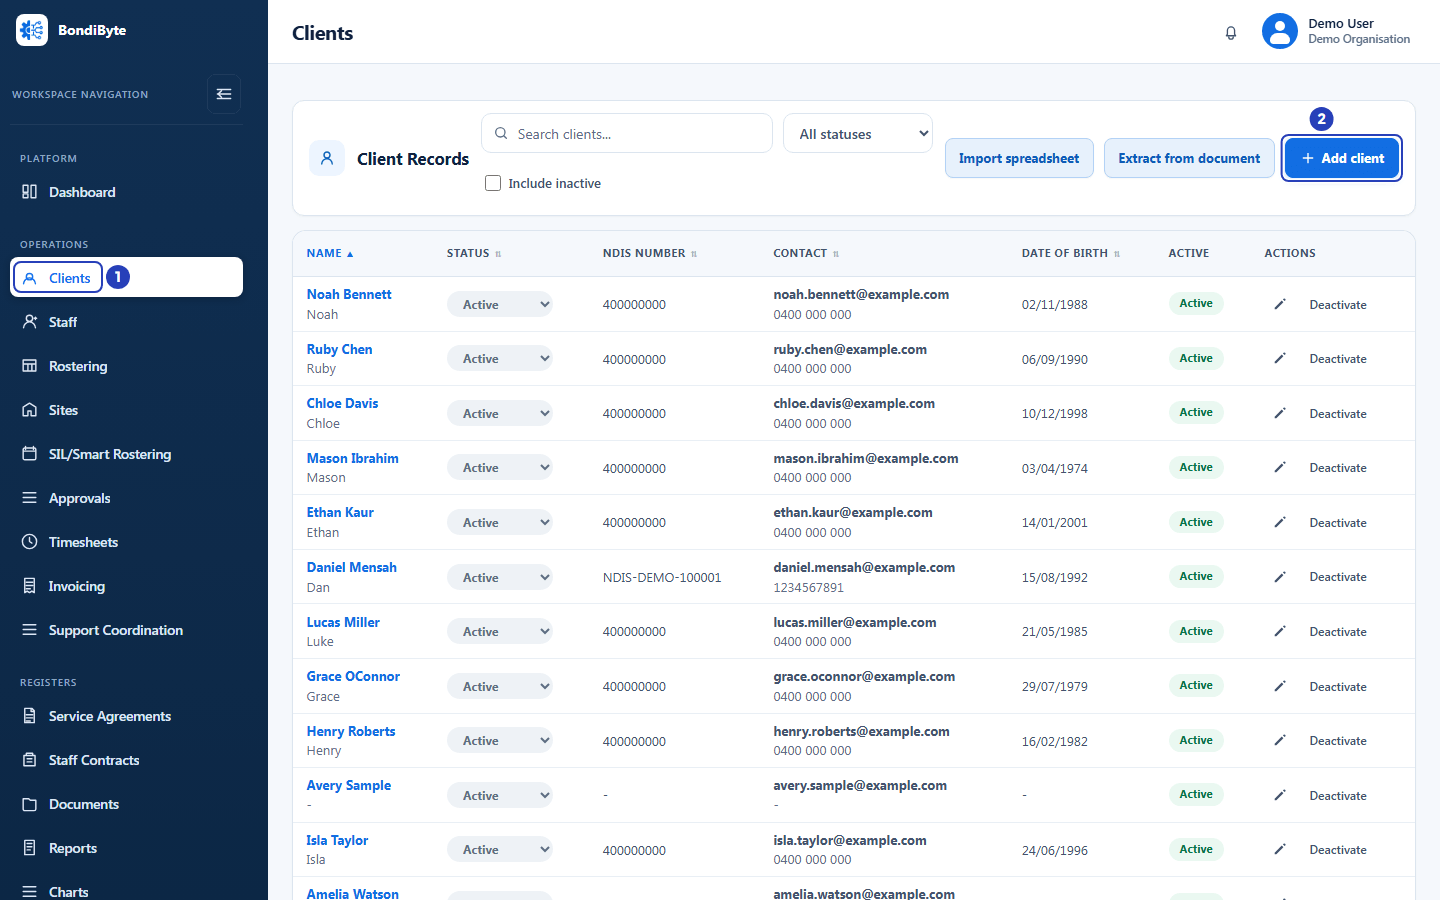
Choose Clients in the left menu (1), then Add client (2). -
Enter the essentials
Fields marked * are required.
1 In First name, type the client's first name.
2 In Last name, type their last name.
3 In Email, type the client's email address if you have it. It is optional.
Fields in step 2 Field What it means First name Required. Last name Required. First and last name are shown in Client Records and wherever the client is chosen. Email Optional. It must look like an email address. Site Shown only if your own access is limited to certain sites. Choose one of your sites. If you have just one site, it is filled in for you and the window says The new client is added to your site. Tip: The NDIS number, address, site, representative and the rest are added later with Edit client (steps 4 to 11).
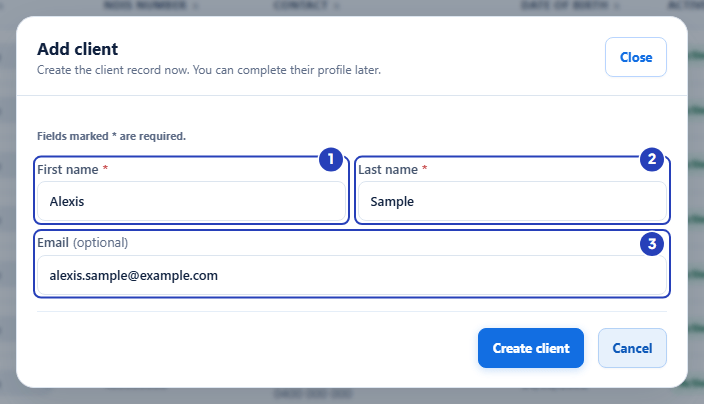
Type the first name (1) and last name (2), and the email address if you have it (3). -
Choose Create client and check the new client
1 Choose Create client. Choose Cancel instead to close the window without saving.
2 A message confirms Client record created. The window closes and the new client appears in Client Records as Active.
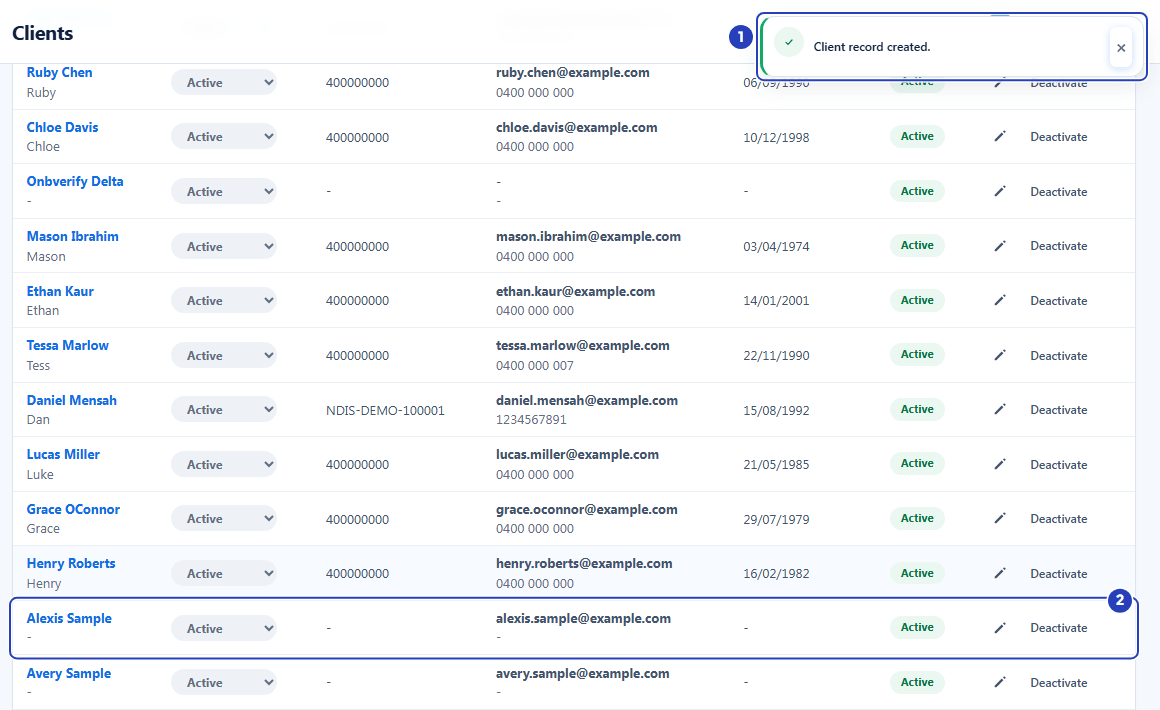
The confirmation message (1) and the new client in the list (2). -
Complete the profile with Edit client
Add the rest of the client's details when you have them. The Edit client window has six sections: Basic Details, Contact Details, Address Details, Guardian / Representative, Emergency Contact and Plan / Support Contacts. Scroll down the window to reach each one. Only First name and Last name are required.
On the client's row in Client Records, choose the pencil icon. The Edit client window opens on Basic Details.
1 In Preferred name, type the name the client goes by, if it is different.
2 In Date of birth, choose or type the date.
3 In Gender, choose from the list if you want to record it.
4 In NDIS number, type the client's NDIS number if you have it.
5 In Internal client reference, type your own file or reference number, if you use one.
6 Check Status. A new client is Active.
7 In Profile photo, choose a photo from your device if you have one. A Preview shows it before you save.
Fields in step 4 Field What it means Preferred name Optional. Shown under the name in the Client Records list. Date of birth Optional. Shown in the Date of birth column. Gender Optional. Choose Female, Male, Non-binary, Prefer not to say or Other. NDIS number Optional. Nine or ten digits. Spaces and hyphens are allowed and are removed when you save. Two clients in your organisation cannot have the same NDIS number. Shown in the NDIS number column. Internal client reference Optional. Your own reference for the client. Status Active, Inactive, On Hold or Exited. Active and On Hold clients count as active. Inactive and Exited clients are hidden from the list until you tick Include inactive, and are not linked to a site when you save. Profile photo Optional. A JPG, PNG or WebP image from your device. It is saved with the client's profile when you choose Update client. 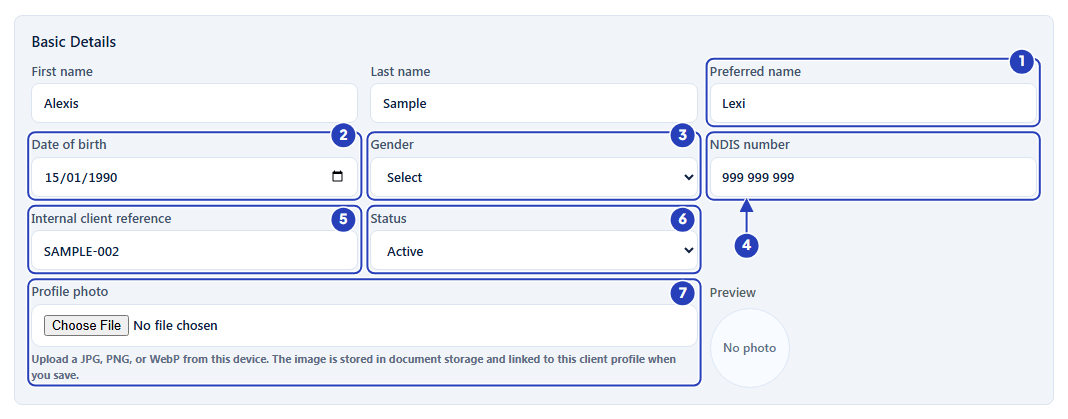
Type the preferred name (1), date of birth (2), gender (3), NDIS number (4) and internal reference (5), check the status (6) and choose a photo (7). -
Add contact details
The Contact Details section is next.
1 Check Email. It shows the email you typed in Add client, if any.
2 In Phone, type a landline number if they have one.
3 In Mobile, type their mobile number.
4 In Preferred contact method, choose how the client likes to be contacted.
5 In Preferred contact time, type when to contact them, for example
Weekdays only.6 Tick Can contact directly if your team may contact the client themselves, rather than only through someone else.
7 In Communication notes, add anything staff should know when they contact the client.
Fields in step 5 Field What it means Email Optional. It must look like an email address. Phone Optional. Shown under the email address in the Contact column. Mobile Optional. Preferred contact method Optional. Choose Phone, Mobile, Email, Guardian / Representative or Support Coordinator. Preferred contact time Optional. Free text, such as MorningorAfter 5pm.Can contact directly Tick box, not ticked to start with. It shows on the client's record as Can be contacted directly. Communication notes Optional. Free text. 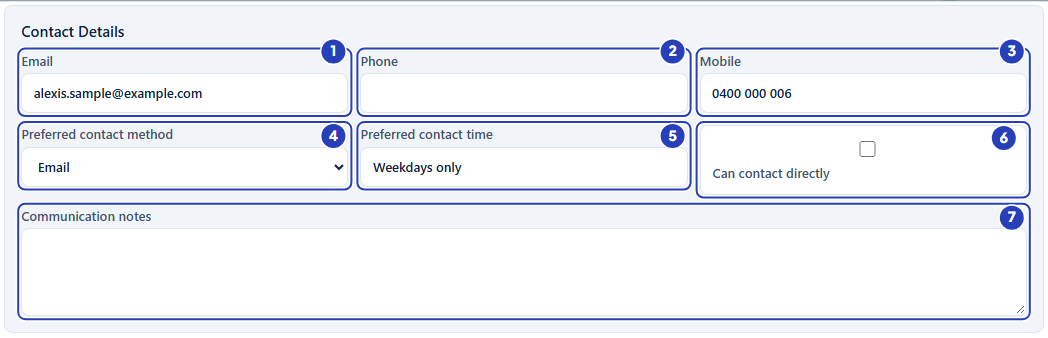
Check the email (1), type the phone (2) and mobile (3), choose the contact method (4) and time (5), tick Can contact directly if it applies (6) and add notes (7). -
Enter the client's address
The first part of the Address Details section holds the client's home address and where their support is delivered.
1 In Residential address line 1, start typing an Australian address and choose a suggestion from the list that appears. The address fields below fill in for you. You can also type the address yourself.
2 In Residential address line 2, type a unit or level if there is one.
3 In Suburb, check or type the suburb.
4 In State, choose the state or territory.
5 In Postcode, check or type the postcode.
6 In Country, choose Australia or Other. It starts as Not set.
7 In Service delivery address, search for or type the address where support is delivered, if it is different from the home address. Choosing a suggestion fills in the full address.
Fields in step 6 Field What it means Residential address line 1 Optional. Start typing and choose a suggestion to fill the suburb, state and postcode too. Residential address line 2 Optional. A unit, level or building name. Suburb Optional. State Optional. Choose ACT, NSW, NT, QLD, SA, TAS, VIC or WA. Postcode Optional. Country Not set to start with. Choose Australia or Other. Service delivery address Optional. Where staff deliver support, if not at the home address. Saved as one line of text. 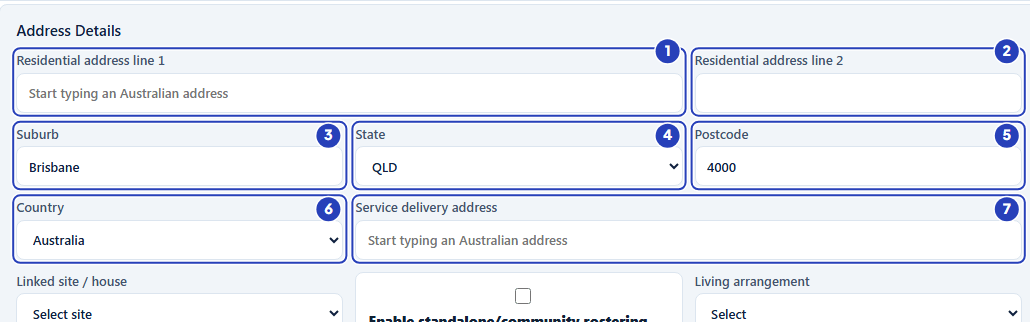
Search for or type the home address (1), then the second line (2), suburb (3), state (4), postcode (5) and country (6), and the service delivery address (7). -
Link the client to a site
Next, in the same Address Details section, choose where the client is supported. There are two choices and you can only use one of them. This step covers a client who lives at, or is supported through, one of your sites. Step 8 covers a client with no site. If you use neither, the client is not attached to a site and is scheduled on the Rostering screen.
1 In Linked site / house, choose the site. The list shows your active sites by name and site code. Select site means no site.
2 In Living arrangement, choose how the client lives, if you want to record it.
Once you choose a site, Enable standalone/community rostering is greyed out. Pointing at it explains that clients assigned to a site are rostered through that site.
Fields in step 7 Field What it means Linked site / house Optional. Choose one of your active sites. A line under the list says community rostering sites are not selectable here. When you save an Active client with a site chosen, BondiByte also adds the client to that site's Clients tab as a Primary residence, starting today. Living arrangement Optional. Choose Lives alone, With family, With partner, Supported Independent Living, Group home, Temporary accommodation or Other. Note: A Coordinator cannot see the site list, so Linked site / house shows only Select site. Save the client without a site, then ask a Manager, Admin or Owner to link the site, or use community rostering (step 8).
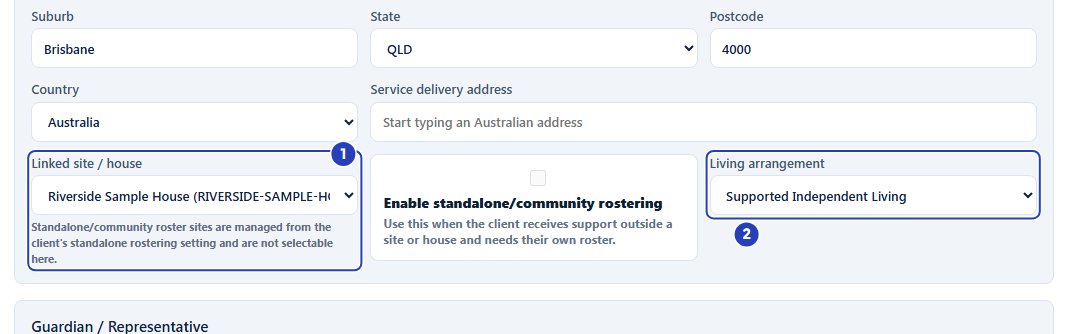
Choose the site in Linked site / house (1) and the living arrangement (2). The community rostering tick box is now greyed out. -
Or choose community rostering for a client with no site
Do this step instead of step 7, only for a client who is supported outside a house or site and needs their own roster.
1 Tick Enable standalone/community rostering.
2 Check Linked site / house. It clears and is greyed out, and a line under it says A community access site will be created using this client's name.
To go back, untick the box. The site list becomes available again.
Fields in step 8 Field What it means Enable standalone/community rostering Tick box, not ticked to start with. When you save an Active client with this ticked, BondiByte creates a Community Access site named after the client, and the client is rostered through it. You cannot link a site and tick this at the same time. Note: A community client has no real site. They are scheduled in SIL/Smart Rostering: choose the client's name in the Select Site/Client list. A client with no site and no community rostering shows on the Rostering screen instead.
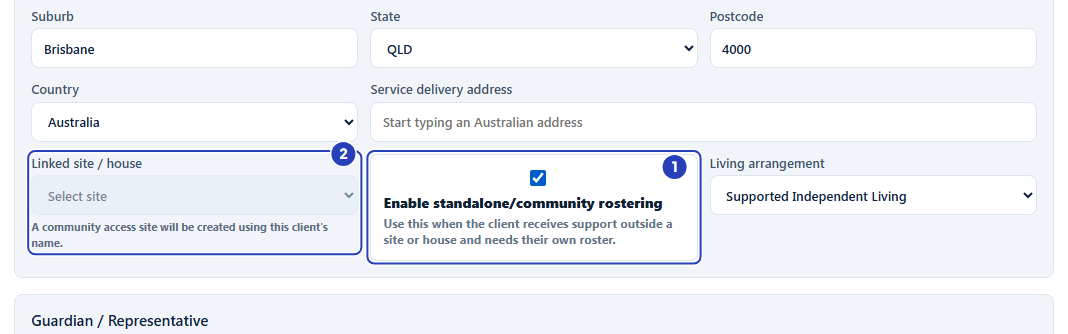
Tick Enable standalone/community rostering (1). The site list (2) clears and a line explains that a community access site will be created. -
Add a guardian or representative
The Guardian / Representative section records a person who acts for the client. Skip it if the client acts for themselves.
1 Tick Has guardian / representative.
2 In Representative type, choose the person's role.
3 In Representative full name, type their name.
4 In the next row, type Relationship to client (how they are related to the client), Representative phone and Representative email.
5 In Representative address, type their address. The address box works like the other address boxes.
6 In the first row of tick boxes, tick each thing the representative is allowed to do: Can sign service agreement, Can make service decisions and Can receive client information.
7 In the last row, tick Can receive invoices if the representative receives invoices, Consent to contact representative if the client has agreed that your team may contact them, and Primary representative if this is the main contact.
Add anything else in Representative notes, at the bottom of the section.
Fields in step 9 Field What it means Has guardian / representative Tick box, not ticked to start with. Representative type Optional. Choose Guardian, Plan Nominee, Correspondence Nominee, Parent, Family Member, Carer, Power of Attorney, Support Coordinator, Advocate or Other. Representative full name, relationship, phone, email and address Optional. Free text, except that the email must look like an email address. The address box works like the other address boxes and is saved as one line of text. Can sign service agreement, Can make service decisions, Can receive client information and Can receive invoices Tick boxes, not ticked to start with. They record what the representative is allowed to do. Consent to contact representative and Primary representative Tick boxes, not ticked to start with. Representative notes Optional. Free text. 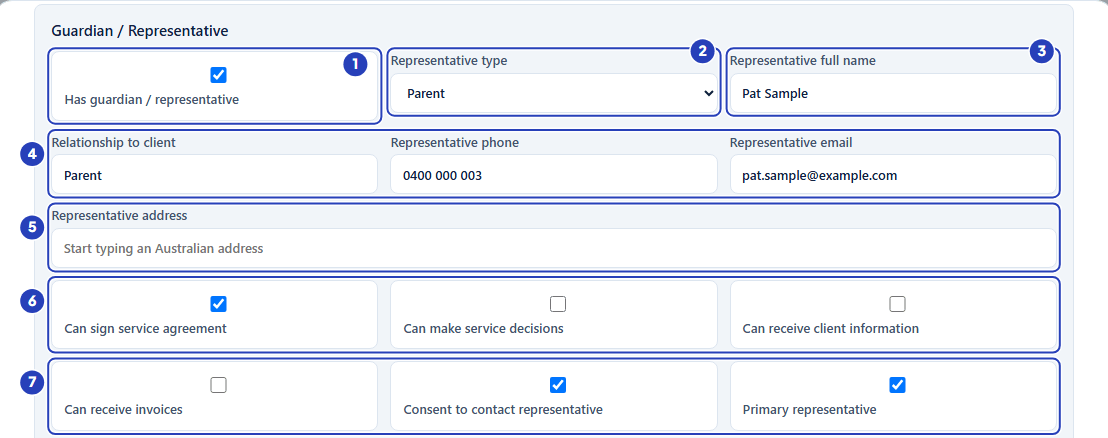
Tick Has guardian / representative (1), choose the type (2), type the name (3), the relationship, phone and email (4) and the address (5), then tick what they may do (6) and the consent and primary options (7). -
Add an emergency contact
1 In Emergency contact name, type the person to call in an emergency.
2 In Emergency contact relationship, say how they are related, for example
Friend.3 In Emergency contact phone, type their phone number.
4 In Emergency contact email, type their email address, if you have it.
5 Tick Can contact after hours if they can be called outside business hours.
6 In Emergency contact notes, add anything others should know when they call.
Fields in step 10 Field What it means Emergency contact name Optional. Emergency contact relationship Optional. Free text. Emergency contact phone Optional. Emergency contact email Optional. It must look like an email address. Can contact after hours Tick box, not ticked to start with. Emergency contact notes Optional. Free text. 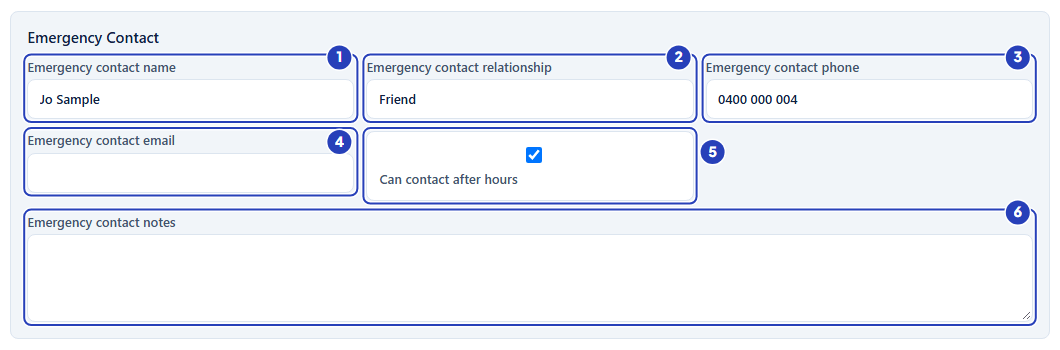
Type the emergency contact's name (1), relationship (2), phone (3) and email (4), tick Can contact after hours (5) and add notes (6). -
Add plan and support contacts, then save
The last section, Plan / Support Contacts, records who manages the client's NDIS plan and who supports them.
1 In Plan management type, choose how the plan is managed.
2 Fill in the plan manager's details, starting with Plan manager name: also Plan manager organisation, Plan manager email and Plan manager phone.
3 Fill in the support coordinator's details, starting with Support coordinator name: also Support coordinator organisation, Support coordinator email and Support coordinator phone.
4 Fill in Local Area Coordinator name and Local Area Coordinator email, if the client has a Local Area Coordinator.
5 In NDIS plan document, type a link or reference for the client's plan document.
6 Choose Update client. The buttons at the bottom of the window stay in view as you scroll. A message confirms Client record updated. Choose Cancel instead to close the window without saving.
Fields in step 11 Field What it means Plan management type Optional. Choose Self Managed, NDIA Managed or Plan Managed. It is used on the Invoicing screen when you prepare an invoice for the client. Plan manager name, organisation, email and phone Optional. Recorded on the client's record. The Invoicing screen shows these details as the billing contact until billing details are saved. To send an invoice, also enter a billing email on the client's Billing Details tab. Support coordinator name, organisation, email and phone Optional. Recorded on the client's record. Local Area Coordinator name and email Optional. Recorded on the client's record. NDIS plan document Optional. Free text, such as a link or a reference. It is not an upload. 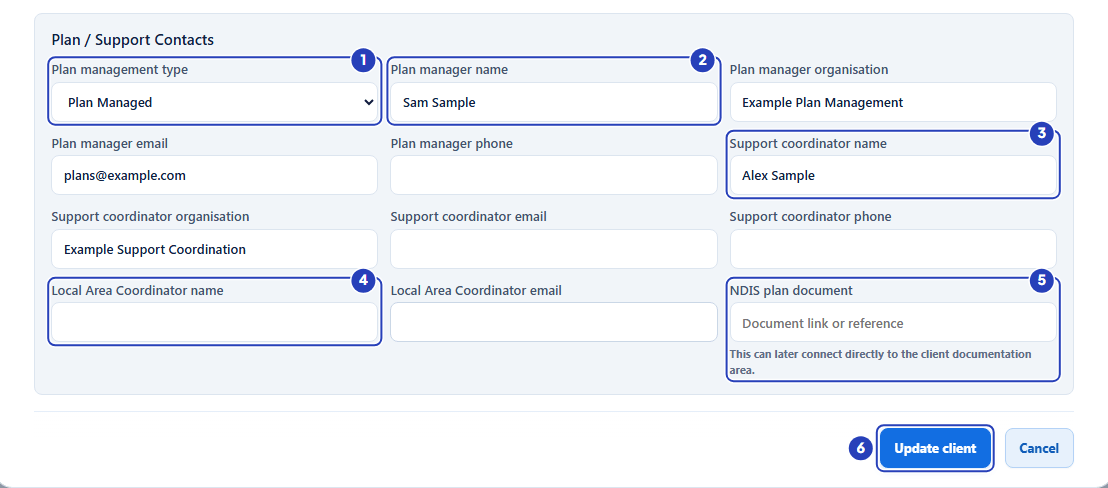
Choose the plan management type (1), fill in the plan manager (2), support coordinator (3), Local Area Coordinator (4) and plan document (5) details, then choose Update client (6). -
Find, update or deactivate a client from the list
Use the controls on the Client Records list to look after the clients you have created.
1 Type in Search clients... to narrow the list.
2 Use the Status filter to show one status only. It starts on All statuses.
3 Tick Include inactive to show Inactive and Exited clients as well. They are hidden until you tick it.
4 In the Status column, choose a different status from the drop-down on a row. The change is saved straight away and a message confirms Client status updated.
5 Choose the pencil icon in the Actions column to open the Edit client window, as in step 4.
6 Choose Deactivate to make the client inactive. It happens straight away, without asking you to confirm, and a message confirms Client record deactivated. The button then becomes Reactivate (visible when Include inactive is ticked); choose it to return the client to Active.
Warning: Making a client inactive, by Deactivate or by choosing Inactive or Exited, also makes their active Service Agreements inactive automatically. Reactivating the client does not switch those agreements back on, so check them on the client's Service Agreements tab.
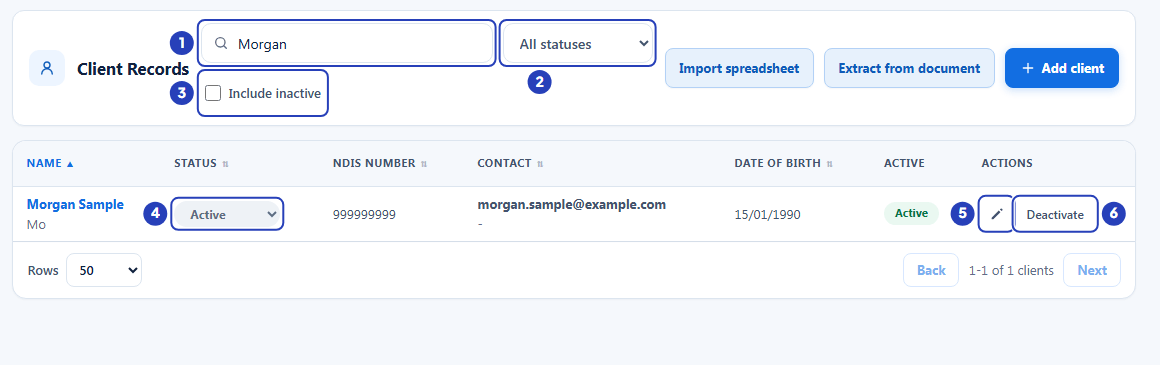
Search (1), filter by status (2), show inactive clients (3), change the status (4), edit (5) or deactivate (6) a client.
What happens next
The client appears in Client Records. Choose their name to open their record. Its tabs are Overview, Billing Details, Service Agreements, Documentation, Reports, Charts, Sites, History, Imported history and Intelligence. You see only the tabs your role allows.
The Overview is kept short. Until the profile is complete, it shows a Complete the profile card that names what is still missing, with a Complete profile button. Under At a glance, each line, such as Service agreement or Site and rostering, links to the tab where you manage it.
If you linked a site and the client is Active, they are already on that site's Clients tab. If you chose community rostering, a Community Access site named after the client now exists in the Sites list, and you schedule them in SIL/Smart Rostering by choosing their name in Select Site/Client.
A new client has no Service Agreement yet. Add one from the client's Service Agreements tab when you are ready.
Important notes
Important: Only First name and Last name are required. Add the rest when you have it, using the pencil icon on the list, or Edit client or Complete profile on the client's record.
Tip: To bring in many clients at once, use Import spreadsheet or Extract from document above the list instead of adding them one by one. They appear only if your role allows imports.
Good practice
- Search Client Records, with Include inactive ticked, before you add a client. A client who left and has come back may already have a record, and Reactivate returns them to Active without creating a second one.
- Enter the NDIS number whenever you have it. BondiByte stops two clients with the same NDIS number, which helps you catch a duplicate, but it can only do that when the number is filled in.
- Decide how the client will be rostered when you complete the profile. A client is either linked to a site or set up for community rostering, never both, and a client with a site must have that site assignment removed before community rostering can be turned on.
- Keep the client Active if you want them linked to the site straight away. A client saved as Inactive or Exited keeps the chosen site on the form but is not added to the site's Clients tab.
- Fill in the Guardian / Representative section at intake, and tick only what the person is actually authorised to do. The ticks show on the client's record, and your team will rely on them.
- Record the Emergency contact and the Plan / Support Contacts while you have the client's paperwork in front of you, so staff and your finance team can find them in one place.
- Keep Status up to date. Use On Hold for a pause, and Inactive or Exited only when support has ended, because both make the client's active Service Agreements inactive.
Troubleshooting
I cannot see Add client.
Why it happens: Your role does not include the Can create clients permission.
What to do: Ask an Owner or Admin to check your role, or to add the client for you.
A message under Site says Choose one of your sites for this record.
Why it happens: Your access is limited to certain sites, and a client must be created at one of them.
What to do: Choose a site in Site, then choose Create client again.
A message says Please check the information you entered and try again. when I choose Update client.
Why it happens: A value is not accepted. The most common cause is an NDIS number that is not nine or ten digits.
What to do: Check NDIS number (digits only, with or without spaces or hyphens) and any email address you typed, then choose Update client again.
A message says a client record with this NDIS number already exists.
Why it happens: Another client in your organisation already has that NDIS number.
What to do: Search Client Records, with Include inactive ticked, for the existing record. If it is the same person, use Reactivate or Edit client on the existing record. If you typed the number wrongly, correct it.
The site I need is not in the Linked site / house list in Edit client.
Why it happens: The list shows active sites only, and sites made for community rostering are never in it.
What to do: Check the site in Sites with Include inactive ticked. Reactivate it, or create it first. See Create a site.
Linked site / house or Enable standalone/community rostering is greyed out.
Why it happens: The two choices exclude each other. A site is chosen, so community rostering is off, or community rostering is ticked, so the site list is off.
What to do: To use the other choice, clear the one you have. Choose Select site in the list to clear a site, or untick the community rostering box.
A message about a profile photo appears after I choose Update client.
Why it happens: The photo is saved after the client's details, so the details may already be saved even though the window stays open.
What to do: Close the window, search Client Records for the client and add the photo again with the pencil icon. Use a JPG, PNG or WebP image.