

Who this is for
This guide is written for Owner and Admin.
Before you begin
- You are signed in to BondiByte on a computer.
- The Chart template is published. A new or cloned template needs to be activated first. See Create an organisation Chart template and Clone a built-in Chart template.
- The client already exists in BondiByte.
Steps
The screenshots show a demonstration organisation with made-up names. Your own screens show your organisation's details. Select a screenshot to open it full size.
-
Go to Clients > the client's record
1 In the left menu, choose Clients. The Client Records list opens.
2 Choose the name of the client you want to give the Chart to. Their record opens.
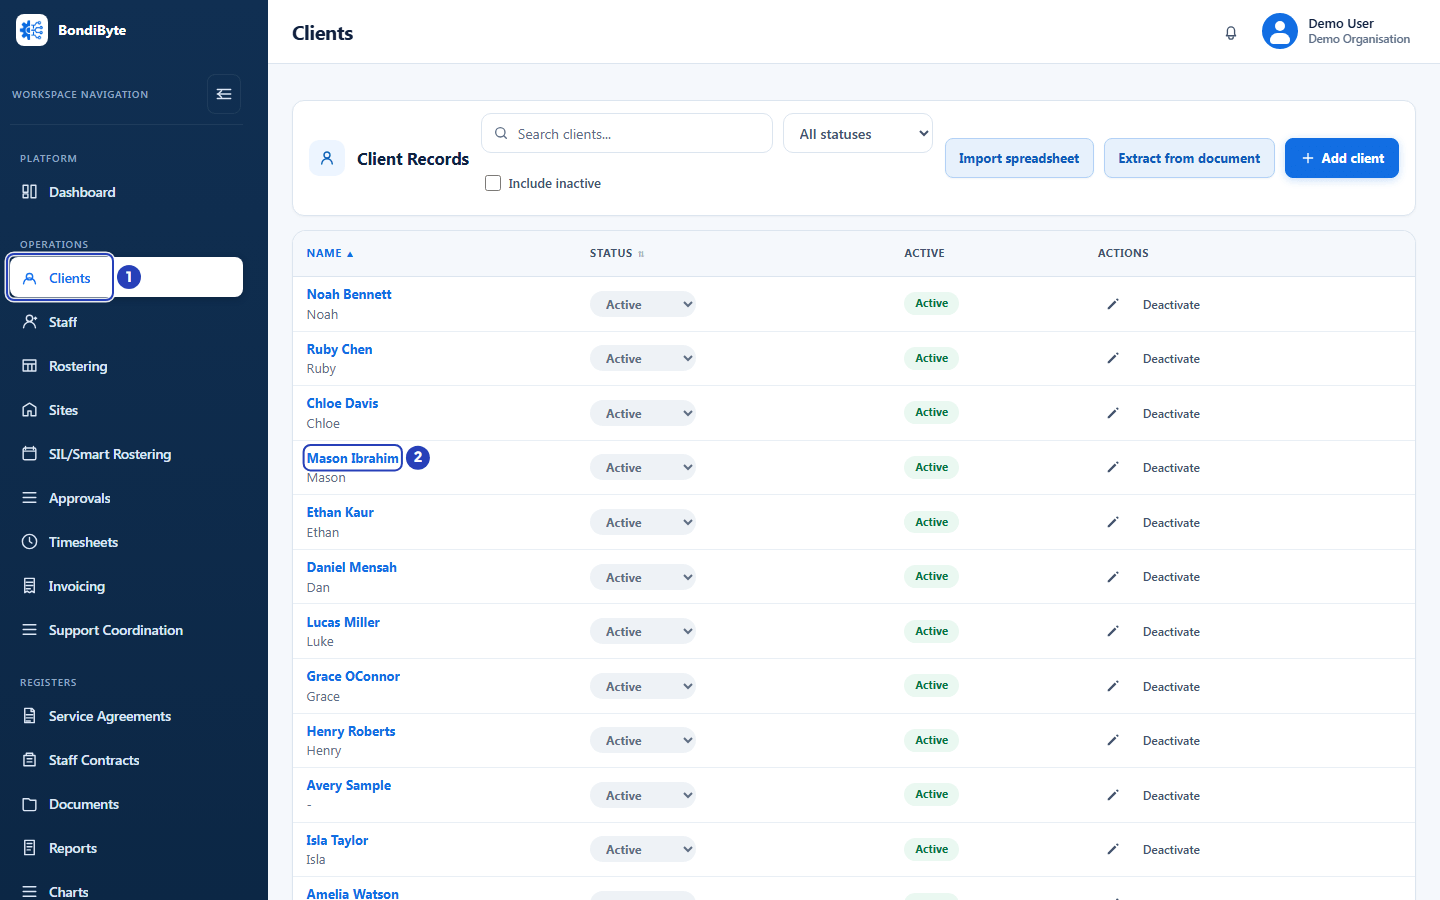
Choose Clients in the left menu (1), then the client's name (2). -
Open the Charts tab
1 On the client's record, choose the Charts tab. The Client Chart setup section lists the Charts assigned to this client.
2 Choose + Add chart. The Add chart window opens.
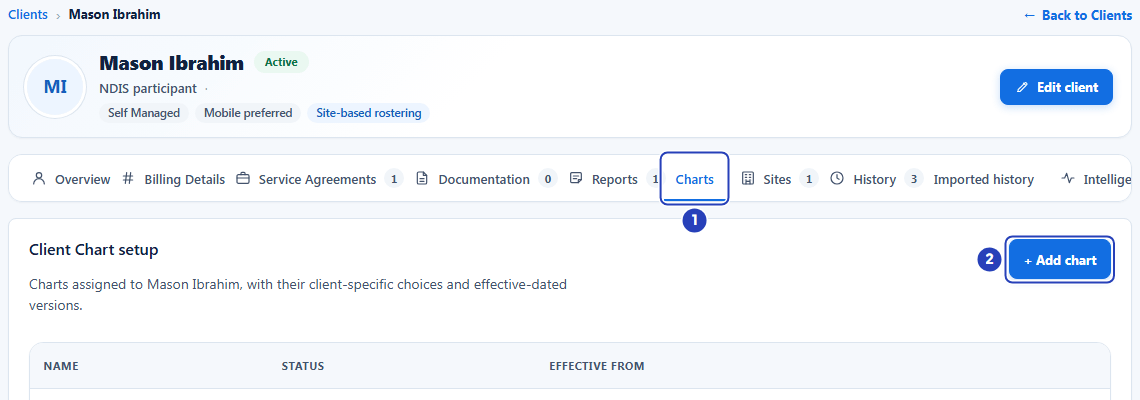
Choose the Charts tab (1), then + Add chart (2). -
Choose the Chart template
1 In Chart template, choose the Chart. Only templates with the status Published are listed.
2 Choose Continue. Choose Cancel instead to close the window without assigning anything.
Fields in step 3 Field What it means Chart template Required. A list that starts on Select a chart template. It lists only the Chart templates in your organisation with the status Published, so a Draft or Archived template is not listed. If there are none, the window says No published chart templates yet and links to the Chart Library. You cannot continue until you choose one. Note: Built-in templates are not listed. A built-in template has to be cloned and activated before it can be assigned. See Clone a built-in Chart template.
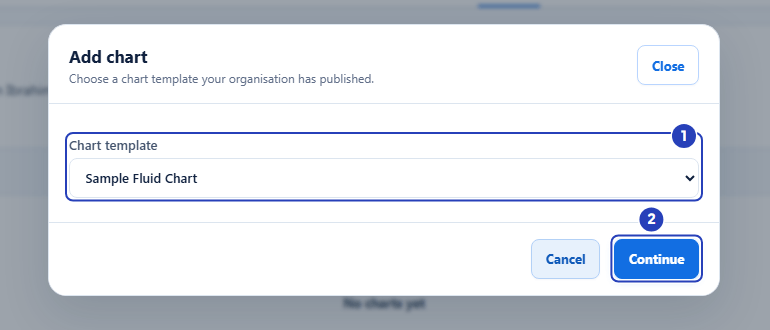
Choose the Chart template (1), then Continue (2). -
Configure the Chart for this client
The Configure chart for this client window opens.
1 In Chart name, keep the template's name or type a name for this client's Chart.
2 For each choice field, such as Drink, choose + Add option and type an option this client needs. Add at least one option for each choice before you activate the Chart. Use the arrow buttons to change the order and Remove to delete an option.
3 Leave Activate now unticked to save the Chart as a Draft, or tick it to make the Chart active straight away. Staff can only record entries once the Chart is active.
4 Leave Show on the staff app ticked to turn on the template's Staff App switch, or untick it to leave the switch off. This box appears only while the switch is off.
5 Choose Add chart.
Fields in step 4 Field What it means Chart name Required. It starts as the template's name. It is the name shown for this client's Chart in Client Chart setup, and the name staff see in the Charts list on the Staff App. You can change it later with Edit configuration. If the box is empty, a message says Enter a name for this chart. Options for each client-specific choice, for example Drink One block for each Single choice or Multiple choice field whose choices are set for each client. The block is headed with the field's label and marked Options for this client only. Choose + Add option and type the option. Until you type, the box shows Option 1, Option 2 and so on. Use the up and down buttons to change the order, and Remove to delete an option. An empty list shows No options yet. Add at least one before activating this chart. Every option needs text, otherwise a message says Give every option a label before saving and names the choice. If the template has no client-specific choices, the window says This chart has no client-specific choices to configure. Activate now Optional tick box, unticked to start with, with the note Staff can only record entries once this chart is active. Unticked, the Chart is saved as a Draft. Ticked, the Chart is added and activated in one go, which needs at least one option in each client-specific list. Otherwise a message says This chart cannot be activated yet and names the choices that need options. Show on the Staff App Optional tick box labelled Show on the staff app, ticked to start with. It appears, under the note This chart is not shown on the staff app yet., only while the template's Staff mobile app switch is off. Ticked, it turns that switch on when you choose Add chart. The switch belongs to the template, not to one client. Unticked, the switch stays off. Staff still see the Chart only for clients it is assigned to, once it is active. If you do not have permission to manage Chart templates, the box is replaced by the note to ask someone who can manage charts to turn on Show on staff mobile app in the Chart Library. If the switch is already on, neither the note nor the box appears. Important: The options are saved with this client's Chart, not with the template. Another client given the same template starts with an empty list and sets their own.
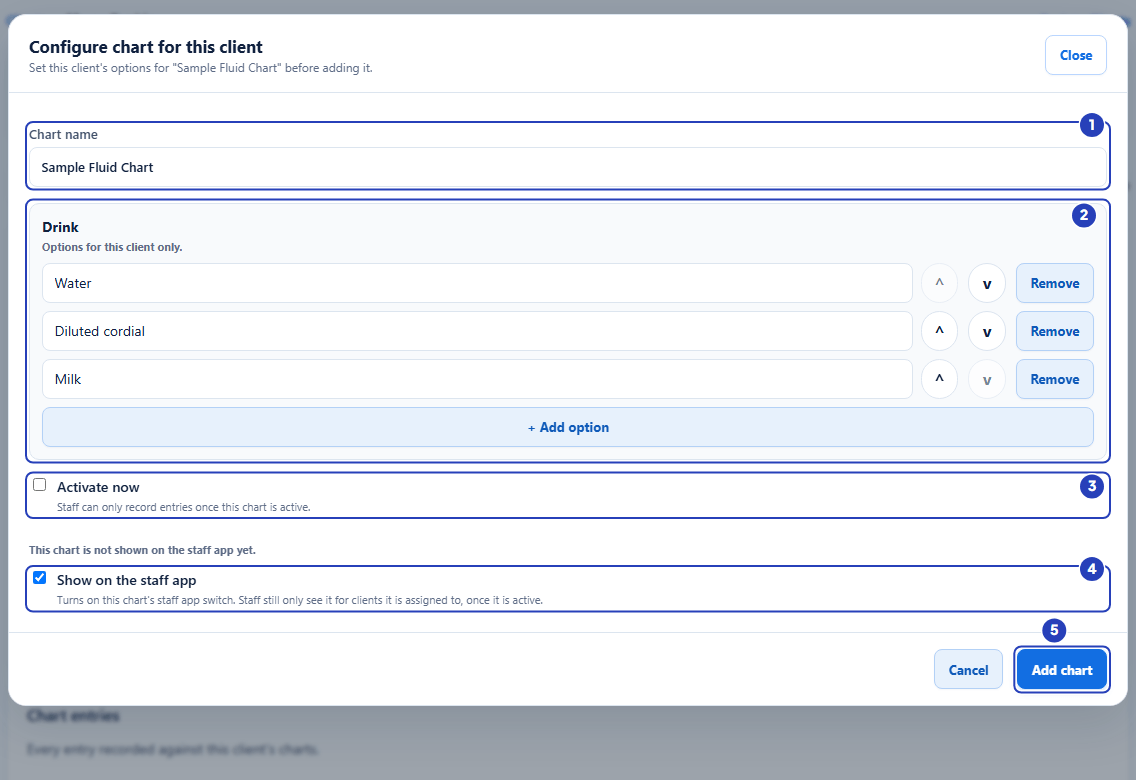
Check the chart name (1), add this client's options (2), choose whether to activate now (3) and whether to show the Chart on the Staff App (4), then choose Add chart (5). -
Check the new Chart in Client Chart setup
1 A message confirms that the Chart was added as a draft. If you ticked Activate now, the message says it was added and activated instead, and adds that it is available on the Staff App for this client when the template's switch is on.
2 The Chart appears in Client Chart setup. Its Status is Draft, and Effective from shows today's date and version 1.
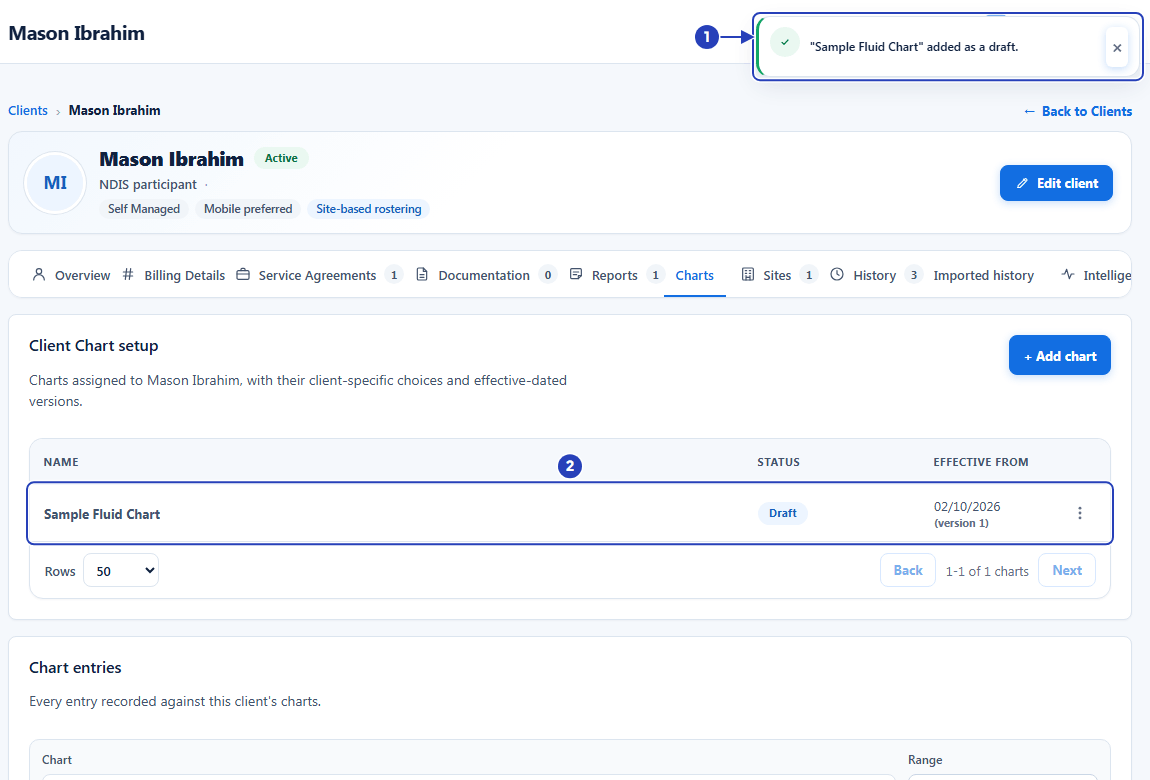
The confirmation message (1) and the new Chart in the list, shown as a Draft (2). -
Activate the Chart if you left Activate now unticked
1 On the Chart's row, choose the actions button (three dots).
2 Choose Activate.
Note: If the template's Staff App switch is still off, a window asks Activate this chart? and offers Show on the staff app, ticked to start with. Leave it ticked and choose Activate to turn the switch on as well. Untick it to activate the Chart and leave the switch off. Choose Cancel to close the window without activating.
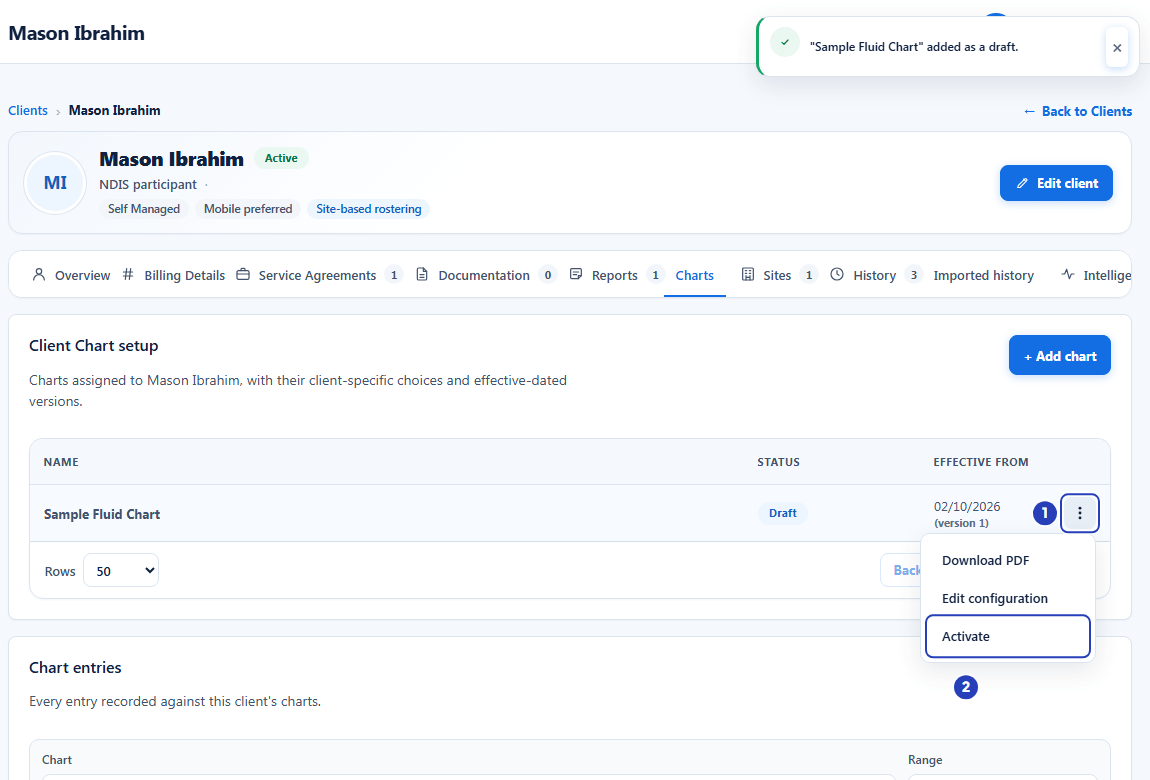
Choose the actions button on the row (1), then Activate (2). -
Check that the Chart is Active
1 A message confirms that the Chart was activated and is available on the Staff App for this client.
2 The Status of the Chart is now Active.
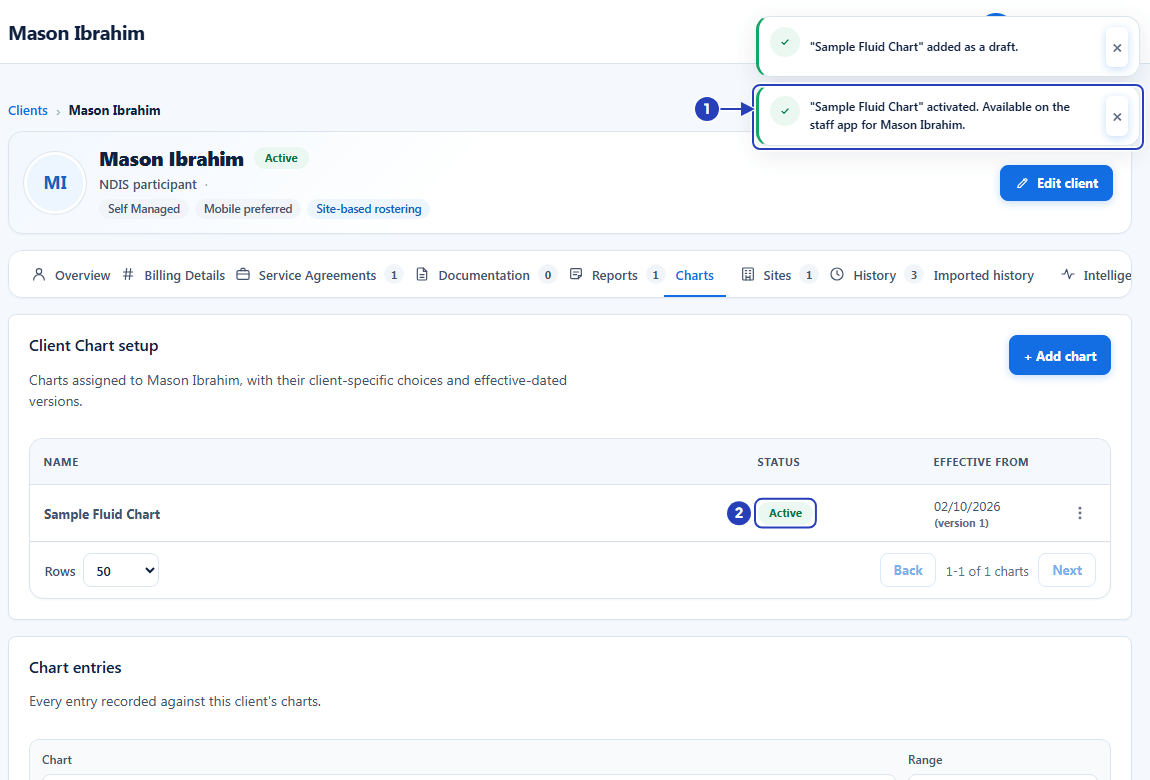
The confirmation message (1) and the Status now showing Active (2). -
Check the Staff App switch in the Chart Library
In the left menu, choose Configuration, then choose Chart Library. Stay on the Organisation templates tab.
1 On the template's row, Assigned to now says how many clients have the Chart.
2 The Staff mobile app switch is on.
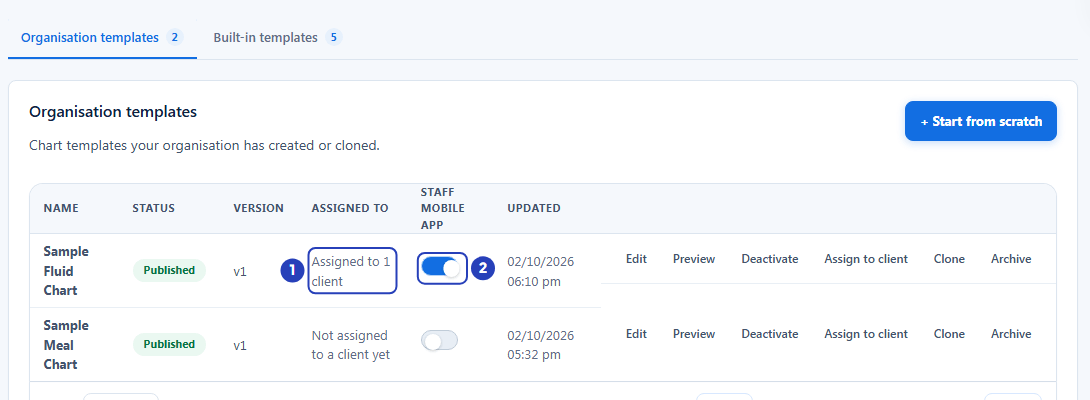
The number of clients the Chart is assigned to (1) and the Staff mobile app switch, now on (2).
What happens next
The Chart now belongs to this client. It appears in Client Chart setup with its own status, its own options and version 1. Another client needs their own assignment, with their own options. A Chart is never shared between clients.
Once the Chart is Active and the template's Staff App switch is on, staff can record entries for this client on the Staff App. Recorded entries appear under Chart entries further down the client's Charts tab.
To change this client's options later, choose Edit configuration in the row's actions menu. Existing entries are not changed.
A Client Chart has three statuses. Draft means it was added but is not active yet. Active means staff can record entries, once the template's Staff App switch is on. Inactive means it has been switched off.
To stop new entries, choose Deactivate in the row's actions menu. BondiByte asks Deactivate this chart?. Choose Deactivate to confirm. The Status changes to Inactive and the entries already recorded are kept. To bring the Chart back, choose Activate in the same menu.
Important notes
Important: A Chart is available only for the client it is assigned to. Assigning a template to one client does not make it available for any other client.
Tip: You can also assign a Chart from the template. In the Chart Library, choose Assign to client on a Published template's row. The same windows open, with an extra Client list at the start.
Good practice
- Add every option the client needs before you tick Activate now. An active Chart must keep at least one option in each client-specific list, and BondiByte will not activate it until each list has one.
- Give the Chart a name that staff will recognise in the Charts list on the Staff App. The name starts as the template's name, so add a short word that tells it apart if you will assign the same template to many clients.
- After you activate a Chart, check the Staff mobile app switch for its template in the Chart Library. Staff see the Chart only while that switch is on.
- When a client's needs change, choose Edit configuration and, under When should these changes take effect?, choose Choose a date to bring the change in on a future date. Entries already recorded are not changed.
Troubleshooting
The + Add chart button is greyed out.
Why it happens: Assigning a Chart needs permission to manage client charts and to view chart templates. A role without both cannot use the button.
What to do: Ask an Owner or Admin to assign the Chart, or to check your role.
The Add chart window says No published chart templates yet.
Why it happens: No template in your organisation has the status Published.
What to do: Open the Chart Library, choose Activate on a Draft template, or create one first, then try again.
A message says This chart is already assigned to this client. Open the existing chart to change it.
Why it happens: This client already has a Chart from the same template.
What to do: Look for the existing Chart in Client Chart setup. Use Edit configuration in its actions menu to change it.
A message says This chart cannot be activated yet and names a choice, for example Drink.
Why it happens: A client-specific choice has no options, so the Chart cannot be made active.
What to do: Choose + Add option under that choice and add at least one option, then save again. If you saw the message after choosing Activate in the row's actions menu, choose Edit configuration, add the options, choose Save changes, then choose Activate again.
A message says Give every option a label before saving.
Why it happens: One of the options is empty.
What to do: Type a label in every option, or choose Remove next to the empty one.
The Chart is Active, but staff cannot see it on the Staff App.
Why it happens: The Chart appears for a client only when its template is Published and its Staff App switch is on, the client's Chart is Active with a current version and complete choices, and the staff member is allowed to work with that client.
What to do: Check each of these in turn. The Staff mobile app switch is in the Chart Library, and the Chart's Status is in the client's Charts tab.