

Who this is for
This guide is written for Owner, Admin, Manager and Compliance Officer.
Before you begin
- Incidents is available to your organisation and has no switch of its own in Settings or Configuration. If Incidents is missing from your left menu, your role does not include Can view incidents: ask an Owner or Admin. If the page says Incidents are not enabled for your organisation (a banner may also say Your plan does not include this feature.), your organisation's subscription is not active. An Owner or Admin checks Billing & subscription and contacts BondiByte support if it is active. See the Troubleshooting section below.
- You are signed in to BondiByte on a computer.
- You know when and where the incident happened, who was involved and what was done straight away.
- The client, the site and the staff you want to link already exist in BondiByte. See Create a client, Create a site and Staff.
- If you want a follow-up, you know who will own it and the date it is due.
- Optional. If your organisation has built its own incident forms, they were published in the Incident category. See Create or clone a form and Publish a form. Without any, the standard form opens straight away.
Steps
The screenshots show a demonstration organisation with made-up names. Your own screens show your organisation's details. Select a screenshot to open it full size.
-
Go to Incidents > Add incident
1 In the left menu, under Registers, choose Incidents. The Incidents page opens, with four summary tiles (Total, Open, Follow-up and High risk) above the register of incidents.
2 At the top right of the register, choose Add incident.
If your organisation has built its own incident forms, the Choose incident type window opens next. If it has not, the Add incident window opens straight away, and you can go on to step 3.
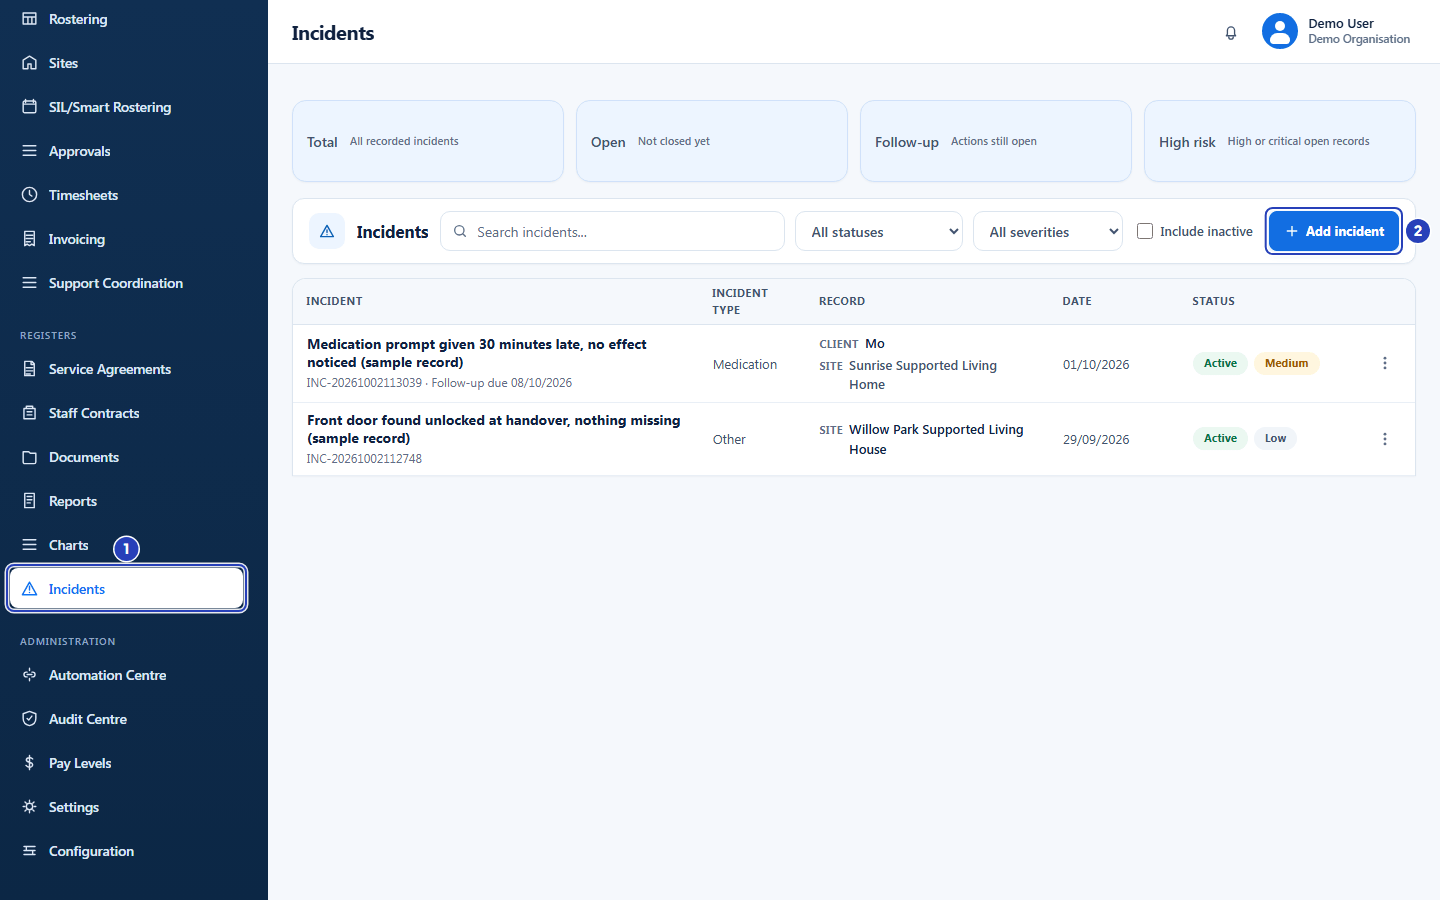
Choose Incidents in the left menu (1), then Add incident (2). -
Choose the incident type
The Choose incident type window lists the forms you can use. Under BondiByte templates is Incident report (standard), the form this guide uses. Under Organisation templates are any incident forms your organisation has built.
1 Type part of a name in Search incident types to narrow the list. If nothing matches, the list says No incident types match your search.
2 Choose Incident report (standard). The Add incident window opens on Incident Details.
Note: After you have chosen a form once on a computer, a Recently used group appears at the top of the list. Choose Cancel at the top right to close the window without starting an incident.
Note: If you choose one of your organisation's own forms instead, a window named after the form opens. Choose the Client the incident is about, answer the questions and choose Record incident. A message confirms Incident recorded. The fields described in the next steps, such as Severity and Follow-up required, belong to the standard form. See The incident workflow for how your organisation's own forms are kept.
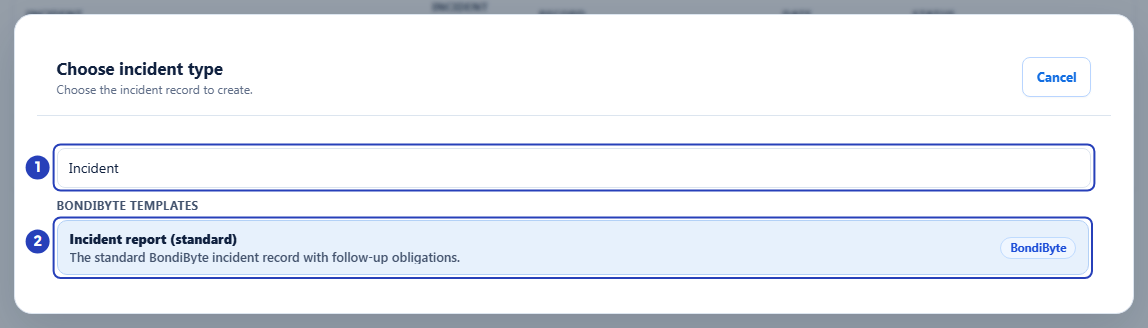
Search for the form if you need to (1), then choose Incident report (standard) (2). -
Enter the incident details
The first section of the window is Incident Details.
1 Leave Incident number empty so that BondiByte numbers the incident, or type your own reference.
2 Choose the Type that fits best.
3 Choose the Severity.
4 In Date and time, check the date, which starts as today. Then choose the time the incident happened in the list beside it, which starts on Select time.
Fields in step 3 Field What it means Incident number Optional. Starts empty, with the hint Auto-generated if empty. If you leave it empty, BondiByte gives the incident a number that starts with INC-. A number you type must not already belong to another incident in your organisation. The number is shown under the summary in the register and in the review window.Type Required, and always set. Starts as Other. Choose Medication (a matter involving medication), Behaviour (a matter involving someone's behaviour), Fall (a fall or a trip), Injury (someone was hurt), Safeguarding (a concern for someone's safety or wellbeing), Complaint (a complaint made by or about someone) or Other (anything that does not fit the rest). The type shows in the Incident type column of the register. Severity Required, and always set. Starts as Low. Choose Low, Medium, High or Critical. The severity shows beside Active in the Status column, in red for High and Critical. An incident that is High or Critical and not yet closed is counted in the High risk tile. Date and time Required. The date starts as today. The time list works in 15 minute steps on a 24 hour clock, for example 14:30. The date and time cannot be more than 24 hours in the future. They show in the Date column of the register and in the review window.Important: Choose the time yourself. If you leave the time list on Select time, BondiByte keeps the time at which you opened the window, not the time the incident happened.
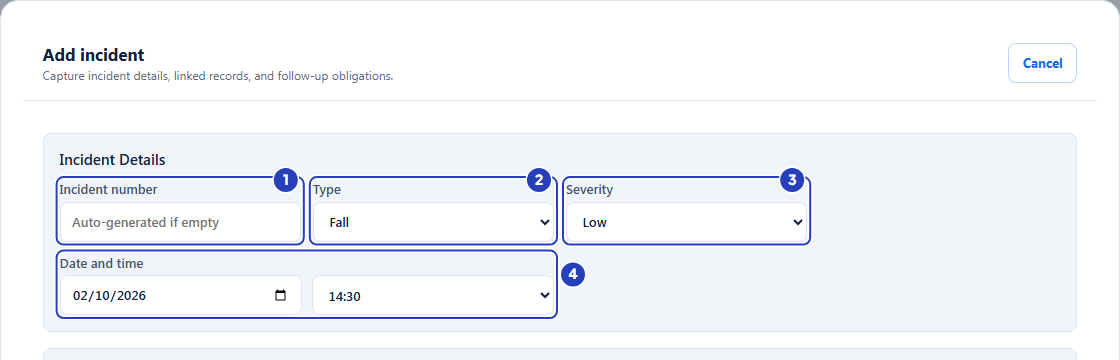
Leave the incident number empty (1), choose the type (2) and severity (3), then check the date and choose the time (4). -
Link the people and place
Next is the People Involved section. Everything in it is optional, but each link makes the record easier to find and to understand later.
1 In Client, choose the client the incident is about, or leave No client.
2 In Location, choose the site where it happened. If it happened somewhere that is not a site, choose Custom address / location and describe the place in the Custom location box that appears.
3 In Shift, choose the shift that was running, or leave No shift.
4 In Staff involved, choose each staff member who was involved, one at a time. Each person you choose appears below the list with a Remove button.
Fields in step 4 Field What it means Client Optional. Starts as No client. The list holds the active clients you can see. If the client has a Linked site / house on their record, choosing the client fills Location with that site. The client's name shows in the Record column of the register; an incident with no client shows its site or location there instead. Location Optional. Starts as No linked location. Choose one of your sites, or Custom address / location, which shows a Custom location box (Enter address or location details). Choosing a site limits the Shift list to that site's shifts. If you leave No linked location, the Shift list shows the shifts at all the sites you can see. Choosing a custom location clears the shift. Shift Optional. Starts as No shift. Lists the shifts from today and the previous 14 days (the small text under the list says Only today and the previous 14 days are shown.), for the site you chose. If no listed shift fits, choose Custom shift date and time and fill in Custom shift date and Custom shift time. Staff involved Optional. The list holds the active staff you can see. Under it, No staff selected. shows until you add someone. Choose Remove beside a name to take that person off. When every staff member has been added, the list says All active staff selected. 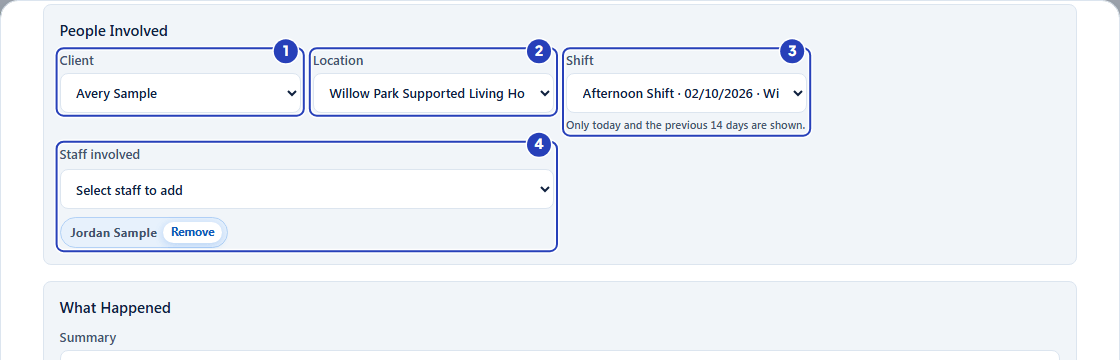
Choose the client (1), the location (2), the shift (3) and each staff member involved (4). -
Describe what happened
The next sections are What Happened and Immediate Response.
1 In Summary, type one line that says what happened. This is the only box you must fill in. It is the title of the incident in the register.
2 In Description, write the facts in order: what happened, where, who was there and what was seen.
3 In Immediate action taken, write what was done straight away, for example first aid, moving people to safety or telling a manager.
The Notifications section is a reminder: write down any notifications, such as who you told and when, in Description or Immediate action taken.
Fields in step 5 Field What it means Summary Required. One line. It is shown as the incident's title in the register and is searched when you search the register. Description Optional. As much detail as you need. It is searched when you search the register, and it is shown in the review window under What happened. Immediate action taken Optional. What was done straight away. It is shown in the review window under Immediate response and follow-up. 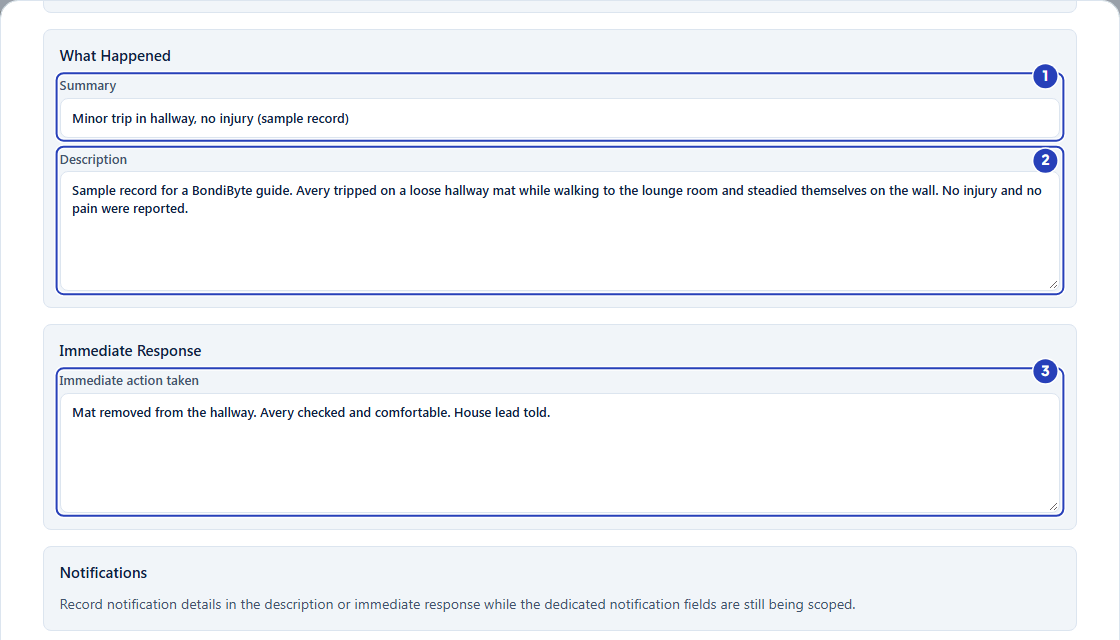
Type a one line summary (1), add the description (2) and the immediate action taken (3). -
Set the follow-up
The last section is Follow-up.
1 If the incident needs action later, tick Follow-up required. Two more fields appear.
2 In Who should follow up, choose the staff member who owns the follow-up.
3 In Follow-up due date, choose the date the follow-up is due.
Fields in step 6 Field What it means Follow-up required Starts unticked. Ticking it shows Who should follow up and Follow-up due date, and both must be filled in. Unticking it clears them. While an incident is not closed, a ticked follow-up is counted in the Follow-up tile. Who should follow up Required when Follow-up required is ticked. The list holds the active staff you can see. The small text under it says that when the Automation Centre toggle is on, this person is emailed 24 hours before the due date. Follow-up due date Required when Follow-up required is ticked. The date shows as Follow-up due under the incident number in the register and in the review window. Note: If you leave Follow-up required unticked, you can still add a follow-up later with Edit.
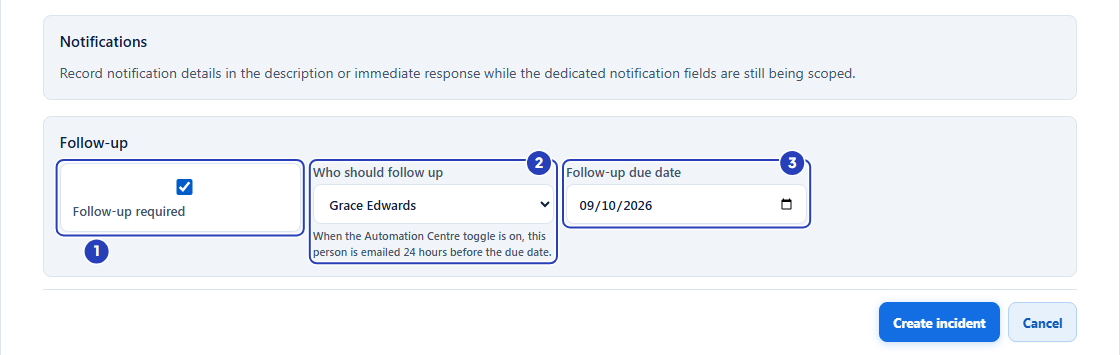
Tick Follow-up required (1), choose who should follow up (2) and set the due date (3). -
Choose Create incident
1 Check the details you entered. The buttons at the bottom of the window stay in view as you scroll.
2 Choose Create incident. Choose Cancel instead to close the window without saving.
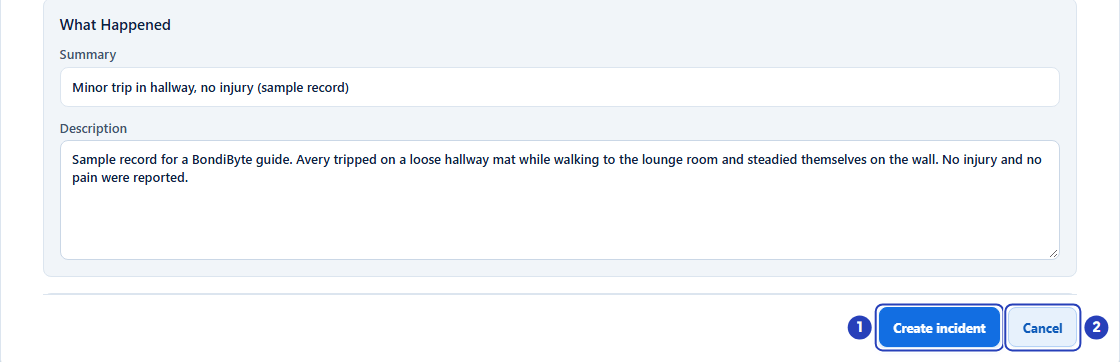
Choose Create incident (1) to save, or Cancel (2) to close the window without saving. -
Check the new incident
1 A message confirms Incident created.
2 The window closes and the new incident appears in the register, which lists incidents with the most recent incident date first.
The summary is the incident's title. Under it are the incident number and, if you set a follow-up, Follow-up due and the date. The Record column shows the Client and the Site, and the Status column shows Active and the severity.
A new incident starts with the status Open. To see or change the status, choose the incident's title. See Review an incident.
If your access is limited to certain sites and you did not choose a site in Location, the incident is saved but it does not appear in your register or your tiles. Choose a site in Location next time.
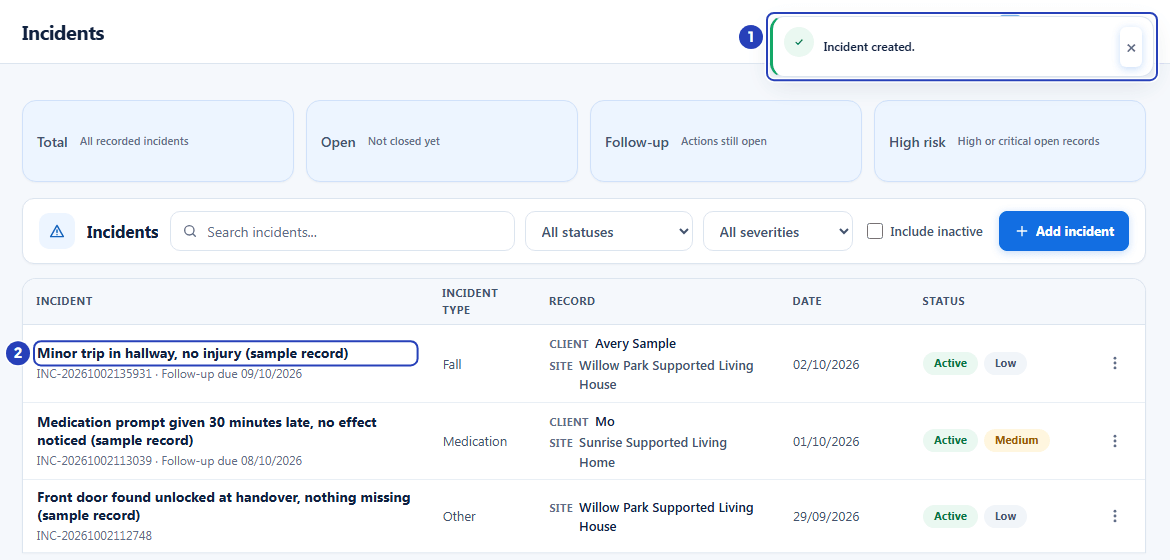
The confirmation message (1) and the new incident in the register (2).
What happens next
If your access is limited to certain sites, choose a site in Location. An incident that has no site is not listed for you afterwards, although it is saved.
The incident is saved with the status Open. It counts in the Total and Open tiles, in Follow-up if you ticked Follow-up required, and in High risk if its severity is High or Critical.
To read the incident, change its status or close it, choose its title in the register. To correct a detail, open the three dots menu on its row and choose Edit. See Review an incident.
Reminders and alerts about incidents are emailed through the Incident follow-up notifications card in the Automation Centre, which an Owner or Admin switches on and sets up. Whether anyone is emailed depends on those settings, not on the Create incident button. See The incident workflow.
Recording an incident does not report it to the NDIS Commission, to the police or to anyone else outside your organisation. Your organisation decides whether an incident has to be reported and makes any report itself.
Important notes
Important: BondiByte keeps your record of the incident. It does not report the incident to the NDIS Commission or anyone else. Your organisation remains responsible for responding to the incident and for any reporting it must do.
Warning: If someone needs urgent help, call emergency services first and record the incident afterwards. Incidents is a record keeping tool, not an emergency service.
Good practice
- Record an incident as soon as it is safe to do so, while the details are fresh. Enter the date and time the incident happened, not the time you are typing it in, and choose the time from the list. If you leave it on Select time, the record keeps the time you opened the window. After you save, check the Date column.
- Write the Summary so that it makes sense on its own in a list, for example
Minor trip in hallway, no injury, notIncident. Summary is the only box you must fill in, and search looks at the summary, the description, the incident number, the client's name and the site's name. - Set Severity honestly. An open High or Critical incident counts in the High risk tile, and it is the kind of incident that Incident follow-up notifications emails to managers when an Owner or Admin has switched that on.
- Link the client, the location, the shift and every staff member involved. The links tell a reviewer where to look for related records, and search finds an incident by client name and site name.
- When you tick Follow-up required, choose an owner who can do it and a due date that is realistic. The owner is emailed 24 hours before the due date when Incident follow-up notifications is on.
- Write who was told and when, such as family, a guardian or a manager, in Description or Immediate action taken, because there is no separate notification field.
- Do not delete an incident to correct a mistake. Use Edit instead. Delete removes the incident from the active register, and there is no button to bring it back.
Troubleshooting
Incidents is not in the left menu.
Why it happens: Your role does not include the Can view incidents permission.
What to do: Ask an Owner or Admin to check your role in Configuration > Roles & Permissions.
The Incidents page says Incidents are not enabled for your organisation. A banner may also say Your plan does not include this feature.
Why it happens: Your organisation's subscription is not active, so the page cannot show the register.
What to do: An Owner or Admin checks Billing & subscription, and contacts BondiByte support if it is active.
I cannot see Add incident.
Why it happens: Your role does not include the Can create incidents permission. You can still read incidents if you have Can view incidents.
What to do: Ask an Owner or Admin to check your role, or to record the incident for you.
A message says Please check the information you entered and try again.
Why it happens: Summary is empty. It is the only box you must fill in.
What to do: Type a one line summary, then choose Create incident again. The window stays open with everything else you entered.
A message at the top of the window says Choose a follow-up due date when follow-up is required. or Choose who should follow up when follow-up is required.
Why it happens: Follow-up required is ticked but Follow-up due date or Who should follow up is empty. Both are needed.
What to do: Choose the due date and the staff member who owns the follow-up, or untick Follow-up required if no follow-up is needed.
A message says an incident with this incident number already exists.
Why it happens: The number you typed in Incident number already belongs to another incident in your organisation. Numbers must be unique.
What to do: Clear Incident number so that BondiByte numbers the incident, or type a different reference.
A message says the incident date and time cannot be more than 24 hours in the future.
Why it happens: The date in Date and time is too far ahead. An incident is a record of something that has already happened.
What to do: Correct the date in Date and time, then choose Create incident again. The window stays open with everything else you entered.
A client, a staff member or a site I need is not in the list.
Why it happens: The lists show only active records that you are allowed to see. If your access is limited to certain sites, records outside those sites are not listed.
What to do: Check the record is active in Clients, Staff or Sites, or ask an Owner or Admin to check your access. If the incident happened somewhere that is not a site, use Custom address / location.
The shift I want is not in the Shift list.
Why it happens: The list only holds shifts from today and the previous 14 days, and only for the site you chose in Location. It is also empty if your role does not include the Can view roster permission, as is the case for a Compliance Officer by default. Then the list offers only No shift and Custom shift date and time.
What to do: Check the Location, or choose Custom shift date and time and fill in the date and time of the shift. If you need shifts to be listed, ask an Owner or Admin to check your role.
The Add incident window opened straight away, but I expected a list of forms.
Why it happens: The Choose incident type window only appears when your organisation has published incident forms of its own, and you are allowed to create reports.
What to do: Carry on with the standard form. To build your own incident forms, see Create or clone a form.