

Who this is for
This guide is written for Owner and Admin.
Before you begin
- You are signed in to BondiByte on a computer.
- You know what the form is for and the questions it should ask.
- To copy an existing template instead, you know which one. See The Reports & Forms library for the difference between built-in and organisation templates.
Steps
The screenshots show a demonstration organisation with made-up names. Your own screens show your organisation's details. Select a screenshot to open it full size.
-
Go to Configuration > Reports & Forms
1 In the left menu, under Administration, choose Configuration. The Configuration page opens with a card for each area.
2 Under System, choose Reports & Forms. The template library opens.
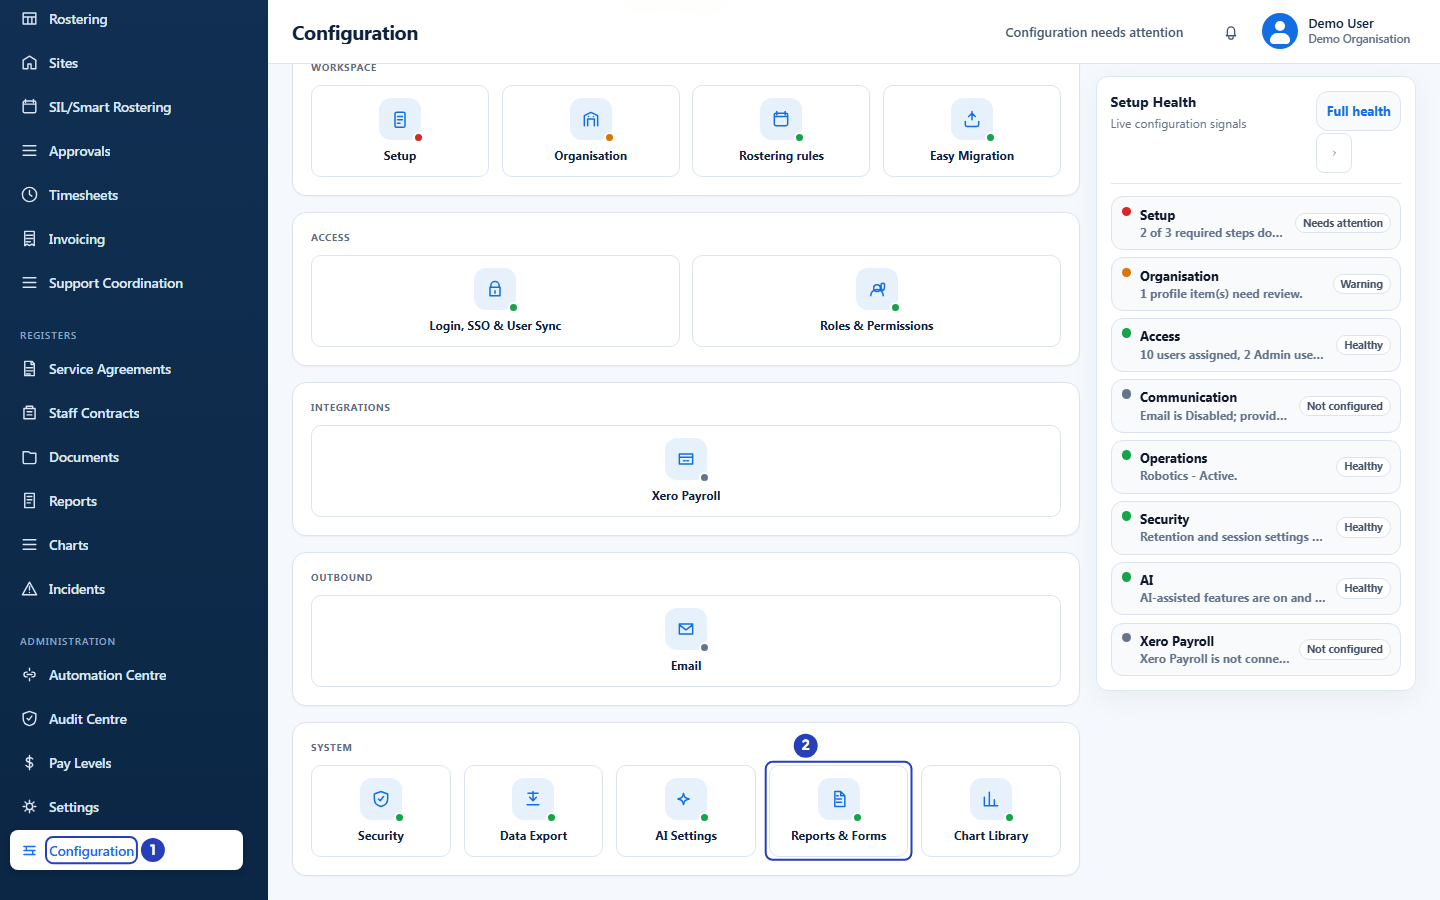
Choose Configuration in the left menu (1), then Reports & Forms under System (2). -
Choose + Create template
You decide how to start here. To build a blank form, follow this step and the next one, Name the template. To start from a copy of an existing template instead, skip those two steps and follow the last two steps of this guide, Alternative: copy a template instead, choose Duplicate and Alternative: name the copy. Then carry on with Add your questions in the builder.
1 The Organisation templates tab lists the forms your organisation has made. The ready-made BondiByte templates are on the Built-in templates tab.
2 To build a blank form, choose + Create template on the Organisation templates tab. The New organisation template window opens.
Tip: To start from an existing template instead of a blank one, go to the step called Alternative: copy a template instead, choose Duplicate.
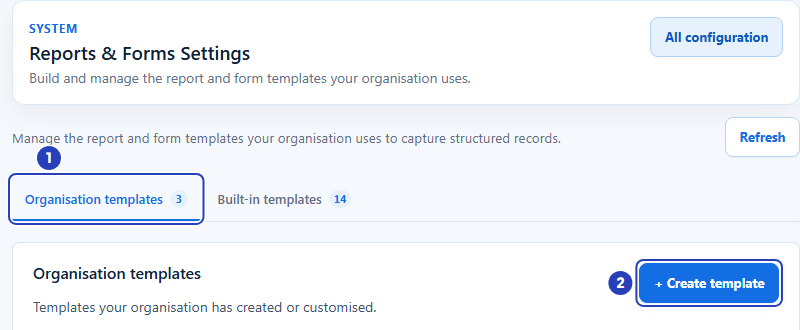
Stay on the Organisation templates tab (1) and choose + Create template (2). -
Name the template
1 In Template name, type a name your team will recognise, for example
Sample Daily Check. Create and open builder stays switched off until you type a name.2 In Description, say what the form is for.
3 In Category, choose the type that fits the form best. It starts on Progress note.
4 Choose Create and open builder. The template is saved as a draft and the builder opens. Choose Cancel instead to close the window without saving anything.
Fields in step 3 Field What it means Template name Required. It must be different from the names of your other templates, including archived ones. People choose a form by this name. Description Optional. It is shown under the form's name when someone chooses a report type on the Reports page, and it is searched there, so it helps people pick the right form. Category Starts on Progress note. Choose Progress note, Assessment, Review, Handover or Other to describe the kind of form. These five work the same way for reports. Choose Incident only for a form that belongs to the Incidents area. Important: A template in the Incident category belongs to the Incidents area and is not offered when someone adds a report. Choose another category for a form that belongs in Reports.
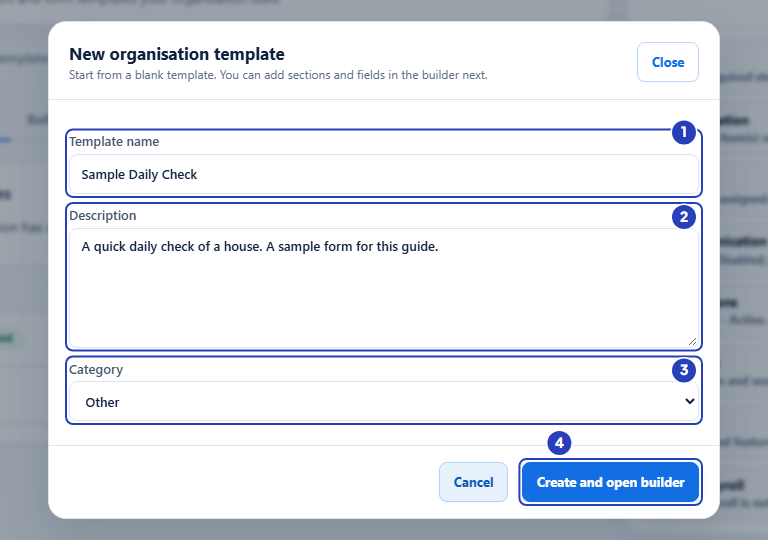
Type the name (1) and description (2), choose a category (3), then choose Create and open builder (4). -
Add your questions in the builder
The builder has three parts. Add a field on the left lists the types of question in four groups: Basic, Choice, People & records and Layout. The middle of the page shows the form, one box for each section. Field settings on the right opens when you select a field. A new form starts with one section called Details.
1 In the Add a field list on the left, choose a field type, for example Short text. The field is added to the section named under the heading, for example Adds to Details.
2 Select the field in the middle of the page. Its settings open on the right under Field settings.
3 In Label, type the question as the person will see it, for example
Checked by.4 Turn on Required if the person must answer before they can save a report. Repeat for each question.
Fields in step 4 Field What it means Label The question or heading the person sees. Every question needs a label, up to 200 characters. A counter under the box shows how many you have used. For a Section heading or Info text field the box is called Text instead. Key A short name that BondiByte fills in when you add the field, for example question1. It does not change when you type the label. Choose Regenerate from label to make it follow the label. It starts with a lowercase letter and then uses letters and numbers only (2 to 60 characters), and it must be different from every other key in the form. A red message under the box says what to fix. You can leave it as it is.Required When it is on, the report cannot be saved until the question is answered. A star marks a required question. It is off to start with. Not offered for layout fields. Help text Optional extra guidance about the question, up to 500 characters. It is shown with the question. Placeholder Optional hint text shown inside an empty answer box. Offered for Short text, Long text, Number, Date, Time, Date and time and People. Default value Optional. The answer the question starts with. The control suits the type: a text box, a number box, a date or time picker, a Checked by default tick for Yes / No and Checkbox, or a list with No default and your options for Single choice. Multiple choice, People, Table and the layout types have none. Tip: The example form has five questions. Checked by (Short text) and Date of check (Date) are required. Everything in order? is Yes / No, Area checked is Single choice and Notes is Long text.
Note: To change a field's type, delete the field and add a new one. A field with a problem is outlined in red and listed in the box above the builder.
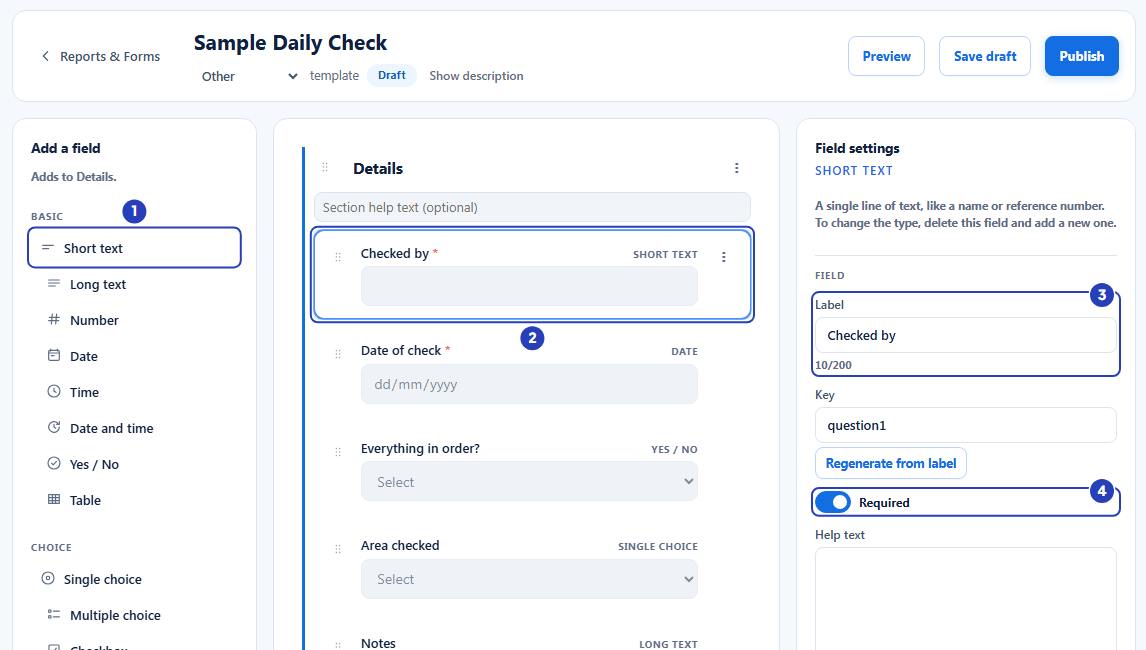
Choose a field type (1), select the field (2), type its label (3) and turn on Required (4). -
Choose the right field type
BondiByte offers fourteen field types. Choose the one that matches the answer you want, because it decides what the person sees when they fill in the form.
Fields in step 5 Field What it means Short text (Basic) A single line of text, such as a name or a reference number. It has a placeholder and a text default value. Long text (Basic) A box for several lines, such as notes or descriptions. It has a placeholder and a text default value. Number (Basic) A number. The default value box accepts numbers only. Date (Basic) A calendar date, chosen from a calendar or typed. Time (Basic) A time of day, with no date. Date and time (Basic) A calendar date with a time of day. Yes / No (Basic) A yes or no answer chosen from a list. Its default value is a Checked by default tick. Table (Basic) A repeating grid of rows with columns you define, such as a set of time-stamped checks. Under Columns, choose + Add column (up to 8 columns). Give each column a label and a type (Short text, Long text, Number, Date, Time, Date and time, Yes / No, Single choice, Multiple choice or People), and turn on Required if it must be filled in. A choice column has its own Options list. A table needs at least one column. The person filling in the form adds rows with + Add row (up to 50) and removes one with Remove row. Single choice (Choice) Choose one option from a list. Add the options under Options. Its default value is one of your options, or No default. Multiple choice (Choice) Choose one or more options from a list. Add the options under Options. It has no default value. Checkbox (Choice) A single tick box for an on or off answer. Its default value is a Checked by default tick. People (People & records) Pick a staff member or a client from your organisation's records. Source chooses Staff or Client. Selection mode shows Single person and cannot be changed in this release. The placeholder starts as Select staff member... or Select client..., matching the source. It has no default value. Section heading (Layout) A heading that breaks up a long section. It is not a question, so it has no Required or default value. Type the heading in Text. Info text (Layout) Read-only guidance text shown to whoever fills in the form. It is not a question. Type the text in Text. -
Add choices to a choice field
1 Select the Single choice or Multiple choice field. Under Field settings, find Options.
2 Choose + Add option. A new option appears with a Label and a Value.
3 Type the choice in Label, for example
Kitchen. The Value is filled in for you, as option1, option2 and so on, so leave it unless you need a particular value. Add one option for each choice you want to offer.To remove an option, choose the x at the end of its row.
Note: A choice field needs at least one option, every option needs a label and a value, and no two options can share a value. A choice field can have up to 30 options, and + Add option switches off when you reach 30. BondiByte lists anything that is missing above the builder before you can publish.
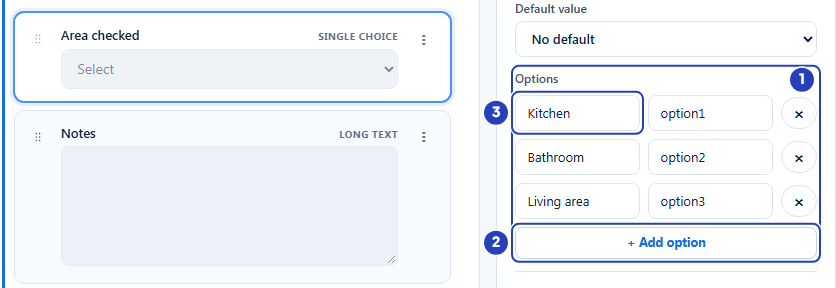
Find Options (1), choose + Add option (2) and type each choice in Label (3). -
Show a question only when another answer needs it
You can hide a question until an earlier answer calls for it, for example a What needs follow-up? question that only appears when Everything in order? is No.
1 Select the question that should appear only sometimes. Under Conditional display in Field settings, choose Configure. The text Only show this field when... appears.
2 In the first list, choose the question whose answer decides it. The list shows each question with its section name, and leaves out headings and info text. The starting choice, No condition (always show), means the question is always shown.
3 In the second list, choose how to compare: is equal to, is not equal to, is Yes / checked or is No / unchecked.
4 For is equal to and is not equal to, type the answer to compare with in Value.
To remove a condition later, choose No condition (always show) in the first list. Choose Cancel to close the box without setting a condition.
Note: A question cannot depend on itself, and a condition that compares to a value needs that value filled in. BondiByte lists any problem above the builder before you can publish.
-
Organise the questions into sections
1 Each section has a title box that you can type in, and a Section help text (optional) box under it for guidance that applies to the whole section.
2 Choose + Add section at the bottom of the form to add another section. New sections are called Section 2, Section 3 and so on. New fields go into the section you last selected.
3 Drag a section or a field by the grip at its left to move it. You can drag a field into another section, and you can drag a field type from Add a field to a place in the form.
4 Use the three dots menu on a section to Move up, Move down, Duplicate section or Delete section. The menu on a field has Move up, Move down, Duplicate field and Delete field. Delete field is also at the bottom of Field settings.
Warning: Deleting a field asks you to confirm. Deleting a section that has fields asks too, because deleting the section deletes its fields.
Note: A form can have up to 12 sections, 80 fields in total, 30 options in a choice field and 8 columns in a table. It needs at least one section. If a limit is passed, the box above the builder says so, for example This template has 13 sections. The maximum is 12.
-
Check the name, category and description in the top bar
1 The name at the top left of the builder is a box you can type in to rename the form. The new name must be different from your other templates.
2 Beside it, the category list shows the same six categories as when you created the form. The status, Draft or Published, is shown next to it.
3 Choose Show description to open the Description box, and Hide description to close it.
If you move a form into or out of the Incident category, BondiByte asks you to confirm when you choose Save draft or Publish. If no reports have been made from the form yet, a window asks you to change the form type (for example Change the form type to Incident?) and says the form moves between Reports and Add Incident. Choose Change type to go ahead.
If reports already exist, a window headed Warning - this will reclassify existing records lists what will change and how many reports are affected. You must type
RECLASSIFYbefore Continue and reclassify switches on. Choose Cancel to leave things as they were.Warning: Moving a form into or out of Incident moves the reports already made from it to the other area. Their content is not deleted, but where they appear changes.
Note: On a form that is already published, a new name, description or category is applied when you save. Changes to the questions wait until you publish. See Publish a form.
-
Preview the form and save the draft
1 Choose Preview to see the form as the person filling it in sees it. Preview does not save any answers. Choose Close when you have finished looking.
2 Choose Save draft. It stays switched off until you have changed something.
3 A message confirms Draft saved.
To leave the builder, choose Reports & Forms at the top left. If there are unsaved changes, BondiByte asks whether to discard them.
Important: A draft is not available to anyone yet. Publish the form when it is ready. See Publish a form.
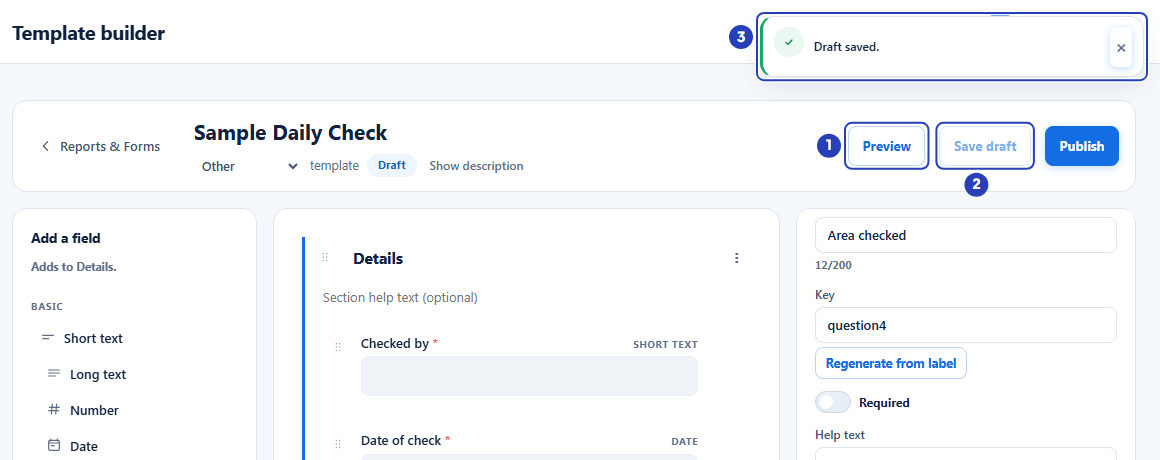
Choose Preview to check the form (1), then Save draft (2). A message confirms the draft is saved (3). -
Alternative: copy a template instead, choose Duplicate
1 Open the Built-in templates tab to copy a BondiByte template.
2 Choose Duplicate & customise on the row you want.
To copy one of your own templates, choose Duplicate on its row on the Organisation templates tab instead. The steps from here are the same.
Note: You do not need to duplicate a built-in template just to use it. Duplicate one only when you want your own version with different questions.
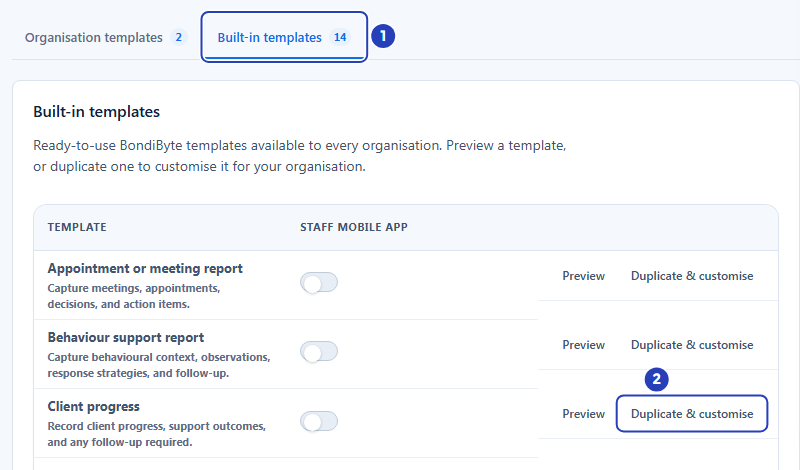
Open the Built-in templates tab (1) and choose Duplicate & customise on the row you want (2). -
Alternative: name the copy
1 In Name for the copy, type a new name. BondiByte suggests the original name followed by (Copy).
2 Change the Description if you want to.
3 Choose Create copy.
Note: The copy starts with all the fields of the original and belongs to your organisation. A copy of a built-in template opens in the builder straight away. A copy of one of your own templates is added to the Organisation templates list as a draft, and a message confirms the copy, ready to open with Edit.
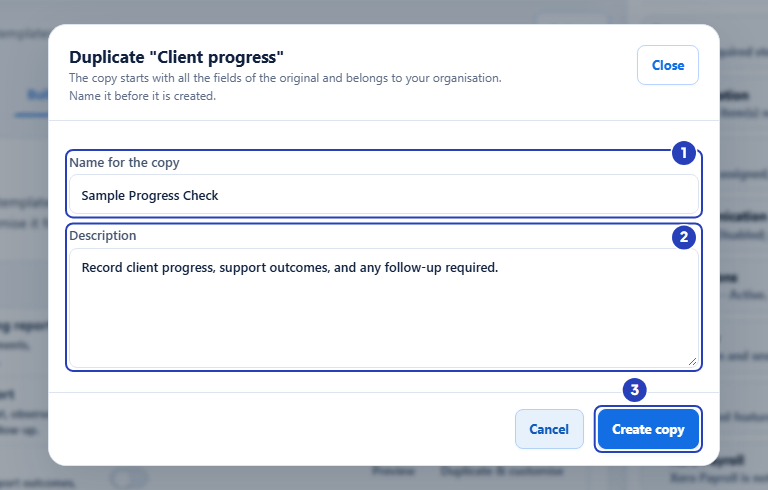
Type a name for the copy (1), change the description if you want to (2) and choose Create copy (3).
What happens next
The template appears in the Organisation templates list with the status Draft. A draft is not offered to anyone yet.
When the form is ready, publish it. See Publish a form. To make it available to staff in the Staff App as well, see Show a form on the staff mobile app.
You can change a template later with Edit on its row. Edit is not offered on an archived row, so restore it first. A published template can be edited too. Your changes to the questions are saved on top of the published form, and people keep using the current version until you publish again.
To publish your changes, choose Publish at the top right of the builder. The row keeps the status Published. Publishing a draft that has changes creates a new version, and reports that were already completed keep the version of your form they were completed on.
Important notes
Important: A form belongs to your whole organisation. You create and publish it once, and a switch decides whether it also appears in the Staff App.
Good practice
- Choose the category before people start using the form. Moving a form into or out of Incident later moves its existing reports to the other area, and BondiByte asks you to type RECLASSIFY to confirm.
- Name a form for what it records, such as Daily house check, and keep the name short and clear, because staff and managers choose a form by its name. Put the date or house name in each report's Title, not in the form's name.
- Write each label as the question a support worker would ask in plain words, use Help text for anything that needs explaining, and turn on Required only for answers you cannot do without. A long list of required questions slows people down.
- Start from a duplicate when a BondiByte template is close to what you need. The copy keeps every question, so you change only what differs. Use Conditional display for follow-up questions so the form stays short.
Troubleshooting
The + Create template, Edit or Duplicate buttons are greyed out.
Why it happens: Your role can view report templates but not manage them. Pointing at a button shows the message You do not have permission to manage report templates.
What to do: Ask an Owner or Admin to create the template, or to give your role the permission to manage report templates.
A message says A template with this name already exists in your organisation. Choose a different name.
Why it happens: Another template in your organisation already uses that name.
What to do: Choose a different name for the new template or the copy. Look in the Organisation templates list to find the existing one, and turn on Show archived in case it was archived.
A box above the builder says 1 issue to fix before publishing.
Why it happens: Something in the form is incomplete, for example a choice field with no options, or a question with no label.
What to do: Read the line under the heading, such as "Area checked" needs at least one option. Open the field marked in red and fix it. The box disappears when nothing is left to fix.
A message says Add at least one section before saving.
Why it happens: Every section has been deleted from the form.
What to do: Choose + Add section, or add a field from Add a field, which creates a section for it.
A message says the form has too many sections, fields, options or columns, for example This template has 13 sections. The maximum is 12.
Why it happens: A form can have up to 12 sections, 80 fields in total, 30 options in a choice field and 8 columns in a table.
What to do: Remove or combine what you do not need, or split the form into two forms.
A message under Key says This key is already used elsewhere in this template. or that keys start with a lowercase letter.
Why it happens: Two fields have the same key, or the key has a space, a capital first letter or a symbol.
What to do: Choose Regenerate from label, or type a short key that starts with a lowercase letter and uses letters and numbers only.
A message says a choice field has a duplicate option value or an option missing a value or label.
Why it happens: Two options share a Value, or an option has an empty Label or Value.
What to do: Give each option its own label and value, or remove the extra option.
I want to change a field from one type to another.
Why it happens: A field's type cannot be changed after you add it.
What to do: Delete the field and add a new one of the type you want, then enter its label and settings again.
Save draft is greyed out.
Why it happens: Nothing has changed since the last save.
What to do: Make a change in the builder and the button turns on again.
I cannot find an Edit button on a built-in template.
Why it happens: Built-in templates are shared by every organisation, so they cannot be changed. Their rows only offer Preview and Duplicate & customise.
What to do: Choose Duplicate & customise to make a copy that belongs to your organisation, then edit the copy.