

Who this is for
This guide is written for Owner, Admin, Manager and Compliance Officer.
Before you begin
- Incidents is available to your organisation and has no switch of its own in Settings or Configuration. If Incidents is missing from your left menu, your role does not include Can view incidents: ask an Owner or Admin. If the page says Incidents are not enabled for your organisation (a banner may also say Your plan does not include this feature.), your organisation's subscription is not active. An Owner or Admin checks Billing & subscription and contacts BondiByte support if it is active. See the Troubleshooting section below.
- You are signed in to BondiByte on a computer.
- At least one incident has been recorded. See Record an incident.
- To change a status, close, edit or delete an incident, your role includes Can edit incidents.
Steps
The screenshots show a demonstration organisation with made-up names. Your own screens show your organisation's details. Select a screenshot to open it full size.
-
Go to Registers > Incidents and find the incident
1 In the left menu, under Registers, choose Incidents. The Incidents page opens, with four tiles (Total, Open, Follow-up and High risk) above the register. The register lists the newest incident date first.
2 To narrow the list, type in Search incidents.... The list updates as you type.
3 To list one status only, choose it in the status list, which starts on All statuses.
4 To list one severity only, choose it in the severity list, which starts on All severities.
5 To include incidents that have been deleted from the active register, tick Include inactive.
6 Find the incident's row. Choose the incident's summary, shown in bold in the Incident column, to open it in the next step.
Fields in step 1 Field What it means Search incidents... Looks for what you type in the incident number, the summary, the description, the client's name and the site's name. If nothing matches, the register says No matches for followed by what you typed, with a Clear search button. Status list Starts on All statuses. Choose Open, In review, Follow-up required, Closed or Cancelled to list only the incidents in that status. Severity list Starts on All severities. Choose Low, Medium, High or Critical to list only incidents of that severity. Include inactive Starts unticked. When ticked, incidents that were deleted from the active register are listed as well, with the label Inactive. 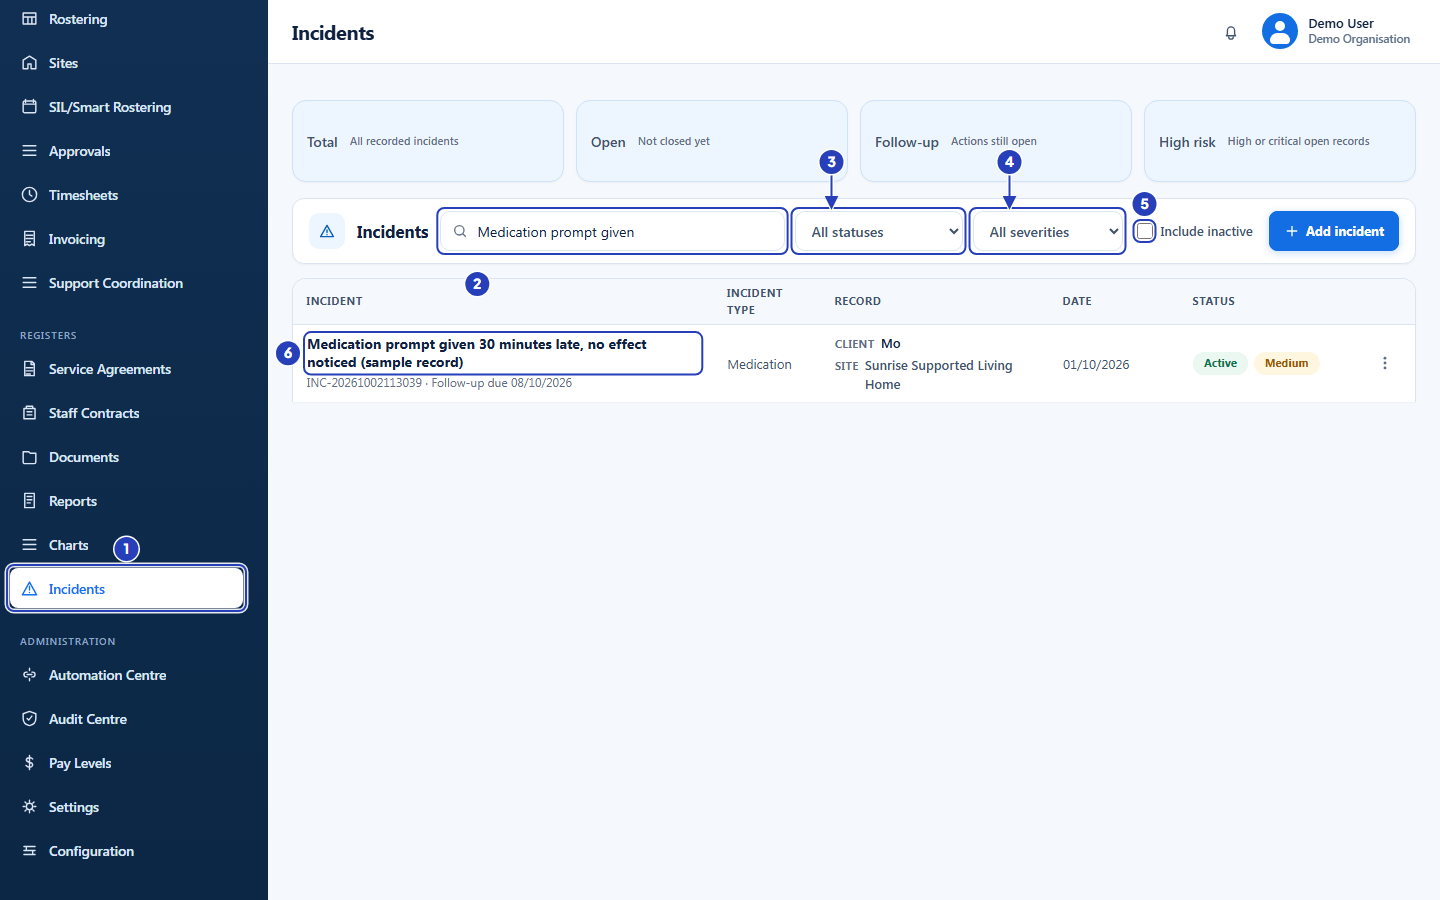
Choose Incidents (1), search (2), narrow by status (3) and severity (4), tick Include inactive to see deleted incidents (5), then choose the incident's summary (6). -
Read the register
The register has one row for each incident. Read across a row to see what it holds.
Fields in step 2 Field What it means Incident column The incident's summary, which opens the Review incident window when chosen. Under it are the incident number and, when a follow-up is set, Follow-up due and the date. Incident type column The type chosen when the incident was recorded, such as Medication or Fall. Record column The Client the incident is about (shown by their preferred name when they have one) and the Site where it happened. An incident with no client shows its Site or Location instead, and Not available when it has neither. Date column The date the incident happened. Status column Shows Active or Inactive and the severity. It does not show whether the incident is open or closed. Three dots menu At the end of each row. It lists Review, and, if you can edit incidents, Edit and Delete. Note: The Status column answers a different question from the status list. Active means the incident is on the active register. Open, In review, Follow-up required, Closed and Cancelled are the incident's progress, shown in the status list and in the Review incident window.
-
Open the Review incident window
Choose the incident's summary in the Incident column. You can also open the three dots menu at the end of the row and choose Review. The Review incident window opens.
1 If you can edit incidents, the first section of the window is Review action, with the Incident status list. The next steps use it.
2 Below it, the Incident section holds the key facts about the incident.
3 Choose Close at the top right of the window to leave it without changing anything.
Fields in step 3 Field What it means Incident status Only shown if you can edit incidents. A list that starts on the incident's current status. See the next steps for what each status means. Incident number The number BondiByte gave the incident, or the reference that was typed when it was recorded. It starts with INC-when BondiByte numbered it.Severity Low, Medium, High or Critical, as chosen when the incident was recorded or last edited. Incident type Medication, Behaviour, Fall, Injury, Safeguarding, Complaint or Other. Status The incident's current status, for example Open. Date and time When the incident happened, shown as day, month and year with the time, for example 01/10/2026 2:30 pm.Follow-up due The date the follow-up is due. Shows -when no follow-up date was set.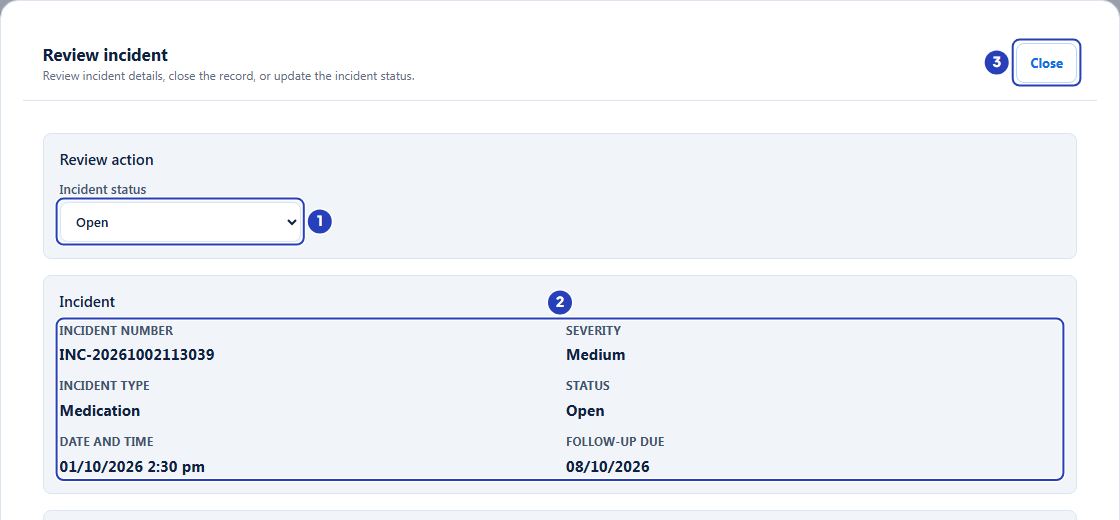
The Incident status list (1) and the facts in the Incident section (2). Choose Close (3) to leave the window. -
Read the rest of the record
1 Scroll down inside the Review incident window. The People and place section shows who and where.
2 The What happened section shows the Summary and the Description.
3 The Immediate response and follow-up section shows what was done straight away and who owns any follow-up.
A field that was left empty shows
-, or a plain phrase such as No client, No location, No shift, No staff selected or No follow-up owner.Fields in step 4 Field What it means Client The client the incident is about, by preferred name when they have one, or No client. Location The site where it happened, or the place that was typed in, or No location. Shift The title of the linked shift, Custom shift: followed by the date and time when a custom shift was entered, or No shift. Staff involved The names of the staff linked to the incident, separated by commas, or No staff selected. Summary The one line title of the incident. Description The detail of what happened, in the words of the person who recorded it. Immediate action taken What was done straight away. Follow-up required Yes or No. Follow-up owner The staff member who owns the follow-up (by preferred name when they have one), or No follow-up owner. Note: When an incident was started from a draft prepared from a shift report, a line at the top of the window says Source: AI-assisted draft from a shift report followed by the report's date. The draft only became an incident when a person chose Create incident.
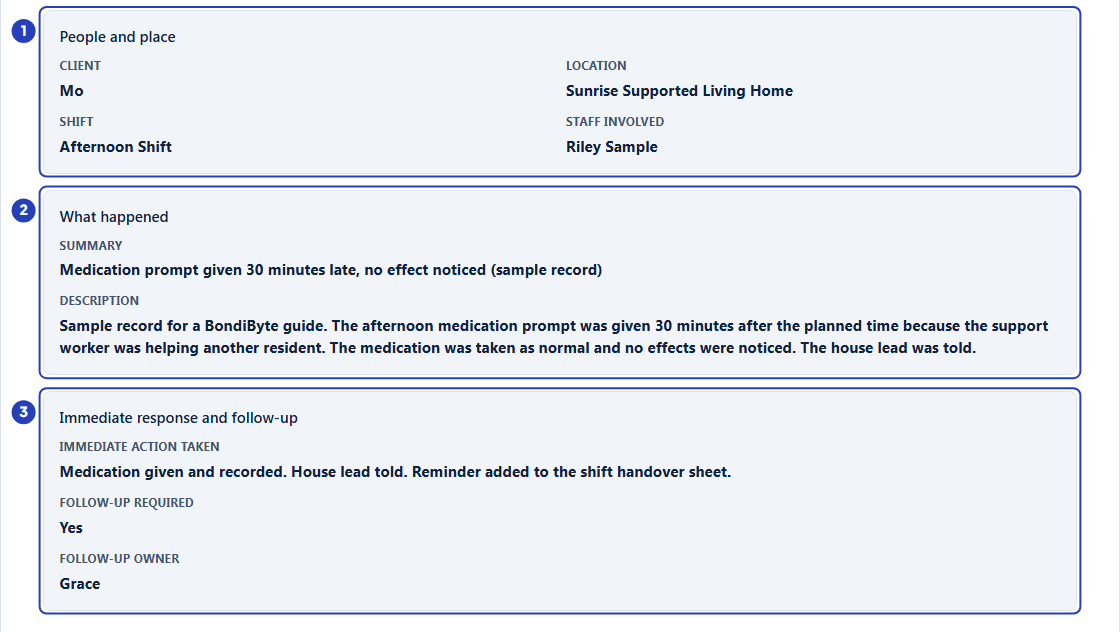
People and place (1), What happened (2) and Immediate response and follow-up (3). -
Change the status
1 In the Review action section, open the Incident status list and choose the status that matches where the incident is up to. Then choose Save status, in the row of buttons at the bottom of the window. The buttons stay in view as you scroll, and the picture for the next step shows them.
2 A message confirms Incident status updated. The Status field in the Incident section now shows the new status, and the window stays open.
The status is saved only when you choose Save status. If you choose a status and then close the window, nothing changes.
Fields in step 5 Field What it means Open Where a new incident starts. It has been recorded and has not been picked up yet. In review Someone is looking into the incident. Follow-up required Actions from the incident are still to be done. This is a status. It is separate from the Follow-up required tick box on the incident form, which holds the follow-up owner and due date. Closed The incident is finished. It no longer counts in the Open, Follow-up or High risk tiles. Cancelled The incident is closed without further work, for example because it was recorded by mistake. It no longer counts in the Open, Follow-up or High risk tiles. Save status Saves the status shown in the Incident status list. It is switched off while the status is saving. Note: The statuses do not have to be used in order. You can choose any status from the list, and you can change it again later by choosing another status and Save status.
Important: Choosing a status does not change the follow-up owner or the follow-up due date, and ticking Follow-up required on the form does not change the status. Check both when you review an incident.
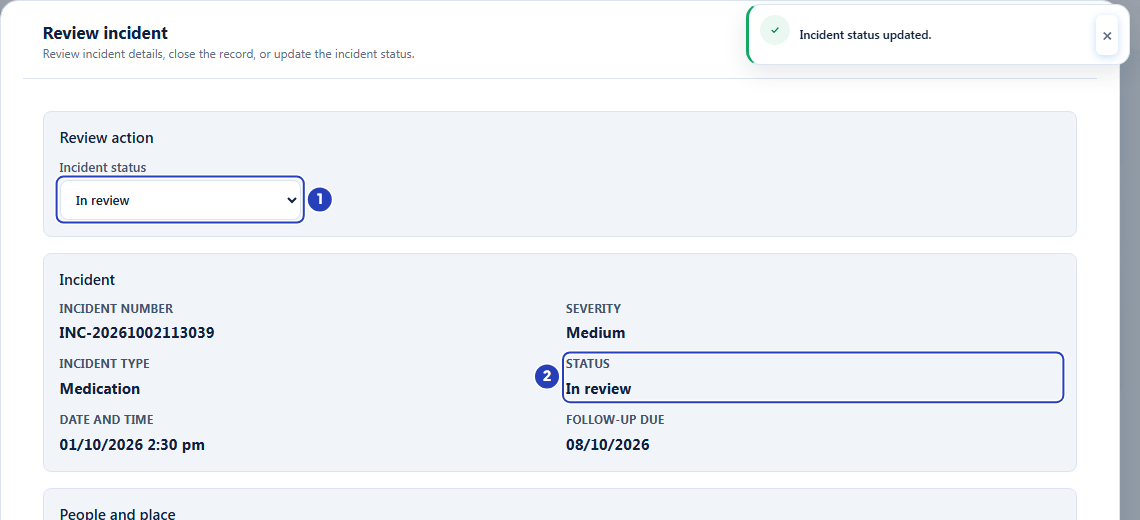
Choose a status in the Incident status list (1), then choose Save status at the bottom of the window. The Status field then shows the new status (2). -
Close the incident
1 When the incident needs no more work, choose Close incident, the red button at the bottom right of the window.
2 BondiByte sets the status to Closed. The Status field in the Incident section now shows Closed, a message confirms Incident status updated. and the Close incident button is switched off, because the incident is already closed.
Close incident does not ask you to confirm. To reopen an incident, choose Open (or another status) in the Incident status list and choose Save status.
To close an incident without further work, for example because it was recorded by mistake, choose Cancelled in the Incident status list and choose Save status instead.
Warning: Close an incident only when its follow-up is finished. A closed incident leaves the Open, Follow-up and High risk tiles, so nobody looking at those tiles sees it any more.
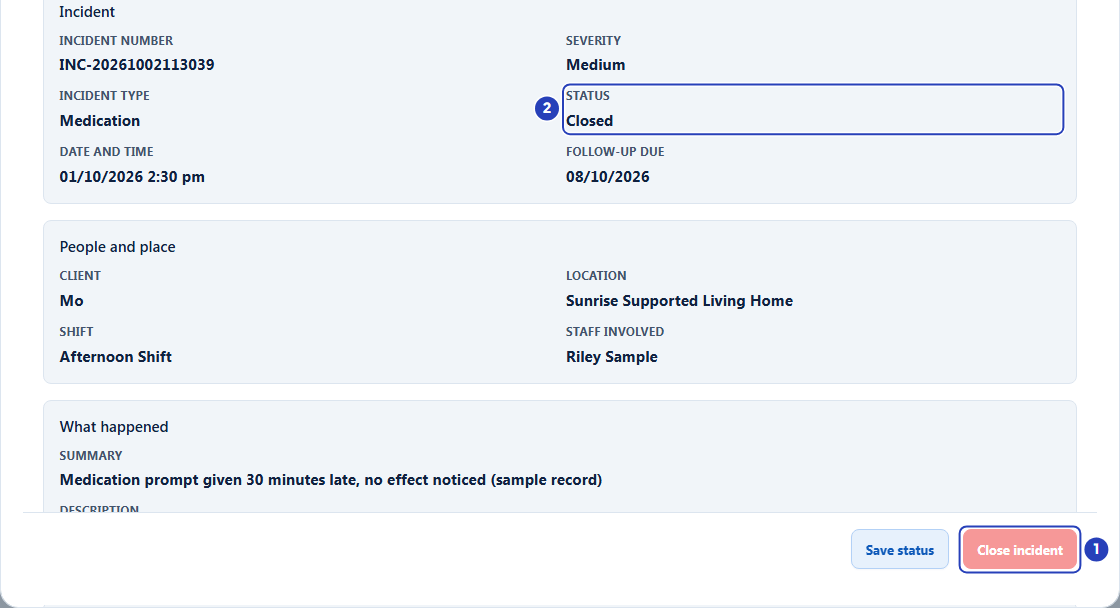
Choose Close incident (1). The Status field then shows Closed (2) and the button is switched off. -
Open the row menu to correct a detail
1 At the end of the incident's row, open the three dots menu. If the Review incident window is still open, choose Close first.
2 Choose Edit. It opens the Edit incident window, described in the next step. Edit only appears if you can edit incidents.
3 Review opens the Review incident window you used in the earlier steps.
4 Delete removes the incident from the active register. It only appears if you can edit incidents, and only while the incident is on the active register. See step 9, Delete an incident you no longer need.
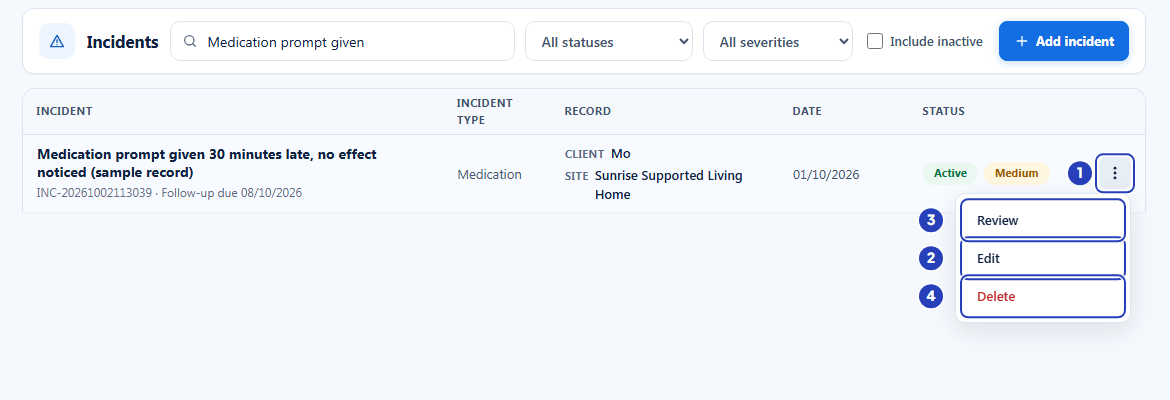
Open the three dots menu on the row (1) and choose Edit (2). Review (3) opens the Review incident window and Delete (4) removes the incident from the active register. -
Change the details and choose Save incident
1 The Edit incident window opens with the details already entered. Its fields are the same as in the Add incident window, described in Record an incident: Incident Details, People Involved, What Happened, Immediate Response, Notifications and Follow-up.
2 Change what needs correcting. The saved values sit in the same fields as when the incident was recorded, for example Date and time.
3 The staff members already linked appear under Staff involved after a moment. Choose Remove beside a name to take that person off.
When you have finished, choose Save incident at the bottom of the window. A message confirms Incident updated. and the register shows the new details. Choose Cancel instead to close the window without saving.
The Edit incident window has no status list. Change the status from the Review incident window, as in the earlier steps. Under the form, a line starting Current description: repeats the description as it was saved.
Note: If you tick Follow-up required, Who should follow up and Follow-up due date must both be filled in, as when the incident was recorded.
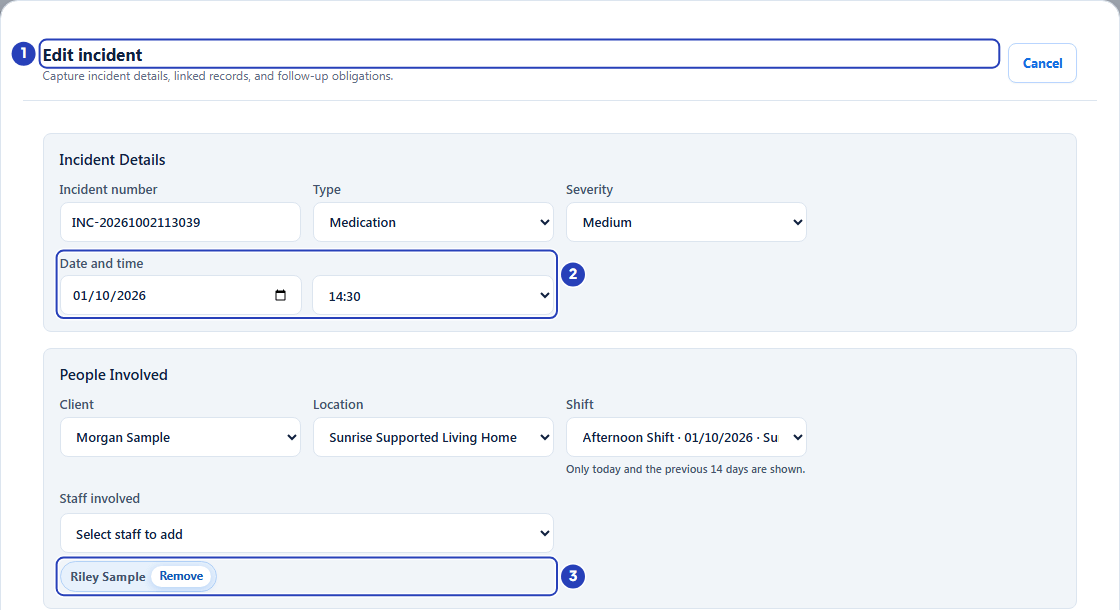
The Edit incident window (1) holds the saved details, such as Date and time (2). The staff already linked appear under Staff involved (3). -
Delete an incident you no longer need on the active register
Open the three dots menu at the end of the incident's row and choose Delete. The Delete incident? window opens and says This removes the incident from the active incident register. Read the incident number in the message to check it is the right incident.
1 Choose Delete incident to confirm. A message says Incident deleted from the active register. and the incident leaves the list.
2 Choose Cancel to keep the incident.
3 Choose Keep incident at the top right of the window to keep the incident as well.
To see a deleted incident again, tick Include inactive above the register. It is listed with the label Inactive. Its three dots menu then offers Review and Edit, but not Delete.
Warning: There is no button to put a deleted incident back on the active register. Use Delete only for a record that should not be on the register. If an incident was recorded by mistake, consider setting its status to Cancelled instead, so the record stays visible in the register.
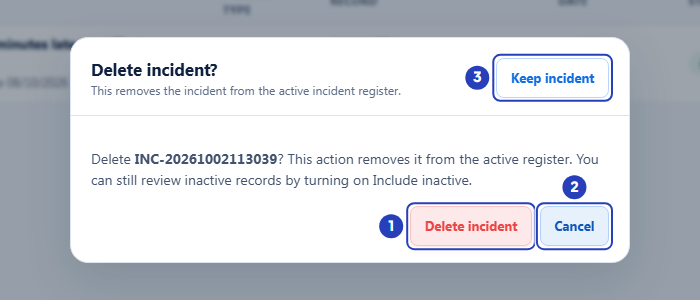
Choose Delete incident (1) to confirm. Choose Cancel (2), or Keep incident (3), to keep the incident.
What happens next
A status change takes effect as soon as you choose Save status or Close incident. The Open, Follow-up and High risk tiles on the Incidents page change to match. An incident that is Closed or Cancelled no longer counts in those three tiles, and it still counts in Total.
A closed incident stays on the register. To find it, choose Closed (or Cancelled) in the status list above the register.
If you changed a detail with Edit, the register shows the new details straight away.
A deleted incident leaves the active register but is not erased. Tick Include inactive to list it.
Reviewing or closing an incident in BondiByte does not report it to the NDIS Commission, to the police or to anyone else outside your organisation. Your organisation decides whether an incident has to be reported and makes any report itself. See The incident workflow.
Important notes
Important: BondiByte keeps your record of the incident and where it is up to. It does not report the incident to the NDIS Commission or anyone else. Your organisation remains responsible for responding to the incident and for any reporting it must do.
Note: The three dots menu on a row and the incident's summary both open the Review incident window. The summary is the quickest way in. Edit is a separate window for correcting details.
Good practice
- Open an incident with Review when you only need to read it. The Review incident window shows the full record and cannot change the details by accident. Use Edit only when a detail has to be corrected.
- Keep the status honest as the work moves along. Choose In review when someone starts looking into it and Follow-up required while actions are still to be done, so the status list above the register shows where every incident is up to.
- Once a week, use the status list to look at Open, In review and Follow-up required in turn, and check that someone is working on every incident listed.
- Check the High risk tile first. Choose High or Critical in the severity list to see the incidents that need a decision soonest.
- Before you choose Close incident, read Follow-up required, Follow-up owner and Follow-up due in the Immediate response and follow-up and Incident sections. If a follow-up is still due, leave the incident open.
- The status list has no box for a reason. If you want the outcome written down, use Edit to add it to Description or Immediate action taken before you close the incident.
- Do not delete an incident to tidy the register. Deleting hides it from the active register, and there is no button to bring it back. Use the status list to close or cancel it, so it stays visible.
Troubleshooting
Incidents is not in the left menu.
Why it happens: Your role does not include Can view incidents.
What to do: Ask an Owner or Admin to check your role.
The page says Incidents are not enabled for your organisation.
Why it happens: Your organisation's subscription is not active. A banner may also say Your plan does not include this feature.
What to do: An Owner or Admin checks Billing & subscription, and contacts BondiByte support if it is active.
The Review incident window has no Incident status list, Save status or Close incident, or the three dots menu has no Edit or Delete.
Why it happens: Your role does not include the Can edit incidents permission, so the window is read only. Delete is also left out for an incident that is already Inactive.
What to do: Ask an Owner or Admin to check your role, or to change the status for you. To see an inactive incident, tick Include inactive.
The Close incident button is switched off.
Why it happens: The incident is already Closed or Cancelled.
What to do: To reopen it, choose Open in the Incident status list and choose Save status.
A message in the window says No closed incident status is set up for your organisation.
Why it happens: BondiByte could not find a status that counts as closed.
What to do: Choose Closed or Cancelled in the Incident status list and choose Save status. If that does not work, contact BondiByte support.
The incident I am looking for is not in the register, or the register says No matches for followed by my search words.
Why it happens: A search or a list is narrowing the register, nothing you typed matches, the incident was deleted from the active register, or it is not linked to a site you can see.
What to do: Choose Clear search, set the lists back to All statuses and All severities, and tick Include inactive. Try a shorter search word. If your access is limited to certain sites, ask an Owner or Admin to check your access.
A message says Unable to refresh incident records. Try again.
Why it happens: The register could not reload after your change, for example because the connection dropped.
What to do: Check your connection and reload the Incidents page. Your change may already have been saved, so check the incident's status before you repeat it.
I chose a status but the incident did not change.
Why it happens: A status only changes when you choose Save status. Closing the window, or choosing another incident, leaves the status as it was.
What to do: Open the incident again, choose the status and choose Save status. Look for the message Incident status updated.