

Who this is for
This guide is written for Owner, Admin and Manager.
Before you start, features that need switching on
Most of the left menu works as soon as your organisation is set up. A few features only start working after an Owner or Admin switches them on. Owners and Admins do this in Account settings: choose your name at the top right, choose Account settings, and find the Automation & Capacity Controls card. Each control in it has an Enable or Disable button. If your organisation asks for multi-factor authentication, the card shows once your multi-factor authentication is set up, so use the Multi-factor authentication card on the same page first.
Pay Levels and automatic interpretation switches on the Pay Levels screen. Until it is switched on, Pay Levels shows Pay Levels are not enabled for this organisation. After you choose Enable, open Pay Levels in the left menu to review and confirm the setup.
Automation Centre is the master switch for the Automation Centre screen. While it is off, none of the automation controls under it run.
Smart Rostering works once an Owner or Admin ticks Enable Smart Rostering in Configuration > Rostering rules > Organisation Settings, each site is switched on, and Smart Rostering automation is enabled here. See Set up Smart Rostering.
Send to Xero on the Timesheets screen works once Xero Payroll is connected in Configuration > Xero Payroll. Until then it says Connect Xero in Configuration to send timesheets.
How BondiByte is laid out
BondiByte has three parts you use all the time. The left menu is the main way to move around. The top bar shows the name of the page you are on, your notifications and your account menu. The page below the top bar shows the records and tools for the menu item you chose.
This guide shows the menu as an Owner sees it. Admins see the same items. Staff do not use this workspace day to day: they use the Staff App on their phones.
To learn how to sign in, see Sign in to BondiByte.
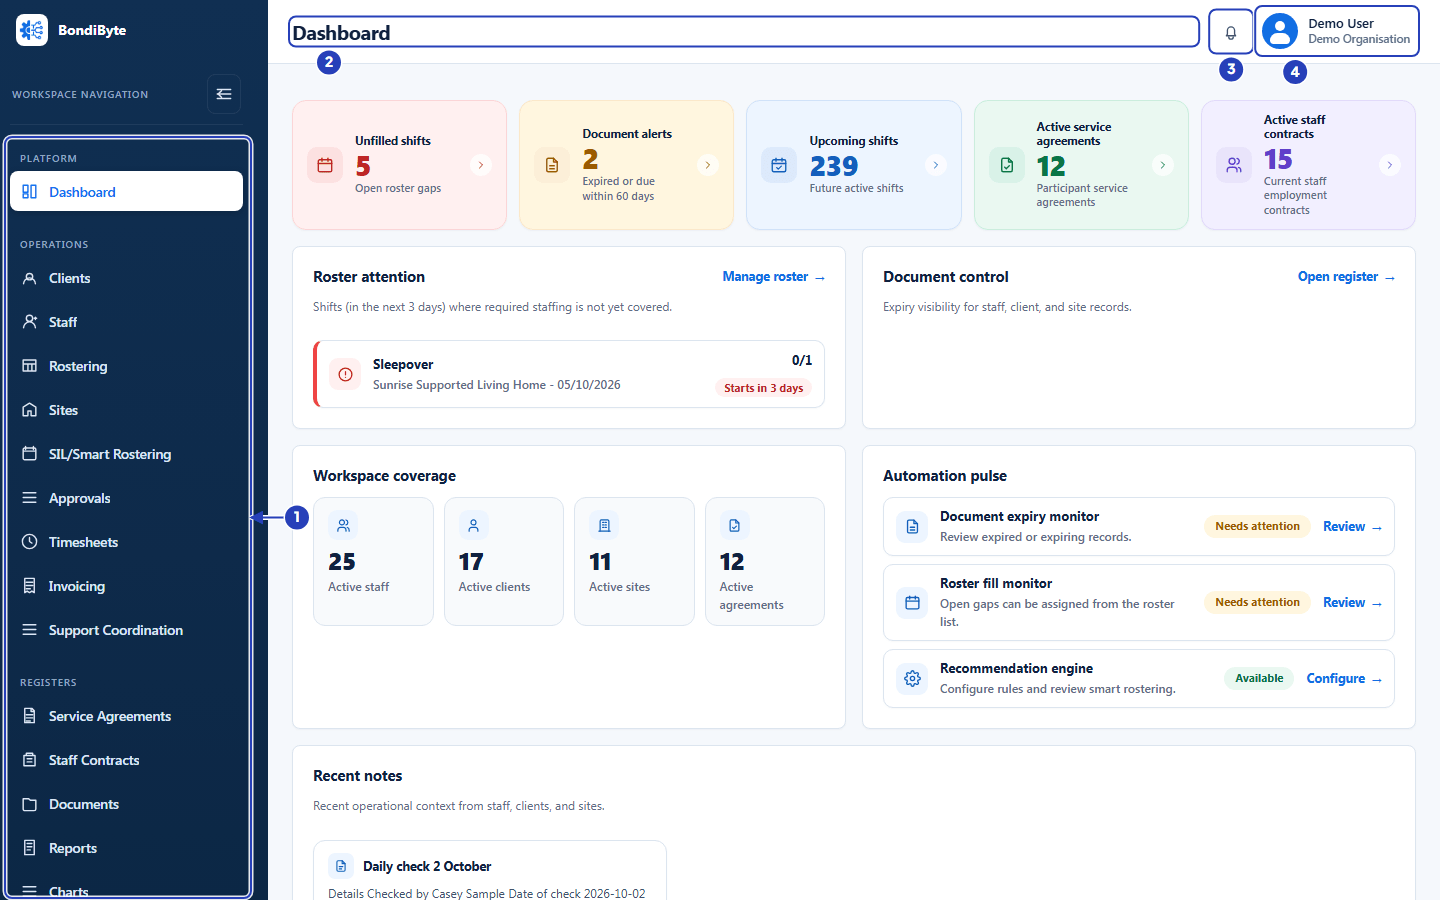
The left menu
The left menu is grouped under four headings: Platform, Operations, Registers and Administration. Choose an item to open its page. The item you are on is highlighted.
Choose the button at the top of the menu to shrink it to icons only. It is labelled Collapse menu, and it becomes Expand menu when the menu is small. BondiByte remembers your choice.
The next four sections go through each heading.
Platform
Dashboard is the first page you see after you sign in. It shows cards such as Unfilled shifts, Document alerts, Upcoming shifts, Active service agreements and Active staff contracts, with lists below it such as Roster attention and Document control. Choose a card or a link such as Manage roster to go to the full page.
Operations
Clients opens Client Records, the list of the people you support. Use it to find, add and open client records.
Staff opens Staff Records, the list of your staff. Use it to find, add and open staff records.
Rostering is the hand-made calendar for clients who are not attached to a site (community clients): you add each shift yourself.
Sites opens Site Records, the list of your houses and locations, with filters for SIL Home, Respite, Community Access, Office and Other.
SIL/Smart Rostering is for sites (SIL houses): shifts belong to the site, several workers can be on one shift, sleepovers and roster periods apply, and Smart Rostering can build the roster for you.
Approvals lists the requests waiting for a decision, in tabs for Swap requests, Shift cancellation requests, Open shift requests, Leave & unavailability and Document requests.
Timesheets opens Timesheet review for a pay period, with options to export payroll and to send timesheets to Xero Payroll.
Invoicing opens the invoicing workspace, where you find a client and work with their invoices.
Support Coordination opens your participant caseload and coordination activities.
Registers
Service Agreements opens Agreement Records, with Create agreement and the Service Agreement Builder.
Staff Contracts opens the staff contract records, with Create contract and the Staff Contract Builder. Only Owners and Admins see this item.
Documents opens Document Control, the register of staff, client and site documents, with their expiry dates.
Reports opens the written reports about clients, staff, sites and shifts, with Add report.
Charts opens the entries recorded on client Charts, with filters for Client, Chart and Range. If the list is empty, try a wider Range.
Incidents opens the incident register, with counts of open and high-risk incidents and Add incident.
A few items appear only in some workspaces. For example, NDIS Catalog appears under Registers only in some workspaces. If you need it and cannot see it, contact BondiByte support.
Administration
Automation Centre shows the rules that run automatically in your workspace and how they have run recently.
Audit Centre opens the Audit & Compliance Centre, with readiness checks, audit sessions, issues, complaints, ratings and settings.
Pay Levels opens Staff Pay Levels, with your pay table and the levels in it. It needs Pay Levels and automatic interpretation to be switched on first, as described at the top of this guide. If you are an Owner or Admin and Pay Levels is not in the left menu, contact BondiByte support.
Settings opens Workspace Settings, where you choose the theme, the organisation display name, the time zone and the date and time format.
Configuration holds the settings for the whole organisation. Its tiles are Setup, Organisation, Rostering rules, Easy Migration, Login, SSO & User Sync, Roles & Permissions, Xero Payroll, Email, Security, Data Export, AI Settings, Reports & Forms and Chart Library. Type in Search settings at the top of the page to find a setting.
To fill in the organisation details and the time zone, follow Set up your organisation.
The top bar
The name of the page you are on is at the top left.
The bell shows how many notifications you have not read. Choose it to open the list of your latest notifications. On a notification, choose Open to go to the record, Mark as read or Mark as unread to change it, or Delete to remove it. Choose Clear all to remove every notification and Close to close the list.
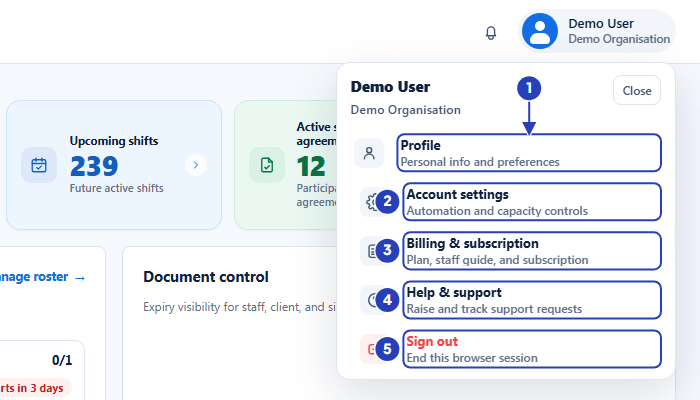
Your name and your organisation's name are at the top right. Choose them to open the account menu.
The account menu
Profile holds your personal details and preferences.
Account settings holds multi-factor authentication and changing your password. Owners and Admins also see automation usage and the Automation & Capacity Controls card there.
Billing & subscription holds your plan and subscription. Only Owners and Admins see it.
Help & support lets you raise support requests and follow them.
Sign out ends your session in this browser. BondiByte then shows a page that asks you to choose Sign out once more.
What you see depends on your role
A menu item appears only when your role has permission to open it. A manager or a coordinator therefore sees fewer items than an Owner. If a colleague can open something that you cannot, ask an Owner or Admin to check your role.
A manager whose access is limited to certain sites sees the same kind of menu, but inside each page they see and create records only for their own sites. For how roles work, see Roles and permissions basics.
Important notes
Tip: The names in the left menu are the names used in every BondiByte guide, so you can search a guide for the item you are looking at.
Good practice
- Start each day on Dashboard. The Unfilled shifts and Document alerts cards and the Roster attention list show what needs action first, and each card opens the full page.
- Use the bell to follow up. Choose Open on a notification to go straight to the record, then Mark as read so the count shows only what is new.
- Use Search settings at the top of Configuration to jump to a setting instead of looking through every tile.
- If you cannot see a menu item that a colleague uses, ask an Owner or Admin to check your role. Always sign in with your own login, so each person's work is recorded under their own name.
Questions and answers
Why does Pay Levels say Pay Levels are not enabled for this organisation?
Pay Levels has not been switched on yet. An Owner or Admin chooses their name at the top right, then Account settings, and in Automation & Capacity Controls chooses Enable on Pay Levels and automatic interpretation. Then open Pay Levels in the left menu to review and confirm the setup.
Why does Send to Xero ask me to connect Xero?
Xero Payroll is not connected yet. An Owner or Admin connects it in Configuration > Xero Payroll, then Send to Xero on Timesheets can be used.
Why does nothing happen for my site on the SIL/Smart Rostering screen?
Smart Rostering has to be switched on for the organisation and then for each site, and Smart Rostering automation must be enabled in Account settings under Automation & Capacity Controls. If Enable Smart Rostering is greyed out on the site, hold the pointer over it. The message Configure organisation settings before enabling sites. means the organisation step is not done yet. See Set up Smart Rostering.
Why can I not see Automation & Capacity Controls in Account settings?
Only Owners and Admins see this card. If your organisation asks for multi-factor authentication, it shows once your multi-factor authentication is set up. Open the Multi-factor authentication card on the same Account settings page, set it up, then sign in again with your authenticator code.
Why can I not see Staff Contracts, Pay Levels or Configuration?
BondiByte shows only the menu items your role is allowed to open. These items are mainly for Owners and Admins. Ask an Owner or Admin to check your role if you need one of them. If you are an Owner or Admin and Pay Levels is still not in the left menu, contact BondiByte support.
How do I make the left menu smaller?
Choose Collapse menu at the top of the left menu. Choose Expand menu to bring the names back.
Where do I change my password or turn on multi-factor authentication?
Choose your name at the top right, then Account settings.
Where do I find my organisation's sign-in link and company code?
In Configuration > Login, SSO & User Sync, in the Tenant login URL tab.
Where do I change the time zone or the date format?
In Settings, under Date and time.