

Who this is for
This guide is written for Owner, Admin and Manager.
Before you begin
- You are signed in to BondiByte on a computer.
- You have the person's first name, last name and email address. Their mobile number is optional.
- To complete the profile later, any site and Pay Level you want to choose already exist. See Create a site and Pay Levels.
Steps
The screenshots show a demonstration organisation with made-up names. Your own screens show your organisation's details. Select a screenshot to open it full size.
-
Go to Staff > Add staff
1 In the left menu, choose Staff. The Staff Records list opens.
2 At the top right of the list, choose Add staff. The Add staff window opens. It says Create the staff record now. You can complete their profile later.
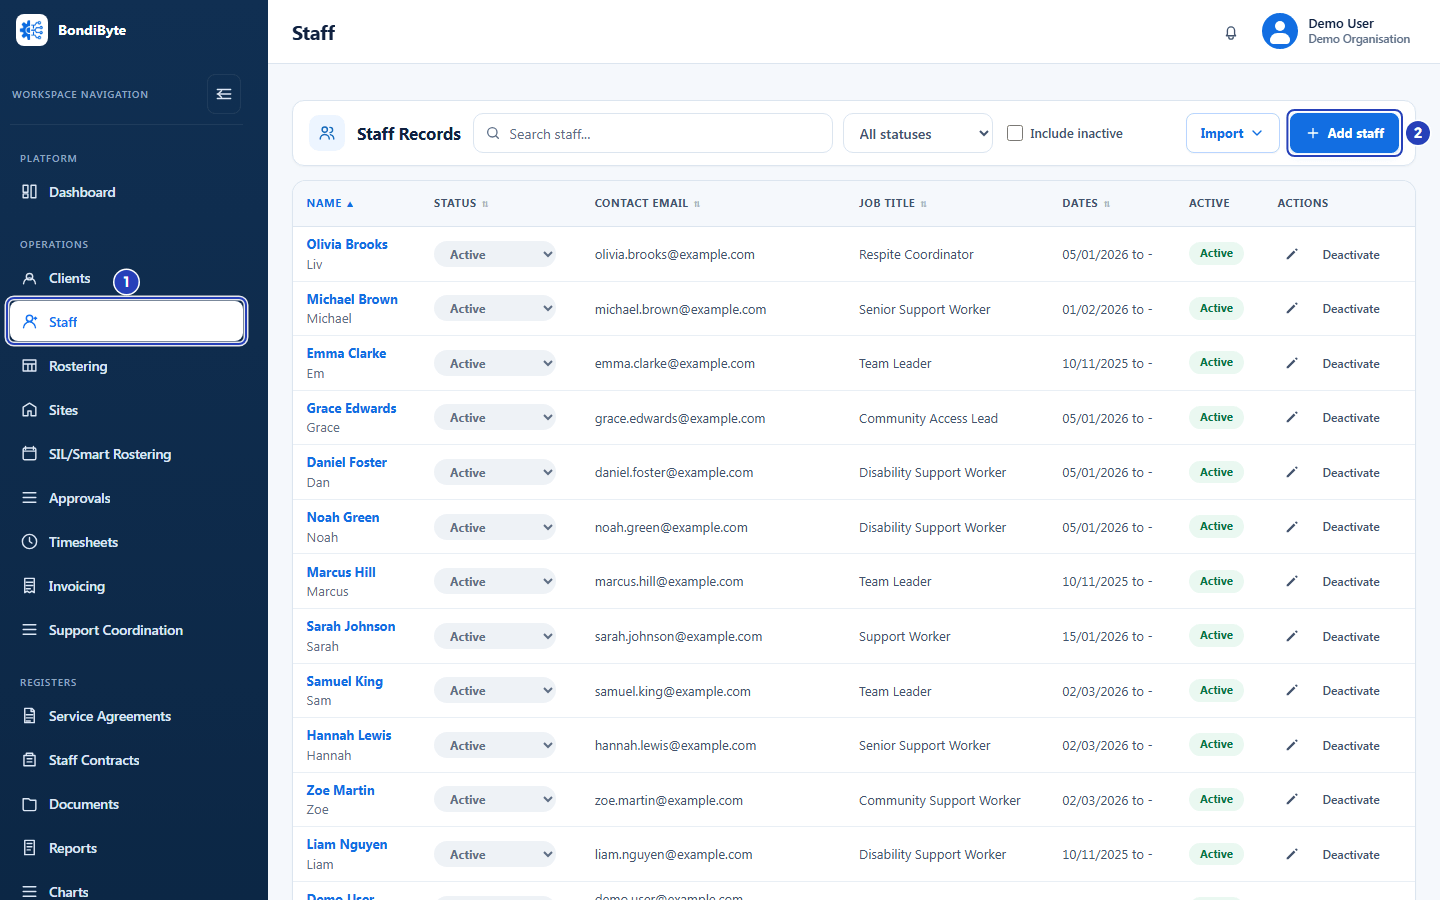
Choose Staff in the left menu (1), then Add staff (2). -
Enter the essentials
Fields marked * are required.
1 In First name, type the person's first name.
2 In Last name, type their last name.
3 In Email, type the person's own email address. Login details are sent here.
4 In Mobile, type their mobile number if you have it. It is optional.
Fields in step 2 Field What it means First name Required. Last name Required. Email Required. Each email address can belong to one staff member in your organisation. Mobile Optional. Site Shown only if your own access is limited to certain sites. Choose one of your sites. If you have just one site, it is filled in for you and the window says The new staff member is added to your site. Tip: Everything else, such as job title, employment type, sites and Pay Level, is added later with Edit staff (step 5).
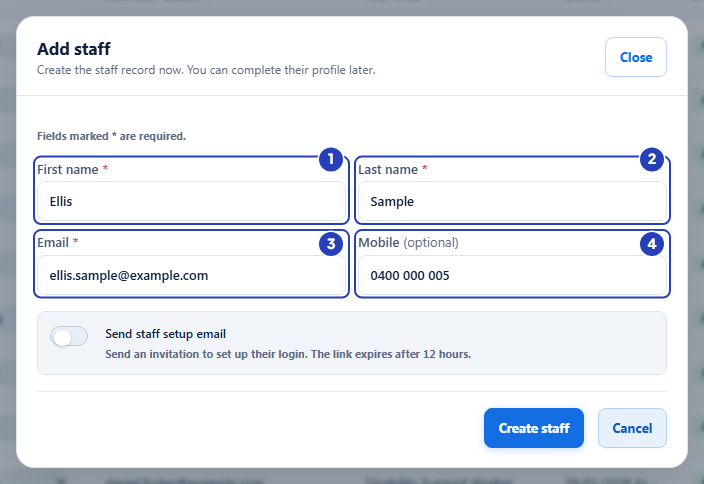
Type the first name (1), last name (2) and email (3), and the mobile number if you have it (4). -
Choose whether to send the setup email
1 To email the person a link to set up their login now, turn on Send staff setup email. The line under it says the link expires after 12 hours.
2 The button at the bottom changes to Create and send invitation.
Leave the switch off to create the record only. You can send login details later from the person's Login access tab. See Give a staff member login access.
Tip: Staff sign in to the BondiByte Staff App on their phone. Ask the person to install BondiByte Staff before you send the email, so they can use the link straight away.
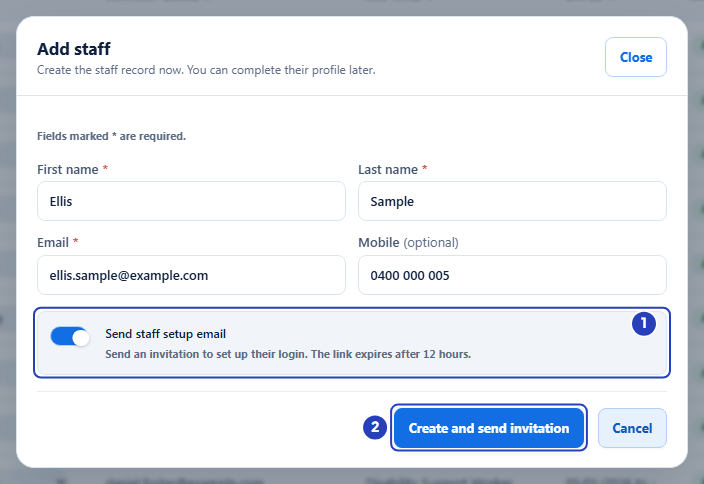
Turn on Send staff setup email (1). The button changes to Create and send invitation (2). -
Choose Create staff and check the result
1 Choose Create staff, or Create and send invitation if the switch is on. Choose Cancel instead to close the window without saving.
2 A message confirms Staff member created. The window closes and the new person appears in Staff Records as Active.
With the switch on, the message says Staff member created. Setup invitation sent. or Staff member created. Setup invitation queued.
If it says Staff member created, but the invitation could not be sent., the record is saved. Choose Retry invitation in the message, or send login details later from the Login access tab.
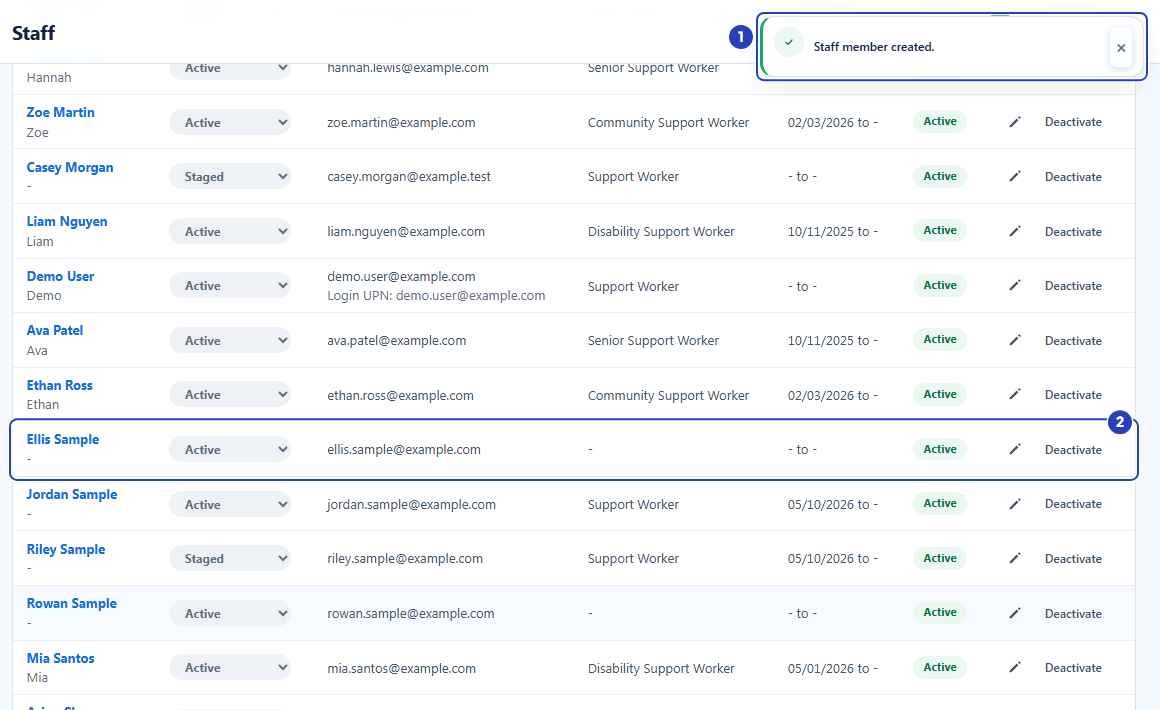
The confirmation message (1) and the new staff member in the list (2). -
Complete the profile later with Edit staff
Add the rest of the person's details when you have them. The Edit staff window has six sections: Basic Details, Contact Details, Emergency Contact, Employment Details, Rostering Preferences and General Notes. Every field in them is optional.
On the person's row in Staff Records, choose the pencil icon. The Edit staff window opens on Basic Details.
1 Type a Preferred name if the person goes by another name.
2 Add their Date of birth.
3 Type your Internal staff reference / employee number, if you use one.
4 Check Status. A new staff member is Active.
You can also open the person's record and choose Edit staff at the top. A new record's Overview shows a Complete the profile card, and its Complete profile button does the same.
Fields in step 5 Field What it means Preferred name The name the person goes by. It is shown under their name in the staff list. Date of birth Optional. Gender Optional. Choose from the list. Internal staff reference / employee number Your own reference for the person, such as a payroll number. Profile photo Optional. Upload a JPG, PNG or WebP image from your device. Status Active, Inactive or Terminated. 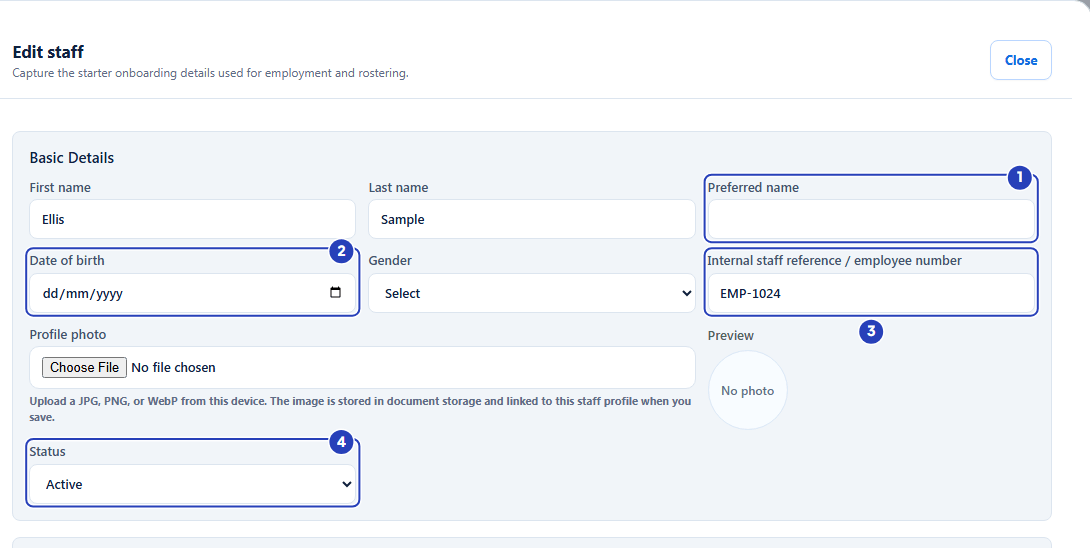
Type a preferred name (1), the date of birth (2) and your internal reference (3), and check the status (4). -
Add contact and emergency contact details
1 Check Staff contact email. It is the email you typed in Add staff.
2 Check Mobile, or type it now.
3 If you have their address, start typing it in Residential address line 1 and choose a suggestion to fill the address fields.
4 In Emergency contact name, type the name of someone to call in an emergency.
5 In Emergency contact relationship, say how they are related, for example friend or parent.
6 In Emergency contact phone, type their phone number.
Fields in step 6 Field What it means Staff contact email The email address for the person. Login details are sent here. Each email can belong to one staff member in your organisation. Phone Optional. Mobile Optional. Preferred contact method Choose Email, Phone or Mobile. Residential address line 1 Start typing an Australian address and choose a suggestion to fill the address fields. Emergency contact email Optional. Can contact after hours Tick this if the emergency contact can be called outside business hours. Emergency contact notes Anything others should know when they call. 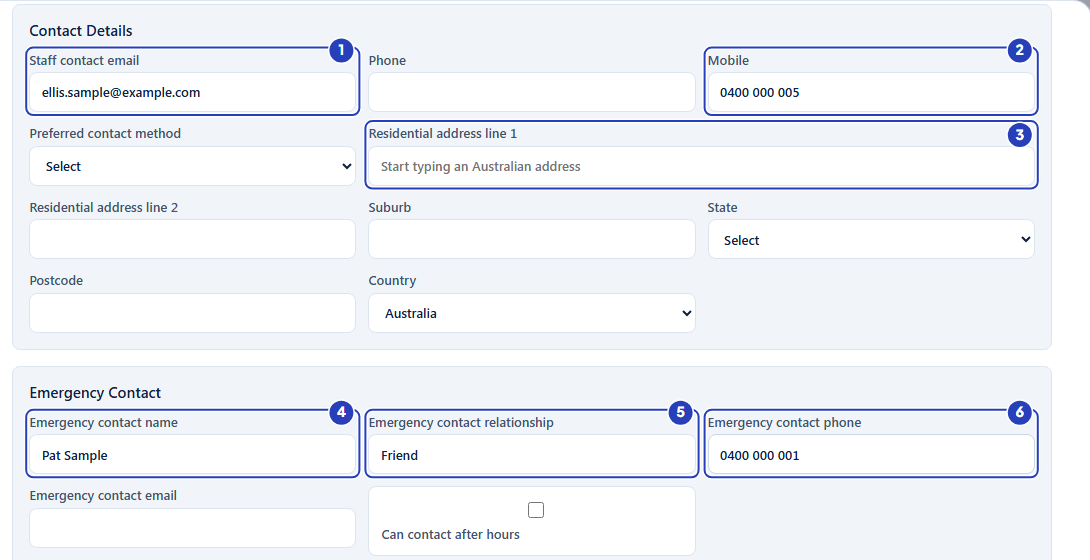
Check the email (1) and mobile number (2), start the address (3), then type the emergency contact's name (4), relationship (5) and phone number (6). -
Set the employment details
1 In Job title, type the person's role or choose one from the list. It starts empty.
2 Choose the Employment type. It starts as Not set.
3 Set the Start date.
4 Choose the Primary site / house if you have set up sites.
5 Choose the Pay level if you have set up Pay Levels.
Fields in step 7 Field What it means Job title Type a new title or choose an existing one from the list. Employment type Choose Casual, Part Time, Full Time or Contractor. Right to work in Australia Optional. Choose Australian citizen, Permanent resident or On a visa. A visa holder also needs a work-rights expiry date. Manager / supervisor Choose a current staff member who supervises this person. Login UPN The sign-in name used later to match the person to their login. It must be unique in your organisation. Start date and End date The end date cannot be earlier than the start date. Leave it blank if the person has no end date. Primary site / house The site where the person mainly works. An Active person is also assigned to this site. Pay level The default Pay Level for the person. Ordinary hours per week Their usual hours, from 0 to 168. Important: If your own access is limited to certain sites, Primary site / house is required and you can only choose one of your sites.
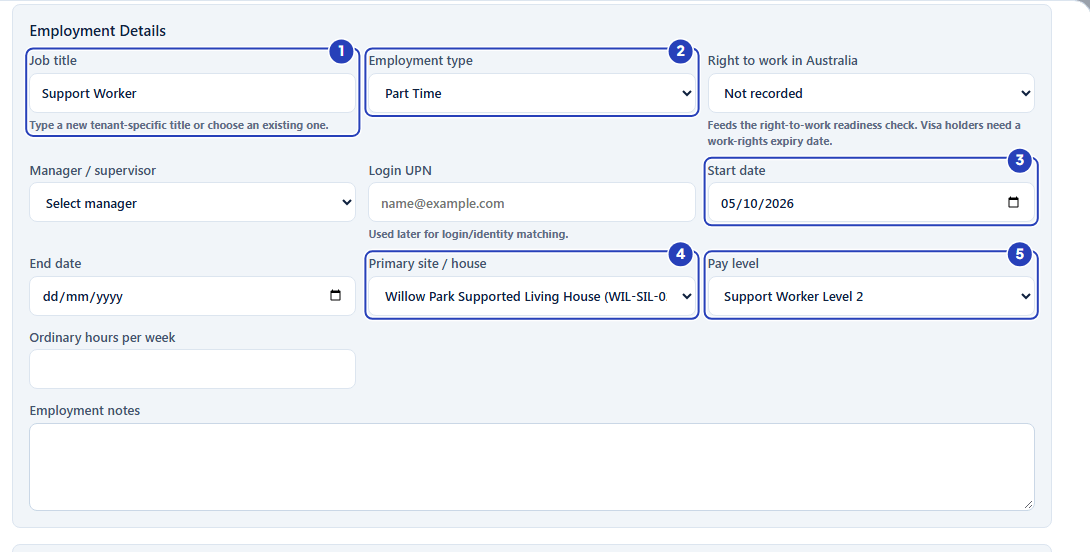
Type the job title (1), choose the employment type (2), set the start date (3), then choose the primary site (4) and Pay Level (5). -
Set rostering preferences and notes, then save
1 In Rostering Preferences, untick anything the person cannot work, such as Can work weekends or Can work sleepover shifts. All of them start ticked.
2 If the person has a limit on rostered hours, enter it in Max rostered hours (hours per fortnight). Leave it blank to use the site capacity setting.
3 Add anything others should know in Onboarding notes.
4 Choose Update staff. The buttons at the bottom of the window stay in view as you scroll. A message confirms Staff record updated.
Tip: You can change these details at any time with Edit staff.
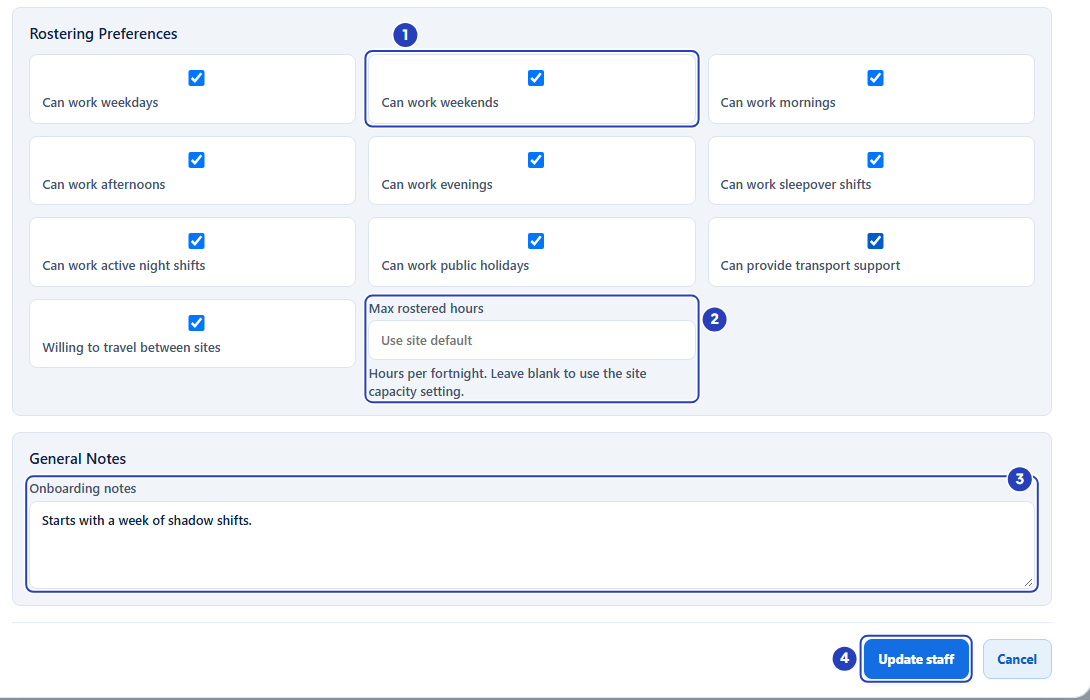
Untick anything the person cannot work (1), set a limit on rostered hours if needed (2), add onboarding notes (3), then choose Update staff (4).
What happens next
The new staff member appears in the Staff Records list. Choose their name to open their record. Until the profile is complete, its Overview shows a Complete the profile card that names what is still missing.
From their record you can add documents, set availability and capabilities, assign sites and review contracts and pay.
If you left Send staff setup email off, nothing is sent. Give them login access later from the Login access tab of their record, or with Bulk invite on the Staff Records list. See Give a staff member login access.
Important notes
Important: Only First name, Last name and Email are required. Add the rest when you have it, using the pencil icon on the staff list or Edit staff on the staff member's record.
Tip: To add many people at once, use Import on the Staff Records list instead of creating them one by one.
Good practice
- Search Staff Records, with Include inactive ticked, before you add someone. A person who left and came back may already have a record.
- Use the person's own email address, not a shared one. It is where their login details go.
- Turn on Send staff setup email only when the person is ready to open the email, because the link lasts 12 hours.
Troubleshooting
I cannot see Add staff.
Why it happens: Your role does not include permission to create staff.
What to do: Ask an Owner or Admin to check your role, or to add the staff member for you.
A message under Email says A staff member already uses this email. Use a different email, or open the existing staff record.
Why it happens: Each email address can belong to one staff member in your organisation.
What to do: Search Staff Records for the person, and turn on Include inactive in case their record was deactivated. Use a different email if this is a different person.
I cannot see the Send staff setup email switch.
Why it happens: Your role does not include the Can manage staff login access permission.
What to do: Create the staff member, then ask an Owner or Admin to send their login details from the Login access tab.
A message says Staff member created, but the invitation could not be sent.
Why it happens: The record was saved, but the setup email could not be sent.
What to do: Choose Retry invitation in the message. If it fails again, ask an Owner or Admin to check Configuration > Email, then send login details from the person's Login access tab.
A message under Site says Choose one of your sites for this record.
Why it happens: Your access is limited to some sites, and a staff member must be created at one of them.
What to do: Choose a site in Site, then choose Create staff again.
In Edit staff, a message says a staff record with this UPN already exists.
Why it happens: Each login UPN must be unique in your organisation.
What to do: Check the Login UPN you typed, or find the existing record in Staff Records.
In Edit staff, the end date cannot be earlier than the start date.
Why it happens: End date is before Start date.
What to do: Correct the two dates, or clear End date if the person has no end date.