

Who this is for
This guide is written for Owner and Admin.
Before you begin
- Xero Payroll must be connected first. Until it is, the Payroll calendars and Mappings sections do not appear. The same happens while the card says Xero needs to be reconnected before pay item and employee mappings can be managed. See Set up Xero Payroll.
- The people you want to send are Active in Staff Records. Only active staff are listed. See Create a staff member.
- Each of those people has an employee record in Xero with a payroll calendar. If the Xero employee list does not offer a person, they are not available to BondiByte in Xero.
Steps
The screenshots show a demonstration organisation with made-up names. Your own screens show your organisation's details. Select a screenshot to open it full size.
-
Go to Configuration > Xero Payroll > Mappings
1 In the left menu, under Administration, choose Configuration. Then, under Integrations, choose Xero Payroll. The Xero Payroll Settings page opens.
2 Choose Manage mappings on the connection card. The page scrolls down to the Mappings section. You can also scroll down to it yourself.
Note: The Mappings section says Match BondiByte staff and pay items to Xero. Nothing is sent to Xero until you save. Saving mappings does not send any timesheets.
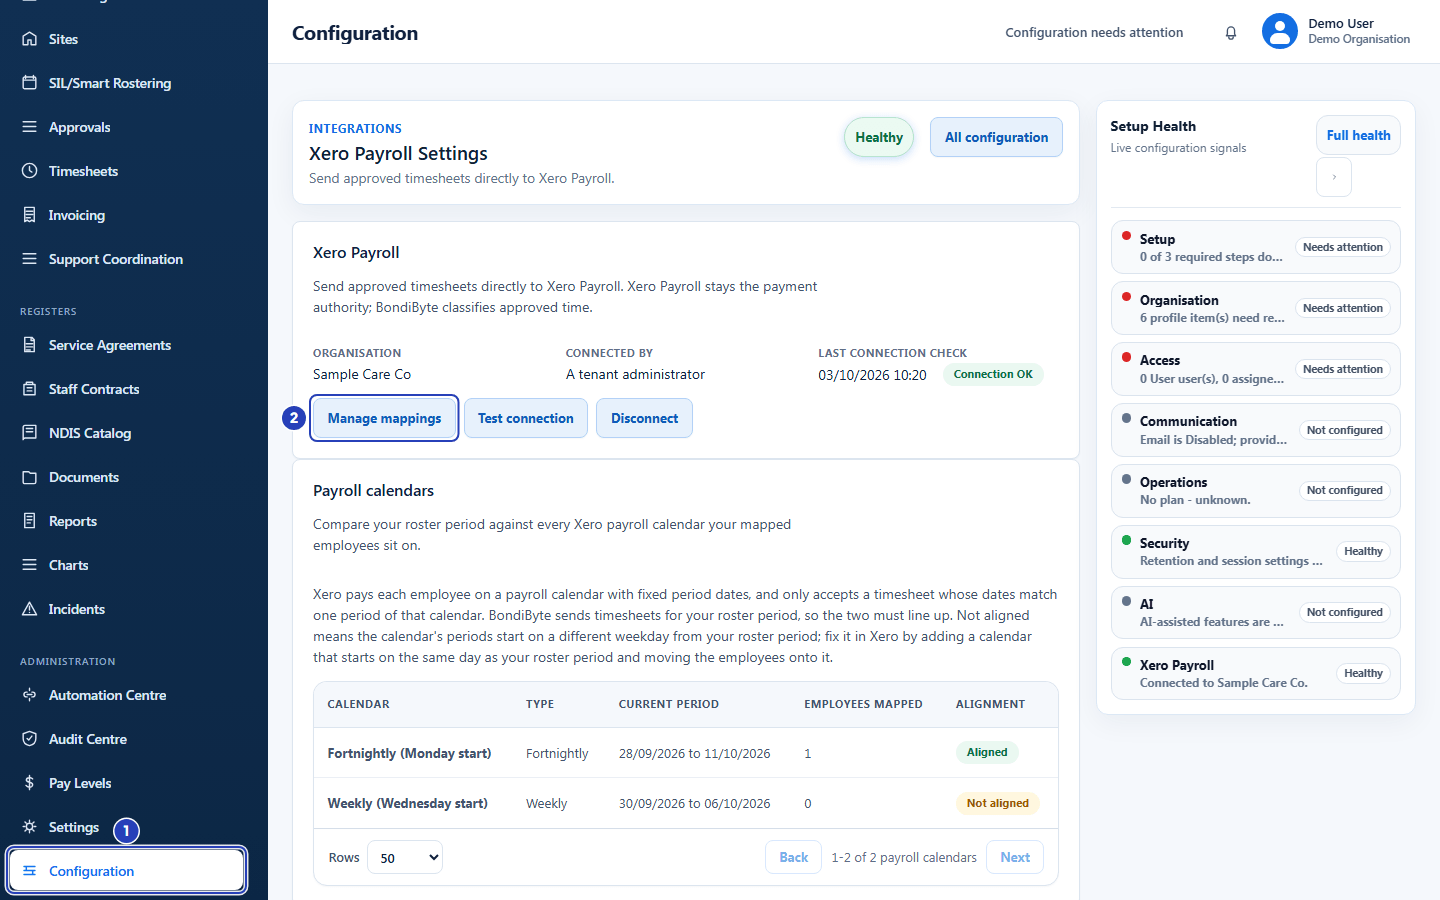
Choose Configuration under Administration and then Xero Payroll (1), then choose Manage mappings (2). -
Read the staff table
The staff table is at the bottom of the Mappings section. Above it you may see settings for earnings rates. They are covered in Map earnings rates in Xero.
1 In BondiByte staff, find the person. Only active staff are listed, in order of last name.
2 Read State. Mapped means a Xero employee is saved for the person. Not mapped means none is saved yet. Xero employee unavailable means a saved Xero employee can no longer be found in Xero.
3 A row that already shows a Xero employee with Suggested beside it has a likely match that is not saved yet.
Fields in step 2 Field What it means BondiByte staff The staff member's name from Staff Records. Xero employee A list of the Xero employees you can choose from. Not mapped means no person is chosen. State Mapped, Not mapped or Xero employee unavailable. 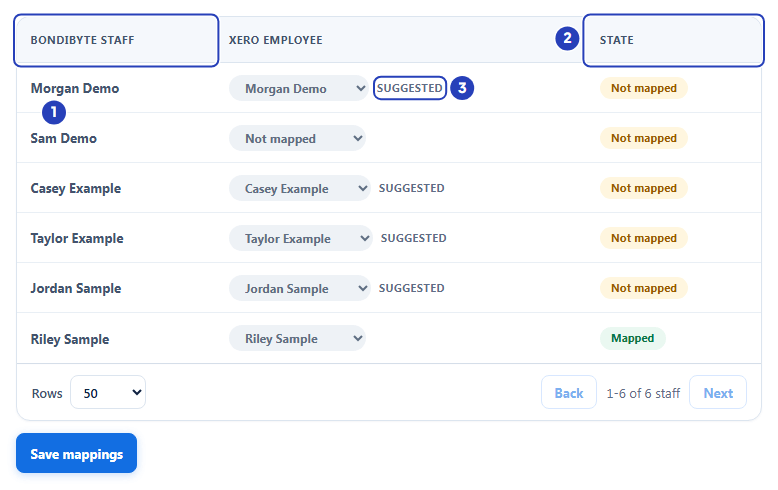
Find the person in BondiByte staff (1), read their State (2) and look for Suggested rows (3). -
Choose the Xero employee for each person
1 For a row marked Suggested, check that the name in Xero employee is the same person. If it is, leave it. If it is not, open the list and choose the right person.
2 For a row that is Not mapped, open the Xero employee list and choose the person. A person you already chose for another row is not offered again.
Nothing is saved yet. The State column changes only after you save.
Warning: Check every Suggested row before you save. A suggestion is only a match BondiByte found. It is saved as it stands when you choose Save mappings.
Important: A Xero employee can be matched to one staff member only. If two rows end up with the same person, a message under the list says Also mapped to followed by the other name, and Save mappings stays greyed out until you change one of them.
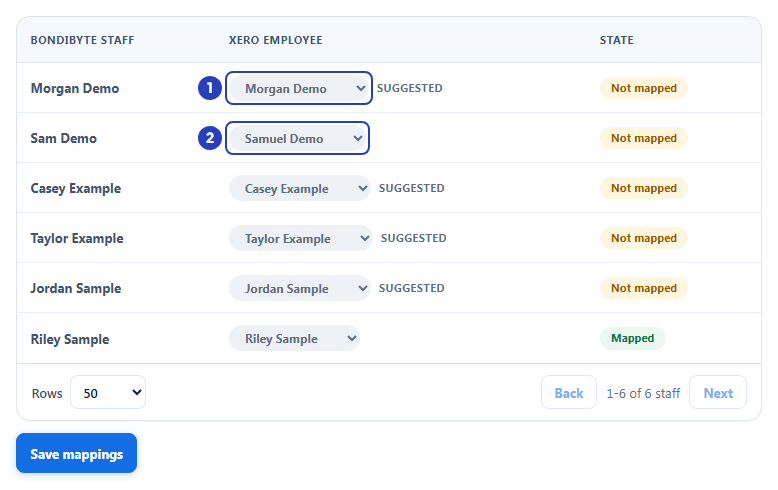
Check a Suggested row (1), then choose the Xero employee for a row that is Not mapped (2). -
Choose Save mappings
1 Choose Save mappings below the table. The button reads Saving... for a moment. It is greyed out when there is nothing new to save.
2 A message says Employee mappings saved. and every row you matched now shows Mapped under State. A person you left as Not mapped stays that way.
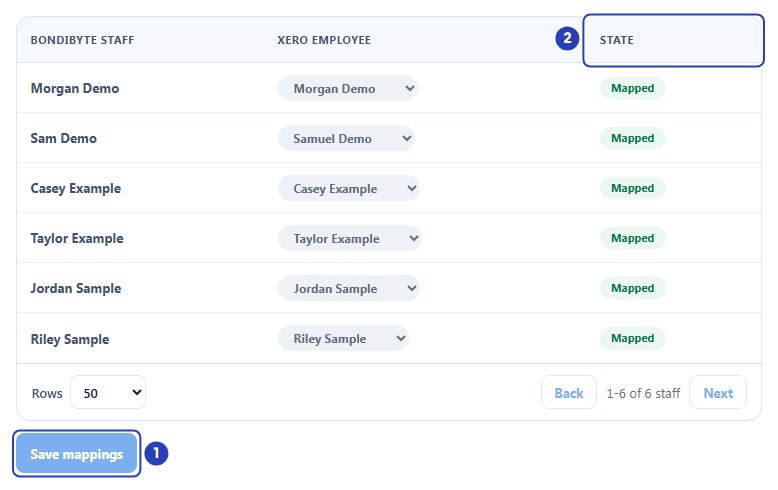
Choose Save mappings (1). Every matched row now shows Mapped (2). -
Check the payroll calendars
Scroll up to the Payroll calendars section, above Mappings. It lists the payroll calendars in Xero.
1 Check Employees mapped. It counts the matched employees on each calendar.
2 Check Alignment. Aligned means the calendar's periods match your roster period. Not aligned means they start on a different weekday.
If a calendar with matched employees is Not aligned, a note under the table says what to change. Timesheets for those employees are held when you send. See Troubleshooting below.
Fields in step 5 Field What it means Calendar The name of the payroll calendar in Xero. Type How often it pays, such as Weekly or Fortnightly. Current period The dates of its current pay period. Employees mapped How many of your matched employees are on this calendar. Alignment Aligned or Not aligned against your roster period. 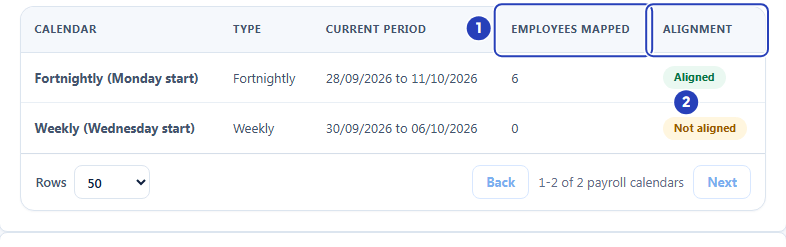
Check Employees mapped (1) and Alignment (2) for each payroll calendar.
What happens next
The people you matched are no longer held for having no Xero employee when you check a period before sending.
Next, choose the Xero earnings rates your hours are sent against. See Map earnings rates in Xero. Then see Send approved timesheets to Xero. When a new person starts, come back here to match them before the next pay run.
Important notes
Important: Matching does not send anything to Xero. It only tells BondiByte which Xero employee each timesheet belongs to.
Good practice
- Match everyone paid through Xero before your first send. Anyone without a match is held, with the reason This staff member has no mapped Xero employee.
- Check each Suggested row before you save.
- Keep names and emails in Staff Records the same as in Xero, so BondiByte can suggest the match.
Troubleshooting
The Payroll calendars and Mappings sections are missing, or Mappings says Xero is not connected.
Why it happens: Xero is not connected, it needs to be reconnected (the card says Xero needs to be reconnected before pay item and employee mappings can be managed.), or the connection ended while the page was open.
What to do: Connect or reconnect Xero, then reload the page. See Set up Xero Payroll.
A staff member is missing from the table, or the table says No staff to map and Add staff to your organisation to map them to Xero employees.
Why it happens: Only active staff are listed. The person is not Active (for example Inactive or Terminated), or there are no active staff yet.
What to do: Make the person Active in Staff Records, or add staff there, then reload the page. See Create a staff member.
The Xero employee lists are greyed out and there is no Save mappings button.
Why it happens: Your role does not include Can manage integrations.
What to do: Ask an Owner or Admin to match the staff, or to add Can manage integrations to your role.
The Xero employee list does not offer the person I need.
Why it happens: The person is not available to BondiByte in Xero, or they are already chosen for another row.
What to do: Check the person's employee record in Xero, and check no other row uses them. Then reload the page.
A row says Also mapped to another staff member's name, and Save mappings is greyed out.
Why it happens: The same Xero employee is chosen for two staff members. Save mappings is also greyed out when there is nothing new to save.
What to do: Change one of the two rows to the right person, or to Not mapped.
A row says Xero employee unavailable.
Why it happens: The Xero employee saved for this person can no longer be found in Xero.
What to do: Choose the person's current Xero employee in the list and choose Save mappings.
A calendar in Payroll calendars says Not aligned, with a note that starts Your roster period runs, or the section says No Xero payroll calendars were found.
Why it happens: The calendar's periods start on a different weekday from your roster period, so timesheets for the people on it are held. Or Xero has no payroll calendars for the connected organisation.
What to do: In Xero, add a payroll calendar of the same type that starts on the same day as your roster period and move those employees onto it, then reload the page. Or change your roster period start. See Choose a Sunday or Monday week start.