

Who this is for
This guide is written for Owner, Admin, Manager and Rostering Officer.
Before you begin
- Rostering is in your left menu and the shift cards open when you choose them. They do for roles that include Can view roster, Can edit shift and Can assign staff to shift. An Owner or Admin can add these permissions to a role in Configuration > Roles & Permissions. See Roles and permissions basics.
- You are signed in to BondiByte on a computer.
- The shift already exists on the Rostering screen. To add one, see Create a shift.
- The staff member has an active staff record and has finished onboarding. Someone who is inactive or not onboarded cannot be assigned. See Staff.
Steps
The screenshots show a demonstration organisation with made-up names. Your own screens show your organisation's details. Select a screenshot to open it full size.
-
Go to Rostering > the shift that needs staff
1 In the left menu, choose Rostering.
2 Choose a date in Jump to date, or use the arrow buttons beside it, until you can see the week that holds the shift.
3 Choose the shift card. A shift with nobody assigned is amber and shows Assign staff. The Edit shift window opens on the right.
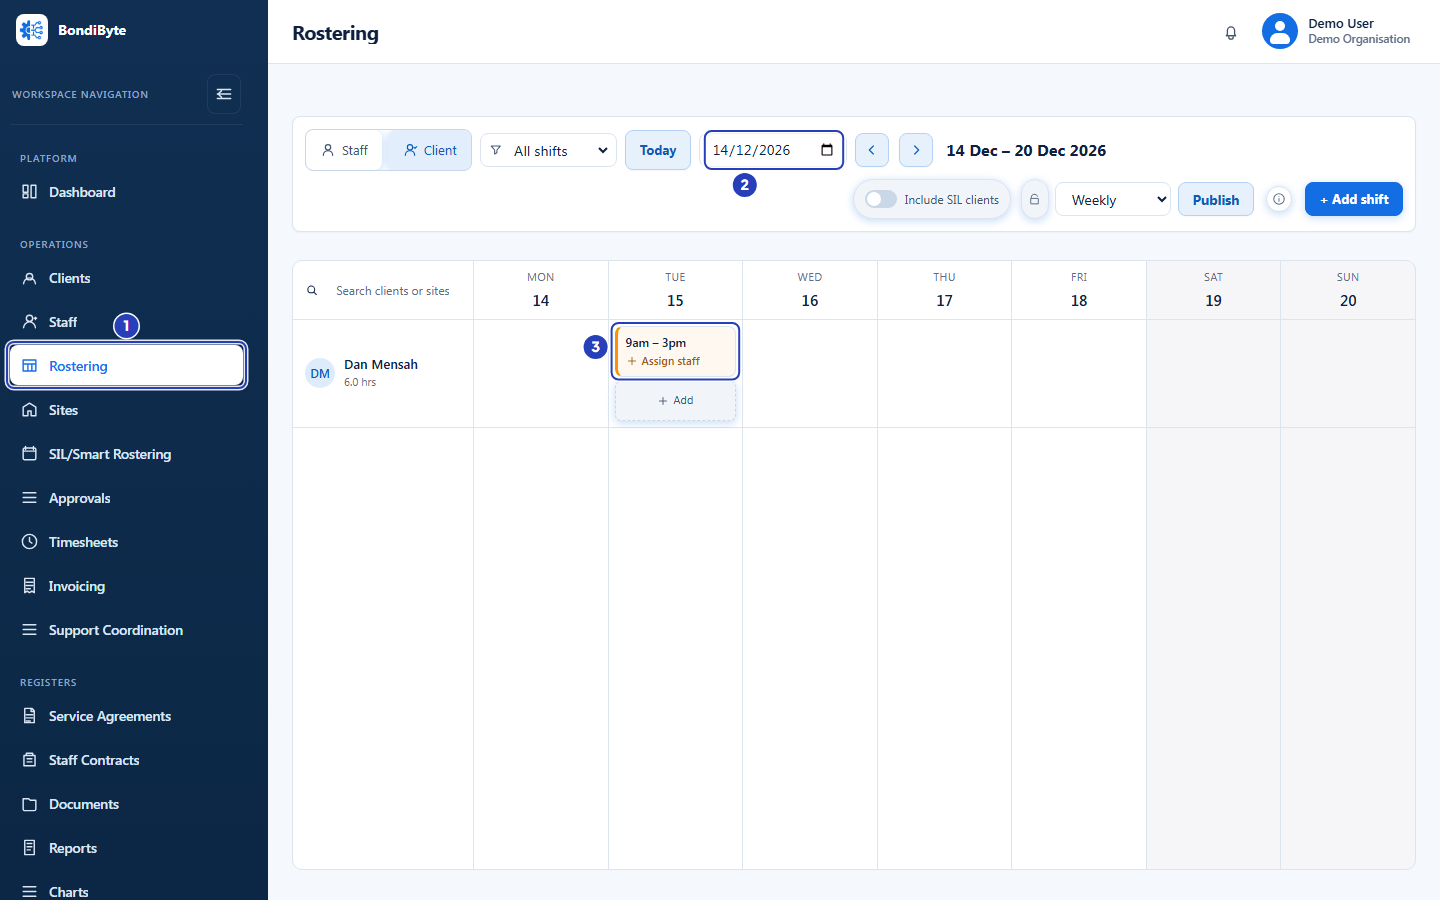
Choose Rostering, the highlighted item in the left menu (1). Show the week with the shift (2), then choose the shift that shows Assign staff (3). -
Choose the person in Assigned staff
1 In the Edit shift window, choose the Assigned staff field. A list of staff opens. Its heading shows the client, the day and the times of the shift.
2 To find someone quickly, type part of their name in Search all staff.
3 Read the note beside each name, then choose the person you want. Choose Unassigned at the top of the list if you want the shift to have no person.
Fields in step 2 Field What it means Available Nothing in BondiByte shows a clash for this person at these times. Already booked The person is assigned to another shift that overlaps this one. The times of that other shift are shown beside the note. Unavailable The person has blocked or unavailable time that overlaps the shift. On leave this week The person's staff status is On Leave. Note: Every name in the list can be chosen. The notes are there to help you decide. Someone who is inactive or not onboarded is refused when you save.
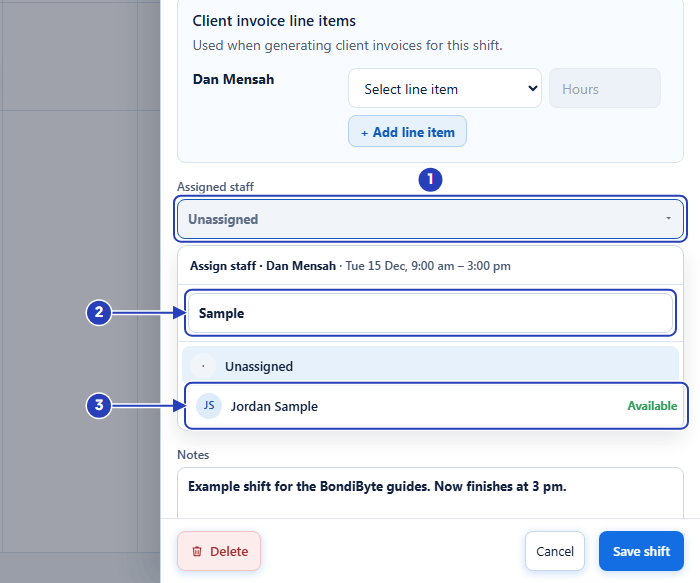
Open the Assigned staff field (1), search for a name (2) and choose the person (3). The note beside each name shows whether they are free. -
Choose Save shift
1 Check that Assigned staff now shows the person's picture or initials.
2 Choose Save shift. Saving can take a few seconds.
3 Choose Cancel instead to close the window without saving your changes.
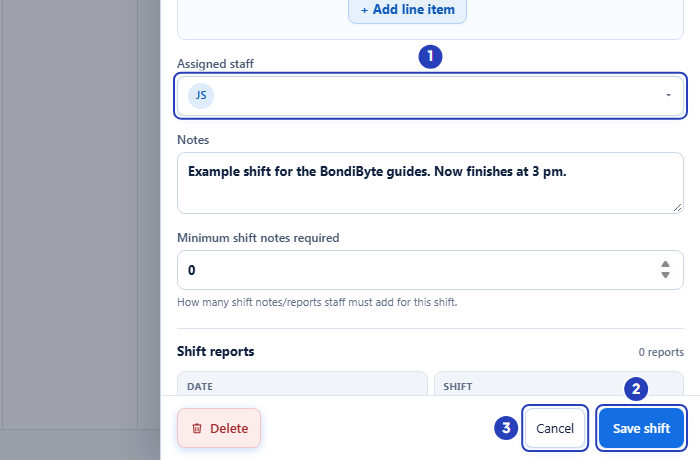
The Assigned staff field shows the person you chose (1). Choose Save shift (2), or Cancel (3) to close the window without saving. -
Read any warning before the person is assigned
1 If a Heads up before assigning box appears at the bottom of the window, read the reason. For example, it can say the person is already assigned to another shift during this time.
2 Choose Leave unassigned if you do not want this person. The box closes and Assigned staff goes back to Unassigned. Choose another person, or choose Save shift to keep the shift with nobody on it. When you are replacing a worker, choose Cancel instead to keep the first person.
3 Or choose Assign anyway to assign the person despite the warning.
Important: Your changes to the shift's dates, times and notes are kept when the box appears. If you close the window without choosing, the shift stays on the calendar with the person it had before, or with nobody assigned if it had no one.
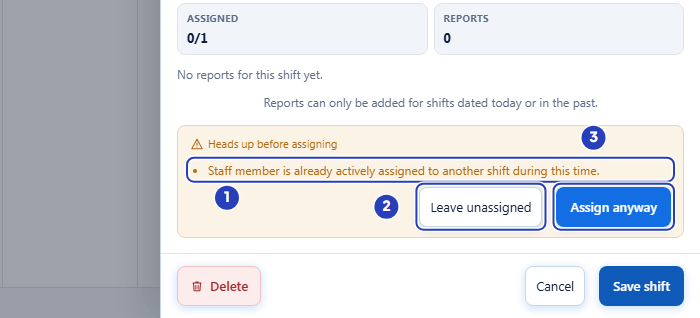
The reason for the warning (1). Choose Leave unassigned (2) or Assign anyway (3). -
Check the assigned shift
1 A message confirms Shift updated.
2 The window closes and the shift card shows the person's name. In the Staff view, the shift now sits in the person's own row.
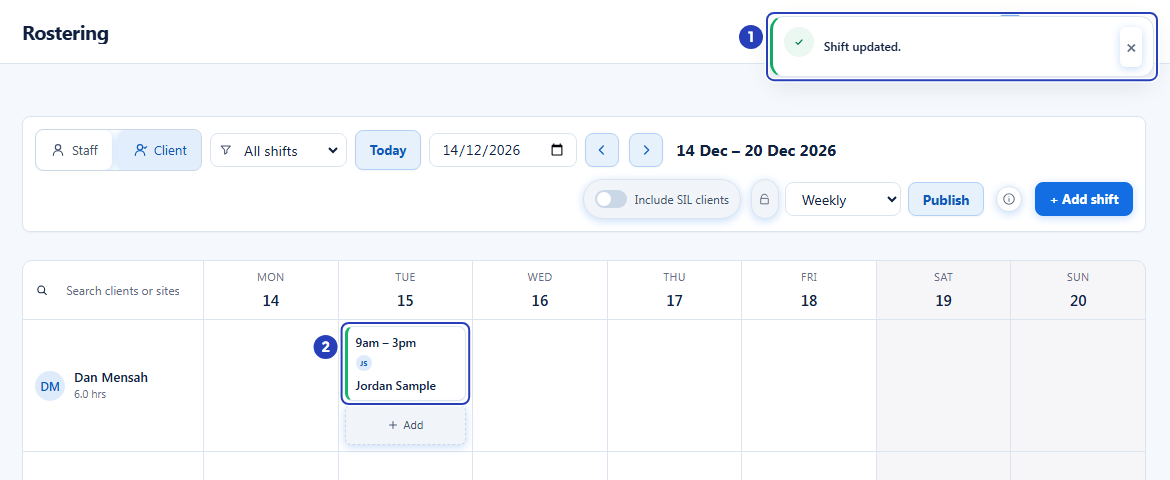
The confirmation message (1) and the shift with the person's name on it (2).
What happens next
The person gets an in-app notification that a shift has been assigned to them, and they can see the shift. Assigning someone does not send an email.
The shift card shows the person's name, and the hours total in the client's row and in the person's own row (in the Staff view) updates.
To change the person later, or to take them off the shift, see Delete a shift or replace the worker. To email assigned staff their shifts for a week or a fortnight, see Publish a roster.
Important notes
Important: A shift takes one staff member. To roster two workers at the same time for a client, add a shift for each worker.
Good practice
- Set the dates and times first, then choose the person. The notes beside each name (Available, Already booked, Unavailable, On leave this week) follow the dates and times in the window.
- Read the Heads up before assigning box before you choose Assign anyway. If the person is already booked, look at their day in the Staff view first.
- At the start of each week, choose Unassigned in Filter shifts by staffing to find the shifts that still need a person.
- After you assign, check the hours under the person's name in the Staff view, then publish once so each person gets one email.
Troubleshooting
I cannot see Rostering in the left menu.
Why it happens: Your role does not include Can view roster.
What to do: Ask an Owner or Admin to add the permission to your role in Configuration > Roles & Permissions.
The shift card says Unassigned instead of Assign staff, and it does not open when I choose it.
Why it happens: Your role does not include Can edit shift, so shifts are shown as plain cards.
What to do: Ask an Owner or Admin to check your role.
A message says This staff member is inactive or not onboarded and can't be assigned.
Why it happens: The person's staff record is inactive, or they have not finished onboarding.
What to do: Choose someone else, or ask an Owner or Admin to check the person's record in Staff.
A message says This shift is already assigned.
Why it happens: A shift takes one staff member, and someone else is already on it.
What to do: Open the shift and replace the person, or add a second shift for the extra worker.
A message says the staff member is missing one or more mandatory compliance requirements for this shift.
Why it happens: Your organisation can require compliance documents before a person is rostered. An Owner or Admin switches this on for each requirement with Enforce for rostering in Audit Centre > Settings, and this person has not met one.
What to do: Choose someone else, or update the person's staff record so it shows the missing requirement. A user with Can override rostering compliance blocks sees an Override compliance block? box, where they can assign the person anyway by entering a reason.
Save shift is refused with a permission message.
Why it happens: Your role does not include Can assign staff to shift. Your other changes to the shift are kept, and only the person is not assigned.
What to do: Ask an Owner or Admin to check your role.
The person I want is not in the list.
Why it happens: The list holds the active staff you are allowed to see. If your access is limited to certain sites, you see only the staff at those sites.
What to do: Ask an Owner or Admin to check that the person is active, or to assign the shift for you.