

Who this is for
This guide is written for Owner, Admin, Manager and Rostering Officer.
Before you begin
- Rostering is in your left menu and the shift cards open when you choose them. They do for roles that include Can view roster and Can edit shift. An Owner or Admin can add these permissions to a role in Configuration > Roles & Permissions. See Roles and permissions basics.
- You are signed in to BondiByte on a computer.
- The shift already exists on the Rostering screen. To add one, see Create a shift.
- If you want to change the invoice line items, the client has an Active Service Agreement that covers the date of the shift. See Service Agreements.
Steps
The screenshots show a demonstration organisation with made-up names. Your own screens show your organisation's details. Select a screenshot to open it full size.
-
Go to Rostering > the shift you want to change
1 In the left menu, choose Rostering.
2 Choose a date in Jump to date, or use the arrow buttons beside it, until you can see the week that holds the shift.
3 Choose the shift card. The Edit shift window opens on the right.
Tip: If the shift looks faded, the Filter shifts by staffing list at the top is set to Unassigned or Assigned. It fades the shifts that do not match, and does not hide them. Choose All shifts to see every shift normally.
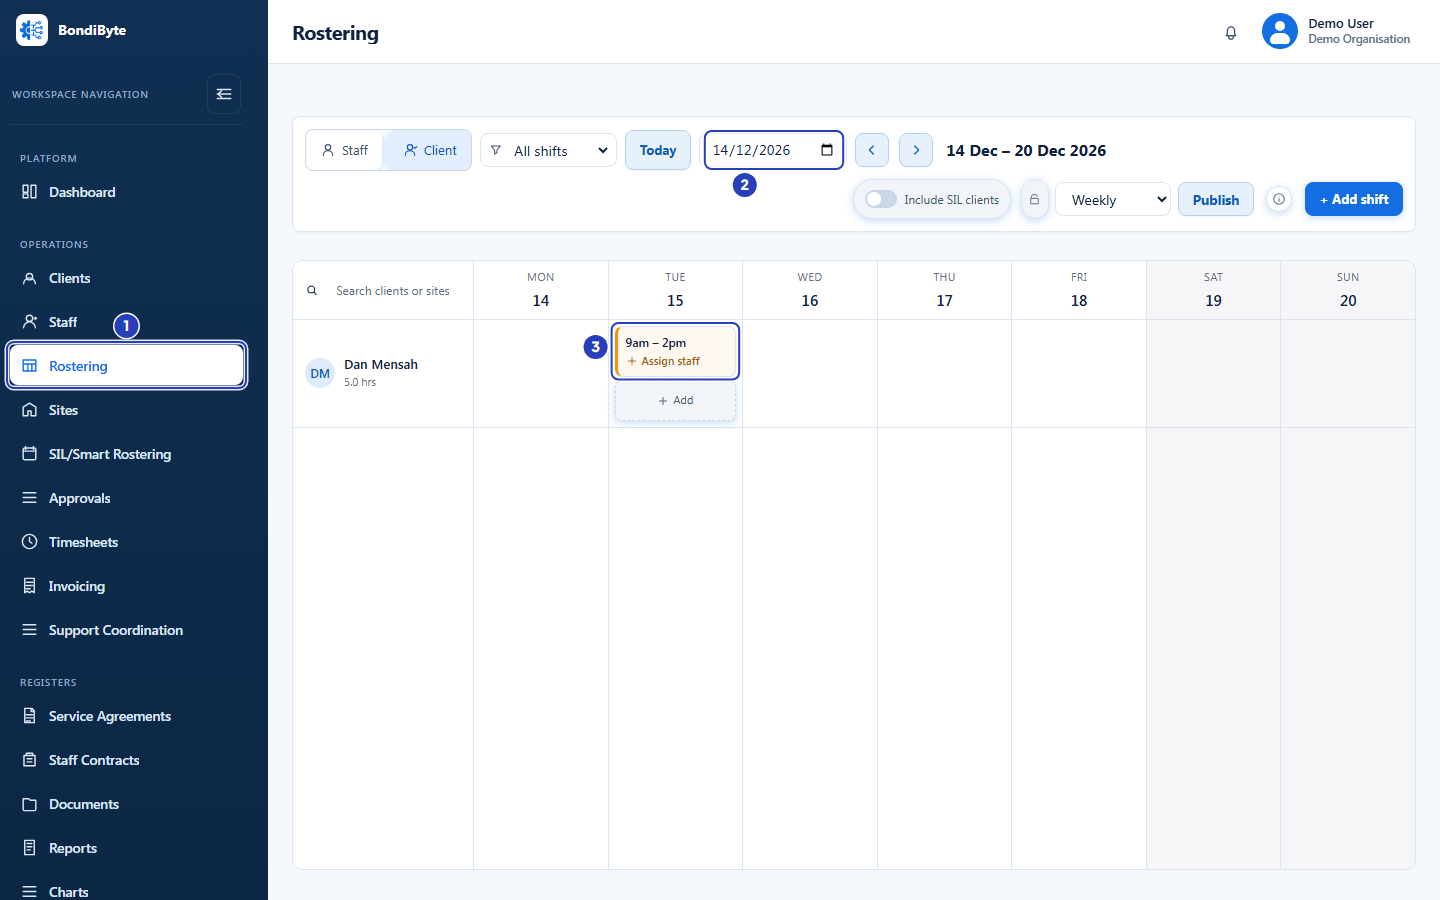
Choose Rostering, the highlighted item in the left menu (1). Show the week with the shift (2), then choose the shift card (3). -
Change the dates and times
1 Client shows who the shift is for. You cannot change it on an existing shift.
2 In Start date, choose a new day if the shift moves.
3 In End date, check the day the shift finishes. If you moved the start date earlier, change End date too, or the shift will run across several days.
4 In Start time, set the new start time.
5 In End time, set the new finish time. The shift must finish after it starts.
Fields in step 2 Field What it means Client Shown for information. To move a shift to another client, delete it and add a new one. Start date The day the shift starts. This is the day column the shift sits in. End date The day the shift finishes. It cannot be earlier than the start date. Start time When the shift starts. End time When the shift finishes. 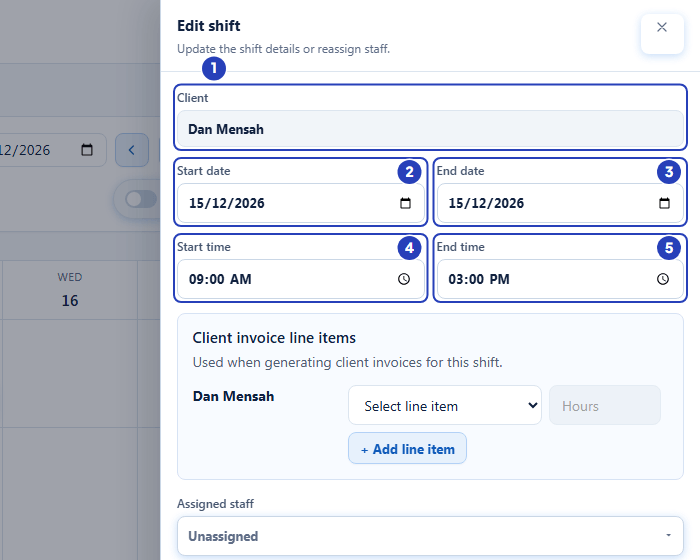
The client is shown for information (1). Change the start date (2), end date (3), start time (4) or end time (5). -
Change the invoice line items, notes or minimum shift notes
1 Under Client invoice line items, choose a different item from the client's active Service Agreement, or change the Hours.
2 Assigned staff shows who is on the shift. To change the person, see Assign staff to a shift.
3 In Notes, change or add notes for this shift.
4 In Minimum shift notes required, change how many shift notes or reports the staff member must add.
Fields in step 3 Field What it means Client invoice line items Optional. Links the shift to an item and hours on the client's active Service Agreement. Choose a different item in the list, or + Add line item for another one. Remove appears beside each line when there is more than one. Hours A number above 0, available once a line item is chosen. It does not change by itself when you change the shift times, so check it matches the shift. Assigned staff Who is on the shift, or Unassigned. Changing the person is covered in the assign and replace guides. Notes Optional notes for this shift. Minimum shift notes required How many shift notes or reports staff must add for this shift. A whole number, 0 or more. 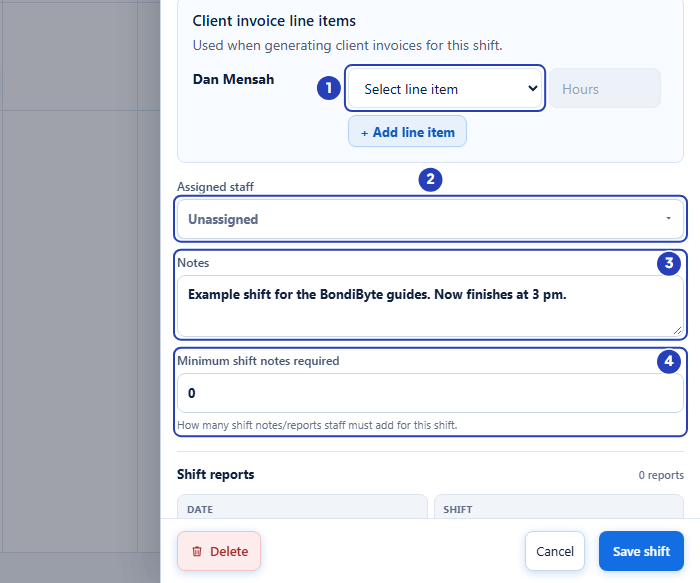
Change the invoice line item (1), check who is assigned (2), update the notes (3) or the minimum shift notes (4). -
Choose Save shift
1 Check your changes. The buttons at the bottom of the window stay in view as you scroll.
2 Choose Save shift. Choose Cancel instead to close the window without saving your changes.
Note: The Delete button at the bottom left removes the shift. It is covered in Delete a shift or replace the worker.
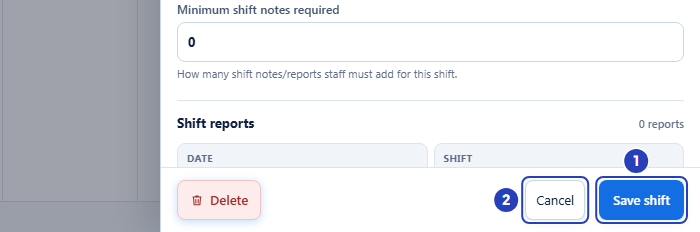
Choose Save shift (1) to keep your changes, or Cancel (2) to close the window without saving. -
Check the updated shift
1 A message confirms Shift updated.
2 The window closes and the shift card on the calendar shows the new times.
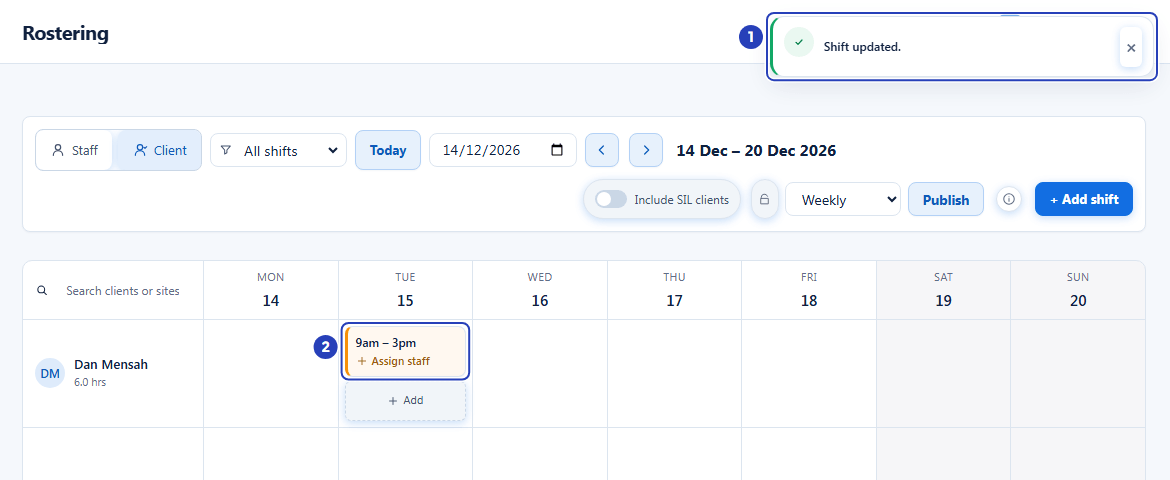
The confirmation message (1) and the shift with its new times (2).
What happens next
The shift card on the calendar shows the new times, and the total hours in the client's row update.
If a staff member is assigned and you changed the date or the times, they get an in-app notification that their shift has changed. A change to the notes or the invoice line items does not send one.
Changes are not emailed. To email assigned staff their shifts for a week or a fortnight, see Publish a roster.
Important notes
Important: Editing changes only the shift you opened. If the shift was created with Repeat this shift, the other shifts in the series stay as they are.
Note: Further down the Edit shift window, Shift reports lists the shift reports and incident reports recorded for the shift. Reports can only be added for shifts dated today or in the past.
Good practice
- Make all your changes to a shift in one visit and choose Save shift once. Each time you save a change to the date or the times of a shift that has a person on it, that person gets an in-app notification.
- After you change the times, check Hours under Client invoice line items. It does not change when the shift length changes.
- A change to one shift does not change the rest of its repeating series. Check each shift in the series that needs the change.
Troubleshooting
I cannot see Rostering in the left menu.
Why it happens: Your role does not include Can view roster.
What to do: Ask an Owner or Admin to add the permission to your role in Configuration > Roles & Permissions.
The shift card does not open when I choose it.
Why it happens: Your role does not include Can edit shift, so shifts are shown as plain cards.
What to do: Ask an Owner or Admin to check your role.
A message says The shift must end after it starts.
Why it happens: The end date and time are not later than the start date and time.
What to do: Correct End date and End time, then choose Save shift again.
I need the shift to be for a different client.
Why it happens: The client of an existing shift cannot be changed.
What to do: Delete the shift (see Delete a shift or replace the worker) and add a new one for the right client (see Create a shift).
I cannot find the shift on the calendar.
Why it happens: The calendar shows one week at a time, and the shift may be in another week.
What to do: Choose its date in Jump to date, or change Weekly to Fortnight to see two weeks at once. Check that the Filter shifts by staffing list is set to All shifts.