

Who this is for
This guide is written for Owner, Admin, Manager and Rostering Officer.
Before you begin
- SIL/Smart Rostering is in your left menu. It shows for roles that include Can view roster. An Owner or Admin can add that permission to a role in Configuration > Roles & Permissions.
- At least one site exists, or a client has Enable community rostering switched on, so there is something to choose in Site/Client. See Create a site.
- Creating a period by hand needs Enable automatic roster periods to be off. It is in Configuration > Rostering rules > Organisation Settings > Roster period automation, and an Owner or Admin switches it on or off. While it is on, BondiByte creates the periods and the Create roster period button is hidden for an Owner or Admin. See Fortnightly and monthly roster cycles.
- A new organisation sets its roster cycle before it adds its first site. See Choose a Sunday or Monday week start.
Steps
The screenshots show a demonstration organisation with made-up names. Your own screens show your organisation's details. Select a screenshot to open it full size.
-
Go to SIL/Smart Rostering > Site/Client and choose a site
1 In the left menu, choose SIL/Smart Rostering. The Roster Workspace opens.
2 In Site/Client, choose the site you want. The list is labelled Site if you have no community rostering clients. A client who has community rostering switched on appears in the same list under their own name.
3 The roster opens with a heading such as Current roster: Running. The first time you open the screen, or after you change site, it shows the period that includes today (if the site has no period for today, the next period coming up, or else the latest period that has passed). On later visits it reopens the site and period you last looked at, on the computer you are using.
Each site has its own roster periods, with their own shifts and their own publish step. A period belongs to one site only.
Note: SIL/Smart Rostering is different from the Rostering menu item. Rostering shows weeks and has no roster periods. See Rostering overview.
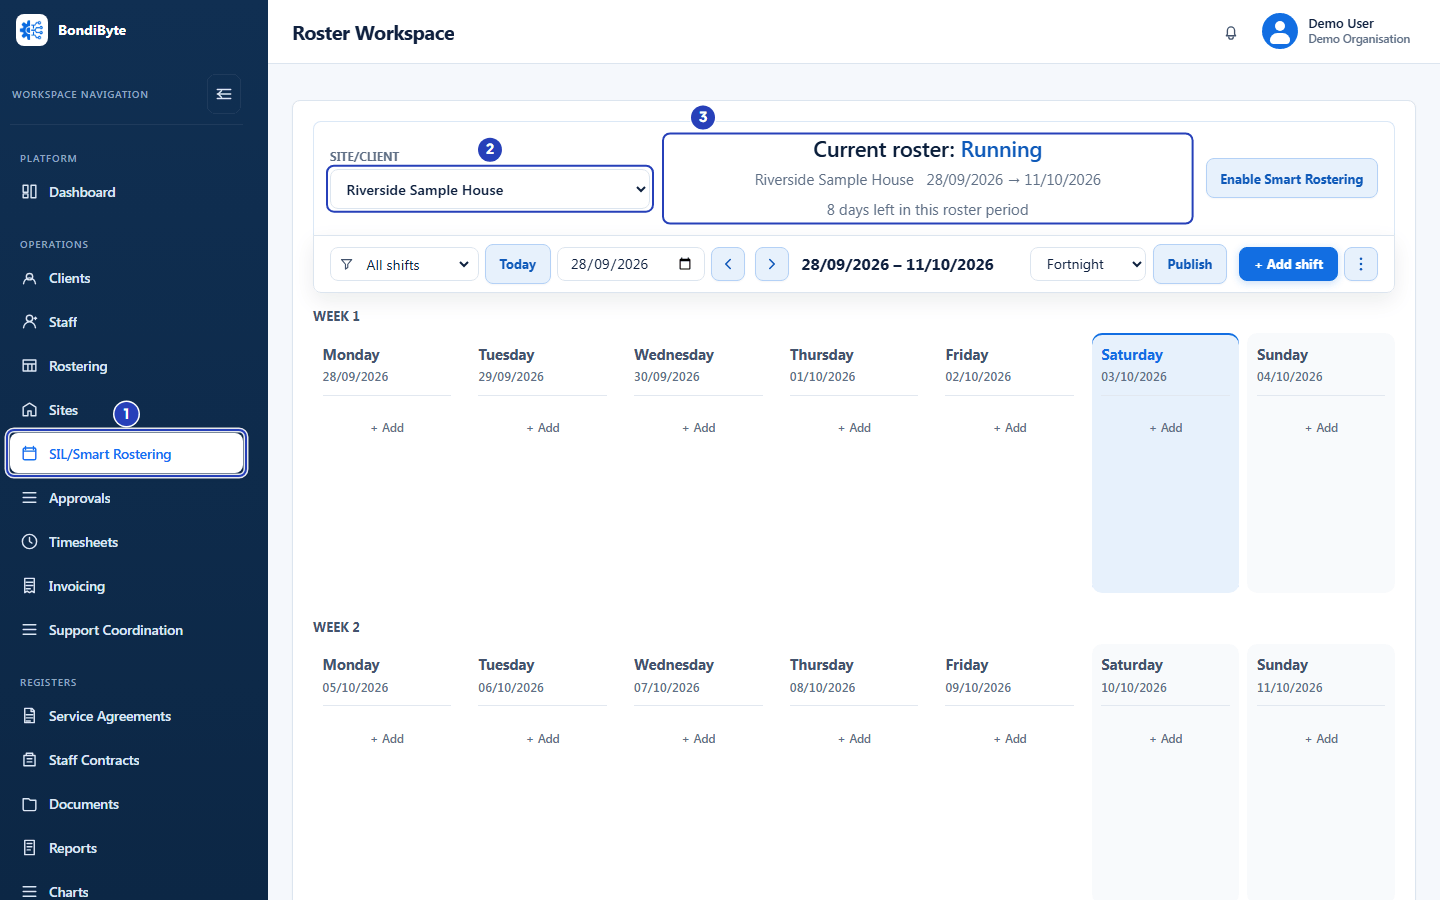
Choose SIL/Smart Rostering in the left menu (1). Choose a site in Site/Client (2). The heading (3) shows the roster period for that site. -
Read the roster period heading
1 At the top of the roster, the heading names the period, for example Current roster: Running. The first words say where the period sits in time, and the word after the colon says what state it is in.
2 Under the heading, the site name is followed by the dates of the period, written as start date, an arrow and end date.
3 The line under the dates counts days, for example 9 days left in this roster period.
4 At the right of the heading, a button turns Smart Rostering on or off for this site. It reads Enable Smart Rostering or Disable Smart Rostering. It is covered in the Smart Rostering guides. While Enable automatic roster periods is off, the Create roster period button also sits here.
If the period has ended and was not published, a blue banner under the heading says This roster period has passed, so it can no longer be published.
Fields in step 2 Field What it means Current roster The period that includes today. Next roster The next period that starts after today, for the site you are looking at. Future roster A period that starts after today but is not the very next one. Previous roster A period that has already ended. Running The period is under way. This is shown whether or not it has been published. The Publish button changes to Unpublish once the period is published. Upcoming The period has not started yet. Interest requested Someone has chosen Request interest for this period, to ask staff which shifts they want. See the Smart Rostering guides. Closed The period has ended. Neighbouring periods show this word in the Neighbouring rosters list. Cancelled The period was cancelled. Days line N days until this roster starts or Starts today before the period, N days left in this roster period or Ends today during it, and N days since this roster ended afterwards. 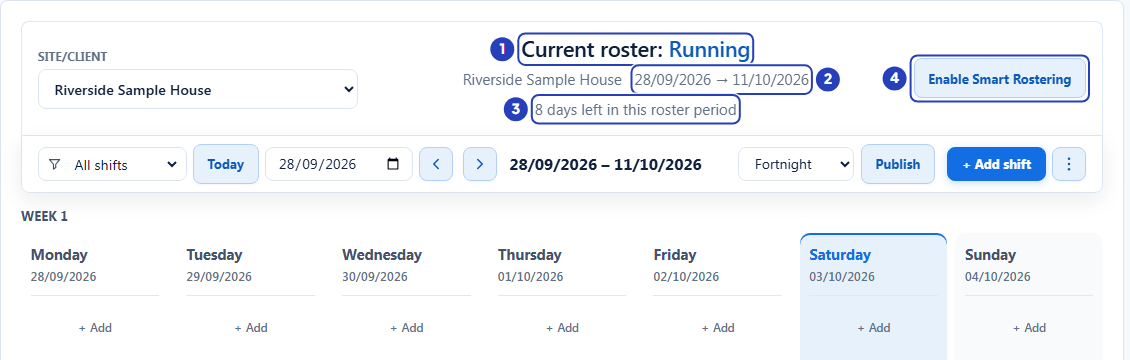
The heading names the period and its state (1). Beside the site name are the period dates (2), and under them is how many days are left (3). The button at the right (4) turns Smart Rostering on or off for the site. -
Move between roster periods and change what the calendar shows
1 Choose Today to return to the period that includes today. The date box also changes to today's date.
2 In Jump to date, choose a date to show it. The roster moves to the period that holds that date.
3 Use the left arrow, Previous period, and the right arrow, Next period, to move to the neighbouring period for the same site. The dates being shown are written beside the arrows. In Fortnight they are the dates of the roster period. In Month, Week and Day they are that month, week or day.
4 Choose Fortnight, Month, Week or Day in the Calendar range list to change how much the calendar shows. Fortnight shows the whole roster period. Month shows the calendar month. Week shows one week and Day one day.
5 Choose Publish to publish the period so that staff can see their shifts. Once published, the button reads Unpublish. A message appears. It begins Roster period published., followed by a short summary of the email and in-app notifications sent, or it reads Roster period unpublished and hidden from staff view.
6 Choose + Add shift, at the right of the toolbar, to add a shift to the period you are looking at.
Fields in step 3 Field What it means All shifts A list with the funnel icon, Highlight shifts by fill status. Choose Unfilled, Understaffed or Fully staffed to highlight those shifts. The others stay on the screen. All shifts removes the highlight. Today Returns to the period and the day that include today. Jump to date A date box. Choosing a date shows the period that includes it. Previous period and Next period Arrows that move one roster period back or forward for the same site. Calendar range Month, Fortnight, Week or Day. It starts as Fortnight. Your choice is remembered on this computer. Publish or Unpublish Shows for people with Can edit roster period. A period that has passed cannot be published. If the period is not ready to be published, the button is greyed out and says so when you point at it. Add shift Shows for people with Can create shift. It opens the Add shift window for the period you are looking at. More roster actions The three dots button. Its menu always holds Week starts. When they apply it also holds Request interest (N), where N is how many times interest has been requested for this period, Undo interest request, Run smart rostering, Report and Select shifts. Request interest and Undo interest request follow the state of the period and need Can edit roster period. Run smart rostering, Report and Select shifts belong to Smart Rostering and work only when it is on for the site. Tip: To plan ahead, choose Next period and look at the Next roster heading. It tells you how many days are left before it starts.
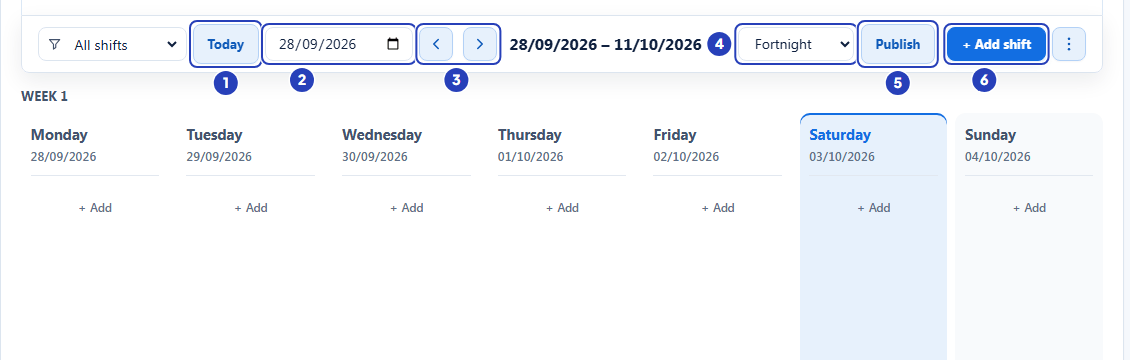
Choose Today (1) or a date in Jump to date (2). Move with the arrows (3), which sit beside the dates being shown. Change the Calendar range (4), then Publish (5) or add a shift (6). -
Check the neighbouring rosters
Scroll to the bottom of the roster. If the site has more than one period, a section titled Neighbouring rosters appears. It says Reference only. Use the period controls above to move the board.
1 Previous roster shows a card for the period before this one, with the roster name, the dates and a status. The roster name is the site name, a hyphen and the start date, for example Riverside Sample House-14/09/2026.
2 Next roster shows the same details for the period after this one.
A card says No previous roster. or No next roster. when the site has no period on that side.
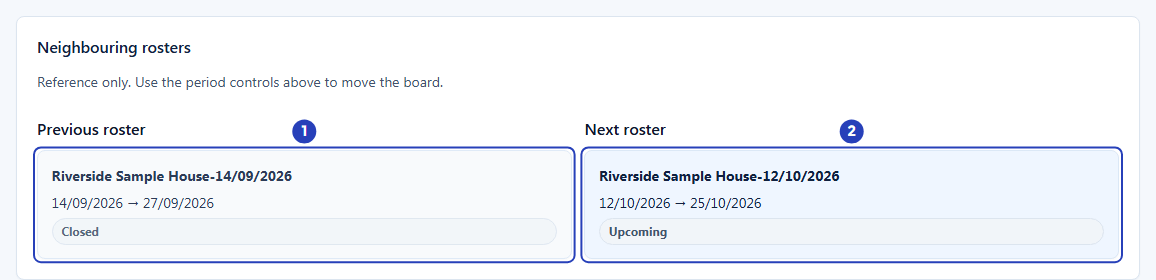
The Previous roster card (1) and the Next roster card (2) show the neighbouring periods for reference. -
Check whether BondiByte creates your roster periods
In the left menu, choose Configuration, then the Rostering rules tile, then the Organisation Settings tab. The Roster period automation card is at the top.
1 Look at the Enable automatic roster periods box. When it is ticked, BondiByte creates the periods for you, following your cycle.
2 Look at the badge beside it. It reads Enabled or Disabled.
If it is Enabled, you do not need the next step. Adding a shift on a date that has no period yet also makes the period that covers it.
If it is Disabled, each period is created by hand, as the next two steps describe. An Owner or Admin can tick Enable automatic roster periods and choose Save organisation settings at any time.
Important: First period starts and Period cycle, on the same card, can be changed only while they are not locked. See Fortnightly and monthly roster cycles and Choose a Sunday or Monday week start.
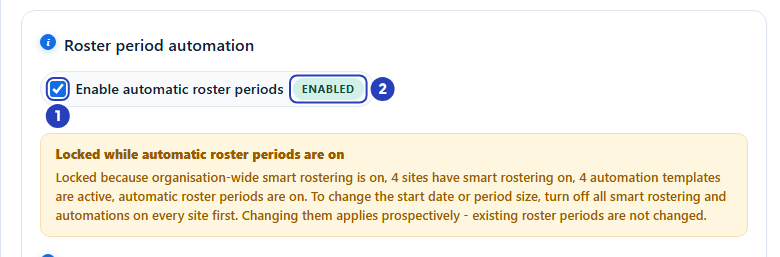
Enable automatic roster periods (1) decides who creates the periods. The badge (2) reads Enabled or Disabled. -
Open the Create roster period window
Do this while Enable automatic roster periods is off (see step 5). You also need Can create roster period. While the setting is on, the Create roster period button is hidden for an Owner or Admin. A Manager or Rostering Officer may still see it, but BondiByte accepts only a period that follows your roster cycle, so ask an Owner or Admin to switch the setting off first.
On the SIL/Smart Rostering screen, choose the site, then choose Create roster period. It sits in the roster heading, beside the Smart Rostering button, or beside Site/Client if no roster is shown. The Create roster period window opens.
-
Fill in the window and create the period
The window starts with a reminder that BondiByte can create the periods for you, and the link Set your roster cycle to the settings where an Owner or Admin can switch that on.
1 Check Site.
2 Look at Roster name. You cannot edit it.
3 Set Start date.
4 Set End date.
5 Type Notes if you want to.
6 Choose Create roster period, or Cancel (or the cross at the top right) to close the window without saving. A message confirms Roster period created.
If the dates run into a period the site already has, a yellow warning appears, for example This period overlaps followed by the roster name and its dates, and Choose dates after the end date of that period. Create roster period stays greyed out until you change the dates.
Fields in step 7 Field What it means Site Required. The site (or standalone client) the period belongs to. It starts as the site you were looking at. Choose another site in the list if the period is for a different site. Roster name Shown for information and cannot be edited. It is the site name and the start date, for example the site name followed by a hyphen and 12/10/2026. Start date Required. The first day of the period. It starts as the day after the site's latest period, or today if the site has none. End date Required. The last day of the period. It starts 13 days after the start date, so the period is two weeks long. Notes Optional. A short note kept with the period. Warning: A period cannot overlap another period for the same site. You can leave a gap between periods, but shifts on the days in the gap need a period that covers them, so create the next period before the current one ends.
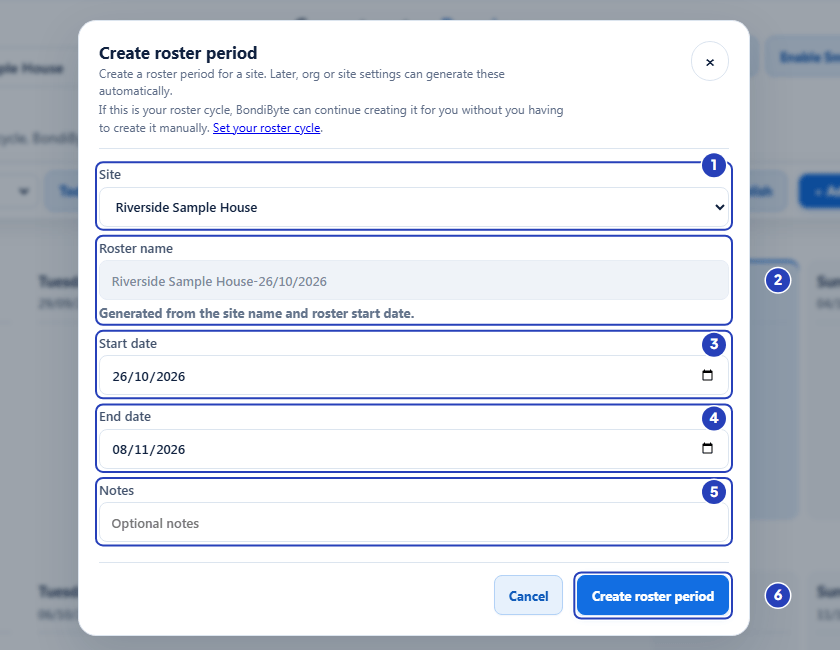
Check Site (1) and Roster name (2). Set Start date (3) and End date (4), add Notes if you wish (5), then choose Create roster period (6). The note at the top of the window reminds you that BondiByte can create the periods for you.
What happens next
The new period appears on the SIL/Smart Rostering screen for its site, in the roster you move to with Next period or Jump to date, and in Neighbouring rosters. It starts with no shifts.
Add shifts with + Add shift, assign staff, and publish the period when it is ready. Publishing makes the shifts visible to staff and notifies the people assigned to them.
If you switch Enable automatic roster periods on later, BondiByte takes over creating periods. Periods you created by hand keep their dates.
Important notes
Important: A roster period belongs to one site (or standalone client). Creating a period for one site does not create it for the others.
Note: The Rostering menu item does not use roster periods. It shows weeks, and every client who is not attached to a site is rostered there.
Good practice
- Leave Enable automatic roster periods on unless you have a reason to create periods yourself. With it on, nobody has to remember to create the next period, and every site follows the same cycle.
- If you do create periods by hand, create the next period before the current one ends, and start it the day after the last one ends. A gap leaves days that nobody can roster.
- Use Next period and the Next roster heading at the start of each period to see how many days you have left to finish the next roster.
- Choose Unfilled in Highlight shifts by fill status before you publish, so any shift with nobody on it stands out.
- Publish a period only when its shifts are ready, because publishing notifies the staff who are assigned to them. You can choose Unpublish to hide the period again, but you cannot publish a period that has already passed.
- After you create a period, open Neighbouring rosters at the bottom of the roster and check that the Previous roster and Next roster cards show the dates you expect.
- Check the site name in the heading before you add shifts. Periods are separate for each site, and it is easy to build the right roster on the wrong site.
Troubleshooting
I cannot see Create roster period.
Why it happens: Enable automatic roster periods is on, so BondiByte creates the periods and hides the button from an Owner or Admin, or your role does not include Can create roster period.
What to do: To create periods by hand, an Owner or Admin switches Enable automatic roster periods off in Configuration > Rostering rules > Organisation Settings, and should switch it on again afterwards. Otherwise ask an Owner or Admin to check your role.
A yellow warning says This period overlaps another roster period, and Create roster period is greyed out.
Why it happens: The start date or end date falls inside a period the site already has.
What to do: Change Start date and End date to the dates after the end date the warning names.
A message says This period does not match your roster cycle.
Why it happens: Automatic roster periods are on, so a period must follow the cycle exactly. It can appear when a Manager or Rostering Officer uses Create roster period with other dates, or when Jump to date or Next period goes beyond the last period BondiByte has made.
What to do: Stay within the existing periods. To add later dates, ask an Owner or Admin to switch Enable automatic roster periods off, create the period by hand, and switch it on again. See Fortnightly and monthly roster cycles.
The roster shows No roster period selected.
Why it happens: The site has no roster period yet.
What to do: If automatic roster periods are off, choose Create roster period beside the Site/Client list. If they are on, refresh the page, or ask an Owner or Admin to check Enable automatic roster periods.
The screen says No sites found and Create a site before building roster periods.
Why it happens: Your organisation has no site yet, or your access is limited to sites that do not exist.
What to do: Ask an Owner or Admin to add a site in Sites. See Create a site.