

Who this is for
This guide is written for Owner, Admin, Manager and Rostering Officer.
Before you begin
- Rostering is in your left menu. It shows for roles that include Can view roster. An Owner or Admin can add that permission to a role in Configuration > Roles & Permissions.
- There is at least one active client who is not attached to a site and does not have their own community rostering site. The Client view lists those clients. See Rostering overview.
- There are active staff members, so the Staff view has rows. Staff are added in Staff. See Create a staff member.
- To see SIL shifts on this calendar, you need nothing extra. Include SIL clients is on the screen. Choosing a SIL shift opens a quick editor for that one shift. Rostering the house itself is done on SIL/Smart Rostering.
Steps
The screenshots show a demonstration organisation with made-up names. Your own screens show your organisation's details. Select a screenshot to open it full size.
-
Go to Rostering > Client view
In the left menu, choose Rostering. The calendar opens on the current week, in the Client view. The screen always opens in the Client view.
1 Check that Rostering is highlighted in the left menu. This is the screen with one week or two weeks at a time. SIL/Smart Rostering is a different screen.
2 At the top left of the calendar, the Client and Staff buttons switch the view. Client is the one that is highlighted.
3 Each row below is one client. The row starts with the client's name and the hours of their shifts in the dates shown. The seven days run across the screen, from Monday to Sunday.
4 Above the names, the search box reads Search clients or sites. You type there to narrow the rows.
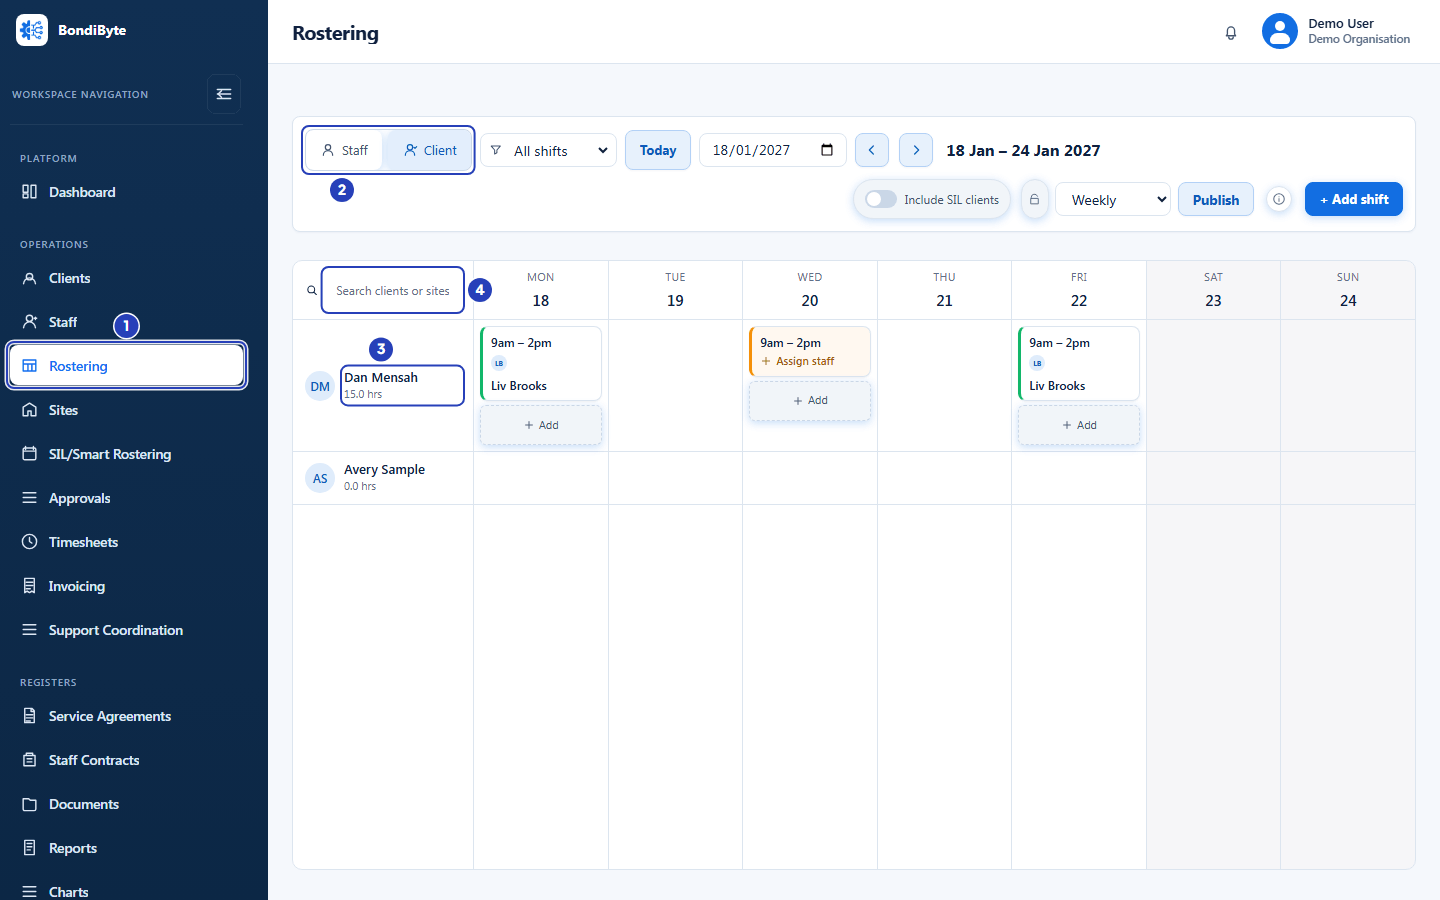
Choose Rostering (1). The Client button (2) is chosen. Each row is a client (3), with the hours of their shifts. Search clients or sites (4) narrows the rows. The week shown, 18 to 24 January 2027, is an example; your screen opens on the current week. -
Read the shifts in a client's row
1 At the left of the row, read the client's name and the line under it, for example 15.0 hrs. It adds up the hours of all the client's shifts in the dates shown, so it changes when you move to another week or choose Fortnight.
2 A card with a person's photo and name is a shift that has someone assigned. The card shows the time, and the person's name.
3 An amber card that says Assign staff is a shift with nobody assigned yet. Choose it to open the shift and choose someone.
4 Choose + Add at the foot of a day that already has a shift to add another shift on the same day. Choose an empty part of a day to add the first one.
Fields in step 2 Field What it means Client name and hours The client's name, and the total hours of their shifts in the dates shown, to one decimal place, for example 15.0 hrs. Day headings The day name and date number across the top. Today's date number is circled, and weekend days have a shaded background. Shift card, with a person Shows the start and end time, and the name of the person assigned. Choosing it opens the shift for changes, for people who can edit shifts. For people who can only view the roster, the card is plain. Shift card, Assign staff An amber card showing Assign staff. Nobody is assigned. People who can only view the roster see the word Unassigned instead. Add A small + Add button at the foot of a day that already has shifts. It adds another shift for the same client and date. 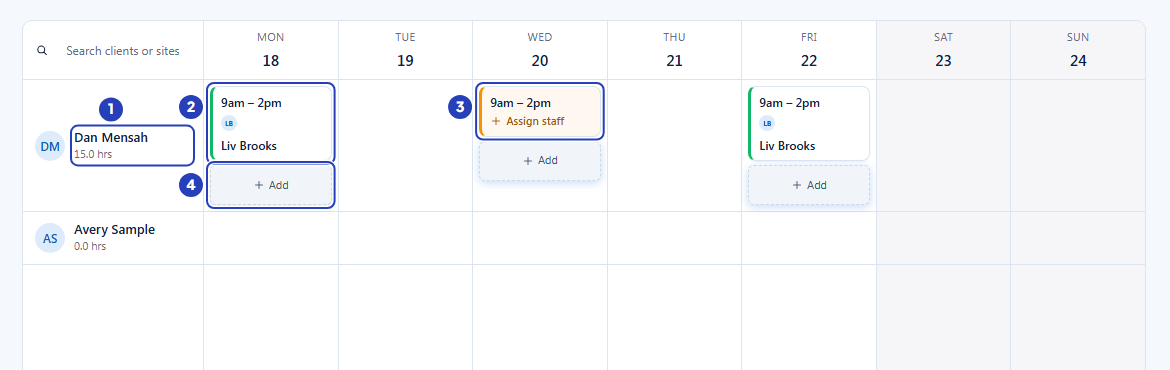
The client's name and hours (1). A card with a name is assigned (2). An amber card showing Assign staff is not (3). Add (4) adds another shift on the same day. -
Switch to the Staff view
1 Choose Staff, at the top left of the calendar. The rows change from clients to staff.
2 The first row is Vacant shift, with the word Unassigned under it. Every shift that has nobody assigned sits in this row, and each card shows the client's name.
3 Each other row is a staff member. Under the name is the total hours of their shifts in the dates shown. These hours count only the shifts scheduled on this screen, not the shifts of SIL houses. A person who is on leave also has the label On leave under their name.
4 The shifts in a person's row show the client's name. Choosing one opens the shift, as in the Client view.
An Other staff row, with the words Not on your staff list, appears only when a shift in the dates shown is assigned to someone who is not one of the rows on your screen, for example a person who has been made inactive. Their name is on the card.
Fields in step 3 Field What it means Vacant shift The first row. It holds the shifts that nobody is assigned to yet. Each card names the client. Staff member row Shows the person's photo or initials, their name, and their hours in the dates shown. The hours count the shifts assigned to them on this screen in these dates, and do not include SIL shifts. On leave A label under the name of a person whose status is On leave. BondiByte warns you, but does not stop you, when you assign them a shift. Other staff Shows shifts assigned to someone who is not one of the rows on your screen. It appears only when there is such a shift. 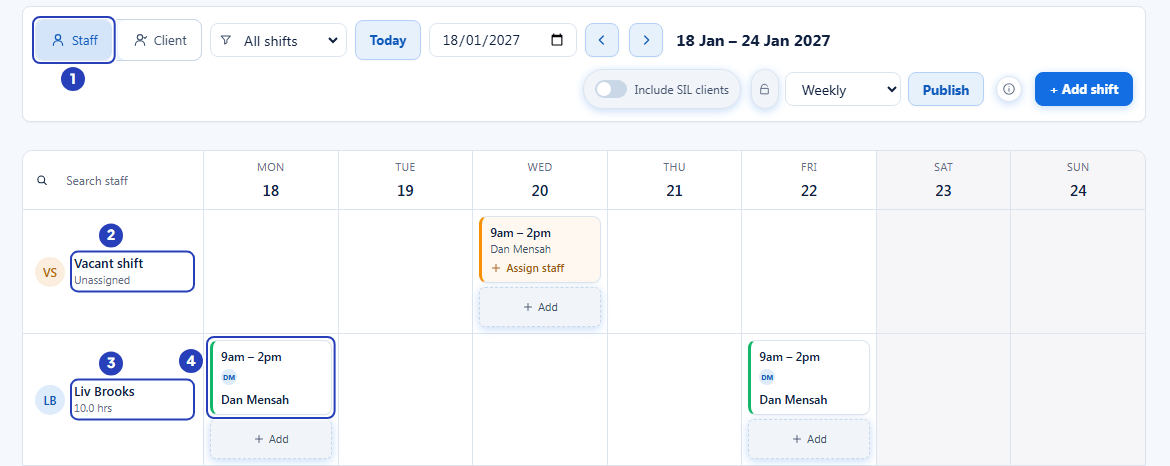
Choose Staff (1). The Vacant shift row (2) holds shifts with nobody assigned. Each staff row (3) shows the person's hours, and their shifts show the client (4). -
Find a client or a person with the search box
1 Choose the search box at the top left of the names. In the Client view it reads Search clients or sites, and in the Staff view it reads Search staff.
2 Type part of a name. The rows narrow as you type, to the clients, sites or staff whose name contains what you typed. In the Staff view the Vacant shift row stays while it holds a shift that matches.
3 Choose the small cross at the right of the box, Clear search, to bring every row back.
If nothing matches, the screen says No clients match or No staff match followed by what you typed.
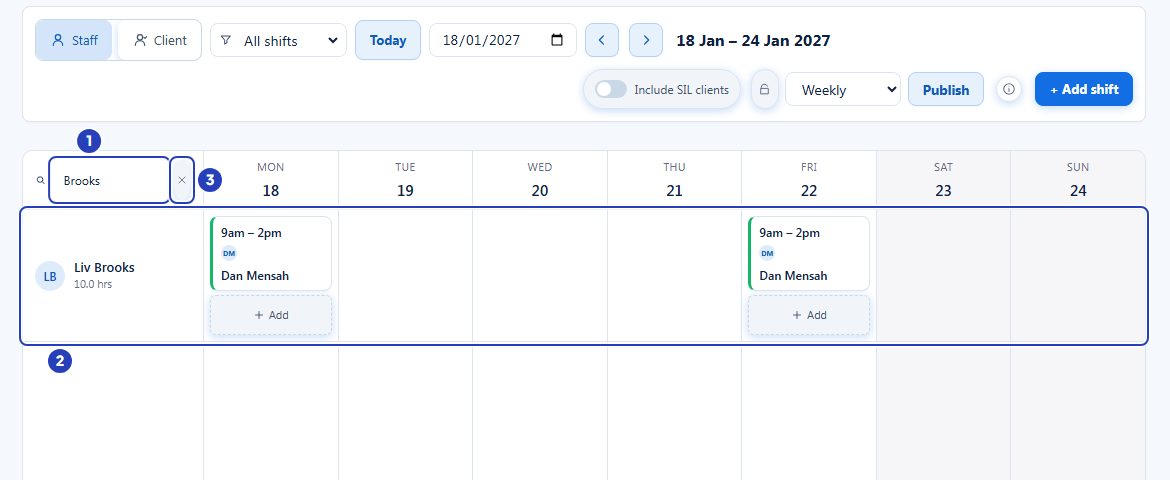
Type part of a name in Search staff (1). The rows narrow to the match (2). Choose the cross (3) to clear the search. -
Highlight shifts that still need a person
1 At the top left, choose the list with the funnel icon, Filter shifts by staffing. It starts as All shifts.
2 Choose Unassigned. The shifts with nobody assigned stay clear, so they stand out. Choose Assigned instead to highlight the shifts that have someone.
3 The shifts that do not match fade, but stay on the screen.
Choose All shifts to remove the effect. The filter works in both views and does not hide anything. It is set back to All shifts each time you open the screen.
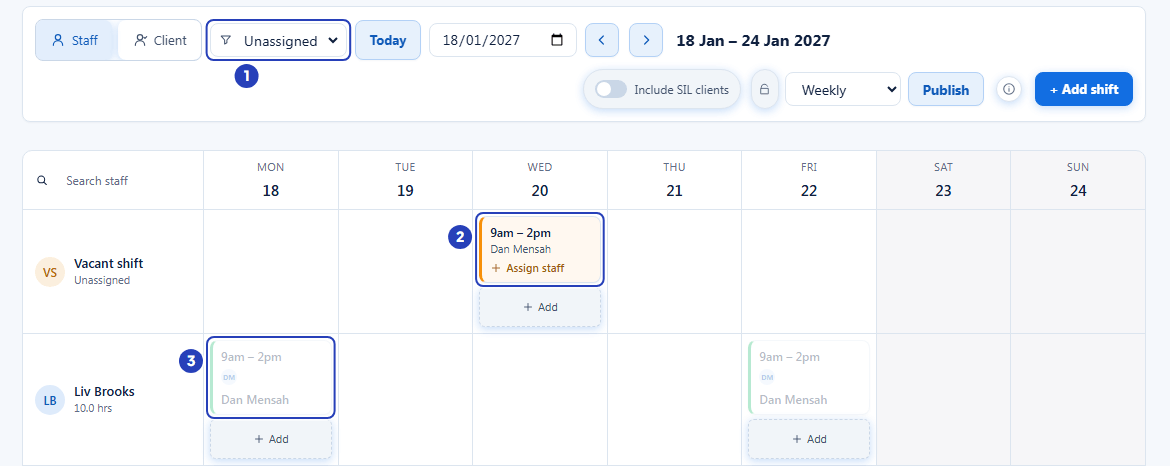
Open Filter shifts by staffing (1) and choose Unassigned. The shift with nobody on it stays clear (2) and the assigned shifts fade (3). -
Show SIL clients on the same calendar
1 Choose Include SIL clients, at the top right. The switch turns on. In the Staff view, the shifts that your SIL houses have rostered for each person appear in their row as lighter cards, so you can see when someone is already working at a house. In the Client view, a SIL Roster section is added below your clients, with a row for each SIL house or community client.
2 To keep the view as it is, choose the padlock beside it. The padlock locks Include SIL clients and the Weekly or Fortnight choice, so they cannot be changed by accident. Choose the padlock again to unlock them.
3 A lighter card with a site name in blue is a SIL shift. It shows the time, the shift title and, in a person's row, the name of the site. The hours beside a name do not include these shifts. Choosing one opens a quick editor that says Managed in SIL/Smart Rostering. Edits apply to this one shift. It changes that one shift only: its title, dates, times, required staff, minimum shift notes required and invoice line items. The roster period, publishing and putting several workers on a shift are managed on SIL/Smart Rostering.
The screen remembers Include SIL clients, the padlock and the Weekly or Fortnight choice, on the computer you are using.
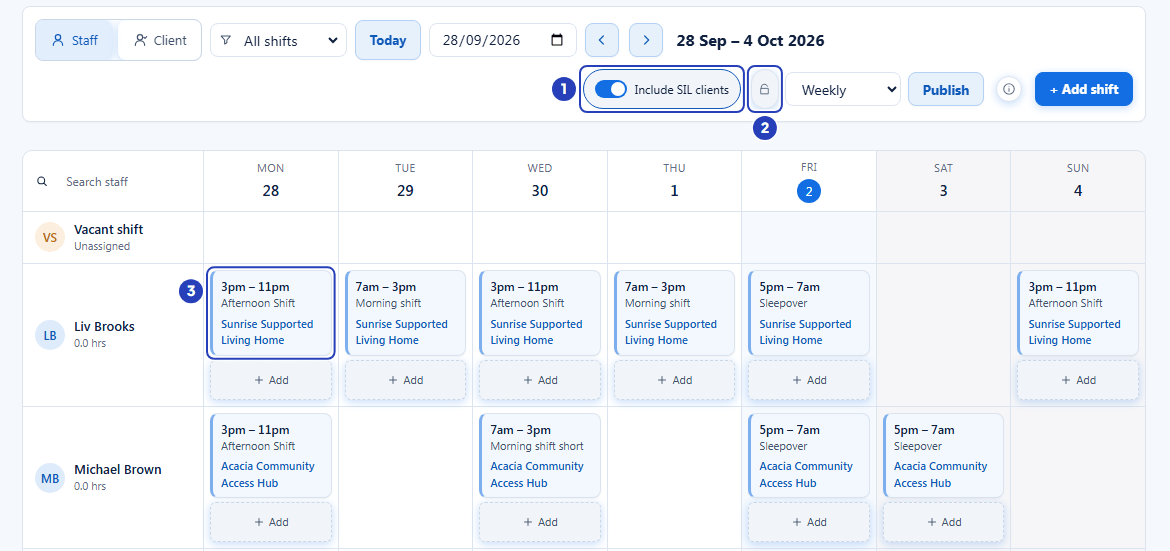
Choose Include SIL clients (1) and the padlock (2) to keep the view. A lighter card with a site name (3) is a SIL shift. -
Add a shift from either view
In the Client view, choose an empty part of a day in a client's row. The Add shift window opens with that client and that date already chosen.
In the Staff view, choose an empty part of a day in a person's row. The Add shift window opens with that person already chosen in Assigned staff. Check Client before you save, because it starts on the first client in the list.
You can also choose Add shift at the top right, which opens the same window for any client and date. Steps for the window itself are in Create a shift.
Note: The Add shift button is greyed out while the week is loading and when there are no clients to roster. Both views show the same shifts, so a shift added in one view appears in the other.
What happens next
Both views show the same shifts, arranged two ways. A shift added or changed in one view is shown in the other.
Use Today, Jump to date, the two arrows and the Weekly or Fortnight choice to move through time. The hours beside each name follow the dates shown.
When the week is ready, choose Publish to tell staff. Publish needs Can edit shift and is hidden if you can only view the roster. The small information button beside it, About publishing, explains that Publish notifies the assigned staff about their shifts for the dates you choose, and that it does not publish SIL rosters, which are published on SIL/Smart Rostering. See Publish a roster.
Important notes
Important: The Rostering screen always shows weeks from Monday to Sunday, whichever week start your organisation uses for roster periods. Roster periods belong to SIL/Smart Rostering.
Note: The Client view is always the first view you see. The screen does not remember Staff between visits, but it does remember Include SIL clients, the padlock and Weekly or Fortnight.
Good practice
- Use the Client view to check that every client is covered, and the Staff view to check how many hours each person has before you give them more shifts.
- At the start of each week, choose Unassigned in Filter shifts by staffing in the Staff view. The Vacant shift row shows what still needs a person, and every other shift fades.
- Switch Weekly to Fortnight to compare people over two weeks. The hours beside each name then cover all fourteen days.
- Turn on Include SIL clients when you plan for people who also work at a house. Their SIL shifts show when they are already working.
- Look for On leave under a name before you assign a shift. BondiByte warns you but does not stop you.
- Use the search box to jump straight to one client or person on a long list, then choose Clear search to bring everyone back.
Troubleshooting
I cannot see Rostering in the left menu, or the Staff and Client buttons.
Why it happens: Your role does not include Can view roster.
What to do: Ask an Owner or Admin to add Can view roster to your role in Configuration > Roles & Permissions.
The Client view says No simple clients yet.
Why it happens: The screen lists active clients who are not attached to a site and do not have community rostering switched on. There are none. Clients who live at a site, or who have community rostering, are rostered on SIL/Smart Rostering.
What to do: Add a client who is not attached to a site, or check the client's record in Clients. To see SIL houses here, turn on Include SIL clients.
The screen says No community clients in your scope.
Why it happens: Your access is limited to certain sites, and this screen schedules clients who are not attached to a site.
What to do: Ask an Owner or Admin if you need access to those clients.
The screen says No clients match or No staff match after I type in the search box.
Why it happens: No name contains what you typed.
What to do: Check the spelling, type fewer letters, or choose Clear search.
Include SIL clients and the Weekly or Fortnight list are greyed out.
Why it happens: The padlock beside Include SIL clients is locked.
What to do: Choose the padlock to unlock the view, change the setting, then lock it again if you want.
A person I expect is not a row in the Staff view.
Why it happens: The rows are the active staff you may see. A person who is inactive, or who works only at sites outside your access, is not a row. A shift assigned to them appears in the Other staff row instead.
What to do: Check the person's status in Staff, or ask an Owner or Admin about your site access.