

Who this is for
This guide is written for Owner, Admin, Manager and Rostering Officer.
Before you begin
- Roster publish notifications is switched on for your organisation. It is on unless an Owner or Admin has switched it off. To check or change it, an Owner or Admin opens the account menu at the top right, chooses Account settings and finds it under Automation & Capacity Controls. See Automation Capacity.
- Rostering is in your left menu and Publish is at the top right of the screen. They show for roles that include Can view roster and Can edit shift. An Owner or Admin can add these permissions to a role in Configuration > Roles & Permissions. See Roles and permissions basics.
- You are signed in to BondiByte on a computer.
- The shifts you want to publish are on the Rostering screen and have a staff member assigned. See Assign staff to a shift.
- Each staff member has a contact email in Staff if they should get the email. Without one they receive the in-app notification only. See Staff.
Steps
The screenshots show a demonstration organisation with made-up names. Your own screens show your organisation's details. Select a screenshot to open it full size.
-
Go to Rostering > Publish
1 In the left menu, choose Rostering.
2 Choose a date in Jump to date, or use the arrow buttons beside it, to show the week you want to publish. The Publish roster window starts with the dates you are looking at.
3 For a reminder of what publishing does, choose the round information button beside Publish. A window called About publishing opens. Choose OK to close it.
4 Choose Publish, at the top right. The Publish roster window opens.
Important: Publishing sends notifications and nothing else. A shift is visible to its staff member as soon as they are assigned, whether or not you publish.
Important: Publish on the Rostering screen covers this screen only. Rosters in SIL/Smart Rostering are published from that screen.
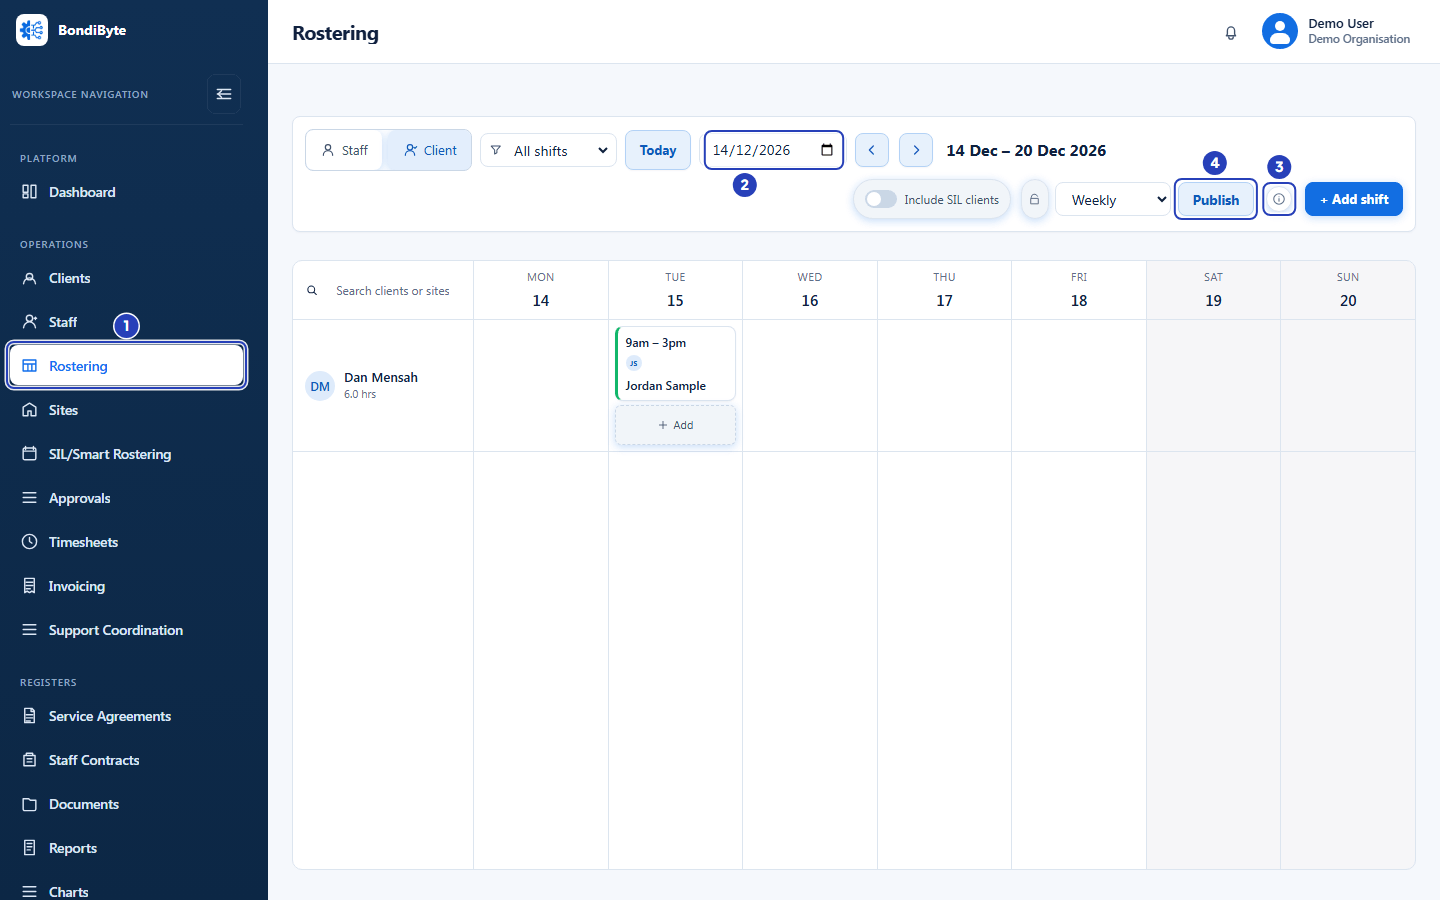
Choose Rostering, the highlighted item in the left menu (1). Show the week you want to publish (2). The information button (3) explains what publishing does. Then choose Publish (4). -
Check the dates and choose Publish
1 In From, check the first day to include.
2 In To, check the last day to include. It cannot be earlier than From.
3 Choose Publish. Choose Cancel instead to close the window without sending anything.
Note: Publishing sends each assigned person an email and an in-app notification. The information button beside Publish explains this too.
Warning: Each time you choose Publish, the emails are sent again, even for dates you have already published. Publish once the week looks right.
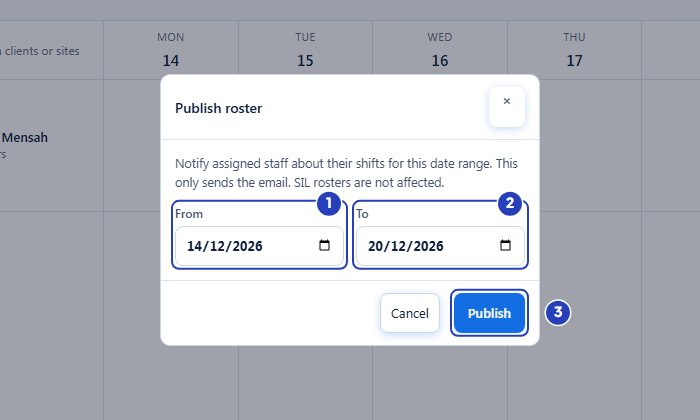
Check the first day (1) and the last day (2), then choose Publish (3). -
Check the confirmation
1 A message first says Publishing roster..., then confirms Roster published: with the number of staff notified and the number of shifts.
2 Only shifts that have a staff member assigned are counted, like this one. Shifts with nobody assigned are left out.
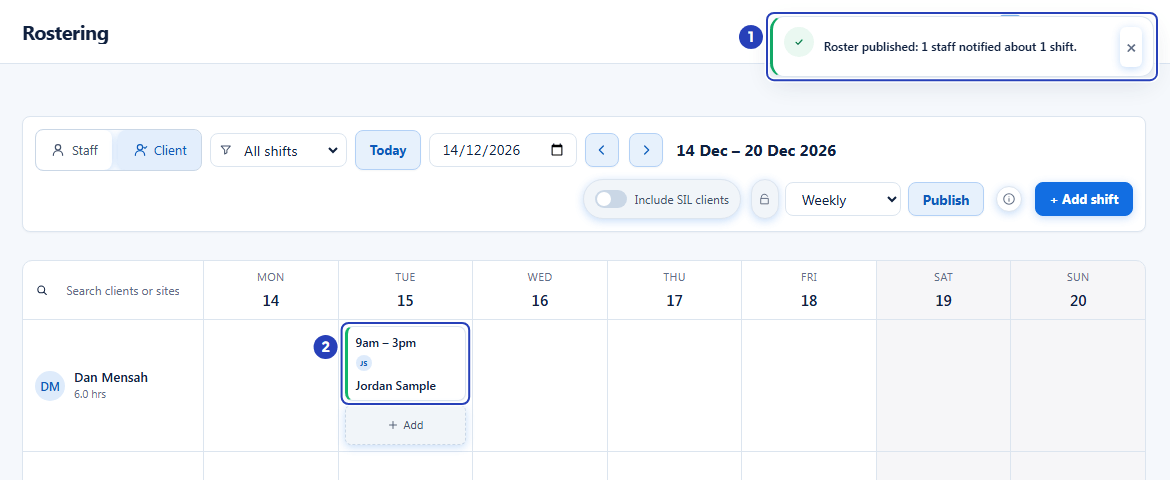
The confirmation message (1) counts the staff notified and the shifts they have. Shifts with a person assigned, like this one (2), are included.
What happens next
Each staff member who has an assigned shift in the dates you chose gets an email listing their shifts, and an in-app notification that their roster is ready. Only the assigned staff are notified.
A staff member whose record has no contact email gets the in-app notification only.
Staff can review their shifts in the Staff App. Nothing about the shifts changes when you publish.
Important notes
Tip: If you change a shift's date or times after publishing, the assigned person gets an in-app notification about the change straight away. To email everyone their shifts again, publish again.
Good practice
- Assign every shift first, then publish once for the week. Each time you choose Publish, the emails go out again.
- Check From and To before you choose Publish. They start as the dates you are looking at, so change Weekly to Fortnight first to publish two weeks at once.
- Keep each staff member's contact email up to date in Staff. Without one, the person receives the in-app notification only.
Troubleshooting
I cannot see Rostering in the left menu.
Why it happens: Your role does not include Can view roster.
What to do: Ask an Owner or Admin to add the permission to your role in Configuration > Roles & Permissions.
I cannot see Publish.
Why it happens: Your role does not include Can edit shift, or your access is limited to certain sites and the screen shows no clients for you.
What to do: Ask an Owner or Admin to check your role and your site access.
A message says No assigned shifts in this range to publish.
Why it happens: None of the shifts between From and To has a staff member assigned.
What to do: Assign staff to the shifts first, or choose dates that include shifts that already have a person on them.
A message says This automation is not enabled for your organisation.
Why it happens: Roster publish notifications is switched off.
What to do: An Owner or Admin can switch it on. Open the account menu at the top right, choose Account settings, find Roster publish notifications under Automation & Capacity Controls and choose Enable.
A message says You have reached your included automation capacity. Manual workflows remain available.
Why it happens: Your organisation has used its included automation capacity.
What to do: An Owner or Admin can check Automation usage in Account settings.
A message says The end date must be on or after the start date.
Why it happens: To is earlier than From.
What to do: Correct the dates, then choose Publish again.
A staff member says they did not get the email.
Why it happens: Their staff record has no contact email, so only the in-app notification was sent.
What to do: Add their contact email in Staff. They still received the in-app notification.