

Who this is for
This guide is written for Owner and Admin.
Before you begin
- You are signed in to BondiByte as an Owner or Admin. See Sign in to BondiByte.
- You have your organisation's legal name, ABN, a support email address and your logo file ready. A logo can be a PNG, JPEG, WebP or SVG file of 2 MB or smaller.
- If you want invoices to show bank details, you also have your account name, BSB and account number.
Steps
The screenshots show a demonstration organisation with made-up names. Your own screens show your organisation's details. Select a screenshot to open it full size.
-
Go to Configuration > Organisation
1 In the left menu, under Administration, choose Configuration. The Configuration page opens with a tile for each group of settings.
2 In the Workspace group, choose Organisation. The Organisation Settings page opens with four cards: Organisation profile, Invoice payment details, Contact & business address and Brand assets.
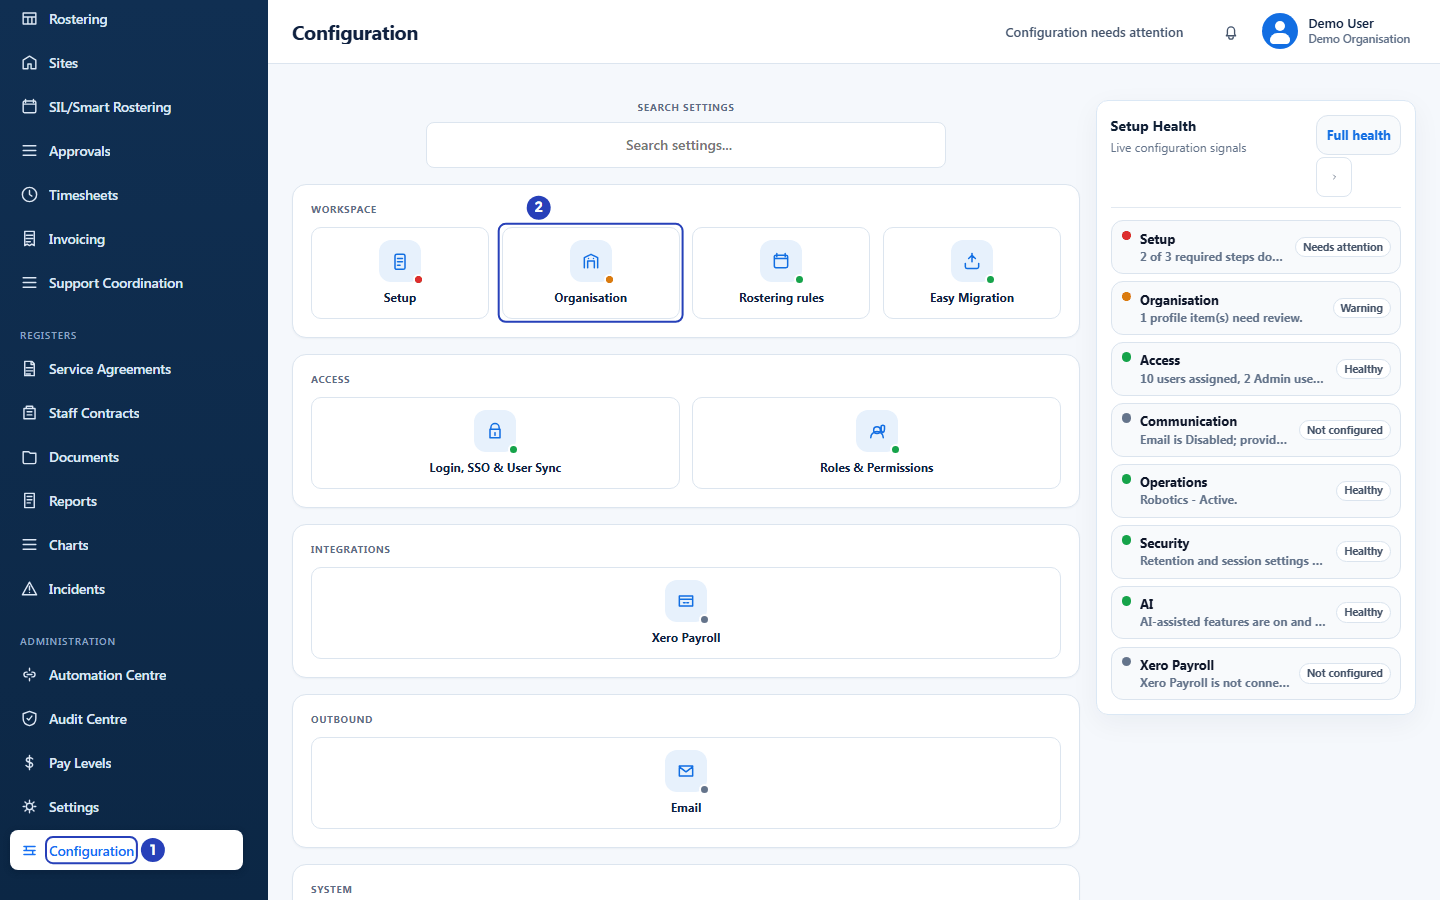
Choose Configuration in the left menu (1), then Organisation in the Workspace group (2). -
Upload your logo and choose your brand colours
Do this step before you type anything else on the page. Uploading a logo saves it straight away and refreshes the page, so anything you typed and did not save is lost.
The Brand assets card is the last of the four cards. Scroll down to it.
1 Use the Choose file button next to Upload brand logo (PNG / JPEG / SVG / WebP) to pick your logo file. The logo uploads straight away.
2 Choose your Primary brand colour. It is used for accents and primary actions.
3 Choose your Secondary brand colour. It is used for headers and supporting surfaces.
4 Check your logo under Logo preview. Until you upload a logo, Logo preview shows the BondiByte mark.
The logo is already saved. The two colours are saved with your other details when you choose Save section in step 6.
Warning: If you have already typed or changed anything on this page, choose Save section before you upload a logo, or those changes are lost. The same applies if you upload a different logo later.
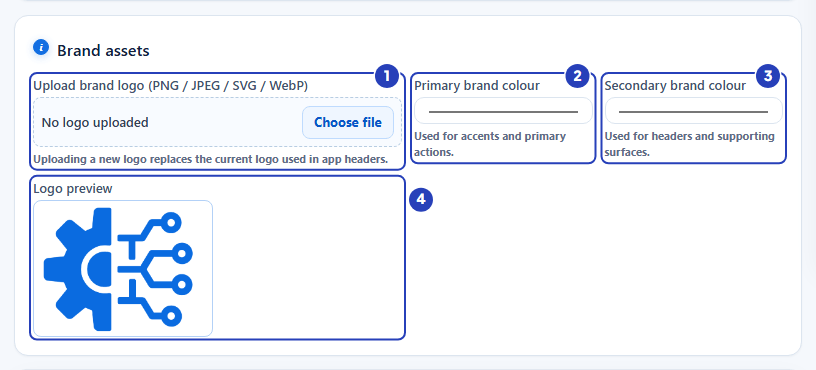
Choose your logo file (1), your primary (2) and secondary (3) brand colours, and check the logo preview (4). -
Enter your organisation profile
The Organisation profile card is at the top of the page. These details appear on invoices, portals and headers.
1 In Legal name, type your organisation's registered name. BondiByte uses this name across the platform.
2 In Trading name, type the name you trade under, if it is different from your legal name. Leave it empty if it is not.
3 In ABN, type your Australian Business Number. It appears on invoices.
4 In NDIS registration number, type your NDIS provider registration number. BondiByte uses it in the bulk-claim CSV export.
Fields in step 3 Field What it means Legal name Required for setup. The primary name for your organisation. The Settings page calls this same name Organisation display name. Trading name Optional. Used on documents and portals when it is different from the legal name. ABN Required for setup. Your Australian Business Number. It appears on invoices. ACN Optional. Your Australian Company Number, used on documents where a company number is needed. NDIS registration number Optional. Your NDIS provider registration number, used in the bulk-claim CSV export. Default currency A three-letter code. It starts as AUDand is used for budgets and pricing.Website Optional. Your organisation's website address. Tip: To bring in organisation details from a spreadsheet instead of typing them, choose Import organisation details at the top of the Organisation profile card.
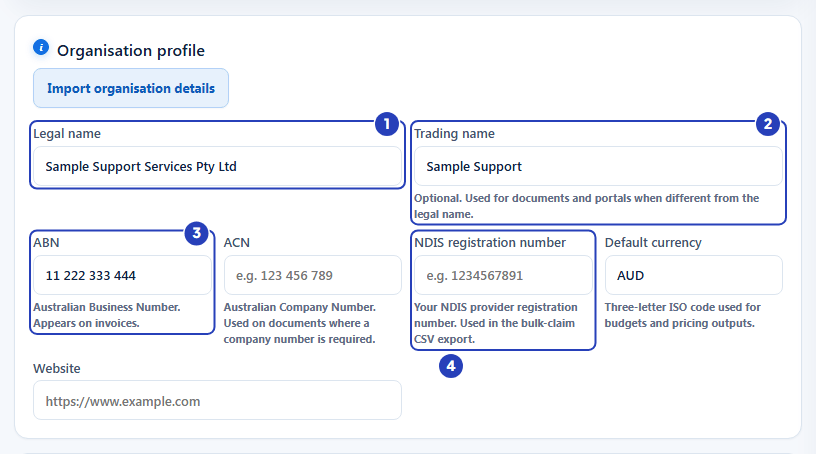
Type your legal name (1), trading name (2), ABN (3) and NDIS registration number (4). -
Add your invoice payment details
The Invoice payment details card holds the bank details and payment terms that can be printed on future client invoices. You can fill it in now or come back before you send your first invoice.
1 In Account name, type the name on your bank account.
2 In BSB, type the six-digit BSB, for example
123-456.3 In Account number, type your account number. It must be 4 to 12 digits.
4 In Payment terms, type how many days after the invoice date payment is due. Type
0for due on receipt.Fields in step 4 Field What it means Account name The name shown beside the bank account in the payment instructions. BSB Six digits, for example 123-456. You can type it with or without the hyphen.Account number Four to twelve digits. Leading zeros are kept. Payment terms A whole number of days from 0 to 120. It starts as 14.Staff leave approval threshold (days) Staff unavailability longer than this many days needs manager approval before it takes effect. This setting sits in this card but is not about invoices. Remittance email Optional. The email address for payment advice. It is linked to the billing reply-to address in the Email settings. Invoice payment instructions Optional wording shown with the bank details on future invoice PDFs and emails. 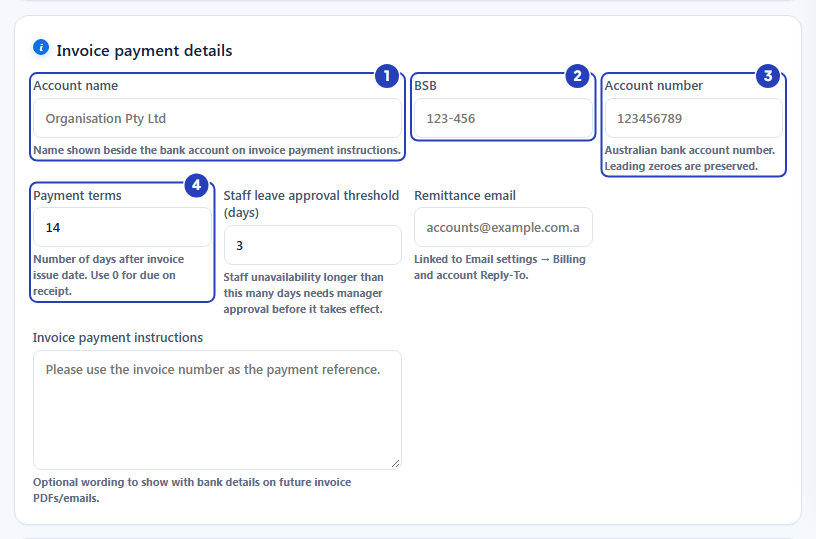
Type the account name (1), BSB (2) and account number (3), and set the payment terms in days (4). -
Add your contact and business address
1 In Primary support email, type the email address people should use to reach your organisation. It is shown on portals and used as the contact address on outgoing automation messages.
2 In Organisation phone, type your public contact number.
3 In Address line 1, type your street address. Use Address line 2 for a unit, floor or campus name.
4 In Country, type
Australia. Also fill in City, State / region and Postcode.Important: Setup counts your organisation as complete only when Legal name, ABN, Country and Primary support email are filled in.
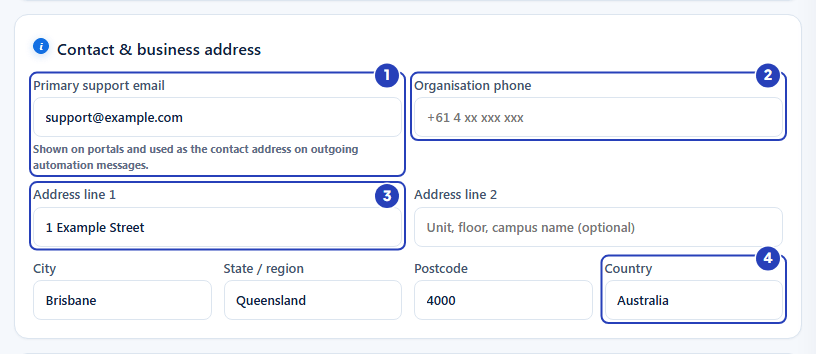
Type the support email (1), phone number (2) and street address (3), then the country (4). -
Choose Save section
1 Look at the bar at the bottom of the page. It shows how many changes are pending, for example 10 changes pending.
2 Choose Save section. A message confirms Organisation saved. and the bar changes to All changes saved.
To throw away changes you have not saved, choose Discard instead.
Note: If you change Default currency, BondiByte asks you to confirm first, because future invoice defaults will use the new currency. Existing invoices keep their original currency.
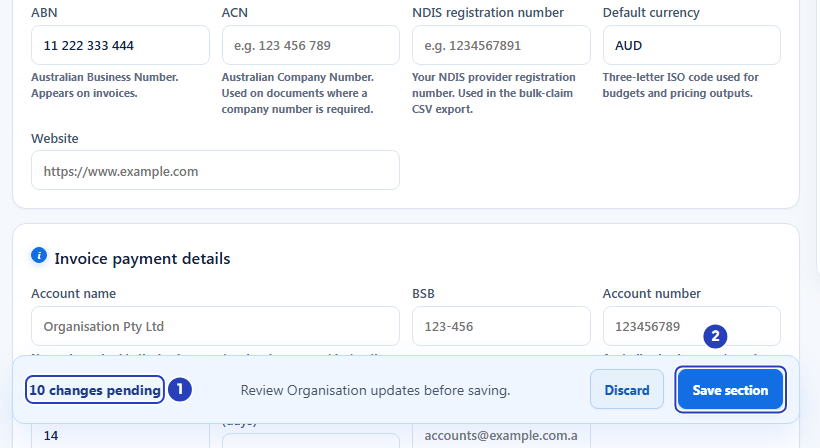
Check how many changes are pending (1), then choose Save section (2). Discard throws the changes away. -
Check the time zone and date format in Settings
These settings are the default time zone and date and time format for your whole organisation. In the left menu, under Administration, choose Settings. The Workspace Settings page opens.
1 Under Date and time, choose your Time zone.
2 Choose a Date format.
3 Choose a Time format.
4 Choose Save settings. A message confirms Settings saved.
Fields in step 7 Field What it means Organisation display name The same name as Legal name on the Organisation page. Changing one changes the other. Theme mode Choose Light, System default or Dark. Primary colour The same colour as Primary brand colour on the Organisation page. Owner phone number (optional) Your own phone number, saved on your login. Time zone Choose from Australia/Brisbane, Australia/Sydney, Australia/Melbourne, Australia/Adelaide or Australia/Perth. Date format Choose dd/MM/yyyyoryyyy-MM-dd.Time format Choose 24 hour or 12 hour. 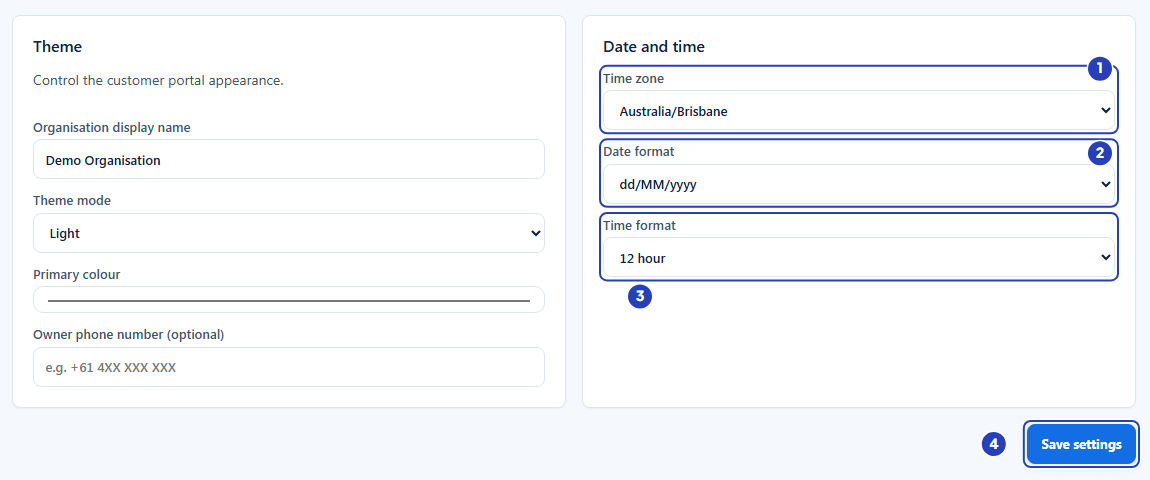
Choose your time zone (1), date format (2) and time format (3), then choose Save settings (4). -
Check your setup progress
Go to Configuration and choose Setup, the first tile in the Workspace group. The guided setup page opens.
1 The counter at the top right shows how many of the three required steps are done.
2 Next recommended action tells you what to do next.
3 Choose a step in the list to see what BondiByte checked and what still needs attention. Each step is marked Done, Current, Locked or Skipped.
After you make a change, choose Refresh setup to read your settings again.
Tip: The three required steps are Tell us about your organisation, Upload your brand and Set up roles and users. The first is done when Legal name, ABN, Country and Primary support email are filled in. The second is done when a logo has been uploaded.
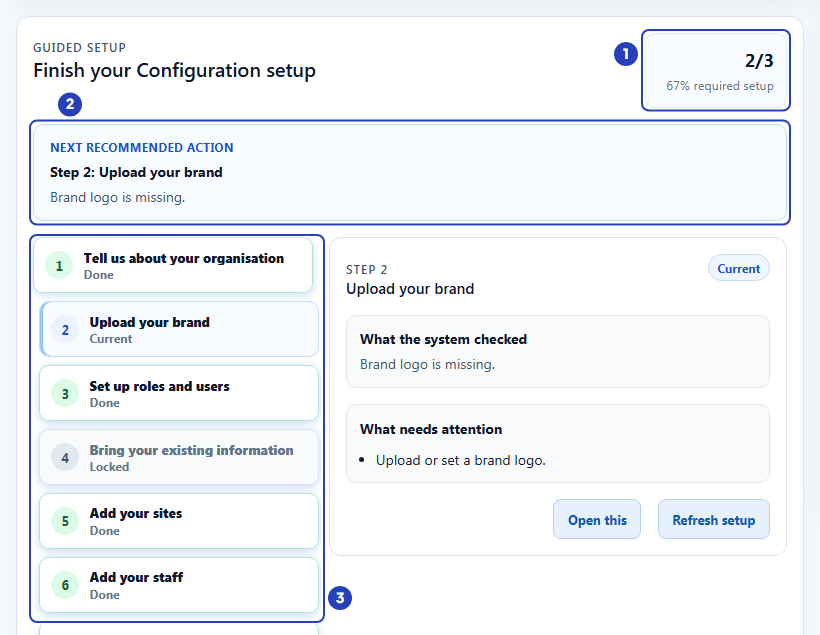
The counter shows the required steps done (1), the next recommended action tells you what to do (2), and the list shows each step (3).
What happens next
The details you entered are used on invoices, portals and headers, as the card descriptions explain. Your logo and colours are used in app headers and organisation portals.
The third required setup step is Set up roles and users. It needs at least one active Admin and at least one person assigned to a role. See Roles and permissions basics.
Next, add your sites, staff and clients. See Create a staff member and Create a site.
To share your organisation's sign-in link and company code with your team, find them in Configuration > Login, SSO & User Sync.
Important notes
Important: Nothing in the Organisation page is saved until you choose Save section, and nothing on the Settings page is saved until you choose Save settings. The logo is the one exception, because it uploads as soon as you choose the file.
Tip: Fill in only what you have. Your name, ABN, country, support email and logo are the details the setup checklist asks for. You can add the rest later from the same cards.
Good practice
- Upload your logo and choose your brand colours before you type anything else on the Organisation page, or choose Save section first. Uploading a logo refreshes the page, and anything typed but not saved is lost.
- Check your Legal name and ABN against your registration before you choose Save section. Both appear on invoices, and setup counts the organisation as complete only when they are filled in.
- Check the BSB and Account number twice. They are printed with the payment instructions on your future client invoices, so a typing mistake reaches your clients.
- Choose your Time zone, Date format and Time format in Settings before you start rostering, so dates and shift times show the way your team expects.
- After you save, open Configuration > Setup and choose Refresh setup. The counter should now show your organisation and brand steps as done.
Troubleshooting
Save section is greyed out.
Why it happens: The bar shows Make a change to enable Save. until something on the page has changed.
What to do: Change a field first. The bar then shows how many changes are pending and Save section becomes available.
A message says BSB must be six digits, for example 123-456.
Why it happens: The BSB has fewer or more than six digits, or contains letters.
What to do: Type the six digits of your BSB, with or without the hyphen, then choose Save section again.
A message says Account number must be 4 to 12 digits.
Why it happens: The Account number is too short or too long, or contains letters.
What to do: Type only the digits of your account number, then choose Save section again.
A message says Brand logos must be 2MB or smaller.
Why it happens: The logo file is larger than 2 MB.
What to do: Export a smaller version of the logo, or compress it, then choose the file again.
A message says Brand logos must be image files.
Why it happens: The file you chose is not a PNG, JPEG, WebP or SVG image.
What to do: Choose a logo saved as a PNG, JPEG, WebP or SVG file.
I cannot see the Organisation tile or Settings.
Why it happens: Your role does not include permission to open or manage organisation settings.
What to do: Ask an Owner or Admin to make the changes, or to check your role.