

Who this is for
This guide is written for Owner, Admin, Manager and Coordinator.
Before you begin
- You are signed in to BondiByte on a computer.
- The form you want to use is published. BondiByte templates are always available. For your own forms, see Publish a form.
- The client the report is about is already in BondiByte.
Steps
The screenshots show a demonstration organisation with made-up names. Your own screens show your organisation's details. Select a screenshot to open it full size.
-
Go to Reports > Add report
1 In the left menu, choose Reports. The Reports page lists the reports your organisation has recorded.
2 At the top right of the list, choose Add report. The Choose report type window opens.
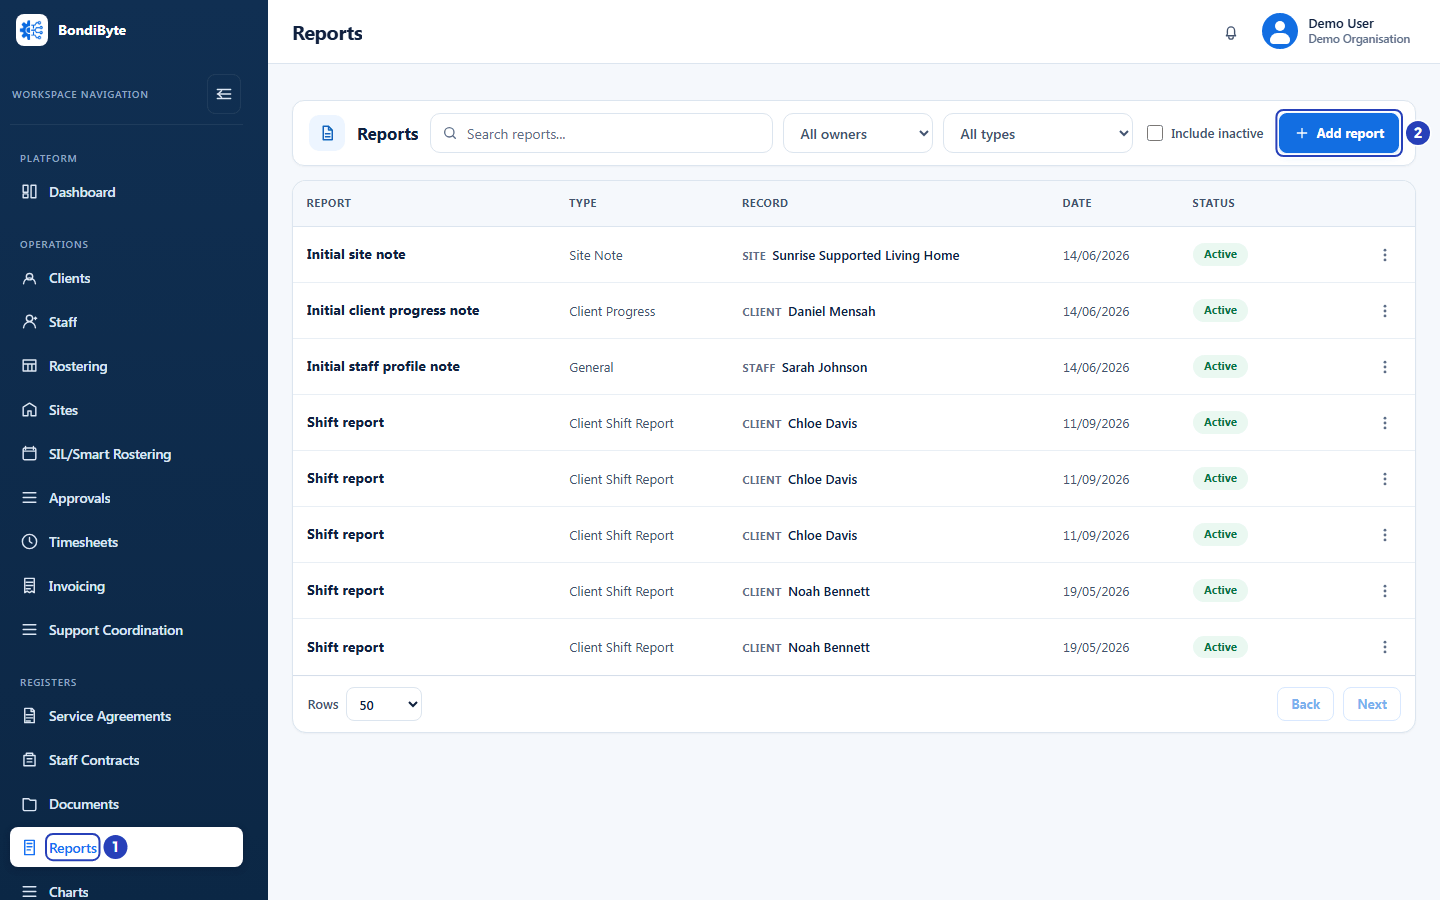
Choose Reports in the left menu (1), then Add report (2). -
Choose the form
1 Check that Report context is Client. The options are Staff, Client, Site and Shift, and they decide which report types are listed. Your organisation's own forms are offered for Client only.
2 In Search report types, type part of the form's name or description, for example
Sample Daily. If nothing matches, the list says No report types match your search.3 Under Organisation templates, choose the form. When the search box is empty, a Recently used group at the top lists the last few forms you chose on this computer, and the BondiByte templates group comes before Organisation templates.
Note: Forms that your organisation created and published are tagged Organisation. The ready-made BondiByte forms are tagged BondiByte and work in the same way. The description under a form's name is the one set when the form was created.
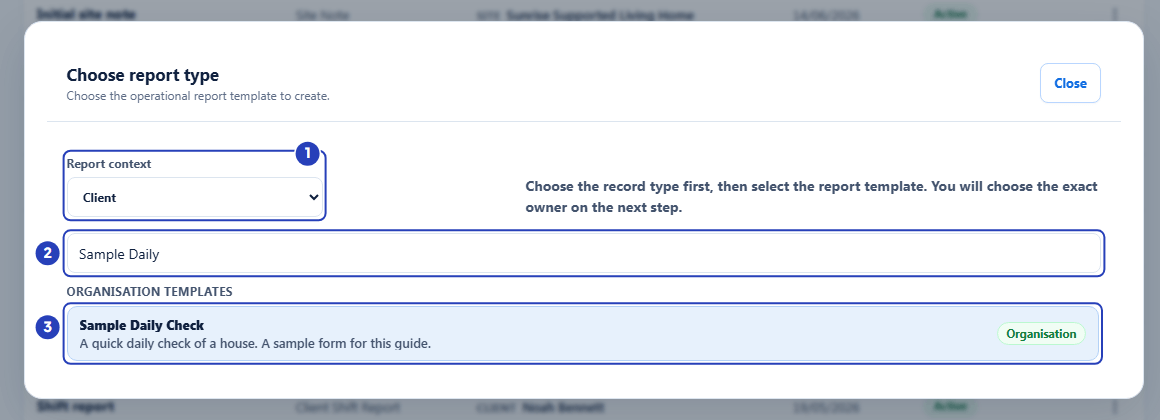
Check the report context (1), search for the form (2) and choose it (3). -
Choose who the report is about
The Add report window opens with the form's questions.
1 Check that Owner type is Client.
2 In Owner, choose the client the report is about.
3 Change the Title if you want to, for example to add the date. It starts as the form's name.
Report type shows the name of the form you chose. You cannot type in it. To use a different form, choose Change type at the bottom of the window.
Tip: If you chose the wrong form, choose Change type at the bottom of the window to go back to the list of forms.
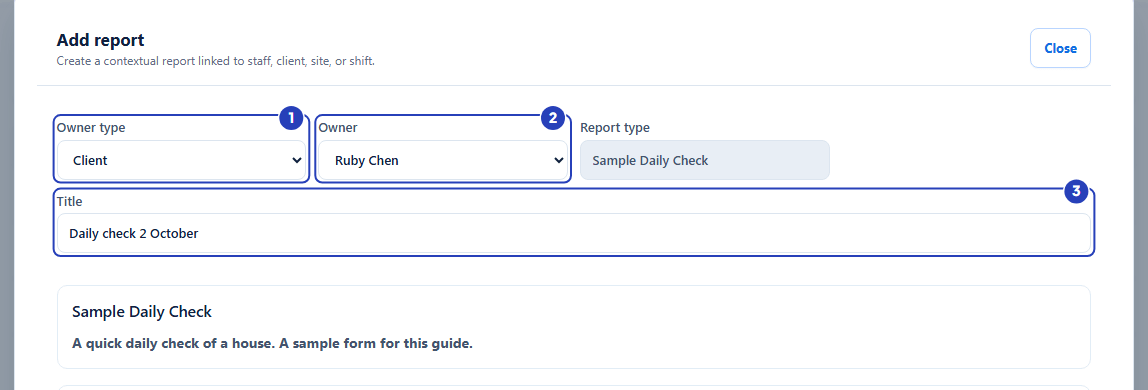
Check the owner type (1), choose the client (2) and change the title if you want to (3). -
Fill in the form
1 Answer each question. In the example form, type who did the check in Checked by.
2 Choose the Date of check.
3 Choose an answer for Everything in order?
4 Choose the Area checked.
5 Add anything else in Notes.
Fields in step 4 Field What it means Questions marked required Must be answered before the report can be created. Required questions are not marked in this window. To see which questions a form requires, check its Preview in Reports & Forms, where a star marks each one. If you leave one empty, your browser stops you and shows which question needs an answer. For an answer your browser cannot check, BondiByte shows a message at the top of the window, such as Complete the required field: Checked by. Choice questions Choose one of the options the form's author set up. A multiple choice question lets you choose more than one. Date questions Choose a date from the calendar or type it. 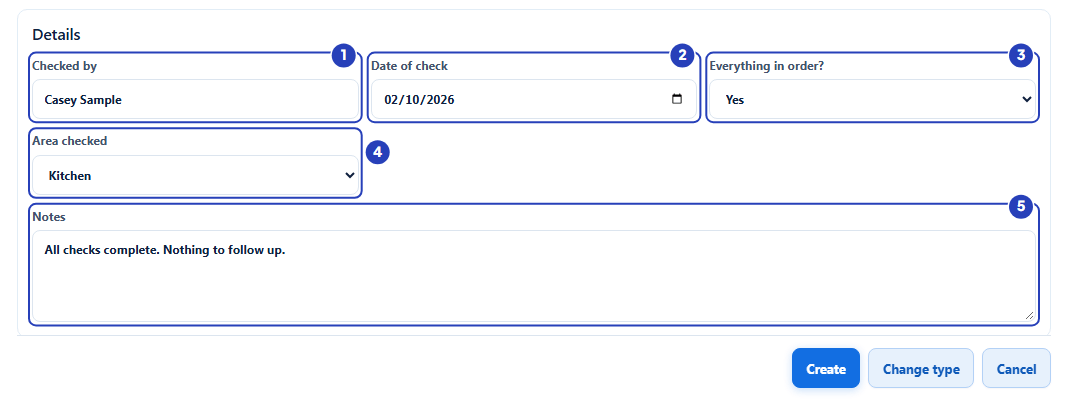
Answer each question, from Checked by (1) to Notes (5). -
Choose Create and check the new report
Choose Create at the bottom of the window. Choose Cancel instead to close the window without saving.
1 A message confirms Report created.
2 The new report appears in the Reports list, with the form's name under Type and the client under Record.
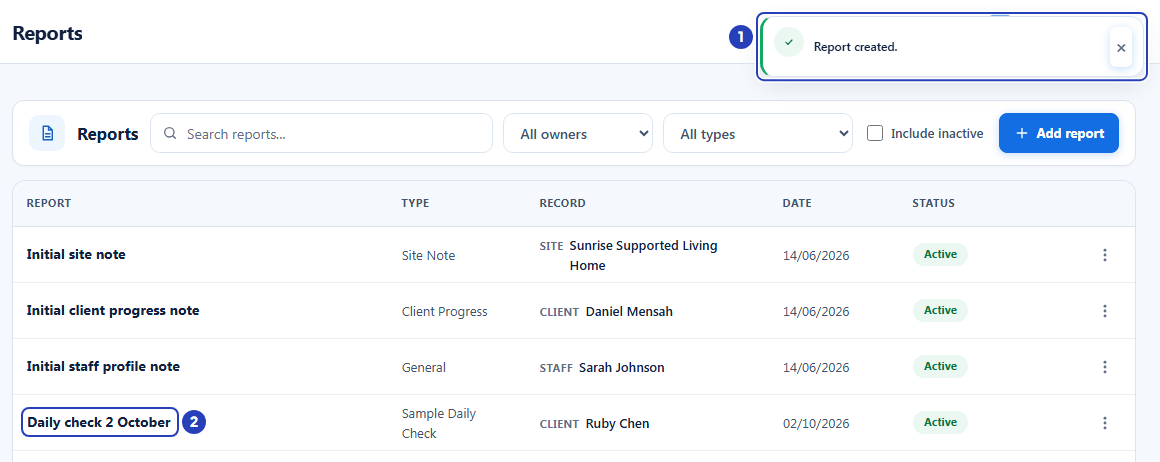
A message confirms the report is created (1) and the new report is in the list (2).
What happens next
The report is saved against the client you chose. It stays in the Reports list, where you can search for it. Search finds words in the title and in the answers, and it finds the name of a BondiByte report type.
To read a report, choose its title, or open the three dots menu on its row and choose View. To change it, choose Edit from the same menu. To keep a copy, see Download a report PDF.
A report made from one of your organisation's forms keeps the version of the form it was completed on. If the form is changed and published again later, reports already completed still read the way they were written.
Support workers complete reports themselves in the Staff App. Reports they submit appear in this same list.
Important notes
Important: A form in the Incident category belongs to the Incidents area and is not offered here. Record those from the Incidents page instead.
Good practice
- Add the date or the house name to the Title, for example
Daily check 2 October. The Reports list shows the title first, and search finds words in the title and in the answers. - Check the client and the answers before you choose Create. If something needs changing afterwards, use Edit from the row menu, and download the PDF again if you had already saved one, because a PDF shows the report as it was when you downloaded it.
- Choose the form with the right name, not one that is nearly right. Use the Recently used group or the search box, and read the description under the name to be sure it is the form you want.
Troubleshooting
I cannot see the Add report button.
Why it happens: Your role does not include permission to create reports.
What to do: Ask an Owner or Admin to check your role.
My organisation's form is not in the list of forms.
Why it happens: The form is not published, its category is Incident, or Report context is not Client. Forms that your organisation created are offered for client reports.
What to do: Set Report context to Client. In Reports & Forms, check that the form is published and that its category is not Incident. Then try again.
A message such as Please fill out this field. appears beside a question.
Why it happens: The question is marked required in the form, and it is empty.
What to do: Answer the question the message points to, then choose Create again.
A message at the top of the window says Complete the required field: ... followed by a question name.
Why it happens: A question marked required has no answer, and your browser could not check it.
What to do: Answer each question named in the message, then choose Create again.
The client I want is not in the Owner list.
Why it happens: The list shows only the clients your role can see. If your access is limited to certain sites, clients outside those sites are not listed.
What to do: Ask an Owner or Admin to check your access, or to add the report for you.
I chose the wrong form after opening the report window.
Why it happens: The form is chosen before the questions are shown.
What to do: Choose Change type at the bottom of the window to go back to the list of forms. Your answers to the old form's questions are not kept.