

Who this is for
This guide is written for Owner, Admin, Manager and Compliance Officer.
Before you begin
- Incidents is available to your organisation and has no switch of its own in Settings or Configuration. If Incidents is missing from your left menu, your role does not include Can view incidents: ask an Owner or Admin. If the page says Incidents are not enabled for your organisation (a banner may also say Your plan does not include this feature.), your organisation's subscription is not active. An Owner or Admin checks Billing & subscription and contacts BondiByte support if it is active.
- Reminder and alert emails about incidents need three things to be on. An Owner or Admin turns on Automation Centre and Incident escalation automation under Automation & Capacity Controls in Account settings, and Incident follow-up notifications in the Automation Centre. See the section on reminders and notifications below.
- Your organisation's own incident forms are optional. They are forms published in the Incident category. See Create or clone a form and Publish a form.
What Incidents is for
Incidents is the register where your organisation records incidents: what happened, when and where, who was involved, what was done straight away and what follow-up is needed. Each incident is one record with a type, a severity, a status and an incident number.
BondiByte keeps the record. It does not report an incident to the NDIS Commission, to the police or to anyone else outside your organisation, and it does not decide whether an incident has to be reported. Your organisation remains responsible for responding to an incident and for any reporting it must do.
If someone needs urgent help, call emergency services first and record the incident afterwards. Incidents is a record keeping tool, not an emergency service.
How an incident gets into the register
An office user records it. An Owner, Admin, Manager or Compliance Officer chooses Add incident on the Incidents page and fills in the standard form, Incident report (standard). This is the main route, and Record an incident walks through it.
Your organisation's own incident forms. If your organisation has built and published a form in the Incident category, Add incident first opens the Choose incident type window, which lists the standard form under BondiByte templates and your own forms under Organisation templates. A person who chooses one of your own forms picks the Client, answers the form's questions and chooses Record incident. The window then confirms Incident recorded. These records are listed in the Incident form records section lower on the Incidents page, with the columns Date, Title, Incident type, Client, Created by and a View button. They are not part of the main register, so they do not count in the four tiles and they have no status or severity of their own. The Choose incident type window only appears for people who can also create reports (the Can create notes permission).
A staff member writes an Incident report in the Staff App. That is a report, not an incident in the register. It is listed with your other reports. A manager who wants it on the register records it with Add incident.
A draft prepared from a shift report. This needs AI-assisted features to be switched on by an Owner or Admin: AI-assisted features under Account settings > Automation & Capacity Controls, and Potential incident detection and Incident report drafting under Configuration > AI Settings. Once they are on, a manager can confirm a possible incident in Approvals. The confirmation window says This does not submit an incident. You will be taken to an incident draft to review and complete. The Add incident window then opens with the line Draft prepared from a shift report and the date, and the suggested fields are marked Suggested from shift report. Nothing is saved until a person chooses Create incident, and checking every field is still their job.
The Incidents page
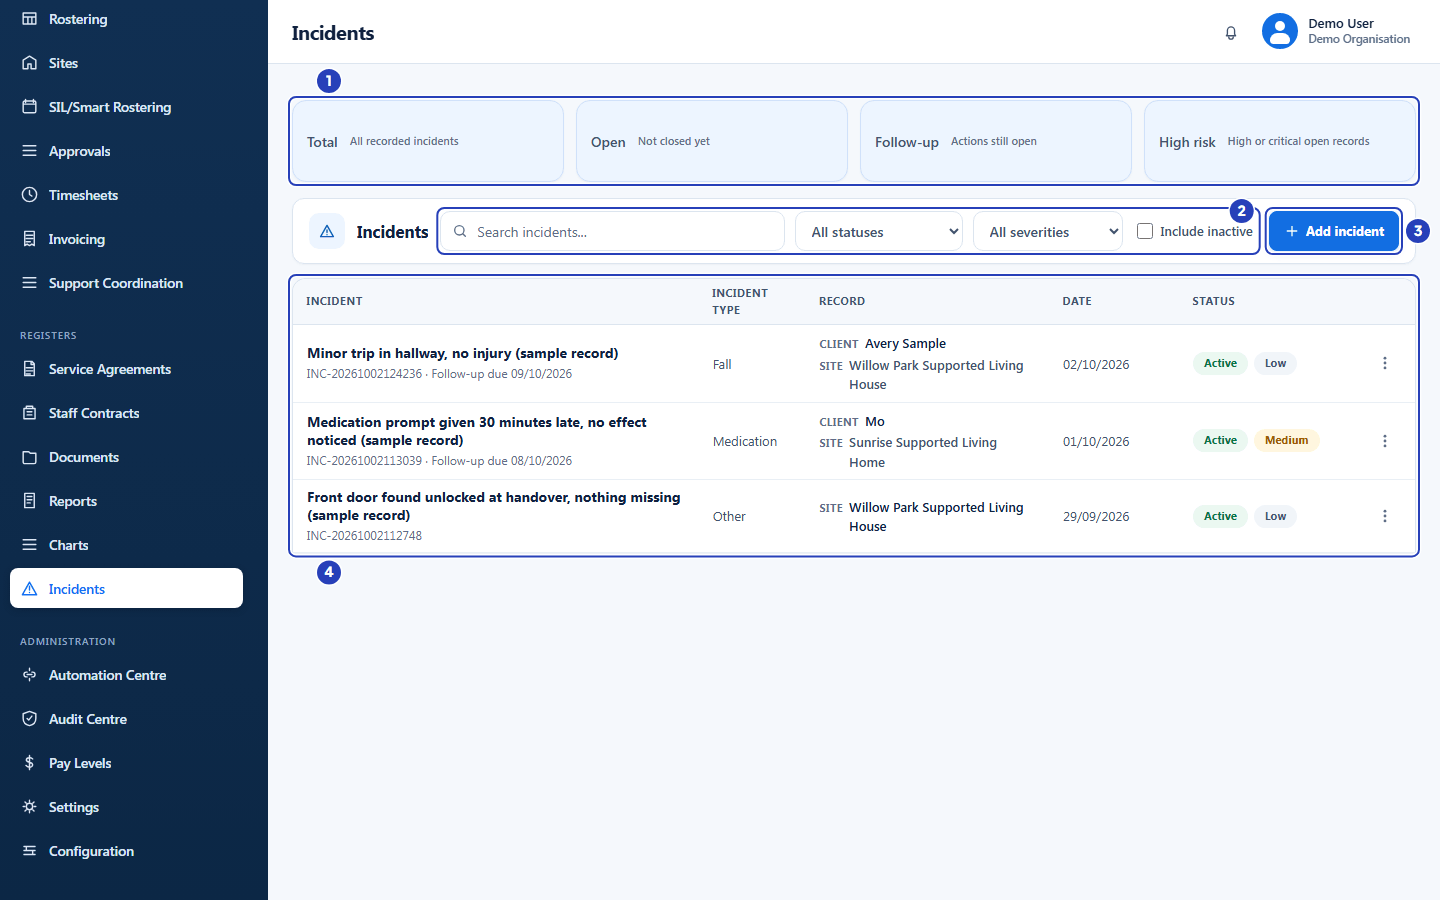
In the left menu, under Registers, choose Incidents. At the top are four tiles. Total counts all recorded incidents, including deleted ones. Open counts incidents that are not closed yet. Follow-up counts the actions still open: incidents that need a follow-up and are not closed. High risk counts the High or Critical incidents that are not closed. The tiles always count all your incidents, whatever you type in the search box or choose in the lists.
Below the tiles is the register toolbar. It has a search box (Search incidents...) that looks at the incident number, the summary, the description, the client's name and the site's name. Next are a status list (All statuses, Open, In review, Follow-up required, Closed, Cancelled) and a severity list (All severities, Low, Medium, High, Critical). Include inactive also lists incidents that were deleted from the active register. Add incident starts a new record.
The register lists the newest incident date first. Its columns are Incident (the summary, which opens the Review incident window, with the incident number and any Follow-up due date under it), Incident type, Record (the client and the site, or the site or location when there is no client), Date, Status (Active or Inactive, and the severity) and a three dots menu with Review, Edit and Delete. A pager under the register has a Rows list and Back and Next buttons. When nothing matches your search, the register says No matches for followed by what you typed, with a Clear search button. A brand new organisation sees No incidents yet and Add an incident to get started.
Types, severity and the incident number
Type describes what kind of incident it is: Medication, Behaviour, Fall, Injury, Safeguarding, Complaint or Other. A new incident starts as Other. The type shows in the Incident type column.
Severity says how serious the incident was: Low, Medium, High or Critical. A new incident starts as Low. The severity shows beside Active in the Status column, in red for High and Critical. An incident that is High or Critical and not yet closed counts in the High risk tile, and High and Critical are the severities that Incident follow-up notifications emails managers about.
Incident number identifies the incident. If the person recording it leaves the box empty, BondiByte numbers the incident with a number that starts with INC-. A number that someone types must not already belong to another incident in your organisation.
Date and time is when the incident happened, not when it was typed in. It cannot be more than 24 hours in the future. The register lists incidents by this date.
Statuses and how an incident moves
Every incident has a status, which is separate from Active and Inactive. A new incident starts as Open. The status list in the Review incident window has five choices. Open: recorded and not yet picked up. In review: someone is looking into it. Follow-up required: actions are still to be done. Closed: finished. Cancelled: closed without further work, for example because it was recorded by mistake.
Closed and Cancelled both count as closed. A closed incident leaves the Open, Follow-up and High risk tiles but still counts in Total, and it stays on the register. Choose Closed or Cancelled in the status list above the register to find it. Open, In review and Follow-up required do not change any tile.
The statuses do not have to be used in order. A person who can edit incidents opens the incident with Review, chooses a status in Incident status and chooses Save status, or chooses Close incident to set Closed in one go. Close incident does not ask for confirmation, and the incident can be reopened by choosing another status.
Delete is a different action. It removes an incident from the active register, and the incident is then labelled Inactive. Tick Include inactive to list it again. An inactive incident can still be reviewed and edited, but Delete is no longer offered, and there is no button to put it back on the active register.
Follow-up
The standard form has a Follow-up required tick box. Ticking it asks for Who should follow up, the staff member who owns the follow-up, and the Follow-up due date. Both are required once it is ticked. Unticking it clears both.
A follow-up shows as Follow-up due and the date under the incident number in the register and in the Review incident window, and the incident counts in the Follow-up tile until it is closed.
The Follow-up required tick box and the Follow-up required status are separate. Choosing the status does not set an owner or a due date, and ticking the box does not change the status. Check both when you review an incident.
When the follow-up reminders are switched on (see the next section), the staff member who owns the follow-up is emailed 24 hours before the due date. The form says so under Who should follow up.
Who can see and change incidents
Can view incidents opens the Incidents page and the Review incident window. Can create incidents shows Add incident. Can edit incidents shows the Incident status list, Save status and Close incident in the Review incident window, and Edit and Delete in the three dots menu. A role with only Can view incidents can read every incident it can see and cannot change anything. Owners and Admins have every permission. Managers and Compliance Officers can view, create and edit incidents by default.
To check or change what a role can do, go to Configuration > Roles & Permissions, open the role and choose its Permissions tab. The incident permissions are in the Documents group. See Roles and permissions basics.
If a person's access is limited to certain sites, the register, the four tiles and the Review incident window only cover the incidents linked to their own sites, and the client, site and staff lists on the form only offer records they can see. An incident that is recorded with no site is saved but is not listed for them, so a person with limited access should choose a site in Location when recording an incident.
Reminders and notifications
BondiByte can email people about incidents. Three things must all be on. They are set by an Owner or Admin, in this order.
1. Account settings. Choose your name at the top right, then Account settings. Under Automation & Capacity Controls, make sure the badge on the Automation Centre master switch and on Incident escalation automation starts with Enabled (for example Enabled - Not run yet). If a badge says Disabled, choose Enable. Incident escalation automation allows BondiByte to send incident escalation, follow-up due and severe incident notifications. The card says these use ACU (Automation Capacity Units) when notifications are generated.
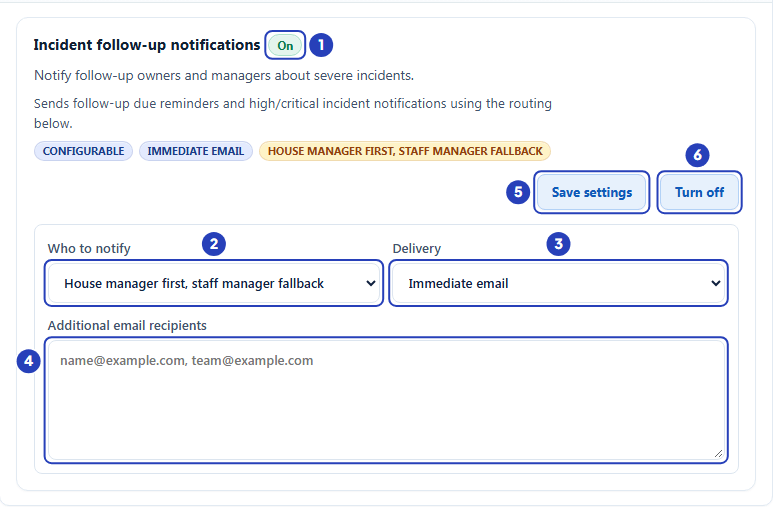
2. Automation Centre. In the left menu, under Administration, choose Automation Centre. On the Library tab, in the Incidents group, find Incident follow-up notifications. It shows On or Off, with Turn on or Turn off. If the card shows Off, choose Turn on. The card says it notifies follow-up owners and managers about severe incidents, and that it sends follow-up due reminders and high or critical incident notifications using the routing set on the card.
3. The settings on the card. Who to notify, Delivery, Additional email recipients and Save settings appear once the card is On. Who to notify has four choices: House manager first, staff manager fallback, House manager for the client/site, Staff manager and Both managers when available. Delivery has two: Immediate email and End-of-day email. Additional email recipients takes extra email addresses, written with a comma between them. Choose Save settings to keep a change.
The follow-up owner on an incident is emailed 24 hours before the due date, as the form says. The managers' emails depend on Who to notify. Whether anyone is emailed does not depend on the Create incident button, only on these settings. If your organisation has used up its included automation capacity, these emails are not sent, while recording and reviewing incidents carries on as normal. An Owner or Admin can check the automation usage in Account settings.
Where else incidents appear
On a client's record, the Reports tab lists the client's incidents beside their reports. An incident row shows the category Incident. Choosing it opens the incident on the Incidents page: in the Edit incident window if you can edit incidents, or in the Review incident window if you cannot.
A notification in the notification bell can link to an incident, and opens it the same way.
In the Audit Centre, Incident register (CSV) is one of the registers that can be included when an audit is prepared.
What BondiByte does not do
BondiByte does not report an incident to the NDIS Commission, the police, a guardian, a family member or any other person outside your organisation. Recording, reviewing or closing an incident sends none of those reports.
BondiByte does not decide whether an incident is reportable or how serious it is. The person recording it chooses the type and severity, and your organisation decides what has to be reported and when.
There is no notification section on the incident form. The form says to write who was told, and when, in Description or Immediate action taken.
Important notes
Important: BondiByte keeps your record of the incident and where it is up to. It does not report the incident to the NDIS Commission or anyone else. Your organisation remains responsible for responding to the incident and for any reporting it must do.
Warning: If someone needs urgent help, call emergency services first and record the incident afterwards.
Note: A Staff App Incident report is a report, not an incident on the register. If you cannot find it on the Incidents page, look with your other reports.
Good practice
- Record every incident on the register as soon as it is safe to do so, even when a staff member has already written an Incident report in the Staff App. The register is what the Open, Follow-up and High risk tiles count.
- Check the four tiles at the start of each week. A High risk count above zero, or a Follow-up count that does not fall, tells you which incidents to open first.
- Keep the status up to date as the work moves along, so that the status list above the register shows where each incident is up to.
- Give every follow-up an owner and a realistic due date. The owner is emailed 24 hours before the due date once the notifications are switched on.
- Decide in advance who is told about severe incidents, then set Who to notify and Additional email recipients on the Incident follow-up notifications card to match, and write who was told, and when, in Description on the incident.
- Do not delete an incident to correct a mistake. Use Edit for a wrong detail, and Cancelled for a record that should not have been made.
Questions and answers
Does BondiByte report incidents to the NDIS Commission?
No. BondiByte records the incident and where it is up to. Your organisation decides whether an incident has to be reported and makes any report itself.
What is the difference between the Active label in the register and a status such as Closed?
Active means the incident is on the active register. Closed is one of the five statuses, which show how far the incident has got. A closed incident is still Active, and stays on the register until someone chooses Delete.
Can I change an incident after I have saved it?
Yes. A person who can edit incidents can correct the details with Edit, and change the status in the Review incident window.
Why does an incident that I closed still count in the Total tile?
Total counts every recorded incident, including closed and deleted ones. Only Open, Follow-up and High risk leave out closed incidents.
Incidents is not in my left menu. What should I do?
Your role does not include the Can view incidents permission. Ask an Owner or Admin to check your role in Configuration, Roles & Permissions.
The Incidents page says Incidents are not enabled for your organisation. What should I do?
A banner may also say Your plan does not include this feature. That means your organisation's subscription is not active. An Owner or Admin checks Billing & subscription, and contacts BondiByte support if it is active.
An incident was recorded but nobody was emailed. Why?
Emails about incidents only go out when Automation Centre, Incident escalation automation and Incident follow-up notifications are all on, and Who to notify or Additional email recipients names someone. An Owner or Admin checks the three switches in the order shown in the Reminders and notifications section, and chooses Save settings on the card after any change.
I cannot find Incident follow-up notifications in the Automation Centre.
It sits on the Library tab, in the Incidents group. Choose Incidents in the filter list to show it. If Automation Centre is missing from the left menu, ask an Owner or Admin to check your role.
A form my organisation built does not appear in the Choose incident type window.
The form may not be published, its category may not be Incident, or your role may not be able to create reports. Check the form in the Report Library, as described in the guides on creating and publishing a form, and ask an Owner or Admin to check your role.