

Who this is for
This guide is written for Owner and Admin.
Before you begin
- You are signed in to BondiByte on a computer.
- You know what the Chart should record each time, for example a time, a drink and an amount. A Chart records the same structured observation again and again for one client.
Steps
The screenshots show a demonstration organisation with made-up names. Your own screens show your organisation's details. Select a screenshot to open it full size.
-
Go to Configuration > Chart Library
1 In the left menu, under Administration, choose Configuration. The Configuration page opens.
2 Under System, choose Chart Library. The Chart Library Settings page opens.
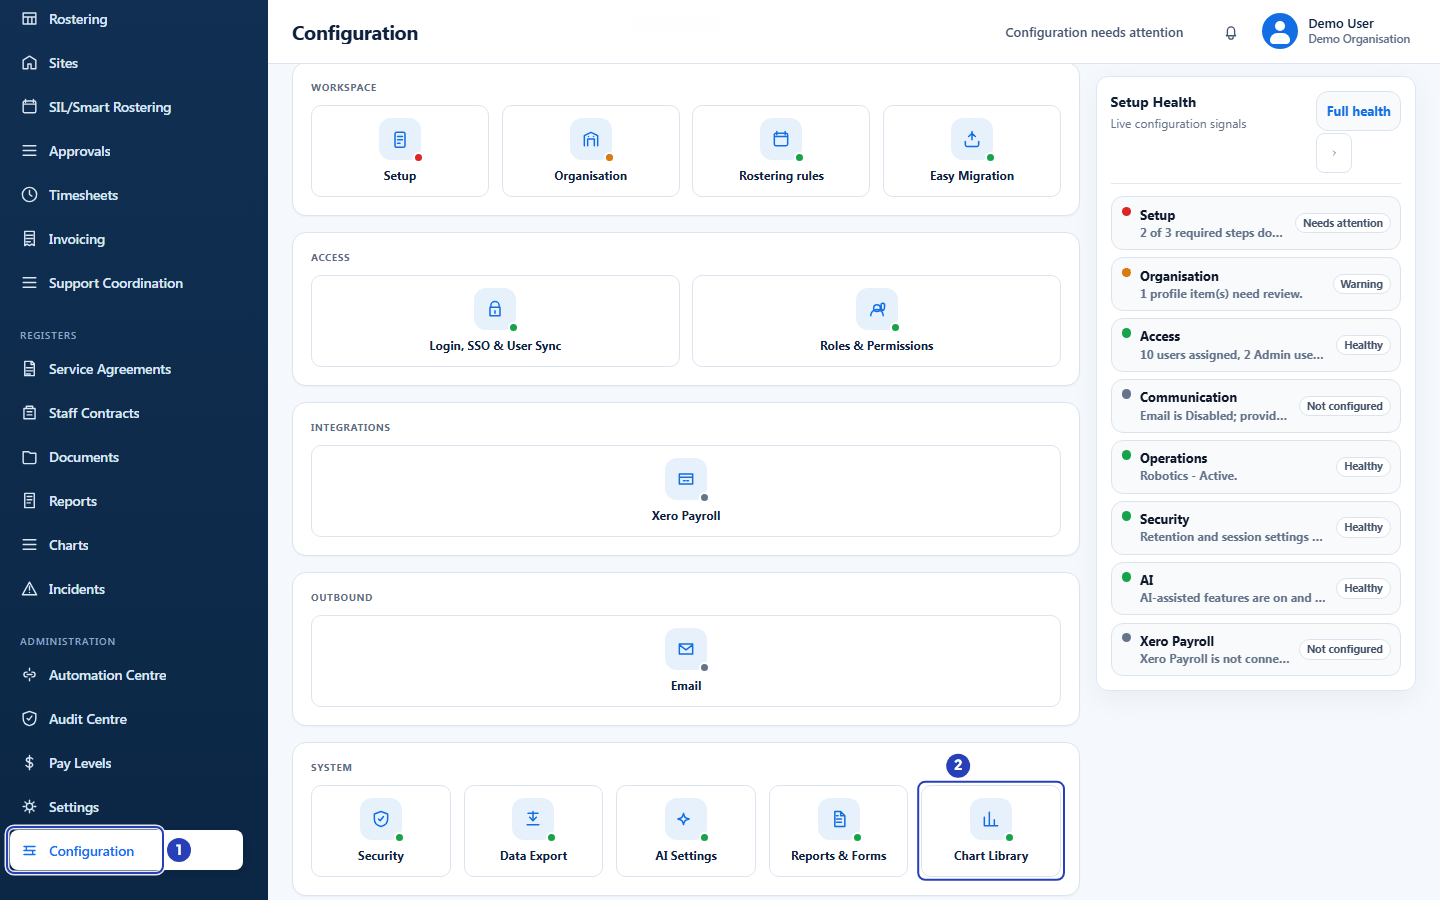
Choose Configuration in the left menu (1), then Chart Library under System (2). -
Start a new template
On the Organisation templates tab, choose + Start from scratch. A window titled Start from scratch opens.
1 In Chart template name, type a name your team will recognise.
2 In Description, say what the Chart records.
3 Choose Create and open builder. Choose Cancel instead to close the window without creating anything.
Fields in step 2 Field What it means Chart template name Required. Each Chart template in your organisation needs its own name. A name that differs only in capital letters counts as the same name, and the name of an archived template counts too. The Create and open builder button stays greyed out until you type one. Description Optional. It helps your team choose the right template later. You can read and change it later in the builder by choosing Show description. 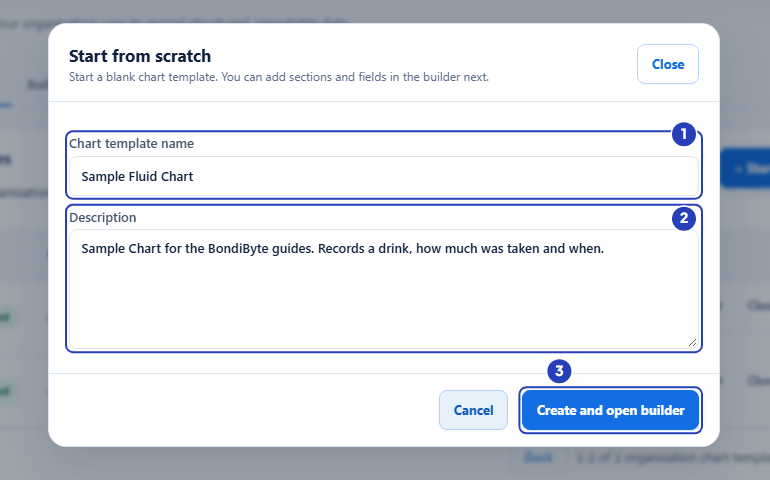
Type a name (1), describe the Chart (2), then choose Create and open builder (3). -
Add a Time field
The builder opens with a new Draft template. The Add a field list is on the left, your Chart is in the middle, and the settings of the selected field are on the right.
1 In Add a field, choose Time. The field is added to the Chart and its settings open.
2 In Label, type the name the Chart form shows for this field, for example Time.
3 Turn on Required if the field must always be answered.
Fields in step 3 Field What it means Label Required. The name shown on the Chart form, up to 200 characters. A counter under the box shows how many you have used. For Section heading and Info text fields the box is called Text. Key A short name that BondiByte makes for you, for example question1. Leave it as it is, or choose Regenerate from label to make it match the label. It must start with a lowercase letter, use only letters and numbers, be 2 to 60 characters long and differ from the other fields in the template, otherwise a message appears under the box. Required A switch, off to start with. When it is on, a red star appears next to the label and the field must be answered every time the Chart is recorded. Section heading and Info text fields do not have it. Help text Optional guidance for the person filling in the Chart, up to 500 characters. It appears under the field. 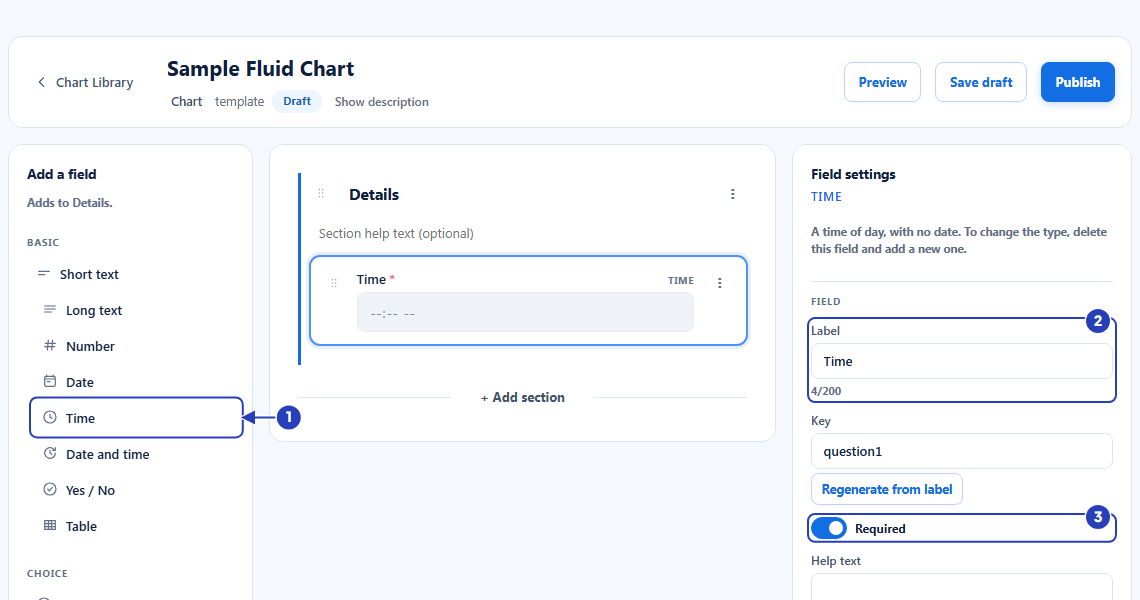
Choose Time in the Add a field list (1), type the label (2) and turn on Required (3). -
Add a choice field
1 In Add a field, choose Single choice.
2 In Label, type Drink, and turn on Required if you want.
3 Under Where do the choices come from?, choose Configure choices for each client.
A Single choice field has the same Label, Key, Required and Help text settings as the Time field, plus the ones below.
Fields in step 4 Field What it means Where do the choices come from? A list that starts on Same choices for everyone. That value means you type the options in the template and every client uses the same list. Configure choices for each client leaves the list empty here, and you add each client's own options when you assign the Chart. The list is offered for Single choice and Multiple choice fields, and for choice columns in a Table. Options The answers a person can pick. With Same choices for everyone, choose + Add option for each answer and type its label and its value, up to 30 options. Use the cross button on an option's row to remove it. The Chart cannot be published while such a field has no options. With Configure choices for each client, leave Options empty. The message No options yet. Add at least one. can stay, and the Chart can still be published. Default value Optional. A list that starts on No default and offers the options you have typed. Note: Same choices for everyone is the default. You type the options in the field settings and every client uses them. Configure choices for each client leaves the list empty here. You add the options for each client when you assign the Chart. See Fixed and client-specific choices.
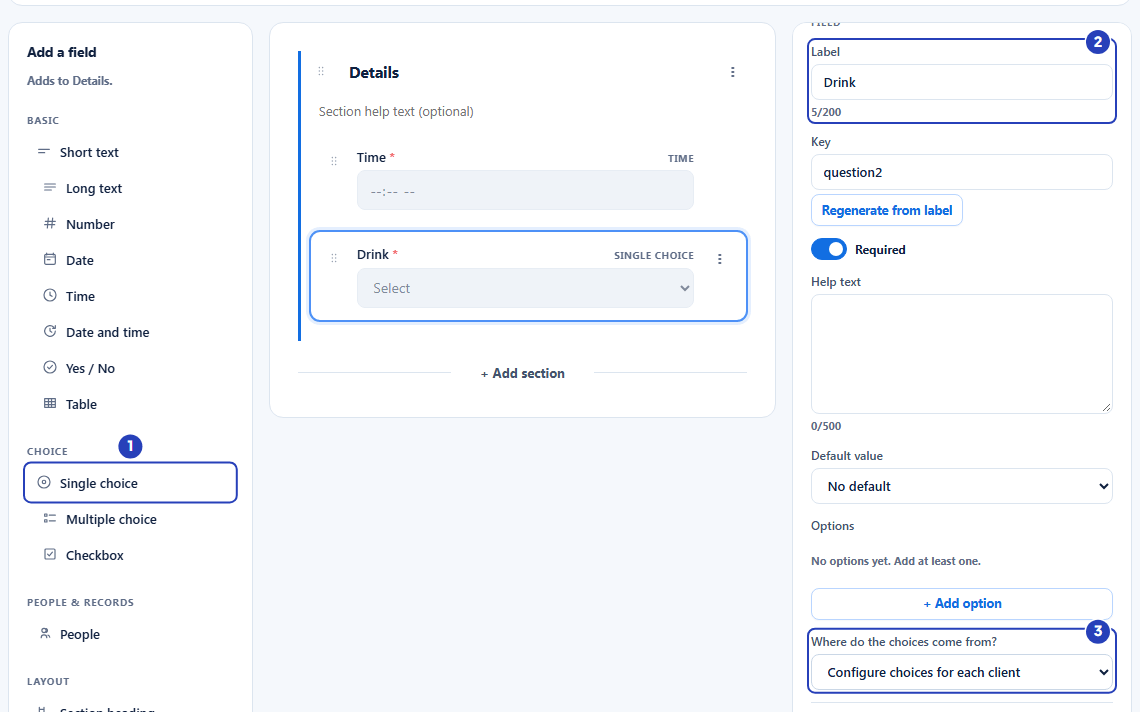
Choose Single choice (1), type the label (2), then choose Configure choices for each client (3). -
Add a Number field
1 In Add a field, choose Number.
2 In Label, type Amount (mL).
Tip: To keep your work and finish later, choose Save draft at the top right. The template stays a Draft until you publish it. Save draft is greyed out until you change something.
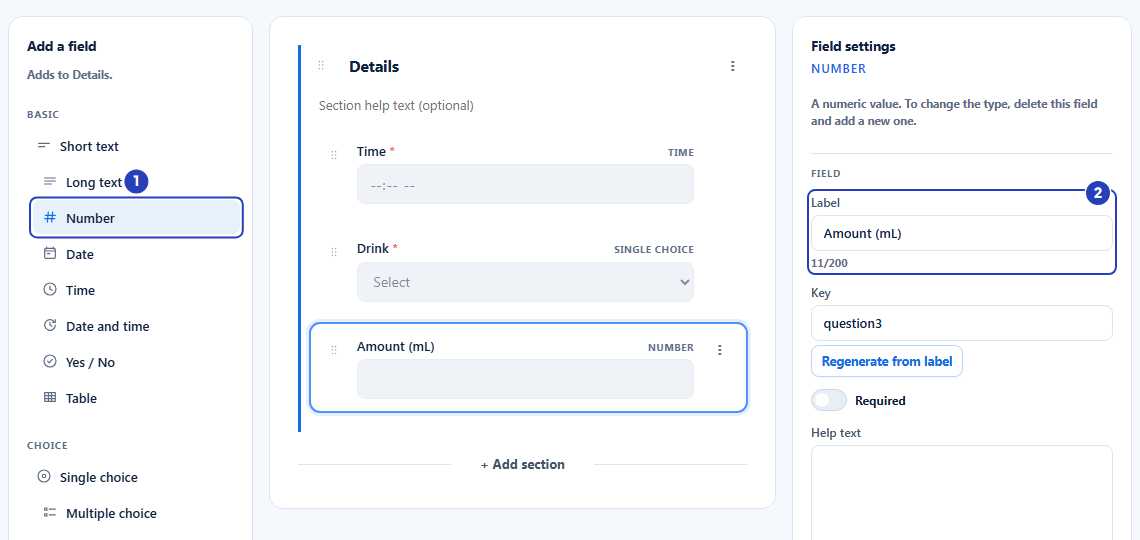
Choose Number (1) and type the label (2). -
Set the optional field settings
Choose a field in the Chart to open its settings on the right. The settings below are optional, and each is offered only for the field types it suits.
Fields in step 6 Field What it means Placeholder Example text shown inside an empty field in the builder and in Preview. It is offered for Short text, Long text, Number, Date, Time, Date and time and People fields. Default value A starting answer shown in the builder and in Preview. Short text and Long text take text, Number takes a number, and Date, Time and Date and time take a date or time. Yes / No and Checkbox offer Checked by default. Single choice offers a list. People, Table, Multiple choice, Section heading and Info text have no starting answer. Conditional display Starts with Configure. Choose it, then choose another field in the Chart, shown as the section name followed by the field's label, and a comparison, is equal to, is not equal to, is Yes / checked or is No / unchecked. For the first two, type the value to compare with. In Preview, the field is then shown only when the comparison is true. The list starts on No condition (always show). Choose Cancel to close it without a condition. Delete field A red button at the bottom of the settings. A window asks Delete this field?. Choose Delete field to remove the field and its settings, or Cancel to keep it. You cannot change a field's type after you add it, so delete the field and add a new one instead. -
Organise the Chart with sections and other field types
The Add a field list is grouped. Basic holds Short text (one line of text), Long text (a multi-line box), Number, Date, Time (a time of day with no date), Date and time, Yes / No and Table (a repeating grid of rows with the columns you define). Choice holds Single choice (one option from a list), Multiple choice (one or more options) and Checkbox (a single tick box). People & records holds People, which picks a staff member or client. Layout holds Section heading and Info text, which are guidance for the person filling in the Chart and are not questions.
A new field is added to the section named under Add a field, which starts as Details. Type in a section's title box to rename it, and use the Section help text (optional) box for a short note. To add another section, choose + Add section under the Chart.
Each section has a three-dot menu with Move up, Move down, Duplicate section and Delete section. A section that holds fields asks Delete this section? first, because deleting it deletes its fields too. Each field has a three-dot menu with Move up, Move down, Duplicate field and Delete field. You can also drag a field or a section by its handle.
-
Preview the template
At the top right of the builder, choose Preview. A window titled Preview followed by the template's name opens.
1 Look through the fields in order. An asterisk (*) marks a required field. The preview does not save any answers.
2 Choose Desktop width or Narrow width to check how the form lays out on a narrower screen.
3 Choose Close to go back to the builder.
To read or change the description you typed in step 2, choose Show description under the template's name.
-
Publish the template
At the top right of the builder, choose Publish. A window asks Publish this template?
1 Read the message. It says that publishing creates a version of the template, and that anything already recorded keeps its original version.
2 Choose Publish to confirm. Choose Cancel to keep working.
Note: If a box headed 1 issue to fix before publishing appears under the title (the number may be higher), the list inside it says what to change. You cannot publish until each issue is fixed.
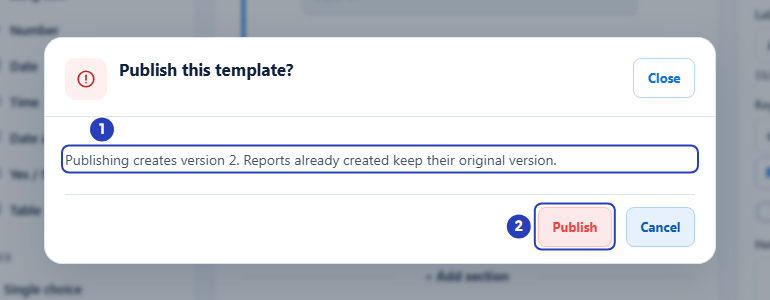
Read what publishing does (1), then choose Publish (2). -
Check that the template is Published
1 A message confirms that the template was published.
2 The Chart Library opens on Organisation templates. In your row, the Status is Published and the Version is v1.
3 The row now offers Assign to client. Use it to give the Chart to a client.
Note: The Version column shows the version that was created.
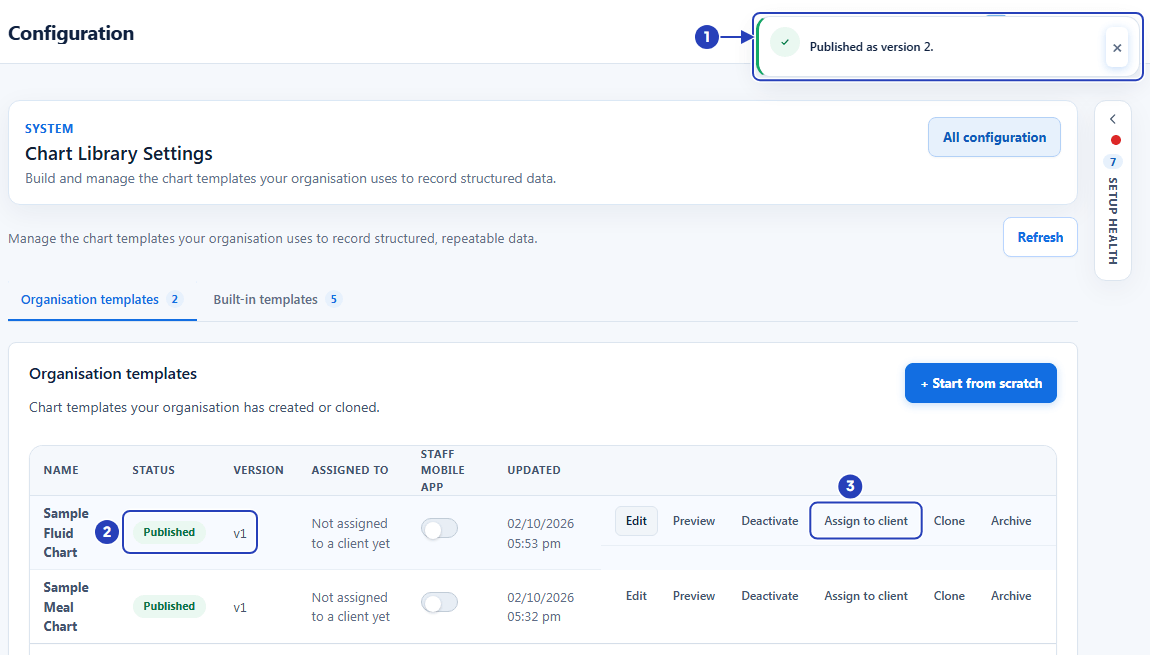
The confirmation message (1), the Published status and version (2), and the new Assign to client button (3).
What happens next
Your template is Published as version 1 and is listed in Organisation templates. It is not yet available to anyone. A Chart is only available on the Staff App for the clients it is assigned to, once it is active.
The next step is to give the Chart to a client. Choose Assign to client on the row, or use + Add chart on the client's Charts tab. See Assign a Chart to a client.
To change the template later, choose Edit on its row. Your changes are saved as a draft, and publishing them creates the next version. Entries already recorded keep the version they were recorded on.
Important notes
Important: A Chart template is not a form. A form is an organisation-wide template that staff can use without any client assignment. A Chart template is a design that does nothing until it is assigned to a client, activated for that client and shown on the Staff App.
Tip: To start from one of BondiByte's ready-made templates instead, see Clone a built-in Chart template.
Good practice
- Choose Preview before you choose Publish. A published template changes only by publishing a new version, so check the fields, their order and which ones are required first.
- Use Configure choices for each client only for lists that really differ between clients, such as the drinks one client prefers. Type a list that is the same for everyone once, in the template. Every client then needs at least one option in each client-specific list before the Chart can be activated.
- Put what staff need to know in each field's Label and Help text, and keep labels short and clear, for example Amount (mL). On the Staff App each field shows its label, a star when it is required, and its help text.
- Turn on Required only for answers needed every time. Staff cannot save a Chart entry on the Staff App until every required field is answered.
Troubleshooting
The Create and open builder button is greyed out.
Why it happens: The Chart template name box is empty.
What to do: Type a name, then choose Create and open builder.
A message says A chart template with this name already exists in your organisation. Choose a different name.
Why it happens: Every Chart template in your organisation needs its own name. The name may belong to a template that has been archived.
What to do: Type a different name. To look for an archived template, open Organisation templates and turn on Show archived.
The builder shows issue to fix before publishing, for example needs at least one option.
Why it happens: A Single choice or Multiple choice field set to Same choices for everyone has no options.
What to do: Choose the field, then choose + Add option and type the options. Or change Where do the choices come from? to Configure choices for each client.
A message says Fix the highlighted issues before publishing.
Why it happens: The template still has an issue listed under its title.
What to do: Fix each issue in the list, then choose Publish again.
A window asks Discard unsaved changes? when I go back to the Chart Library.
Why it happens: You have changed the template since you last saved.
What to do: Choose Cancel, then choose Save draft and go back again. Choose Discard and leave only if you do not need the changes.