

Who this is for
This guide is written for Owner, Admin, Manager, Coordinator and Finance.
Before you begin
- You are signed in to BondiByte on a computer.
- The client already exists and is active. See Create a client.
- You know the date the agreement starts. A total budget and a title are optional.
- If you plan to add line items, you also know the date the agreement ends. BondiByte works out the cost of each line item from the weeks between the start and end dates.
Steps
The screenshots show a demonstration organisation with made-up names. Your own screens show your organisation's details. Select a screenshot to open it full size.
-
Go to Clients > the client > Service Agreements > Add Service Agreement
1 In the left menu, choose Clients, then choose the client's name to open their record.
2 Choose the Service Agreements tab. It lists the client's agreements, or tells you there are none yet.
3 At the top right, choose Add Service Agreement. The Add service agreement window opens.
Note: You can also start from Service Agreements in the left menu by choosing Create agreement. That Create service agreement window differs in a few ways. You choose the Client from a list. It has a Service agreement ID field that is filled in for you and a Pricing zone field, and it has no creation method buttons and no import tick box. Its save button is Create Agreement, and it does not grey out when something is missing: if the client or the start date is empty, a message says Select a client and enter a start date before creating the agreement. A successful save shows Service agreement created. The other fields work the same way as below.
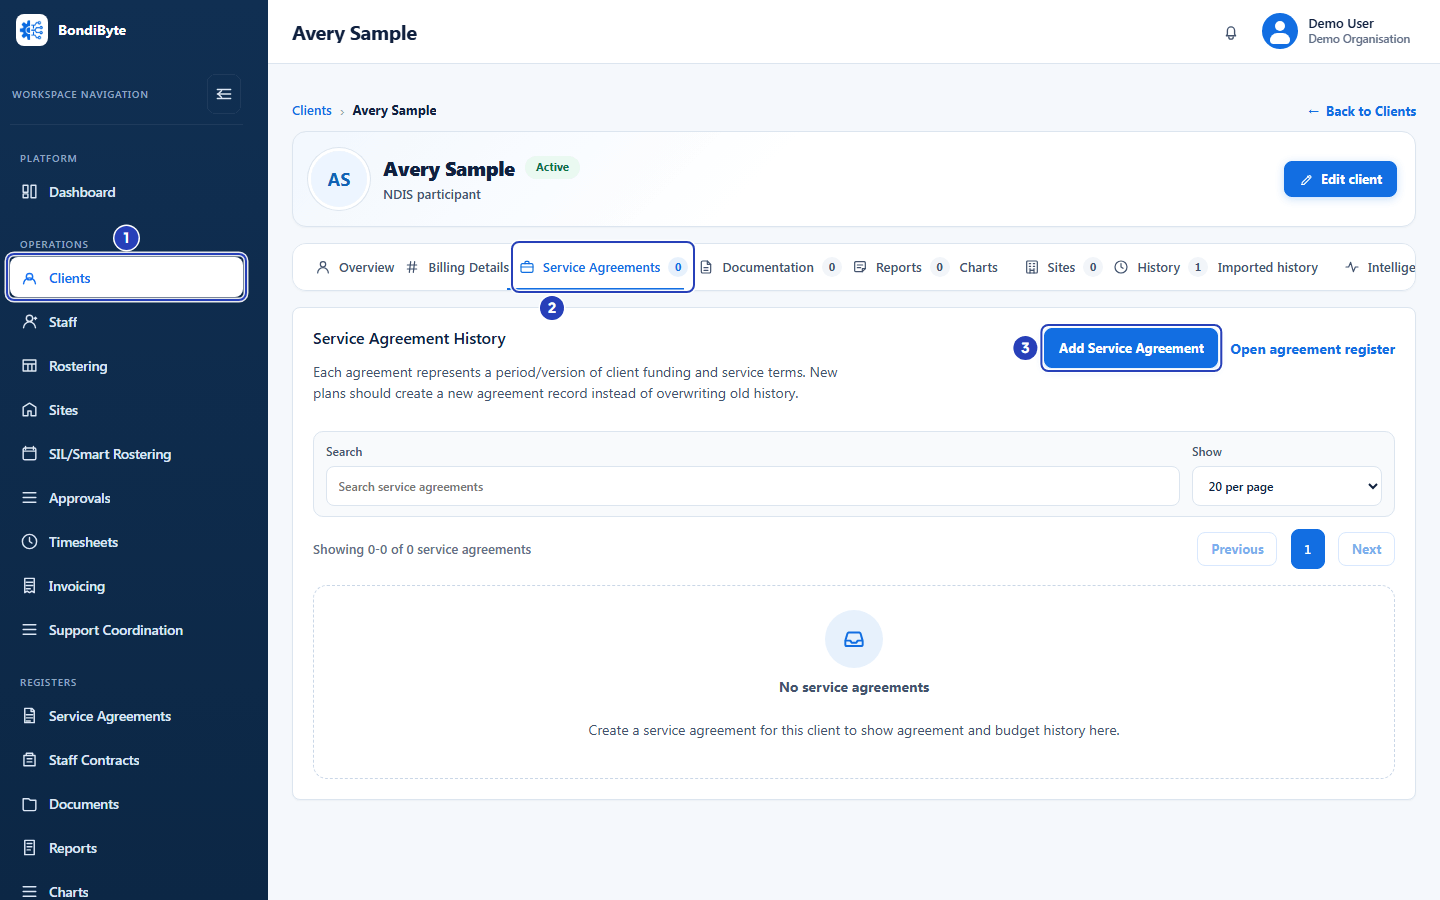
Choose Clients in the left menu and open the client (1), choose the Service Agreements tab (2), then choose Add Service Agreement (3). -
Check the starting point, the client and the title
1 Leave Start from scratch chosen to build the agreement yourself. Choose Use last agreement setup instead to start from the client's most recently created agreement. The window then says Copies fields and line items from and that agreement's number, and it fills in the last agreement's title, start date, end date, total budget, funding management and notes. Its pricing zone and line items are copied too. This button is available only when the client already has an agreement.
2 Check that Client shows the right person. You cannot change it here.
3 Check that Status shows Draft. A new agreement is always a draft.
4 In Agreement title, type a name you will recognise. For a new agreement from scratch, the window suggests the client's name followed by
service agreement. After Use last agreement setup, it shows the last agreement's title, so change it to tell the two apart.Fields in step 2 Field What it means Creation method Start from scratch begins with empty fields. Use last agreement setup copies the client's most recently created agreement into the new draft. It is greyed out when the client has no agreement yet. Client The client whose record you opened. An agreement stays with its client for its whole life. Status Always Draft for a new agreement. Agreement title Optional. A recognisable name, shown under the agreement number in lists. Important: If you choose Use last agreement setup, the window fills in the last agreement's title, dates, total budget, funding management and notes. Change Start date and End date to the new plan period before you save. If you save with the old dates, the new draft covers the same period as the earlier agreement.
Important: The client of an agreement cannot be changed after it is saved. If you started on the wrong client, create the agreement on the right client and deactivate the wrong one.
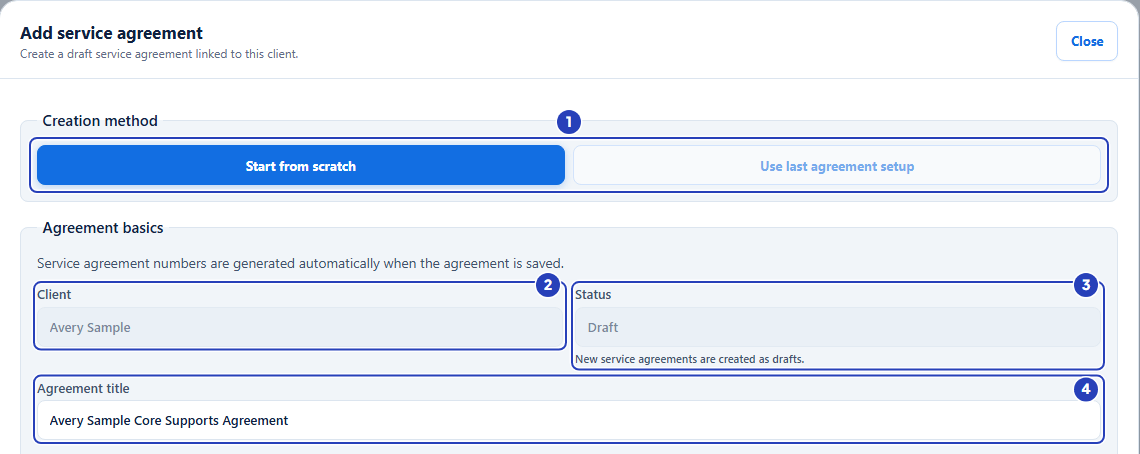
The creation method (1), the client (2), the Draft status (3) and the agreement title (4). -
Set the dates, total budget and funding management
1 In Start date, choose the day the agreement starts. This is required. After Use last agreement setup, the last agreement's start date is already there, so replace it with the new plan's start date.
2 In End date, choose the day the agreement ends. Leave it blank only if you do not know it yet. After Use last agreement setup, replace the old end date with the new plan's end date.
3 In Total budget, type the agreed funding budget in dollars if you know it. This is optional. After Use last agreement setup, check the copied amount.
4 In Funding management, choose how the client's funding is managed: Plan Managed, Self Managed or Agency Managed.
Fields in step 3 Field What it means Start date Required. Save agreement stays greyed out until you choose a start date. Click anywhere in the field to open the date picker. End date Optional when you save. Add one before you add line items. It cannot be earlier than the start date. Total budget Optional. A dollar amount, zero or more, with up to two decimal places. The helper text says to use the agreed funding budget for this agreement. The agreement profile has no budget field later, so enter it now if you have it. Funding management Plan Managed by default. You can also choose Self Managed or Agency Managed. After Use last agreement setup, it starts with the last agreement's choice. Important: If the client already has an agreement that would still be running on the new start date, and the new start date is in the future, BondiByte sets the end date of that earlier agreement to the day before the new one starts.
Note: This window has no Pricing zone field. A new agreement starts as National, or keeps the zone of the agreement it copies. You can change the zone afterwards in the agreement profile. See Choose a pricing zone.
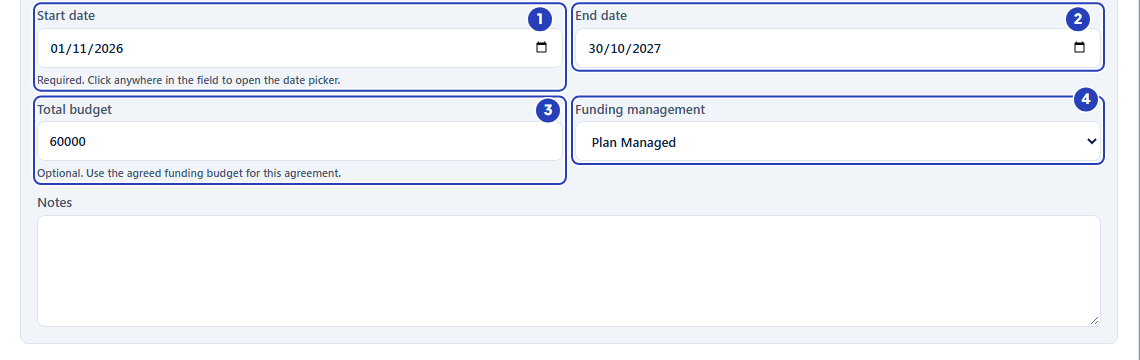
Choose the start date (1) and end date (2), type the total budget (3) and choose the funding management (4). -
Add notes, then choose Save agreement
1 In Notes, add anything your team should know. This is optional.
2 If you can manage line items, leave Create draft and import line items unticked unless you want the import panel to open straight after saving.
3 Choose Save agreement. Choose Cancel instead to close the window without saving.
Fields in step 4 Field What it means Notes Optional. You can change notes later in the agreement profile. Create draft and import line items Optional tick box, shown only if you can manage line items. After saving, the new agreement opens with the line item import panel ready. 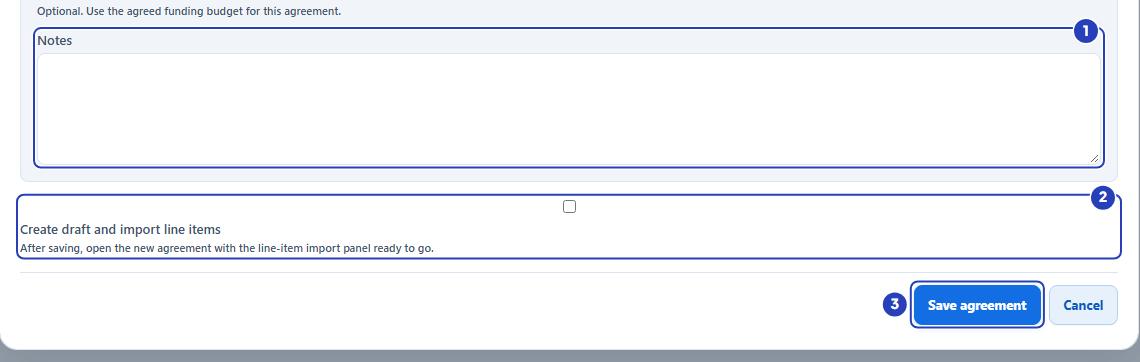
Add notes if you want to (1), leave the import tick box as it is (2), then choose Save agreement (3). -
Check the new agreement in the client's list
1 A message confirms Service agreement added to client.
2 The window closes and the new agreement appears in the client's Service Agreements tab as a card with the status Draft. The tab also has a Search box, a Show list for how many cards appear on a page, and an Open agreement register link that goes to the Agreement Records list.
The card is a summary of the agreement. Choose anywhere on its header, other than a button or the number, to show or hide its details.
Fields in step 5 Field What it means First pill, such as Draft The group the agreement sits in, for example Draft, Current or Expired. Agreement number and title The number is generated for you. Choose it to open the agreement. The title sits under it. Second pill, such as Draft The agreement's Status. A Signed copy pill also appears once a signed copy is attached. Activate Makes this the client's active agreement after you confirm. It needs Can change service agreement status, and it is not shown for the client's current agreement or for an agreement whose end date has passed. Import line items Opens the line item import panel for this agreement. It needs Can manage agreement line items and is not shown for a signed or deactivated agreement. Show or Hide Opens or closes the card's details. The client's current agreement opens by itself. Details Funding, Start Date, End Date, Budget, Signed copy and the agreement's line items table. A new agreement shows No line items. 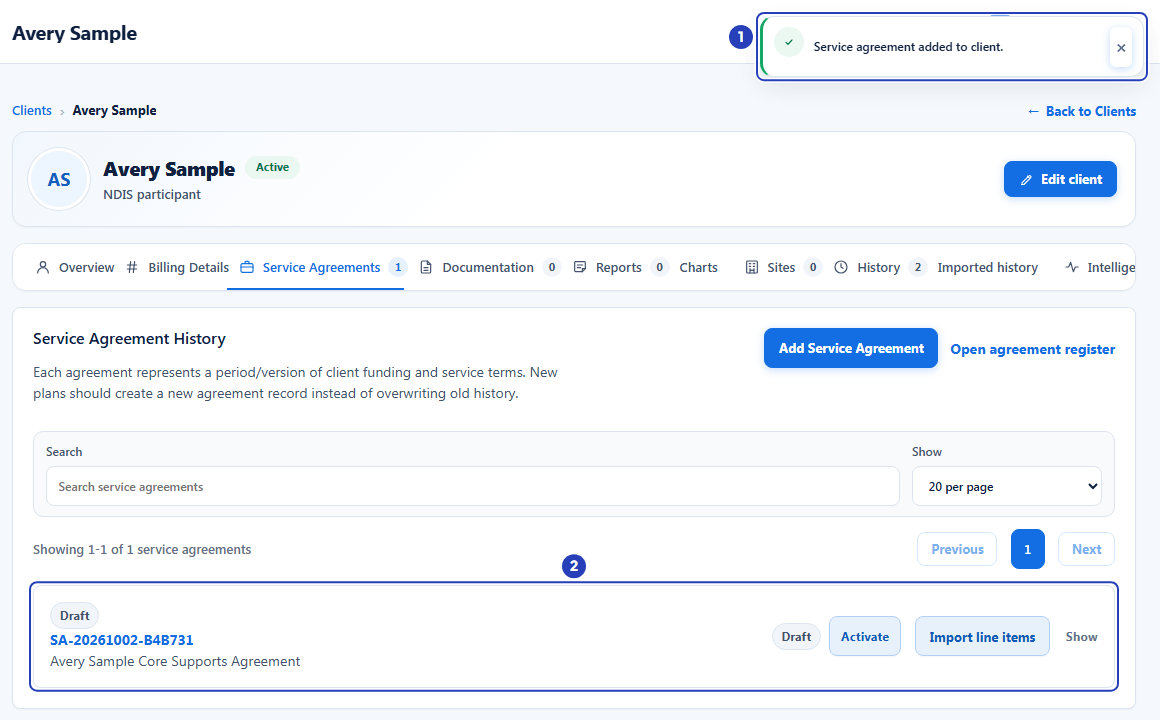
The confirmation message (1) and the new agreement card with the status Draft (2). -
Open the agreement and check its profile
Choose the agreement number on the card to open the agreement. Its Agreement Profile opens.
1 Check that Status reads Draft.
2 Check that Pricing Zone shows National, the zone every new agreement starts with.
3 Look at Agreement Line Items. It is empty until you add line items.
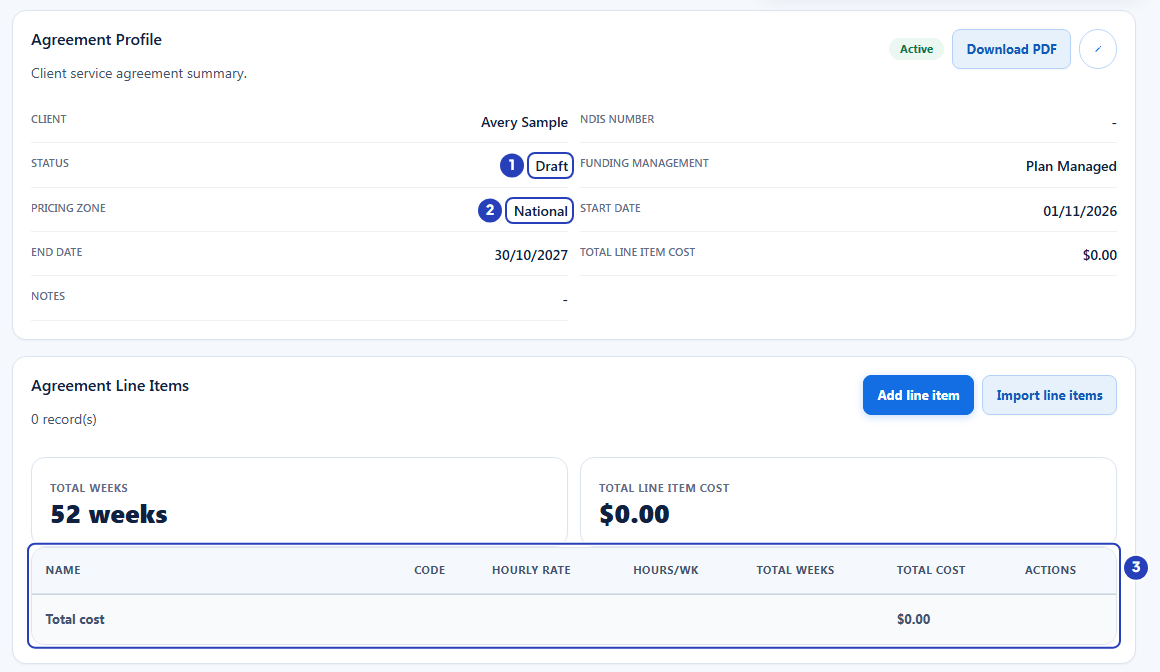
The status reads Draft (1), the pricing zone shows National (2), and Agreement Line Items is empty (3).
What happens next
The agreement is saved as a Draft. BondiByte uses a client's Active agreement when it adds billing to shifts and prepares invoices, so a draft is not used until it becomes the client's active agreement.
To make a draft active yourself, choose Activate on its card in the client's Service Agreements tab. A confirmation titled Activate this service agreement? opens. Choose Activate agreement to confirm. The change is recorded in the client's History tab as Service agreement status changed.
Only one agreement can be active per client. When you activate a new one, the client's previous active agreement is marked Expired and deactivated, so it leaves the default Agreement Records list. The confirmation also warns that automated shift patterns and upcoming shifts that use line items from the previous agreement keep pointing at it, so review the line items on those shifts after the change.
If the client has no active agreement when the start date arrives, BondiByte can make the draft Active for you. It does this only when that draft is the only one that qualifies, and it tells your administrators.
Next, add line items from the NDIS catalogue. See Add line items. You can also complete the rest of the details in the agreement profile. See Complete the agreement profile.
Important notes
Important: A new agreement is a draft. Review its dates, funding management and pricing zone before you rely on it, and have your agreement wording checked by your own team or legal adviser. BondiByte provides the tools to build and manage agreements, not legal advice.
Good practice
- For a renewal, choose Use last agreement setup. It copies the last agreement's title, dates, total budget, funding management, notes, pricing zone and line items into a new draft. Change Start date and End date to the new plan period, and change the title, before you choose Save agreement.
- Enter the End date and the Total budget now, while you have the plan in front of you. The agreement profile has no Total budget field, and line item costs cannot be worked out until the agreement has an end date.
- Give every agreement a title you can tell apart at a glance, such as the plan year and the funding type. The title shows under the agreement number in lists and on the client's cards.
- Keep the new agreement as a Draft until its dates and line items are checked, then choose Activate. A draft is not used for billing, so you can work on it without affecting shifts or invoices.
Troubleshooting
I cannot see Add Service Agreement.
Why it happens: Your role does not include Can create service agreements, or the client is inactive. For an inactive client the tab says that create actions are paused until the client is reactivated.
What to do: Ask an Owner or Admin to check your role. If the client is inactive, reactivate the client first, then open the Service Agreements tab again.
I cannot see the Service Agreements tab on the client's record.
Why it happens: Your role does not include Can view service agreements.
What to do: Ask an Owner or Admin to check your role.
I cannot see Activate on the agreement's card.
Why it happens: Your role does not include Can change service agreement status, or the agreement is already the client's current agreement, has been cancelled or deactivated, or has an end date that has passed.
What to do: Ask an Owner or Admin to check your role. For an agreement whose dates are wrong, correct them in the agreement profile first.
Use last agreement setup is greyed out.
Why it happens: The client has no agreement yet, so there is nothing to copy.
What to do: Leave Start from scratch chosen.
The new agreement has the same dates as the earlier one.
Why it happens: You chose Use last agreement setup and saved without changing Start date and End date.
What to do: Open the new agreement, choose the edit icon in Agreement Profile, enter the new dates and choose Save changes. See Complete the agreement profile.
The Save agreement button is greyed out.
Why it happens: The start date is required and is still empty.
What to do: Choose a Start date. The button becomes available as soon as a start date is set.
A message says Please check the information you entered and try again.
Why it happens: Most often the End date is earlier than the Start date.
What to do: Correct the two dates, or clear End date if you do not know it yet.
I chose the wrong client, and the agreement is saved.
Why it happens: An agreement cannot be moved to another client.
What to do: Create a new agreement on the right client. If your role allows it, choose Deactivate on the wrong agreement in the Service Agreements list in the left menu.