

Who this is for
This guide is written for Owner, Admin, Manager, Coordinator and Finance.
Before you begin
- You are signed in to BondiByte on a computer.
- The agreement already exists and has a start date and an end date. See Create a Service Agreement.
- You know the NDIS support item you want, ideally its code, and the hours per week agreed with the client.
Steps
The screenshots show a demonstration organisation with made-up names. Your own screens show your organisation's details. Select a screenshot to open it full size.
-
Go to Service Agreements > the agreement > Add line item
1 In the left menu, under Registers, choose Service Agreements, then choose the agreement number to open the agreement. See Complete the agreement profile for ways to find it.
2 Scroll to Agreement Line Items and choose Add line item. A new row opens at the bottom of the table, above the total.
Note: BondiByte works out each line's cost from the weeks between the agreement's start and end dates. If the agreement has no end date yet, add one in the agreement profile first.
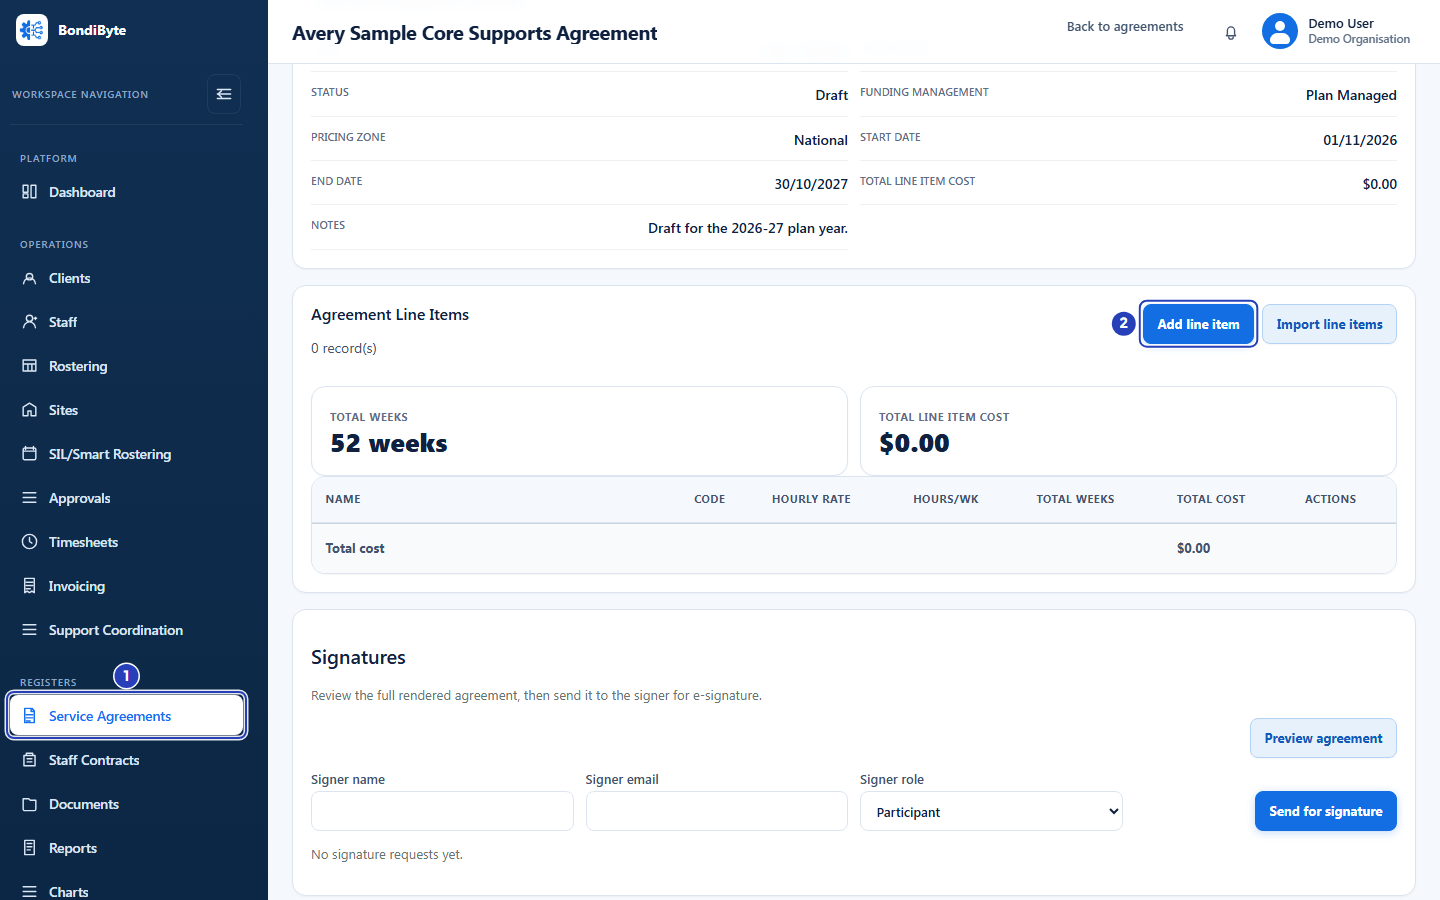
Open the agreement from Service Agreements (1), then choose Add line item (2). -
Search the NDIS catalogue
1 In the new row, click the search box that says Search NDIS catalogue and type a support item code, or part of its name.
2 Wait for the list. While it searches it says Searching catalogue.... Each result shows the item's name, its code and support category, and a catalogue price. Choose the item you want.
Tip: Searching by code gives the shortest list. If nothing matches, the list says No catalogue rows found. Try a shorter part of the name.
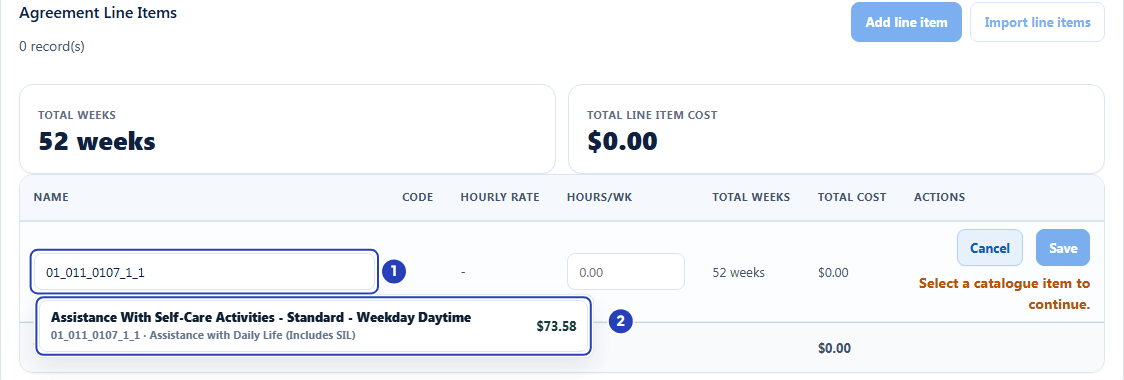
Type the support item code in the search box (1), then choose the matching item from the list (2). -
Check the item and the agreed rate
1 Check that the item name in the Name column and the item code in the Code column are the item you meant.
2 Check the rate box in the Hourly rate column. This is the agreed rate. It starts as the catalogue price for the agreement's pricing zone. The line under the box reads Reference: followed by the zone name and the catalogue price, for example Reference: National. Change the agreed rate only if you have agreed a different price with the client.
Fields in step 3 Field What it means Name The catalogue item you chose. Before you choose one, this cell holds the search box. Code The item's NDIS support item code. It shows a dash until you choose an item. Hourly rate (agreed rate) The rate box in the Hourly rate column. It holds the agreed hourly rate for this line. It is filled from the catalogue price for the agreement's pricing zone and you can edit it. Reference The line under the rate box. It shows the catalogue price for the agreement's pricing zone, for comparison. You cannot edit it. Important: If your agreed rate differs from the reference price, a note says so. If it is higher, the note asks you to confirm the rate is appropriate for this agreement. Check agreed rates against your client's plan and the current NDIS pricing arrangements.
Note: If an item needs a quote, or the catalogue has no price for the agreement's zone, the rate box starts empty and says so. Type the agreed rate yourself before you save.
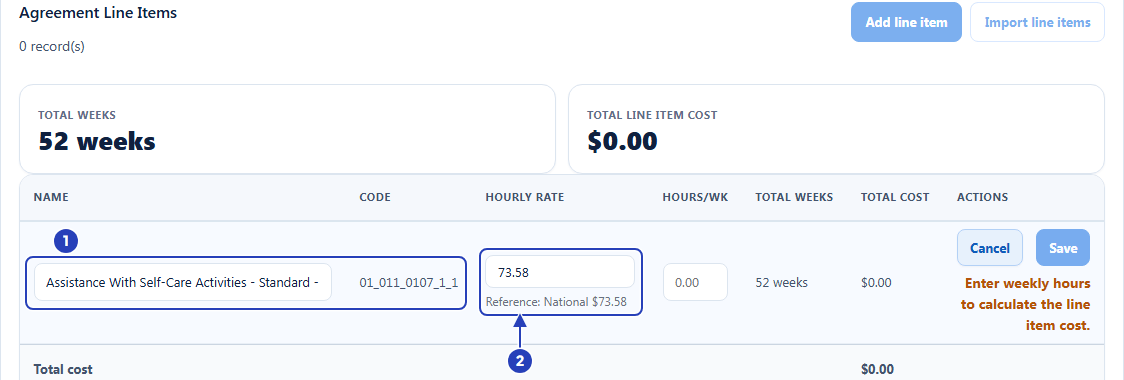
Check the item name and code (1), then the agreed rate in the Hourly rate column and the reference price under it (2). -
Enter the hours per week
1 In the box in the Hours/Wk column, type the weekly hours for this support. Quarter hours such as
7.5are fine.2 Check Total weeks. It comes from the agreement's start and end dates and you cannot edit it here.
3 Check Total cost. It is the agreed rate multiplied by the hours per week and the total weeks.
Fields in step 4 Field What it means Hours/Wk (hours per week) Required. More than zero. It accepts quarter hours. Total weeks The weeks between the agreement's start and end dates. Total cost Agreed rate x hours per week x total weeks. 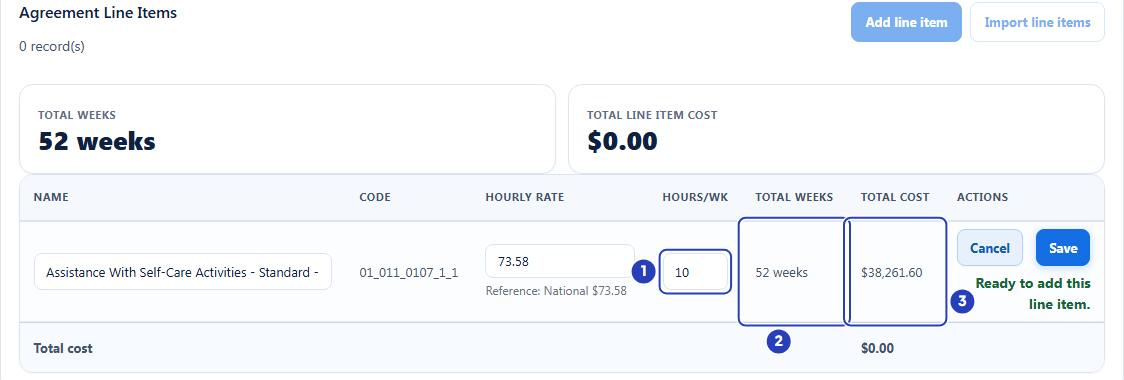
Type the hours per week (1), then check the total weeks (2) and the total cost (3). -
Choose Save
1 Check that the hint under the buttons reads Ready to add this line item.
2 Choose Save.
3 To close the row without adding anything, choose Cancel instead.
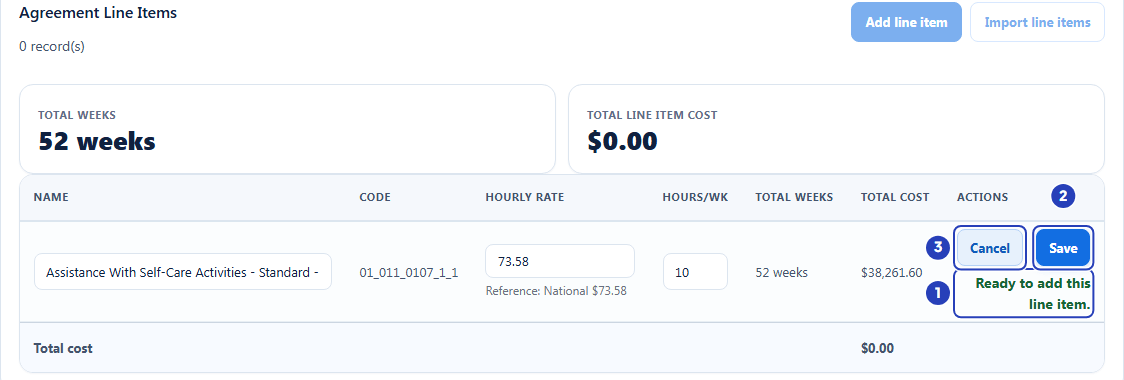
Check the ready hint (1), then choose Save (2), or Cancel (3) to close the row without adding it. -
Check the new line item
1 A message confirms Agreement line item added.
2 The new line appears in the table. The name of the pricing zone shows under its hourly rate.
3 Total line item cost at the top of the list includes the new line.
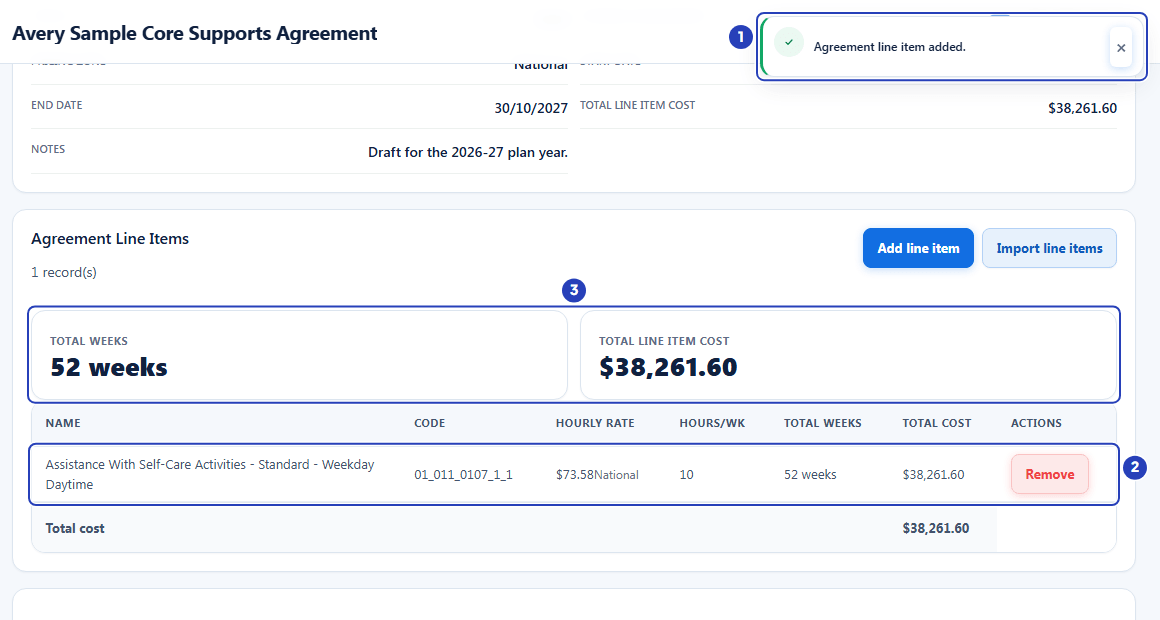
The confirmation message (1), the new line item (2) and the updated total (3).
What happens next
The line item is saved on the agreement and the totals update. The pricing zone shown under the rate is the agreement's zone at the time you saved the line. Changing the agreement's zone later does not change lines that are already saved.
When your agreed rate differs from the catalogue price, the line also shows the catalogue reference price next to the zone name, so the difference stays visible.
To remove a line, choose Remove next to it and confirm Remove line item?.
A draft agreement is not used for billing. BondiByte uses the client's Active agreement when it adds billing to shifts and prepares invoices.
Important notes
Important: Prices come from the NDIS catalogue for the agreement's pricing zone. See Choose a pricing zone. Your organisation is responsible for checking agreed rates against the client's plan and the current NDIS pricing arrangements.
Tip: To add many lines at once from a CSV file or a screenshot of a table, use Import line items next to Add line item. See Import line items. To set an agreed rate different from the catalogue price, see Change an agreed rate.
Good practice
- Search by the support item code when you have it. A code gives the shortest list, and each result shows the item's name, code and support category, so you can confirm you have the right one before you choose it.
- Set the agreement's pricing zone, Start date and End date before you add lines. A new line takes its price from the zone and its weeks from the dates at the moment you add it, and lines you have already saved do not change when you edit the zone or the dates later.
- Review every line whose agreed rate differs from the catalogue price. A saved line shows the zone name followed by Ref and the catalogue price when the two differ, so you can find these lines at a glance and confirm each rate against the client's plan.
Troubleshooting
I cannot see Add line item, or searching the catalogue says You do not have permission to do that.
Why it happens: Your role does not include Can manage agreement line items, or Can view NDIS catalog, which the search needs as well.
What to do: Ask an Owner or Admin to check your role.
Add line item is greyed out.
Why it happens: The agreement has a signed copy and is read-only, or a new row is already open on the page. Pointing at the button shows Signed agreements are read-only. for a signed agreement.
What to do: For a signed agreement, create a new agreement for the changes. Otherwise save or cancel the open row first.
The list says No catalogue rows found.
Why it happens: Nothing in the current NDIS catalogue matches what you typed.
What to do: Search by the support item code, or type a shorter part of the name.
Save is greyed out and the hint says Check the agreement start and end dates.
Why it happens: The agreement has no end date, or its dates do not give a positive number of weeks.
What to do: Open the agreement profile, set a start date and an end date after it, save, then add the line item again.
The hint says Enter weekly hours to calculate the line item cost.
Why it happens: The box in the Hours/Wk column is empty or zero.
What to do: Type the weekly hours, for example 10.
The rate box in the Hourly rate column is empty and says Quote required, or says Catalogue rate unavailable for the zone.
Why it happens: The item needs a quote, or the catalogue has no price for the agreement's pricing zone.
What to do: Type the agreed rate yourself. BondiByte never fills in a price it does not have.
A message says This service agreement has been signed and is read-only.
Why it happens: The agreement has a signed copy or a completed E-signature.
What to do: Create a new agreement for the changes you need.
A message under the table says This client is inactive. when I choose Save.
Why it happens: The client the agreement belongs to has been made inactive, and line items cannot be added while the client is inactive.
What to do: Reactivate the client, then open the agreement and add the line item again.