

Who this is for
This guide is written for Owner, Admin, Manager, Coordinator and Finance.
Before you begin
- You are signed in to BondiByte on a computer.
- The agreement already exists. See Create a Service Agreement.
- You know which zone applies to the support. BondiByte does not work out the zone from the client's address, so choose it using the current NDIS pricing arrangements.
Steps
The screenshots show a demonstration organisation with made-up names. Your own screens show your organisation's details. Select a screenshot to open it full size.
-
Go to Service Agreements > the agreement > the edit icon
1 In the left menu, under Registers, choose Service Agreements, then choose the agreement number to open the agreement.
2 In Agreement Profile, check Pricing Zone. It shows the zone the agreement uses now. Every new agreement starts as National.
3 At the top right of Agreement Profile, choose the pencil icon, Edit agreement profile. The profile turns into a form.
Tip: You can also set the zone when you create an agreement from Service Agreements in the left menu. The Create service agreement window has a Pricing zone field. The Add Service Agreement window on a client's record does not.
Note: The green Active badge beside Download PDF means the record is switched on. It is not the agreement's Status, which you read in the profile.
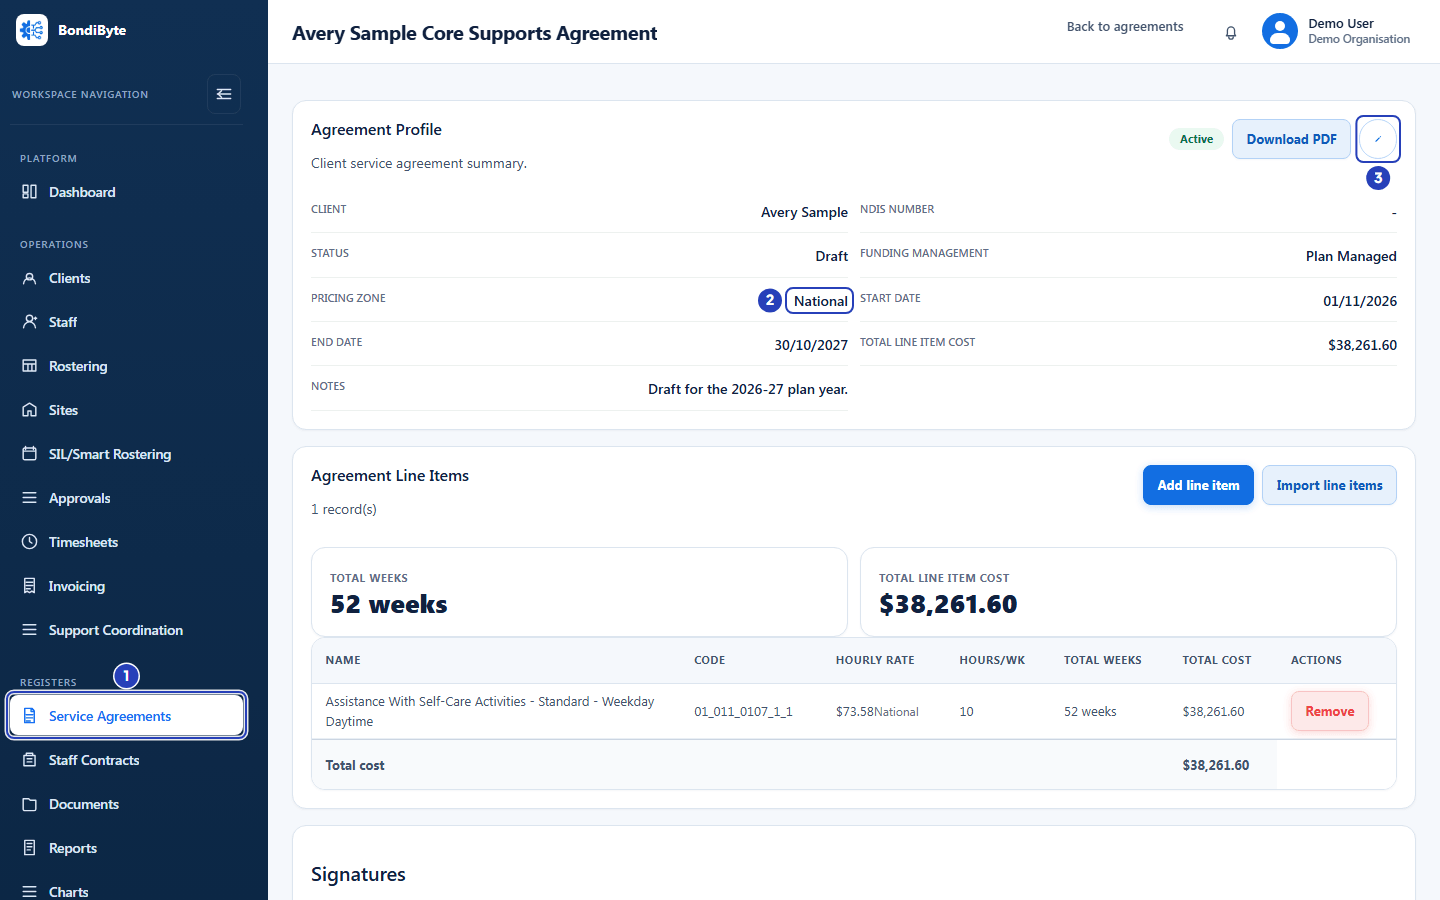
Open the agreement from Service Agreements (1), check the current pricing zone (2), then choose the edit icon (3). -
Choose the zone and save
1 In Pricing zone, choose National, Remote or Very Remote. Point at the i beside the label to read what the setting does.
2 Choose Save changes. Choose Cancel instead to leave the zone as it was.
Fields in step 2 Field What it means National The standard NDIS catalogue price for the support item. This is the default. Remote The catalogue's Remote price for the same support item. Very Remote The catalogue's Very Remote price for the same support item. Important: Changing the pricing zone affects new line items only. Existing agreed rates are unchanged.
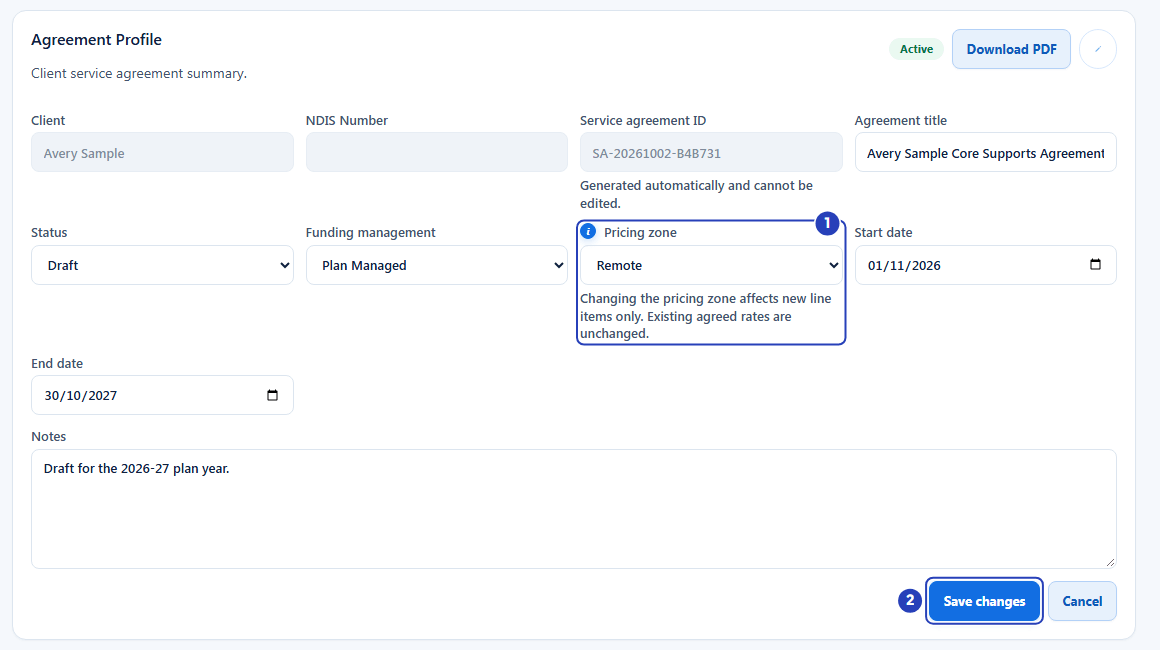
Choose the pricing zone (1), then choose Save changes (2). -
Check the new zone
1 A message confirms Service agreement profile updated.
2 Pricing Zone now shows the zone you chose.
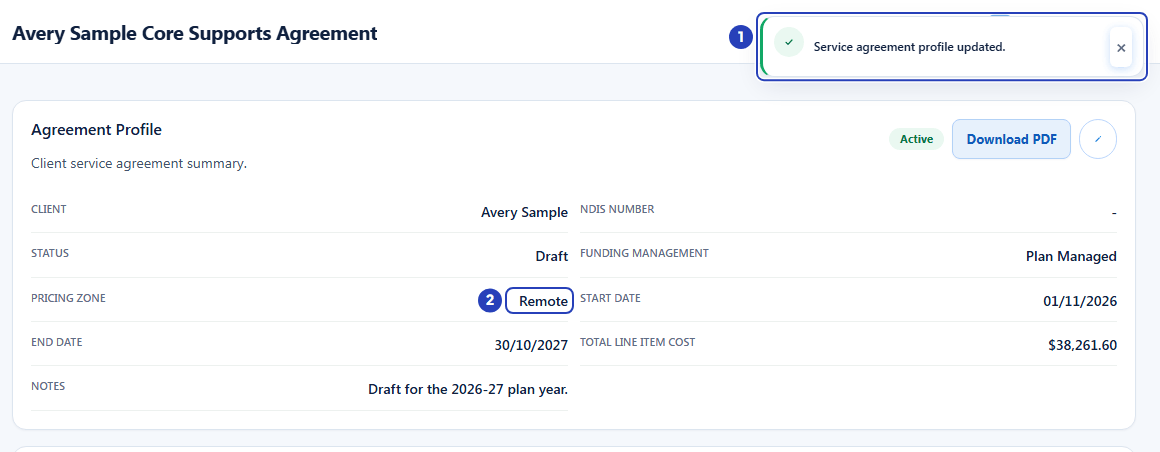
The confirmation message (1) and the new pricing zone in the profile (2). -
Check which price new line items use
1 Choose Add line item, search for a support item and choose it, as in Add line items. In the new row, the line under the rate box in the Hourly rate column now reads Reference: followed by the new zone's name and the catalogue price for that zone, for example Reference: Remote.
2 Check that a line you saved earlier still shows its own zone beside its rate in the Hourly rate column. Changing the zone does not change saved lines.
3 Choose Cancel if you were only checking. Otherwise enter the hours per week and choose Save to add the line.
Note: If the catalogue has no price for the item in this zone, or the item needs a quote, the rate box starts empty and says so. Type the agreed rate yourself before you save.
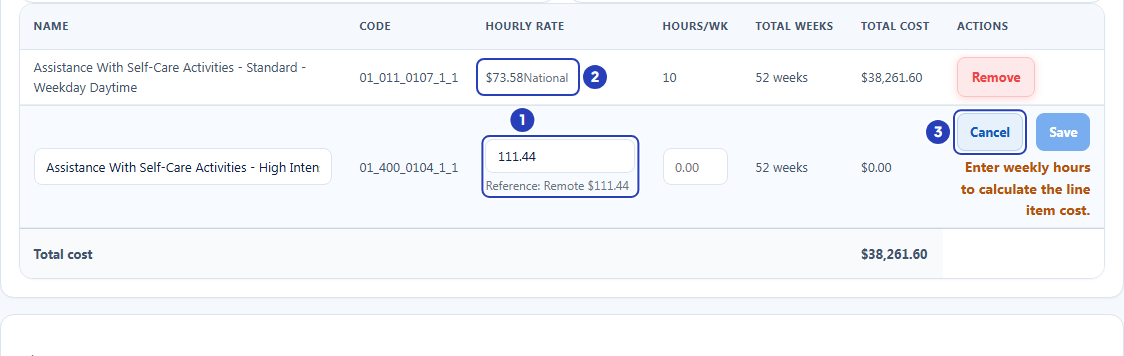
The reference price for the new zone (1), the saved line that still shows National (2), and Cancel (3).
What happens next
New line items you add now start with the catalogue price for the new zone. You can still edit the agreed rate on each line before you save it.
Lines you saved earlier keep their zone and their agreed rate. If you want an existing line to use the new zone's price, remove it and add it again.
The change is recorded in the client's History tab as Service agreement updated.
Important notes
Important: You choose the zone. BondiByte does not work it out from the client's address, and it does not check that the zone suits the client. Your organisation is responsible for choosing the right zone and for checking agreed rates against the client's plan and the current NDIS pricing arrangements.
Good practice
- Set the pricing zone before you add any line items. Lines you have already saved keep the price they were saved with, so choosing the zone first saves you removing and adding lines again.
- BondiByte does not check the zone against the client's address, so note the reason for your choice in Notes in the agreement profile, for example the client's location and the date you checked the NDIS pricing arrangements. The History tab records only that the agreement was updated.
- A new agreement made with Use last agreement setup keeps the copied agreement's pricing zone, so check the zone on every renewal. To see how each zone affects prices, read National, Remote and Very Remote pricing.
Troubleshooting
I cannot see the edit icon, or it is greyed out.
Why it happens: Your role does not include Can edit service agreements, or the agreement has a signed copy and is read-only.
What to do: Ask an Owner or Admin to check your role. For a signed agreement, create a new agreement and choose the zone there.
The lines I saved before still show the old zone.
Why it happens: Changing the pricing zone affects new line items only, so existing agreed rates are unchanged.
What to do: Remove the line and add it again, or leave it as it is if the agreed rate is correct.
The rate box in the Hourly rate column says Catalogue rate unavailable for the new zone.
Why it happens: The catalogue has no price for that support item in that zone.
What to do: Type the agreed rate yourself, or choose a different item.
The price in the search list is different from the Reference price.
Why it happens: The search list shows the item's standard National catalogue price whatever the agreement's zone, while Reference is the price for the agreement's pricing zone.
What to do: Use the Reference price under the rate box in the Hourly rate column as your starting point for the zone.