

Who this is for
This guide is written for Owner, Admin, Manager, Coordinator and Finance.
Before you begin
- If Service Agreements is missing under Registers in the left menu, your role does not include Can view service agreements. Ask an Owner or Admin to check your role. If the page says Your plan does not include this feature., your organisation's subscription is not active. An Owner or Admin checks Billing & subscription. There is no switch to turn on.
- To read a screenshot (step 9), an Owner or Admin must have switched on AI-assisted features: choose their name at the top right, choose Account settings, find AI-assisted features under Automation & Capacity Controls and choose Enable. A screenshot read also uses Automation Capacity. A CSV file needs neither. See Automation Capacity.
- You are signed in to BondiByte on a computer.
- The agreement already exists, is not signed, and has a start date and an end date. See Create a Service Agreement.
- The agreement's pricing zone is set the way you want it before you import, because the catalogue price shown for each row comes from the zone. See Choose a pricing zone.
- You have the line items ready as a CSV file made from BondiByte's template, or as a screenshot cropped to the table. Each row needs an NDIS support item code, an item name, or both.
Steps
The screenshots show a demonstration organisation with made-up names. Your own screens show your organisation's details. Select a screenshot to open it full size.
-
Go to Service Agreements > the agreement > Import line items
1 In the left menu, under Registers, choose Service Agreements, then choose the agreement number to open the agreement. See Complete the agreement profile for other ways to find it.
2 Scroll to Agreement Line Items and choose Import line items, next to Add line item. The Import service agreement line items window opens.
Note: The same window opens from a client's record. On the Service Agreements tab, an agreement card that is not signed and not switched off has its own Import line items button.
Note: Import line items is greyed out when the agreement has a signed copy. Pointing at it shows Signed agreements are read-only.
Note: The green Active badge beside Download PDF only shows that the agreement record is switched on. It is not the agreement's Status. The Status in the Agreement Profile, for example Draft, is what decides whether BondiByte bills from the agreement.
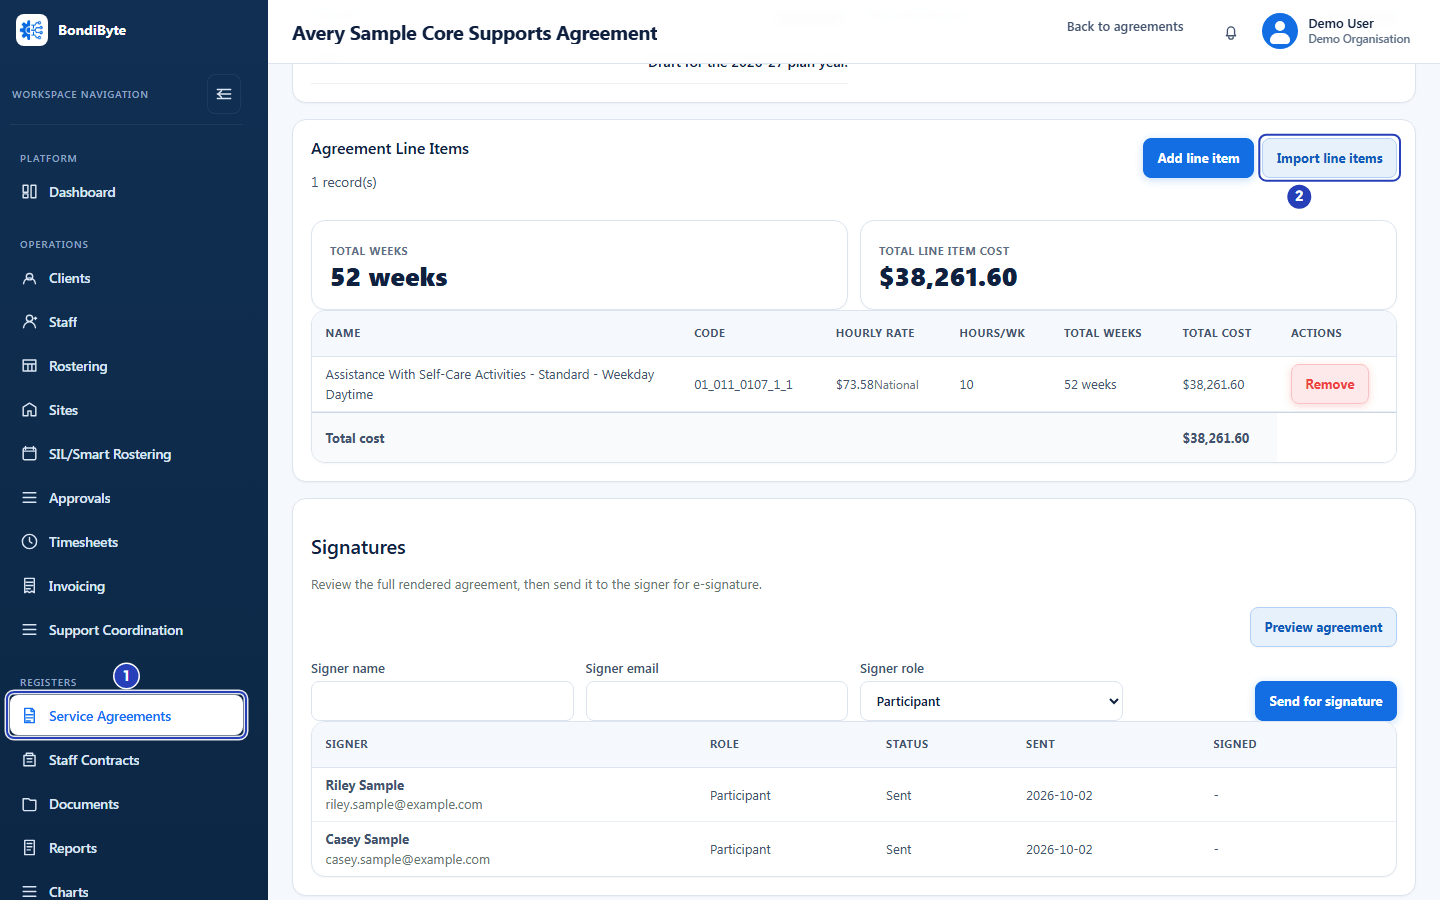
Open the agreement from Service Agreements (1), then choose Import line items (2). -
Choose Upload CSV and download the template
1 Check that Upload CSV is selected. Upload screenshot beside it is the other way in (see step 9). If you only see the CSV upload and no tabs, your role does not include the AI permission.
2 Read the line Reading a CSV file does not use AI. A CSV file is read by fixed rules, not by AI.
3 Choose Download CSV template. It saves a CSV file that holds only the column headings. The window says This template is not the NDIS Support Catalogue workbook. Do not upload the NDIS workbook here.
Fields in step 2 Field What it means Upload CSV The first tab. You prepare a CSV file from BondiByte's template and BondiByte matches its rows to the catalogue. Upload screenshot The second tab. BondiByte reads a table from a picture with AI assistance. It is offered only to roles with the AI permission. Download CSV template Saves the template file. It has one heading row and no sample rows. The six numbered instructions A short list under the button: download the template, open it in a spreadsheet program, fill in the item code, the item name or both, add the hours per week and the rate where you know them, save as CSV keeping the heading row, then upload the saved file. Column details A folded section that explains each template column. You open it in step 3. Read line items Reads the file you chose. It stays usable only once the catalogue check at the top of the window has finished. Cancel and Close Leave the window without saving anything. Any file you chose, and anything BondiByte has read, is discarded. Note: If a card titled Set up your NDIS catalogue first, This catalogue cannot be used yet or We could not check your catalogue appears above the tabs, BondiByte could not find a usable catalogue. Choose Check again or Retry. If it stays, contact BondiByte support. Read line items stays greyed out until the catalogue is ready.
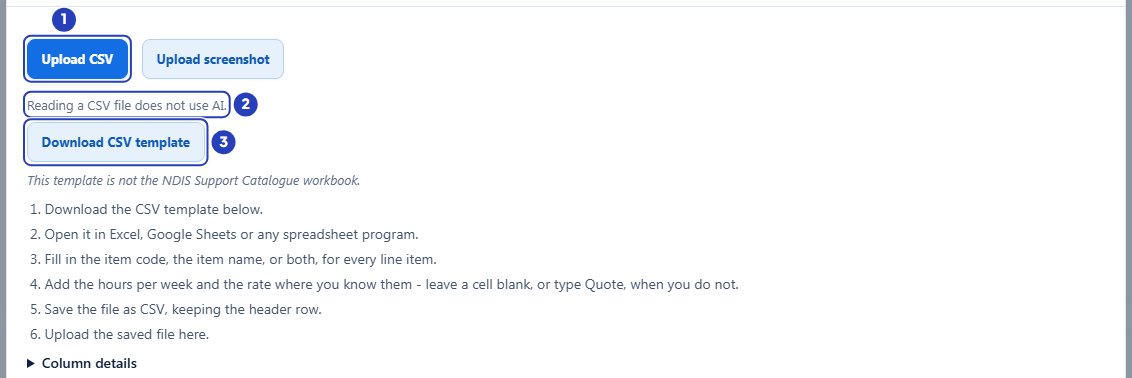
The Upload CSV tab (1), the note that reading a CSV file does not use AI (2) and the Download CSV template button (3). -
Fill in the template
Open the downloaded template in Excel, Google Sheets or any spreadsheet program and keep its heading row. In the window, choose Column details to see what each column wants.
1 In Item Code, type the NDIS support item code exactly as it appears in your service agreement, for example
01_011_0107_1_1. Leave it blank only if you give the item name instead.2 In Item Name, type the support item's name as it appears in the catalogue. Leave it blank only if you give the item code instead.
3 In Hours Per Week, type the weekly hours for the line. Leave it blank if you are not sure yet.
4 In Rate, type the hourly rate you agreed. Leave it blank to use the catalogue price, or type
Quotewhen the price has to be confirmed manually.Save the file as CSV, keeping the heading row. Every row needs an item code, an item name or both, and the file must be a
.csvfile of 1 MB or less. A file with more than 200 item rows has to be split into smaller files.Fields in step 3 Field What it means Item Code Optional on its own, but each row needs this or Item Name. The NDIS support item code. A code is the most reliable way to match the exact item. Item Name Optional on its own, but each row needs this or Item Code. A name can match more than one item, in which case you choose the right one while reviewing. Hours Per Week Optional. The weekly hours. BondiByte multiplies them by the rate and the agreement's weeks to give each line's cost. If it is blank you type the hours in the review table. Rate Optional. The hourly rate. Blank means the catalogue price for the agreement's pricing zone. A rate that differs from the catalogue price has to be confirmed in the review table. Any other column Allowed but not imported. After reading, the window lists the ignored column names under These columns are not imported:. 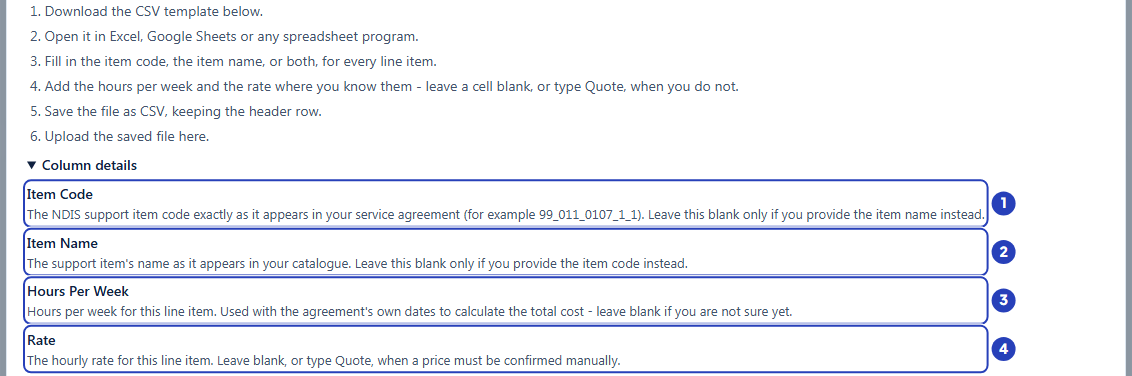
Column details explains Item Code (1), Item Name (2), Hours Per Week (3) and Rate (4). -
Choose your file and read it
1 Drag the saved CSV file onto the box that says Drag a CSV file here, or choose a file. or choose Choose file and pick it. The box is replaced by the file's name with Replace and Remove buttons.
2 Choose Read line items. While BondiByte works, the window says Reading table and then Matching catalogue items.
3 When it finishes, the window says Ready for review and shows a table with one row for every item row in your file.
Fields in step 4 Field What it means Choose file Opens your computer's file picker. Only a .csvfile of up to 1 MB is accepted: the window says Choose a .csv file. or That file is larger than 1 MB. Split it into smaller files. otherwise.Replace Swaps the chosen file for another one before you read it. Remove Clears the chosen file so you can start again. Note: Nothing is added to the agreement yet. Reading only prepares a review table. If you choose Read line items with no file, the window says Choose a CSV file before reading.
-
Review each row
1 Read the lines above the table. Ready for review confirms the file was read. If your file had columns that are not part of the template, These columns are not imported: names them.
2 Work along each row. Select holds a tick box and the row number. Source repeats the code and name from your file, with the original row in italics. Catalogue item shows the matched item's name, code, unit and region, or No item selected.
3 Check Rate and Quantity. The rate starts from your file, or from the catalogue when your file had none, and a small label says where it came from. Quantity holds the number and a Kind list. Weeks / total shows the weeks from the agreement's dates and the cost for the row.
Fields in step 5 Field What it means Select Ticked rows are the ones that will be saved. BondiByte ticks the rows that are Ready. Rows that need attention start unticked. Untick a row to leave it out. A ticked row that is not Ready blocks the save button. Source What your file said: the item code, the item name and the original row. Catalogue item The catalogue item BondiByte matched, with its code, unit and region. Choose another item lets you pick a different one. Rate The hourly rate for the line. A label under the box says Extracted (it came from your file), From catalogue or Confirmed (you typed or accepted it). Under it, National reference or the name of the agreement's zone shows the catalogue price. When your rate differs from it, a note says Agreed rate differs from the catalogue reference price. Confirm this rate is appropriate for this agreement. It never stops you saving. If the catalogue has no price for the zone the line says Catalogue rate unavailable for and the zone name, and an item that needs a quote says Quote required. Quantity and Kind The number from your file and what it stands for. Kind offers Hours per week, Total hours, Units, Visits, Kilometres and Unclear - needs confirmation. Only Hours per week makes a row ready, because a line is costed from weekly hours. Weeks / total The number of weeks from the agreement's start and end dates, and the cost of the line: rate multiplied by hours per week and weeks. It shows Quote required until the rate and hours are settled. If your file had its own total that differs from BondiByte's, a note says Source total differs by and the amount. -
Read the status of each row
1 Look at the coloured label in the Status column. It tells you whether the row can be saved as it is.
2 Read the grey words under the label. They explain why, and for a row that needs attention they start with a sentence that says what to do.
3 Read the line at the bottom of the table. It says how many rows will be added and that existing line items on the agreement are retained.
Fields in step 6 Field What it means Ready The row can be saved as it is. Choose an item More than one catalogue item matches the row. Choose the correct one. Check rate The rate in your file differs from the catalogue price, or the catalogue has no price. The Rate box is empty until you type the rate to use. Check quantity The quantity is missing, or its Kind is not Hours per week. Confirm the weekly hours. Not found No catalogue item matches the row. Search the catalogue or leave the row out. The grey words under the status A few lower-case words that explain why. For example exactcode means the code matched one item exactly, exactname means the name did, defaultregionselected means the catalogue holds the item for several regions and BondiByte chose the standard one, duplicateexistingline means the agreement already has a line for this item, duplicatesourcerow means the item appears twice in your file, fuzzysuggestionsonly or multiplenamematches mean there is no single exact match, nocataloguematch means nothing matched, raterequiresconfirmationmismatch means your rate differs from the catalogue, and quantityrequiresconfirmation means the weekly hours need confirming. Important: A row marked duplicateexistingline is still Ready. If you leave it ticked, saving adds a second line for the same item next to the existing one. Untick it if you do not want that.
-
Fix the rows that need attention
1 Check rate: the Rate box is empty. Type the rate you want to use, for example the rate you agreed, then press Tab. The status changes to Ready. The rate that was in your file is still shown in the Source column.
2 Check quantity: type the number in Quantity and set Kind to Hours per week. If your file gave total hours, units, visits or kilometres, work out the weekly hours yourself first, because BondiByte does not convert them.
3 Choose an item or Not found: choose Choose another item in the Catalogue item column. A panel lists the items BondiByte suggests, each with its name, code, unit and region, and has a Search catalogue box (type a code or a name). Choose the item you want. The panel closes and the row is checked again. A panel with no results says No catalogue rows found. Choose Cancel in the panel to close it without choosing.
4 For any row you do not want, untick it in Select. A row you fixed but BondiByte did not tick, such as one you chose an item for, must be ticked before it is saved.
Note: Each change checks the row again after a moment, so the status, the rate and the cost can update a second after you type. Wait for the status to settle before you choose Save selected line items.
Warning: If you choose an item for a Not found row, check that it is the item you meant. BondiByte matched the row only as far as your file allowed.
-
Choose Save selected line items and check the result
1 Check the line at the bottom of the review table. It says how many rows will be added. The button at the bottom right reads Save selected line items and the number of ticked rows in brackets. It stays greyed out until every ticked row is Ready.
2 Choose Save selected line items. A message confirms Saved and the number of line items, for example Saved 3 line items to this service agreement. The window closes.
3 Find the new lines in Agreement Line Items. Each line has the item name and code, the rate you confirmed with the pricing zone under it, the hours per week, the weeks and the cost. Total line item cost at the top now includes them, and the lines that were there before are unchanged.
4 Choose Cancel instead, at any point before saving, to close the window and discard the review. Nothing is added.
Fields in step 8 Field What it means Save selected line items Adds all the ticked rows at once. If anything stops the save, none of the rows are added. Each new line takes the agreement's start and end dates and the rate and weekly hours you confirmed. Cancel Closes the window and discards the review without adding anything. Warning: Saved lines cannot be edited. To change a rate or hours after saving, remove the line and add it again. See Change an agreed rate.
-
To read a table from a screenshot instead, choose Upload screenshot
If you have not done so already, ask an Owner or Admin to switch on AI-assisted features (see Before you begin). Without it, reading a screenshot is refused with a message.
1 Choose the Upload screenshot tab. It is shown only to roles that have Can use AI to read line items into a service agreement.
2 Read the line Reading a screenshot uses AI assistance. Unlike a CSV file, a picture is read with AI, so every row needs your careful check.
3 Drag the picture onto the box, paste it with Ctrl and V, or choose Choose file. Use a PNG, JPEG or WebP image of up to 10 MB, cropped to just the line item table. BondiByte does not include an image editor.
Choose Read line items. The window shows the AI status while it reads the table and matches the items. You then review the table exactly as in steps 5 to 8, with a Source screenshot picture beside the table so you can compare each row with the original.
Fields in step 9 Field What it means Choose file (screenshot) Accepts PNG, JPEG or WebP. A different type says Choose a PNG, JPEG or WebP image. A file over 10 MB says That image is larger than 10 MB. Crop it to just the table or choose a smaller file. Low resolution hint After you choose a small picture a line says This image may be too small to read item codes and decimals clearly. A larger screenshot usually reads better. Replace and Remove Swap the picture or clear it before you read it. Read line items (screenshot) Reads the picture. With no picture, the window says Choose or paste a screenshot before reading. It is refused with a message when AI-assisted features are off or Automation Capacity is used up (see Troubleshooting). Important: A screenshot is read with AI assistance and can misread codes, decimals or hours. Compare every row, its code, rate and hours, with the Source screenshot before you save. Only the rows you tick are saved.
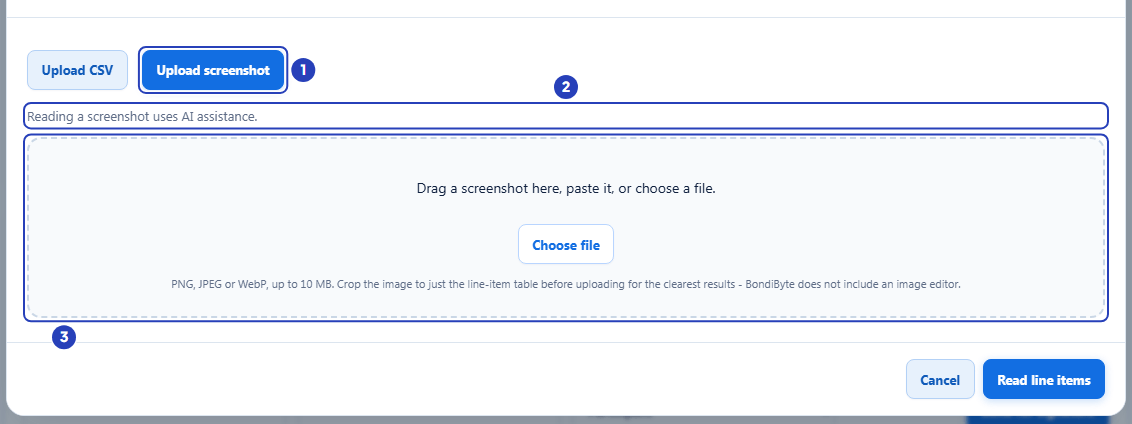
The Upload screenshot tab (1), the note that reading a screenshot uses AI assistance (2) and the box for the picture (3).
What happens next
The rows you saved are now line items on the agreement, and Total line item cost includes them. Each saved line keeps the item name, code, rate and pricing zone it was saved with, and shows the catalogue reference price next to the zone when your rate differs.
A Draft agreement is not used for billing. BondiByte uses the client's Active agreement when it adds billing to shifts and prepares invoices, so activate the agreement when its lines are final.
Rows you left out or did not fix are not added anywhere. To add them later, import a new file or use Add line item.
Importing never changes or removes lines already on the agreement. To correct a line you saved, remove it and add it again.
Important notes
Important: Your organisation is responsible for checking every rate and quantity against the client's plan and the current NDIS pricing arrangements. BondiByte matches rows to the catalogue to help you, and you confirm what is saved.
Note: Prices come from the shared NDIS catalogue for the agreement's pricing zone. See The shared NDIS catalogue.
Good practice
- Use item codes in your file whenever you have them. A code matches one exact item, while a name can match several and then needs a choice for each row.
- Set the agreement's pricing zone, Start date and End date before you import. Each row's rate reference and cost come from them, and saved lines do not change if you edit them later.
- Start with a small file of a few rows the first time. You can see how your spreadsheet's rates and hours read before you commit a long list.
- Put weekly hours in Hours Per Week, not total hours. Only hours per week make a row ready, so a file that already has weekly hours needs no fixing in the review table.
- Leave Rate blank when you are using the catalogue price. A rate that matches the catalogue price is accepted as it is, and a different rate has to be confirmed row by row.
- Untick any row marked duplicateexistingline unless you really want a second line for the same item. Importing never merges with a line that is already there.
- Check a screenshot read against the Source screenshot one row at a time. A CSV file is read exactly as you typed it, so prefer it for long lists.
Troubleshooting
I cannot see Import line items.
Why it happens: Your role does not include Can manage agreement line items.
What to do: Ask an Owner or Admin to check your role.
Import line items is greyed out.
Why it happens: The agreement has a signed copy and is read-only, or a new line row or the import window is already open. Pointing at the button shows Signed agreements are read-only. for a signed agreement.
What to do: For a signed agreement, create a new agreement for the changes. Otherwise save or cancel the open row first.
I only see Upload CSV, with no Upload screenshot tab.
Why it happens: Your role does not include Can use AI to read line items into a service agreement.
What to do: Use a CSV file, or ask an Owner or Admin to check your role.
Reading a screenshot fails with This automation is not enabled for your organisation. An Owner or Admin can enable it from Profile → Automation & Capacity Controls.
Why it happens: AI-assisted features are off for your organisation. A CSV file does not need them.
What to do: Ask an Owner or Admin to choose Enable on AI-assisted features under Automation & Capacity Controls in Account settings. Meanwhile use Upload CSV.
Reading a screenshot fails with You have reached your included Automation Capacity for this billing period, so this automated step did not run.
Why it happens: Your organisation has used the capacity included for this billing period.
What to do: Use Upload CSV, or wait for the allowance to reset with your billing cycle. See Automation Capacity.
Reading a screenshot fails with AI features are not available right now., This AI capability is turned off for this workspace. or The screenshot could not be read.
Why it happens: AI assistance cannot be used at the moment or is turned off for your organisation, or the picture could not be read.
What to do: Try a sharper picture cropped to just the table. This window cannot read pasted text, so if it still fails use Upload CSV, and contact BondiByte support if the first two messages stay.
A card says Set up your NDIS catalogue first, This catalogue cannot be used yet or We could not check your catalogue.
Why it happens: BondiByte could not find a usable catalogue for your organisation, or the check did not finish.
What to do: Choose Check again or Retry. If the card stays, contact BondiByte support. Read line items stays greyed out until the catalogue is ready.
The window says Choose a .csv file.
Why it happens: The file you chose does not end in .csv.
What to do: Save the spreadsheet as CSV and choose that file.
The window says That file is larger than 1 MB. Split it into smaller files.
Why it happens: The CSV file is bigger than the window accepts.
What to do: Split the list across two or more files and import them one after the other.
The window says This CSV file's header row does not match the template. Download the template and check your column headings.
Why it happens: The first row does not have an Item Code or Item Name column, or a column heading appears twice.
What to do: Download the template again, copy your rows under its headings, and keep the heading row.
A message says Found a number of rows, over the 200 row limit.
Why it happens: The file has more item rows than one import reads.
What to do: Split the file into smaller files and import them one after the other.
A row says Not found.
Why it happens: No catalogue item matches the code or name in that row.
What to do: Choose Choose another item and search the catalogue, or untick the row and add the item later with Add line item.
Save selected line items is greyed out.
Why it happens: At least one ticked row is not Ready, or no row is ticked.
What to do: Fix each ticked row that shows Choose an item, Check rate, Check quantity or Not found, or untick it. Then wait a moment for the statuses to update.
A row stays on Check quantity after I typed the number.
Why it happens: Kind is not Hours per week. Only weekly hours make a row ready, and BondiByte does not convert total hours, units, visits or kilometres.
What to do: Work out the weekly hours, type them in Quantity and set Kind to Hours per week.
A message says This preview is out of date. Preview the capture again before applying.
Why it happens: The row details changed while BondiByte was still checking them.
What to do: Wait for the table to finish updating, then choose Save selected line items again.
A message says One of the selected catalogue items is no longer available. Choose again.
Why it happens: A catalogue item you chose is no longer in the catalogue in use.
What to do: Choose Choose another item on that row and pick a current item.
A message says This service agreement has been signed and is read-only. or This client is inactive.
Why it happens: The agreement was signed while you were working, or the client has been made inactive.
What to do: For a signed agreement, create a new agreement. For an inactive client, reactivate the client first, then import again.
The window opens on a review table I did not just create.
Why it happens: An earlier read was never saved or cancelled, so BondiByte keeps it for you in this browser tab.
What to do: Choose Cancel to discard it, then start again with Import line items.