

Who this is for
This guide is written for Owner, Admin, Manager and Coordinator.
Before you begin
- If Service Agreements is missing under Registers in the left menu, your role does not include Can view service agreements. Ask an Owner or Admin to check your role. If the page says Your plan does not include this feature., your organisation's subscription is not active. An Owner or Admin checks Billing & subscription. There is no switch to turn on.
- E-signature is switched on for your organisation. You can tell because the Signatures section at the bottom of the agreement page shows the Signer name, Signer email and Signer role boxes. If it says E-signature is not switched on yet., it is not available yet: contact BondiByte support.
- You are signed in to BondiByte on a computer.
- The agreement is ready to sign: its dates, pricing zone and line items are final. After a signer signs, the agreement becomes read-only. See Create a Service Agreement and Add line items.
- You have the signer's name, the email address they read, and you know whether they sign as the participant, a guardian or nominee, or the provider.
- It helps to check how the signer will see the agreement first. See Preview and download the agreement PDF.
Steps
The screenshots show a demonstration organisation with made-up names. Your own screens show your organisation's details. Select a screenshot to open it full size.
-
Go to Service Agreements > the agreement
1 In the left menu, under Registers, choose Service Agreements. The Agreement Records list opens. Choose the agreement number to open the agreement.
2 Check the Agreement Profile: the client, the Start Date and End Date, the Pricing Zone and the Funding Management. The signer will read an agreement made from these details.
3 Check Agreement Line Items: each line, its hourly rate, its hours per week and the Total cost. Once the agreement is signed you cannot change any of them.
Warning: Make every change before you send. BondiByte keeps the agreement exactly as it was when you chose Send for signature, so a change you make afterwards is not in what the signer reviews and signs.
Note: The green Active badge beside Download PDF only shows that the agreement record is switched on. It is not the agreement's Status. The Status in the Agreement Profile, for example Draft, is what decides whether BondiByte bills from the agreement.
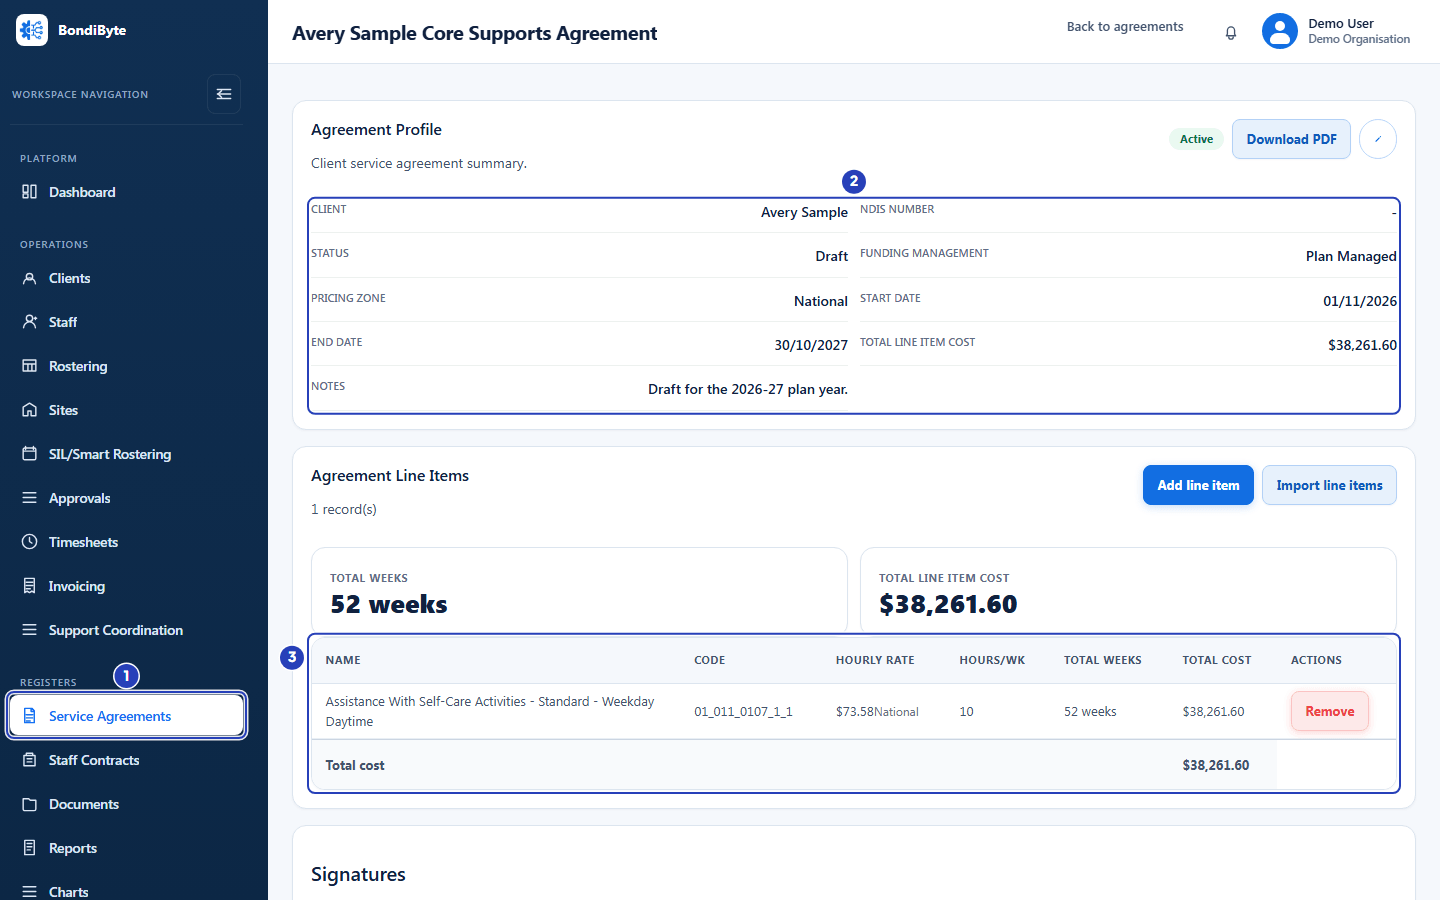
Open the agreement from Service Agreements (1), check the Agreement Profile (2) and the Agreement Line Items (3). -
Preview what the signer will review
1 Scroll to the Signatures section at the bottom of the page and choose Preview agreement. A large window shows the agreement as the signer will read it. See Preview and download the agreement PDF for how to read it.
2 Check the names, dates, line items and wording. Choose Close when you have finished. Nothing has been sent yet.
Tip: If you find a mistake, close the preview, correct the agreement, and preview it again before you send.
-
Fill in the signer's details
1 In Signer name, type the signer's full name as you want it to appear in the email and on the signed copy.
2 In Signer email, type the email address the signer reads. BondiByte sends the signing request to this address.
3 In Signer role, choose how the signer signs. Participant is the starting choice.
Fields in step 3 Field What it means Signer name Required. The person's name. It is used in the greeting of the email and shown on the signing page and the signed copy. Signer email Required. A valid email address. The signing request goes only to this address. Check the spelling: a request cannot be changed after it is sent. Signer role Choose Participant (the client), Guardian / nominee (someone signing for the participant), Provider (someone signing for your organisation) or Other. The starting choice is Participant. The role is shown in the email as Signing as and in the Role column of the table. Guardian / nominee appears there as Guardian. Preview agreement The button above the boxes. It opens the preview and sends nothing. Important: Each time you choose Send for signature you send one request to one person. If the participant and the provider both need to sign, send a separate request for each person. Send them one after the other without changing the agreement in between.
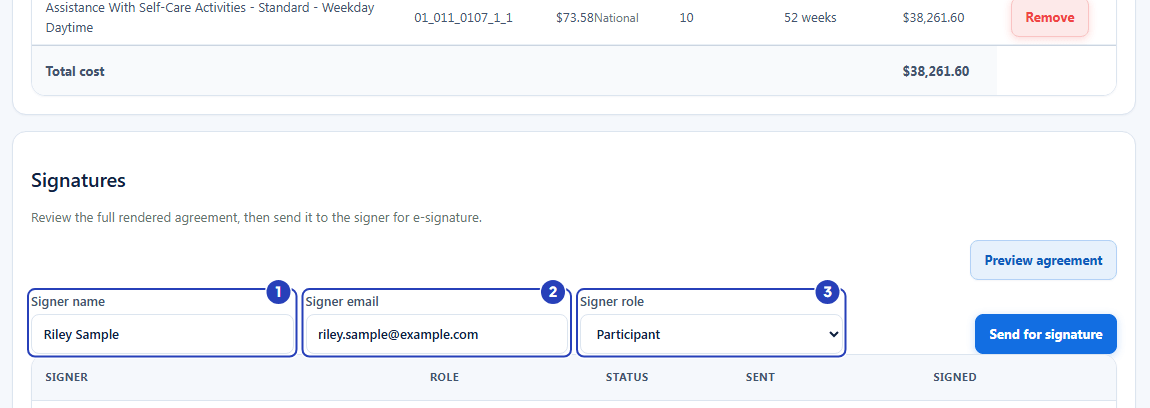
Type the signer's name (1) and email address (2) and choose the role (3). -
Choose Send for signature
1 Choose Send for signature. While BondiByte sends the request the button says Sending.... A message confirms Signing request sent to and the signer's email address, followed by a full stop.
2 The boxes clear and a new row appears at the top of the table below them, because the newest request is listed first. It shows the signer's name with their email address under it, their role, the status Sent, and the date it was sent.
3 Check the Status column. A new request always starts as Sent.
Fields in step 4 Field What it means Send for signature Sends the signing request by email and records it in the table. It is greyed out and says Sending... while it works. Signer The name you typed, with the email address under it. Role The role you chose. Status Sent means the email has gone and the signer has not opened it. Viewed means they have opened the signing page but not signed. Signed means they have signed. Sent The date the request was sent, written year, month, day. Signed The date the signer signed. It shows a dash until then. Warning: A request cannot be edited, taken back or resent from this screen. If a detail is wrong, send a new request with the right details.
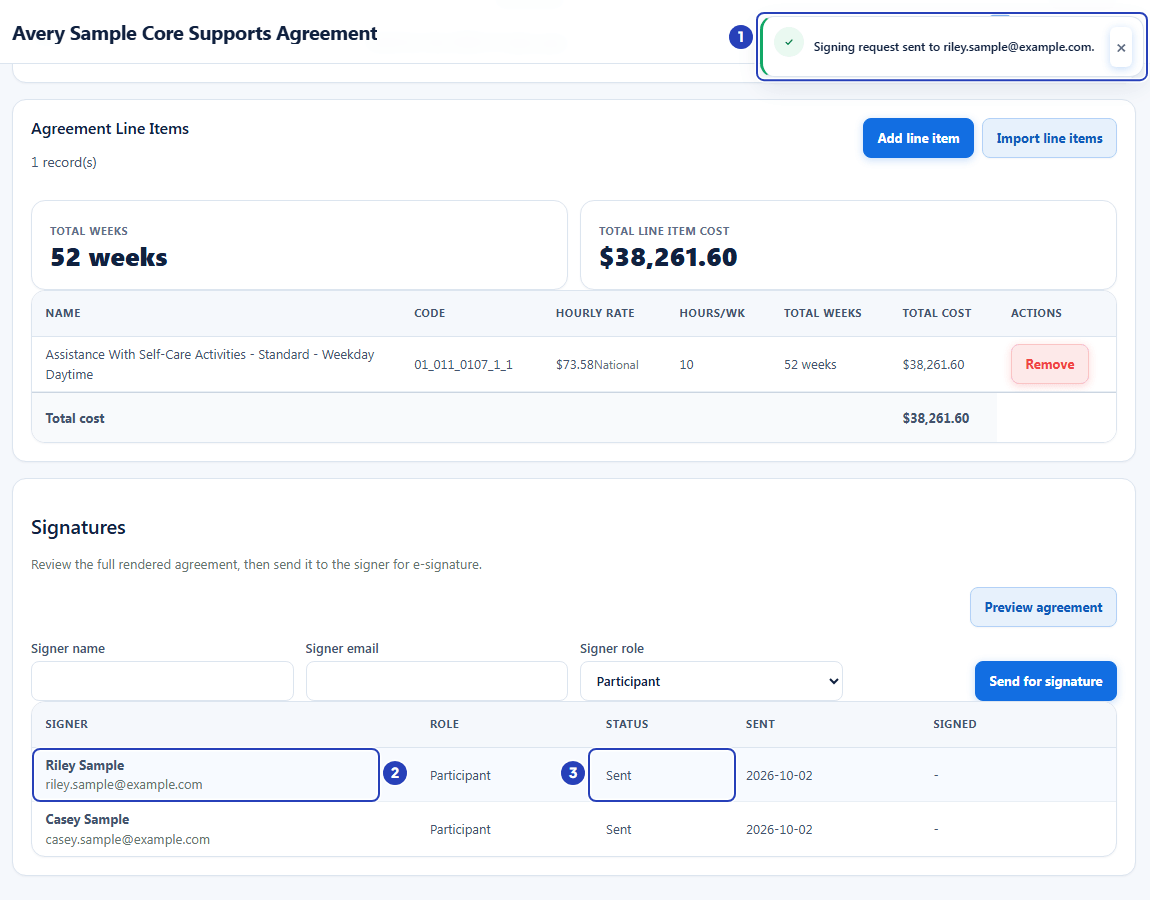
The confirmation message (1), the new request in the Signatures table (2) and its Sent status (3). -
Follow the request until it is signed
1 Open the agreement again whenever you want to check. The Signatures table shows the latest Status of each request. It does not refresh while the page is open, so reopen the agreement or reload the page.
2 When the Status says Signed, the Signed column shows the date and a Download button appears at the end of the row. Choose it to download the signed copy as a PDF.
3 If a signer says the link has stopped working, send a new request. Each link expires after the time stated in the email, and the table does not show an expired status: an old request stays as Sent or Viewed.
Fields in step 5 Field What it means Download Appears only on a Signed row. It downloads the signed agreement as a PDF named after the document name (Service agreement and the agreement number), ending in -signed. The PDF holds the agreement as it was sent and a final page headed Electronic signature, showing who signed, when, and their signature. Note: When the signer has signed, the agreement becomes read-only. Changes to the profile and the line items are refused with This service agreement has been signed and is read-only. To change the terms, create a new agreement. See What happens after an agreement is signed.
What happens next
The signer receives an email with the subject Please sign: followed by the document name, which is Service agreement and the agreement number (not the agreement's title). It is headed Please review and sign, greets them by name, says your organisation has prepared the agreement for them to review and sign electronically, and shows the document name, Signing as and the role, and how long the link stays valid. A button reads Review & sign the document.
The button opens a BondiByte signing page headed with the same document name, Service agreement and the agreement number. The signer reads the agreement, can choose Download PDF, ticks a box that says they have reviewed the document and agree to its contents and consent to signing electronically, draws their signature in the box (Clear starts again) and chooses Sign document. The page then says Thank you, your signature is recorded and offers Download the signed document.
If the link is too old, the signing page says This signing link has expired and asks the signer to contact your organisation for a new link. Send a new request.
Signing does not change the agreement's Status. A Draft agreement stays a Draft until you activate it, and an Active agreement stays Active. BondiByte bills from the client's Active agreement only.
The signed copy stays in the Signatures table of the agreement, and you can download it from there at any time.
Important notes
Important: An electronic signature through BondiByte records who signed, when, and the agreement they reviewed. Your organisation is responsible for checking that the agreement and the way it is signed suit the client, their representative and the current NDIS requirements.
Good practice
- Preview the agreement before you send it. The signer reads exactly that wording, and you cannot change it afterwards.
- Check the signer's email address letter by letter. A request goes only to the address you typed and cannot be changed or taken back from the agreement page.
- Make all your changes first, then send. Once any signer has signed, the agreement is read-only, so send the other signers' requests straight away and before anyone signs.
- Choose the Signer role that matches the person, such as Guardian / nominee for someone signing for the participant. The role is printed in the email and shown in the table, which helps you find the right request later.
- Tell the signer to expect an email with the subject Please sign: and to check their junk folder if it does not arrive. Then check the Status column a day later: Sent means they have not opened it yet.
- Activate the agreement when it is signed and ready. Signing does not make an agreement Active, and billing uses only the Active agreement.
- Download the signed copy as soon as the Status says Signed and keep it with the client's records. It stays available from the Signatures table whenever you need it again.
- Do not send an agreement that is still a rough draft. Finish the profile and the line items first, because the signer signs what you sent and a signed agreement cannot be edited.
Troubleshooting
I cannot see the Signer name, Signer email and Send for signature boxes.
Why it happens: Your role does not include Can edit service agreements, or E-signature is not switched on for your organisation. In that case the section says E-signature is not switched on yet.
What to do: Ask an Owner or Admin to check your role. If the section says E-signature is not switched on, contact BondiByte support.
A message says Electronic signatures are not set up yet. when I choose Send for signature.
Why it happens: E-signature is not available for your organisation yet.
What to do: Contact BondiByte support. Nothing was sent.
A message says Please check the information you entered and try again.
Why it happens: The name is empty or the email address is not a valid address.
What to do: Type the signer's name and a full email address, for example name@example.com, then choose Send for signature again.
The signer did not get the email.
Why it happens: The email may be in their junk folder, or the address you typed is wrong. The Signer column shows the address you used.
What to do: Ask the signer to check their junk folder. If the address is wrong, send a new request with the right address.
The Status is still Sent days later.
Why it happens: The signer has not opened the email or the signing page yet, or the link has expired. An expired link is not shown as a separate status.
What to do: Contact the signer. If the link has expired or is lost, send a new request.
The signer says the signing page shows This signing link has expired.
Why it happens: The link in the email is older than the time the email states.
What to do: Send a new request to the same person.
I need to change the agreement after the signer signed.
Why it happens: A signed agreement is read-only. A message says This service agreement has been signed and is read-only.
What to do: Create a new agreement for the changes you need, and send that one for signature.
I sent a request with the wrong name, email address or role.
Why it happens: A request cannot be edited or taken back from the agreement page.
What to do: Send a new request with the right details, and tell the person who received the first email to ignore it.