

Who this is for
This guide is written for Owner, Admin and Manager.
Before you begin
- Your organisation's subscription or trial is active. The Readiness tab itself tells you if it is switched off for the organisation (Org Smart Rostering Disabled). See Smart Rostering organisation settings.
- You are signed in to BondiByte on a computer as an Owner or Admin.
- Read the Smart Rostering overview. Readiness is what has to be true before the automation plan can run for a site.
Steps
The screenshots show a demonstration organisation with made-up names. Your own screens show your organisation's details. Select a screenshot to open it full size.
-
Go to Configuration > Rostering rules > Readiness
1 In the left menu, choose Configuration.
2 Choose the Rostering rules card.
3 Choose the Readiness tab. Three lists appear: Blocking Issues, Warnings and Information. Wait until the page has finished loading before you read them.
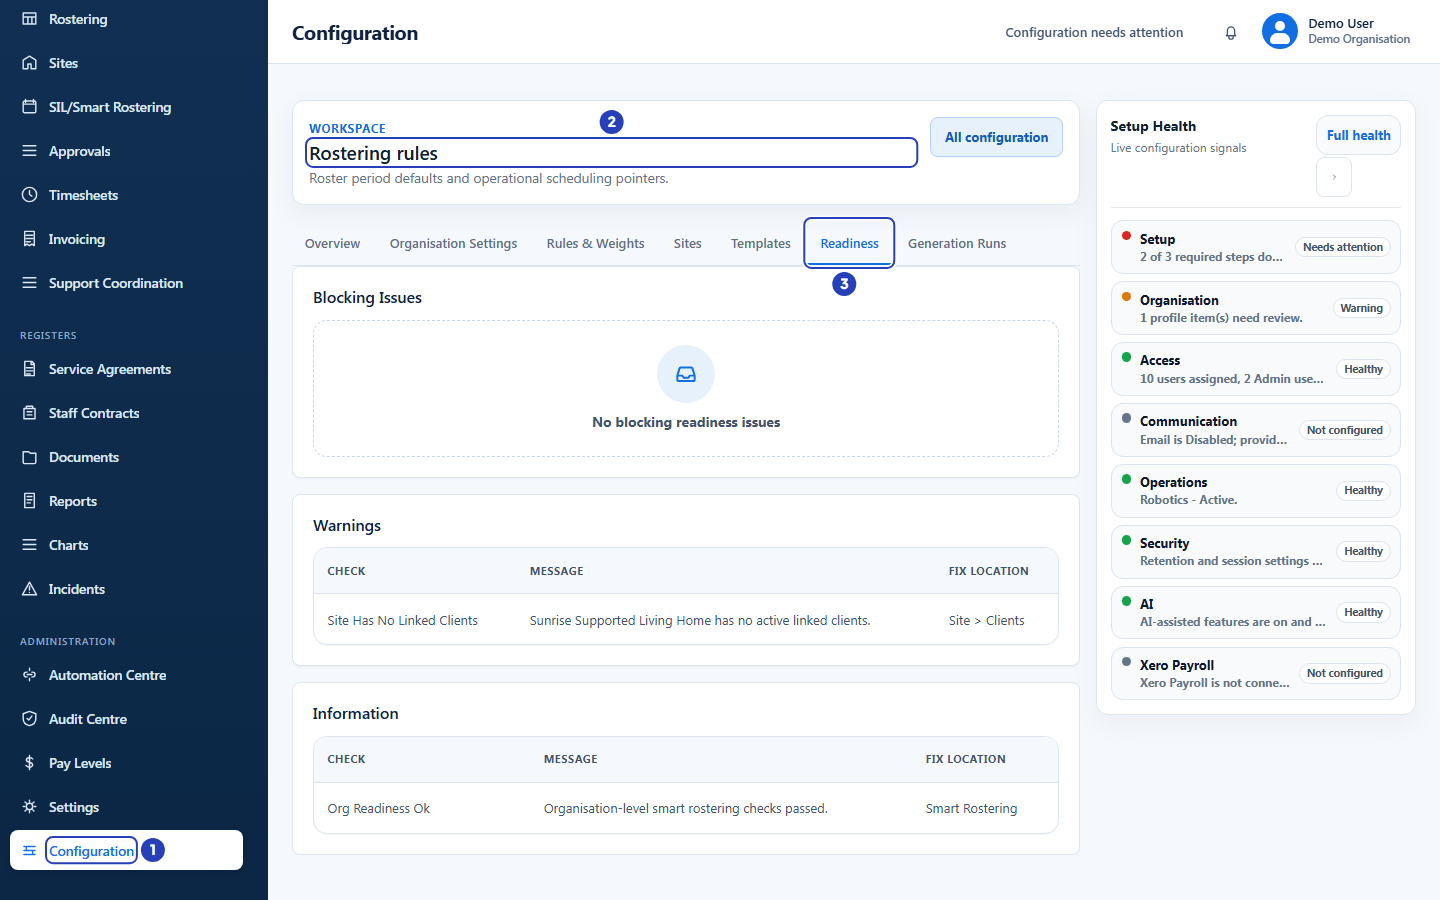
Choose Configuration (1), then the Rostering rules card (2, shown here as the page heading once it is open), then the Readiness tab (3). -
Read the three lists
Each list is a table with the columns Check, Message and Fix location. A list with nothing in it shows a short message instead, for example No blocking readiness issues.
1 Blocking Issues are problems to fix first. BondiByte cannot be relied on to build rosters until they are gone.
2 Warnings are worth fixing. BondiByte can still work, but the result may be poorer, for example a site with no team to roster.
3 Information is notes only. When there are no blocking issues it says Organisation-level smart rostering checks passed.
4 Fix location says where to put the problem right. It is plain text, not a link. Step 4 explains each path.
Note: This tab checks your setup. It does not check whether enough staff are free for every shift. For that, open More roster actions > Report on the roster. The Setup tab is a separate checklist for the first-time setup. This tab stays available afterwards.
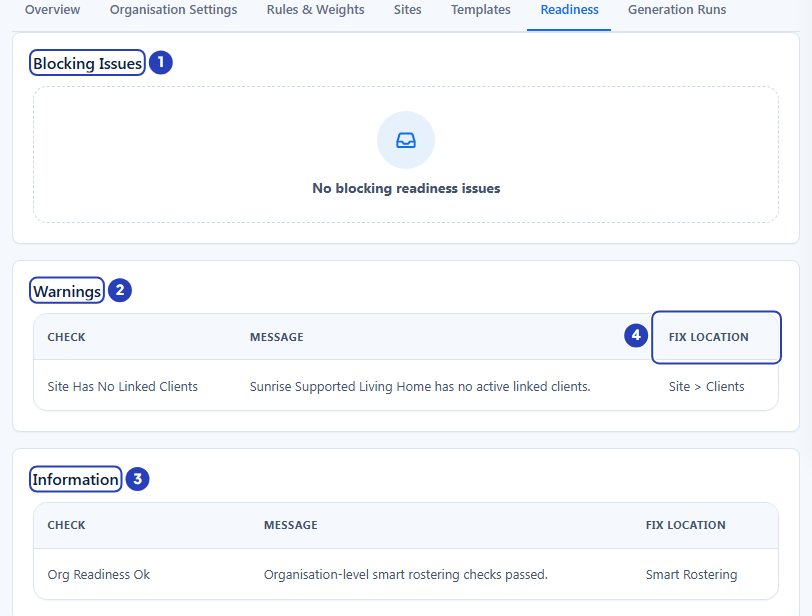
Blocking Issues (1) are fixed first. Warnings (2) are worth fixing. Information (3) is for reading. In each table, the Fix location column (4) says where to put the problem right. -
Work out what each check means
Find the Check shown on your screen. The first five are blocking issues, the next three are warnings and the last is information.
Site checks are made only for sites that have Smart Rostering switched on.
Fields in step 3 Field What it means Org Smart Rostering Disabled Smart Rostering is not on for the organisation. Fix location: Smart Rostering > Organisation Settings. Tick Enable Smart Rostering and save. Org Period Not Configured The roster period type and week start day are not set. Fix location: Smart Rostering > Organisation Settings. Set them in the Roster period automation card. Org Rule Weights Missing No weights are in place yet. Fix location: Smart Rostering > Rules & Weights. Choose a preset and choose Save weights. Fix Org Smart Rostering Disabled first, because the weights stay hidden while Smart Rostering is off. No Enabled Sites No site has Smart Rostering on. Fix location: Site > Settings. Open a site, choose Site settings and switch on Enable smart rostering automation for this site. Site Has No Linked Staff The site has no primary, secondary or relief staff. Fix location: Site > Staff. Open the site, choose Staff and Assign staff. Site Has No Active Template A warning. The site has no template yet. Fix location: Rostering > Create Automation Pattern. See Build a roster template. Site Has No Primary Team A warning. The site has only relief staff. Fix location: Site > Staff. Assign primary or secondary team members. Site Has No Linked Clients A warning. The site has no active clients. Fix location: Site > Clients. Open the site, choose Clients and Assign client. Org Readiness Ok Information. Organisation-level smart rostering checks passed. It appears only when there are no blocking issues. Nothing to fix. -
Go to the place named under Fix location
1 Smart Rostering > Organisation Settings and Smart Rostering > Rules & Weights are tabs on the same Rostering rules page.
2 Site > Settings, Site > Staff and Site > Clients are tabs on the site's own page. Choose the Sites tab, choose the site's name, then Site settings, Staff or Clients.
3 Rostering > Create Automation Pattern is on the roster. Choose SIL/Smart Rostering, the site, then More roster actions > Select shifts.
4 Make the change and save it, using the guide for that screen: Smart Rostering organisation settings, Rules and Weights, Prepare sites for Smart Rostering or Build a roster template.
Note: Work through one site at a time. If Org Smart Rostering Disabled and Org Rule Weights Missing both show, fix the first one first.
-
Check one site on the Sites tab
The Sites tab gives each site its own readiness, which is the quickest check for one site. Managers and Rostering Officers see it too.
1 Choose the Sites tab.
2 Automation is Yes when Smart Rostering is on for the site.
3 Team shows the primary team, the secondary team and relief staff.
4 Clients is the number of active clients linked to the site.
5 Readiness reads Ready, Needs attention, Disabled or Blocked. The other columns are explained in Prepare sites for Smart Rostering.
Fields in step 5 Field What it means Ready Smart Rostering is on for the site and it has at least one client and one team member. Needs attention Smart Rostering is on but a client or a team member is missing. Open the site and add one. Disabled Smart Rostering is switched off for the site. Blocked The site is inactive. You see it only when Include inactive sites is ticked. Note: On the site's own page, the Site settings tab ends with a Readiness tile that reads Ready or Needs review. Needs review also covers a team with fewer people than Minimum daily staff.
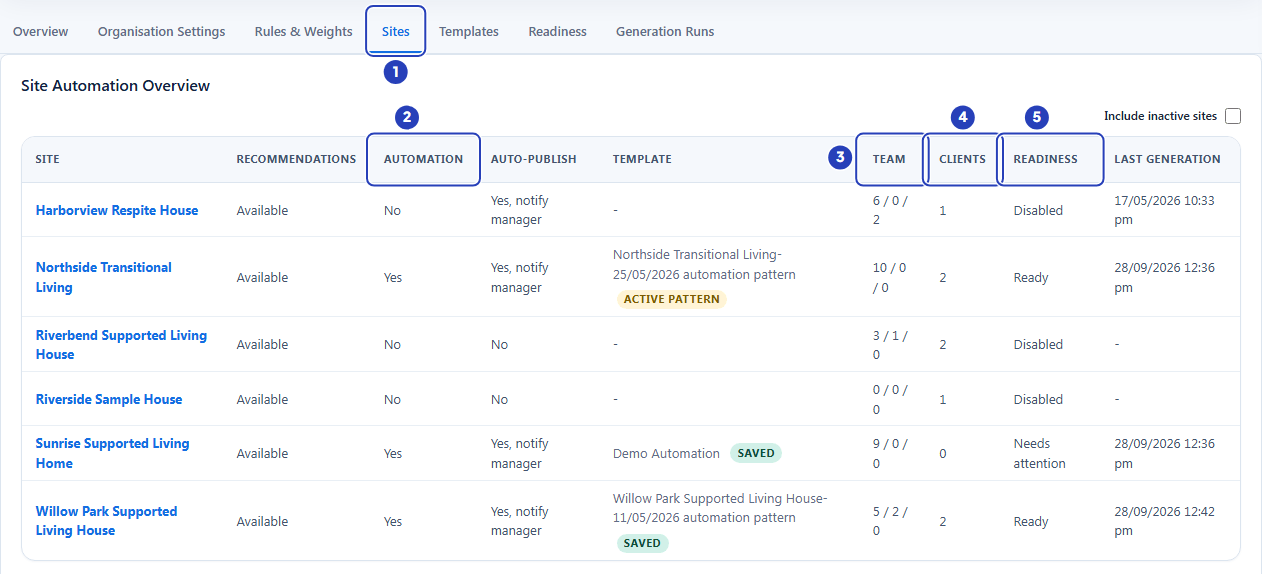
Choose the Sites tab (1). For each site, check Automation (2), the team numbers (3), the clients (4) and Readiness (5). -
Check the tab again after you make changes
1 Return to the Readiness tab. It refreshes itself when you open it. Wait for Refreshing smart rostering data... to disappear.
2 Check that the items you fixed are gone. Repeat until Blocking Issues says No blocking readiness issues.
Nothing on the Readiness tab can be saved or changed. It only reports.
What happens next
Fixing an item changes your setup only. Nothing is created or sent when you look at the Readiness tab.
When Blocking Issues is empty, BondiByte can build rosters by itself for the sites that have Smart Rostering on, on the dates in the automation plan.
Next, see what the automation has done on the Generation Runs tab. See Generation runs.
Important notes
Important: The Readiness tab only reports. It has no buttons. Each item is fixed on the screen named under Fix location.
Good practice
- Look at the Readiness tab after you switch Smart Rostering on for a site, and again after you change a site's staff or clients.
- Fix Blocking Issues first, then Warnings. Read the Message, not just the Check name, because it names the site.
- Make one site Ready on the Sites tab before you switch on the next, so this tab stays short.
Troubleshooting
I cannot see the Readiness tab.
Why it happens: The tab is shown only to people who can open the full Configuration page. Managers and Rostering Officers see only the Overview, Sites and Templates tabs.
What to do: Ask an Owner or Admin to check the tab. In the meantime, use the Readiness column on the Sites tab.
A site I switched on is not mentioned on the Readiness tab.
Why it happens: Site checks are made only for sites with the automation switch on and saved. The tab lists only problems, so a site with nothing wrong is not listed.
What to do: Check the site's Readiness column on the Sites tab. If it says Ready, there is nothing to report. If it says Disabled, switch on Enable smart rostering automation for this site and choose Save site automation.
I fixed an item but it still shows on the Readiness tab.
Why it happens: The tab may still be showing the earlier result while it refreshes.
What to do: Wait for Refreshing smart rostering data... to disappear. If the item is still there, check that the change was saved.
The tab says Org Smart Rostering Disabled, but I cannot find Enable Smart Rostering.
Why it happens: Enable Smart Rostering is on the Organisation Settings tab, which only Owners and Admins can open.
What to do: Ask an Owner or Admin to tick Enable Smart Rostering and choose Save organisation settings.
The tab says there are no issues, but some shifts are still left unfilled.
Why it happens: Readiness checks your setup. It does not check whether the people linked to a site are free, available and allowed to work each shift.
What to do: Open More roster actions > Report on the roster. It lists each unfilled shift with the reasons.