

Who this is for
This guide is written for Owner and Admin.
Before you begin
- Smart Rostering is on for the organisation and for at least one site that has an active template, and Smart Rostering automation is on in Account settings > Automation & Capacity Controls. While that control is off, no new runs appear. See Set up Smart Rostering and Automation Capacity.
- You are signed in to BondiByte on a computer as an Owner or Admin.
- Read the Smart Rostering overview. The runs listed here are the draft-building step of the automation plan.
Steps
The screenshots show a demonstration organisation with made-up names. Your own screens show your organisation's details. Select a screenshot to open it full size.
-
Go to Configuration > Rostering rules > Generation Runs
1 In the left menu, choose Configuration.
2 Choose the Rostering rules card.
3 Choose the Generation Runs tab. A table lists the runs, newest first, for every site in your organisation.
A row is added each time BondiByte builds a roster period for a site. Normally that happens by itself, when the Shift Assignment Task comes due on its planned date. A row is also added when someone chooses Run smart rostering on the roster. Wait until the page has finished loading before you read the table.
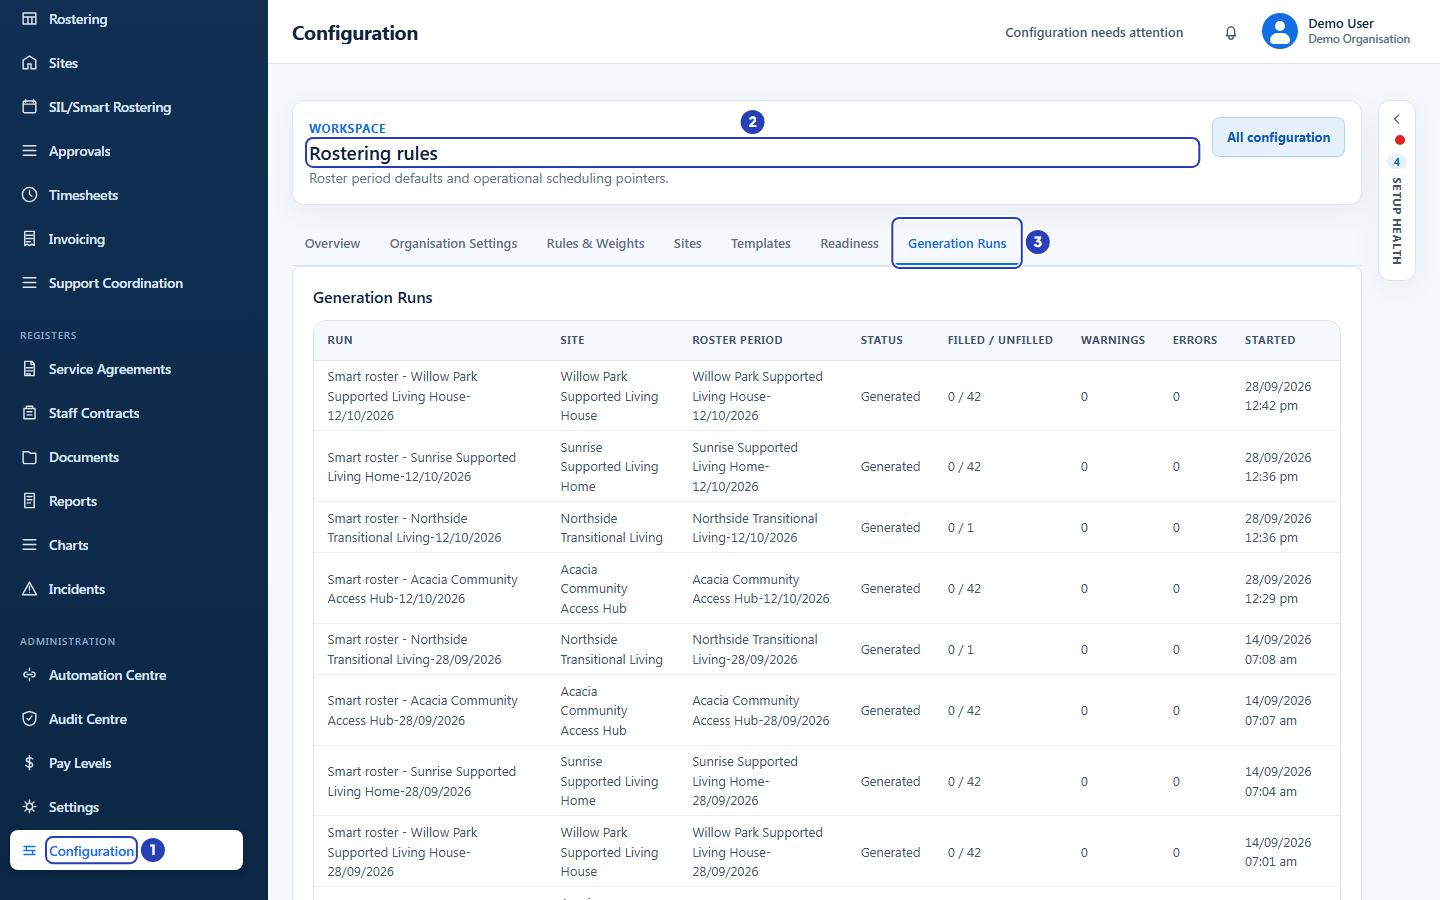
Choose Configuration (1), then the Rostering rules card (2, shown here as the page heading once it is open), then the Generation Runs tab (3). -
Read the table
Each row is one run. Read across the row.
1 Run is the run's name. It starts Smart roster - and then gives the roster period's name, which is the site and the first day of the period.
2 Site is the site the run was for.
3 Roster period is the period the run built. It carries the same name, so you can match it to a roster on SIL/Smart Rostering.
4 Status says where the run has got to. Generated is the normal result.
5 Filled / Unfilled gives two numbers, for example 0 / 42: shifts counted as filled, then shifts counted as unfilled. The next step explains what counts as filled.
6 Warnings is how many warnings the run recorded. It is 0 when there were none.
7 Errors is how many errors the run recorded. It is 0 when there were none.
8 Started is the date and time the run started.
Tip: If Errors and Started are cut off on your screen, choose the small arrow in the Setup Health panel at the right of the page to fold it, or scroll the table sideways.
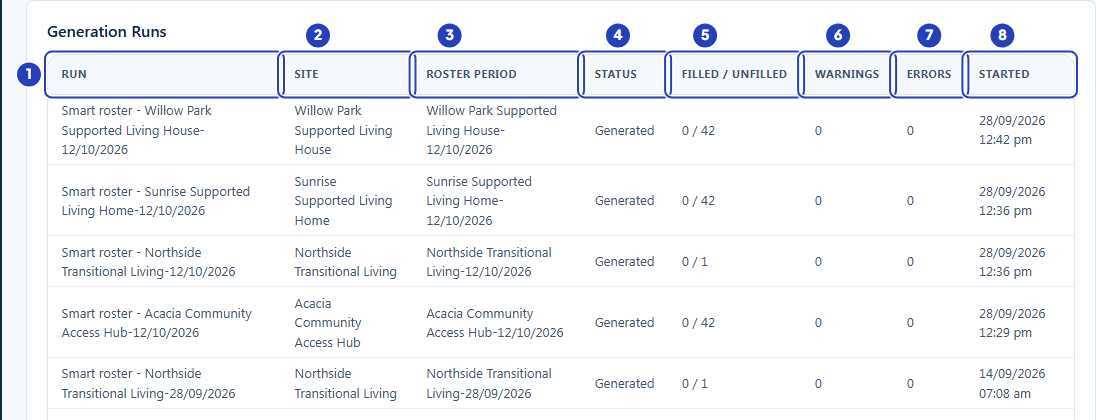
Read each row across, from Run (1), Site (2) and Roster period (3), to Status (4), Filled / Unfilled (5), Warnings (6), Errors (7) and Started (8). -
Understand Filled and Unfilled
A shift counts as Filled once its roster period has been published and it has all the staff it needs. Until then every shift in the period counts as Unfilled, even when staff are already assigned. That is why a run for a roster that has not been published can read 0 / 42 while the roster itself shows staff on most shifts.
A shift also counts as Unfilled while it is Draft, Open or partly filled. Shifts that are already completed are counted as neither.
To see how well a roster period was really staffed, use the Report on the roster. The next steps open it.
Note: The numbers come from the current status of the run's shifts. They show where the period stands today, so they can change after the run finished.
-
Open the warnings or errors for a run
1 In the Warnings or Errors column, find a number above 0. It is a button.
2 Choose the number. A small panel opens, headed Warnings or Errors. Each item names the shift or staff member, gives a message, and a line beginning Fix: that says where to put it right, for example Site > Staff or Staff > Availability.
3 Choose the x at the top of the panel to close it.
Note: A warning does not stop a roster being built. It points at something worth checking, such as a person's availability or a missing capability. An error means a person was blocked or rejected for a shift, so that shift needs a person's attention.
-
Open the Report for the same roster period
The Report shows the staffing result for one roster period.
1 In the left menu, choose SIL/Smart Rostering. In the site list at the top, choose the run's site.
2 Use the Previous period and Next period arrows until the dates in the heading match the run's roster period.
3 Choose More roster actions, the three dots at the right of the toolbar.
4 Choose Report. The Smart rostering report opens. See Review recommendations for how to read it.
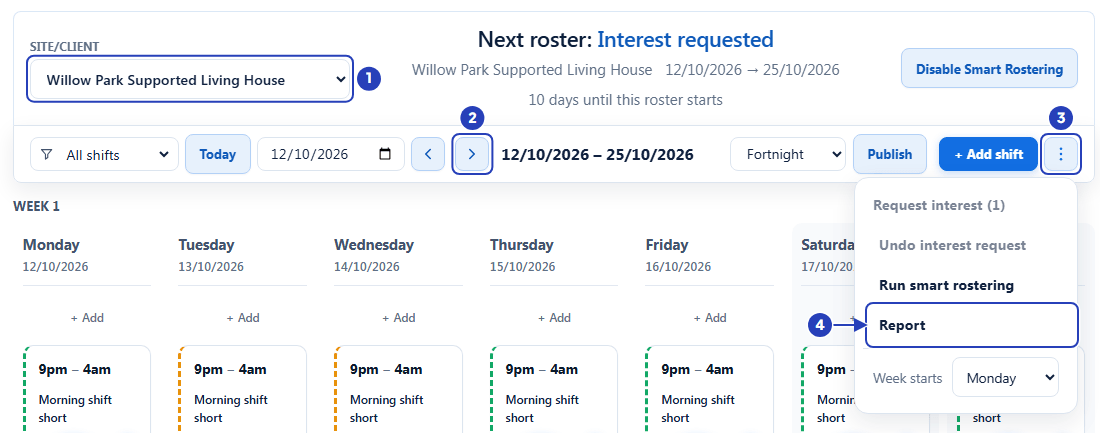
Choose the site (1), use the Next period arrow to reach the run's roster period (2), open More roster actions (3) and choose Report (4). -
Compare the runs with the plan
Runs happen on the dates in the automation plan. To see them, choose the Overview tab and scroll to Upcoming Automation Actions.
1 In Site, choose the site. The table shows its next planned roster periods.
2 Look at the Shift Assignment Task column. Its date is when the run for that period is planned, and it reads Completed once the run has happened.
3 A cell that says Ready now because the planned date has passed. is waiting for BondiByte's next check, which happens every few minutes. The Automation Manager shows the Last check and the next one.
What happens next
Opening the Generation Runs tab changes nothing. It only lists what has already happened.
BondiByte builds a draft for a person to review, so a run does not by itself notify staff. A manager reviews the draft and publishes it, unless the site publishes by itself.
To build a period yourself instead of waiting for its planned date, use Run smart rostering on the roster. See How Smart Rostering builds a roster.
Important notes
Note: The table lists every run for your organisation, newest first. It has no filter or search, so use the Site and Roster period columns to find the run you want.
Good practice
- After a run, look at the Warnings and Errors counts before you rely on the draft roster. Open each number above 0 and follow its Fix: line.
- Read the Report on the roster rather than Filled / Unfilled to judge how well a period was staffed.
- Match the Roster period name to the roster you are reviewing. It carries the site and the first day, so two sites with the same dates are easy to tell apart.
Troubleshooting
The tab says No smart generation runs yet.
Why it happens: BondiByte has not built any roster period yet. Either no site is ready, or the planned date for the first run has not arrived.
What to do: Check the Readiness and Sites tabs for a site that is Ready. Then open Overview > Upcoming Automation Actions to see the planned dates.
I cannot see the Generation Runs tab.
Why it happens: The tab is shown only to people who can open the full Configuration page. Managers and Rostering Officers see only the Overview, Sites and Templates tabs.
What to do: Ask an Owner or Admin to look at the tab, or open the Report on the roster yourself.
A run shows 0 / 42 under Filled / Unfilled, but the roster has staff on most shifts.
Why it happens: A shift counts as filled only once its roster period is published. Until then every shift counts as unfilled.
What to do: Open More roster actions > Report on the roster for the real staffing figures. Publish the roster when it is ready and the count changes.
A run shows a number above 0 under Warnings or Errors.
Why it happens: The run recorded something about a shift or a staff member that needs a person to look at it.
What to do: Choose the number. Read the message and the Fix: line for each item, put it right, and then check the roster's Report.
A message says This automation is not enabled for your organisation.
Why it happens: Smart Rostering automation is switched off in Automation & Capacity Controls, so BondiByte does not build rosters.
What to do: An Owner or Admin opens Account settings from their name at the top right, finds Smart Rostering automation under Automation & Capacity Controls and chooses Enable.
A message says you have reached your included automation capacity.
Why it happens: Your organisation has used the automation capacity included in its plan. You can still roster by hand.
What to do: An Owner or Admin can see the usage in Account settings under Automation & Capacity Controls. Contact BondiByte support if you need more.