

Who this is for
This guide is written for Owner, Admin, Manager and Rostering Officer.
Before you begin
- Smart Rostering is on for the organisation and the site, the site has an active template, and Smart Rostering automation is on in Account settings > Automation & Capacity Controls. See Set up Smart Rostering and Automation Capacity.
- Read the Smart Rostering overview for the four automatic steps and the words used here.
One roster period, start to finish
Every roster period of a site that has Smart Rostering on goes through the same four steps, on dates that are set when BondiByte first plans the period. Nobody has to press anything.
Here is one fortnight as an example. Suppose the organisation settings are 21 days for shift creation, 1 day for the interest request, 6 days for shift assignment and 3 days for publishing. A roster period that starts on Monday 28 September then runs like this.
- 7 September: create shifts. BondiByte copies the site's template into the period. The shifts appear on the roster with nobody assigned.
- 8 September: ask staff for interest (optional). Staff are asked which shifts they would like.
- 14 September: build the draft roster. BondiByte assigns suitable staff to the shifts and records why.
- 17 September: publish, or ready for review. If the site publishes by itself, staff see the roster. Otherwise it waits for a manager to publish it.
- 28 September: the roster period starts and staff work the shifts.
The timings come from Organisation Settings. BondiByte checks every few minutes whether a step has come due, so a step happens soon after its planned date.
What you see at each step
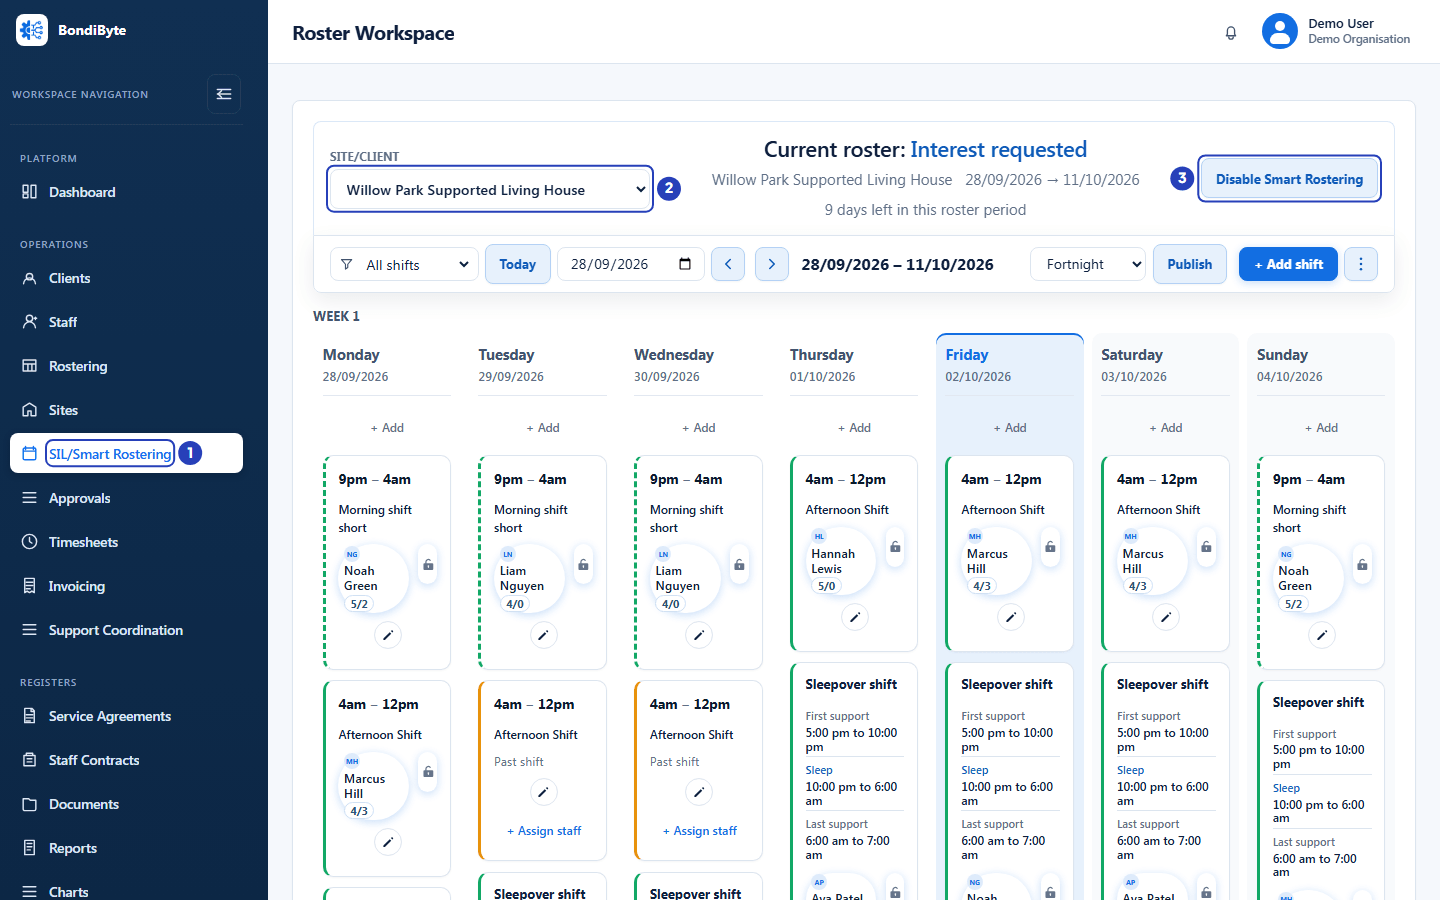
Create shifts. The period's shifts appear on SIL/Smart Rostering, each with an amber edge and + Assign staff. If the site has Notify manager after shifts are created on, the site manager is told.
Ask staff for interest. The roster heading changes to Interest requested. Staff linked to the site are asked in the Staff App, under More > My interest. On the roster, a shift shows how many people are interested, and its page lists them under Staff interests. If the organisation or the site has staff interest off, this step is skipped and the draft is built after shift creation instead.
Build the draft roster. People appear on the shifts. A shift BondiByte could not fill stays amber and keeps + Assign staff. The run is added to the Generation Runs tab. If the site has Notify manager after shifts are assigned on, the site manager is told. If any shift is left unfilled, the site manager (or the Owners and Admins when the site has none) gets Smart Rostering needs manager review.
Publish, or ready for review. If the site publishes by itself, staff are told and see their shifts in the Staff App. The roster goes out even when some shifts are unfilled, which the site manager was told about when the draft was built. With Notify manager after shifts are published on, the site manager is also told when it goes out. If the site does not publish by itself, the roster stays unpublished, the Publish button on the roster is yours to use, and with Remind manager to publish on the site manager gets a daily reminder.
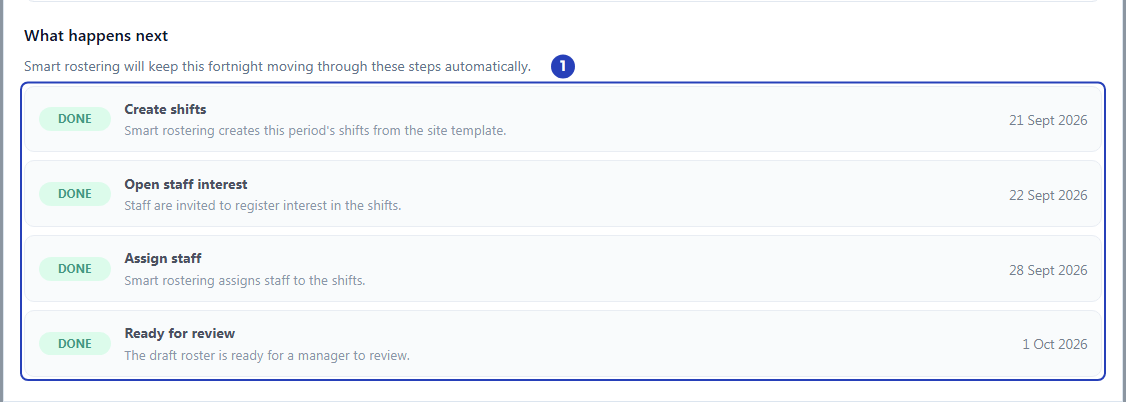
The same steps are listed in the Report under What happens next, each marked Done, Due now or Upcoming with its date. On the Overview tab of Rostering rules, the plan grid shows the same dates for every upcoming period of a site.
What the draft looks like
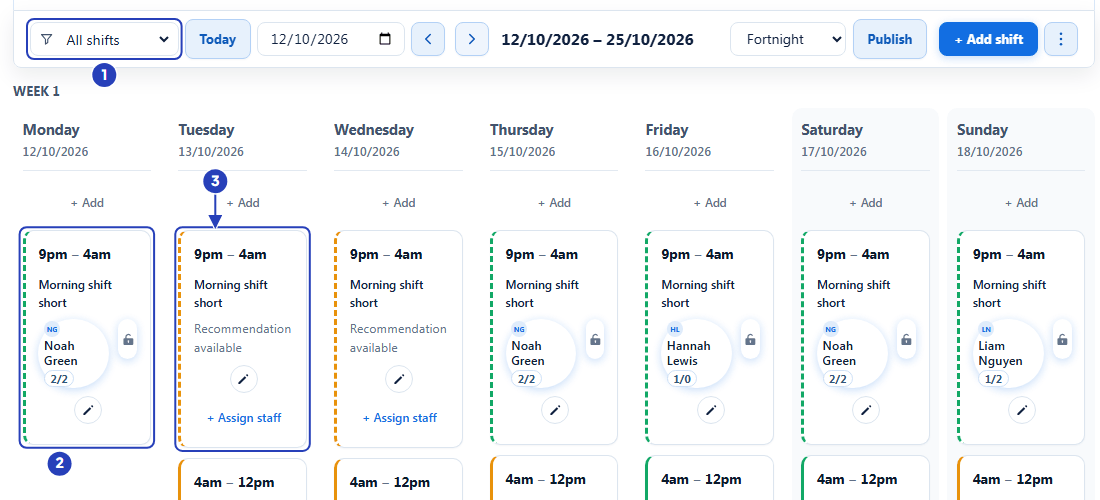
A draft is an ordinary roster, so you can change anything by hand. A shift with all its people has a green edge. A shift that still needs someone has an amber edge and + Assign staff. Beside each person's name, two numbers show how many weekday and weekend shifts they now have in the period.
A note above + Assign staff says whether BondiByte has someone to suggest, for example Recommendation available or No recommendation available. To see why a shift was left open, choose More roster actions > Report.
When you would run a period by hand
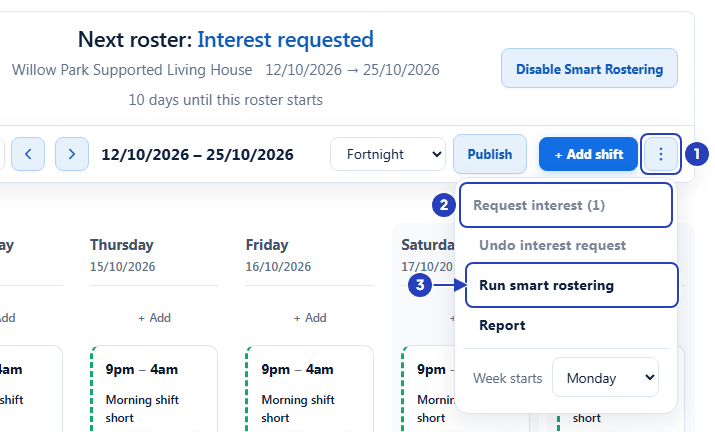
The automatic plan is the normal path. A few controls exist for exceptions. They are in the More roster actions menu (the three dots) on SIL/Smart Rostering.
Run smart rostering builds that roster period now instead of waiting for its planned date. Use it to try Smart Rostering on one period, or to see a new template's result on a period that has not been built yet. Use it too for an open period that comes before the one you chose in Automation starts from roster period, because BondiByte does not build earlier periods by itself.
A manual run skips the staff interest step and fills the open shifts straight away. People you have locked with the padlock are placed first. If the people linked to the site may not have enough hours for the period, a window called Capacity check before Smart Rostering opens first. Choose Continue and assign what can be assigned, or Cancel to add staff or capacity first. While it runs the item reads Running..., and a message gives the result, for example Smart rostering created shifts: 42 new shifts, 17 staff assignments.
Request interest and Undo interest request open or close the staff interest step by hand. Request interest is available only for a period that has not started. Undo interest request returns the period to draft, and works only until staff have been assigned.
Important notes
Important: A run, automatic or manual, builds a draft for a person to review. It assigns people up to the number each shift needs and never replaces someone already assigned, so check the draft before you publish it, unless the site publishes by itself.
Good practice
- Build the very first roster for a site by hand, using Repeat this shift in the Add shift window to fill the fortnight quickly, then turn it into a template and let BondiByte build the later periods. See Build a roster template.
- Keep staff availability up to date. BondiByte never offers a shift to someone whose time is blocked, so out-of-date availability leaves shifts open.
- Open the Report before you publish a draft and look at every shift in the Unfilled and Understaffed filters.
Questions and answers
Do I have to do anything for a roster period to be built?
No. Once Smart Rostering is set up for the site, BondiByte builds each period on its planned dates. You review the draft and publish it, unless the site publishes by itself.
Can I change a draft that BondiByte built?
Yes. Assign, replace and remove people by hand. See Assign and publish from Smart Rostering.
Where can I see when the next steps will happen?
On the Overview tab of Configuration > Rostering rules, under Upcoming Automation Actions, and in the Report on the roster under What happens next.
A roster period has no shifts and nothing seems to happen.
The planned date of the Shift Creation Task has not arrived, Smart Rostering is off for the site, the site has no active template, or Smart Rostering automation is off. Open the Overview tab and choose the site under Upcoming Automation Actions to see the planned dates. Then check the Readiness tab and the Automation Manager, which shows the Last check and the next one.
The plan grid shows Not enabled for site under Publish Task and a Manual Action status.
The site does not publish by itself, so a manager publishes each roster after reviewing it. Review the draft and choose Publish on the roster. To let BondiByte publish, see Prepare sites for Smart Rostering.
I cannot see Run smart rostering in More roster actions, it is greyed out, or a message says Past roster periods cannot run smart rostering.
The item is shown only when Smart Rostering is on for the site, the site has an active template, the period has not ended and is not Closed or Cancelled, and your role includes Can run smart roster calculation. It is greyed out while the roster is still loading or a run is under way. Check the button at the top right of the roster. If it says Enable Smart Rostering, turn it on for the site. Choose the current period or a future one. If it is only greyed out, wait until the shifts appear and open the menu again. Otherwise ask an Owner or Admin to check your role.
A message says This roster period has no available pattern shifts to run.
The site's template produced no shifts for this period. Open Configuration > Rostering rules > Templates, check the template's shifts, and choose Apply to next roster if it applies. See Build a roster template.
A message says This automation is not enabled for your organisation. or You have reached your included automation capacity.
Smart Rostering automation is switched off, or your organisation has used the automation capacity included in its plan. You can still roster by hand. An Owner or Admin opens Account settings from their name at the top right and finds Smart Rostering automation under Automation & Capacity Controls. They choose Enable if it is off, or check the usage and contact BondiByte support if the capacity is used.
The draft is built but many shifts have nobody assigned.
BondiByte found no one it could offer the shift to. The usual reasons are no staff on the site team, people already rostered elsewhere, blocked availability, a missing capability or no hours left in a person's capacity. Open More roster actions > Report. Each open shift lists its reasons. Fix them, or choose + Assign staff on the shift yourself.
A message says No staff email recipients were found after Request interest.
No staff are on the site team, or Staff interest notifications is switched off. Staff with no email address are counted as skipped and still get the Staff App notice. Check the site's Staff tab, and ask an Owner or Admin to check Staff interest notifications in Automation & Capacity Controls.