

Who this is for
This guide is written for Owner, Admin and Finance.
Before you begin
- Timesheets is in your left menu, under Operations. It shows for roles that include Can view timesheets. Export Payroll works for roles that include Can export payroll timesheets. An Owner or Admin can add both permissions to a role in Configuration > Roles & Permissions. See Roles and permissions basics.
- The timesheets you want in the file are Approved. Only approved timesheets are exported. See Approve timesheets.
- For a file with dollar amounts you also need two things. Pay Levels is switched on, and the pay of every approved timesheet is RESOLVED. And your payroll system's own IDs are entered in Payroll CSV mappings. An Owner or Admin switches Pay Levels on in Account settings > Automation & Capacity Controls > Pay Levels and automatic interpretation, by choosing Enable and then Enable and prepare. The card shows Preparing and then Ready to confirm. Choose Review and confirm, look over the setup on the Pay Levels page and choose I've reviewed the setup: enable interpretation. Pay interpretation works when the card says On. See Pay Levels. A file of approved hours only needs neither.
- A payroll system that can take a CSV file in the MYOB or Employment Hero layout. BondiByte does not connect to either system and does not send the file anywhere.
Steps
The screenshots show a demonstration organisation with made-up names. Your own screens show your organisation's details. Select a screenshot to open it full size.
-
Go to Timesheets > Approved
1 In the left menu, under Operations, choose Timesheets. The Timesheet review screen opens on the last period that has finished.
2 Check the dates under Selected period. They must match the pay period you are paying. To change them, choose Previous, Next, Last completed or Current period.
3 Choose Approved. The table shows the approved timesheets of the period.
Important: The file covers exactly the period under Selected period. You cannot choose other dates for an export. Move to the right period first.
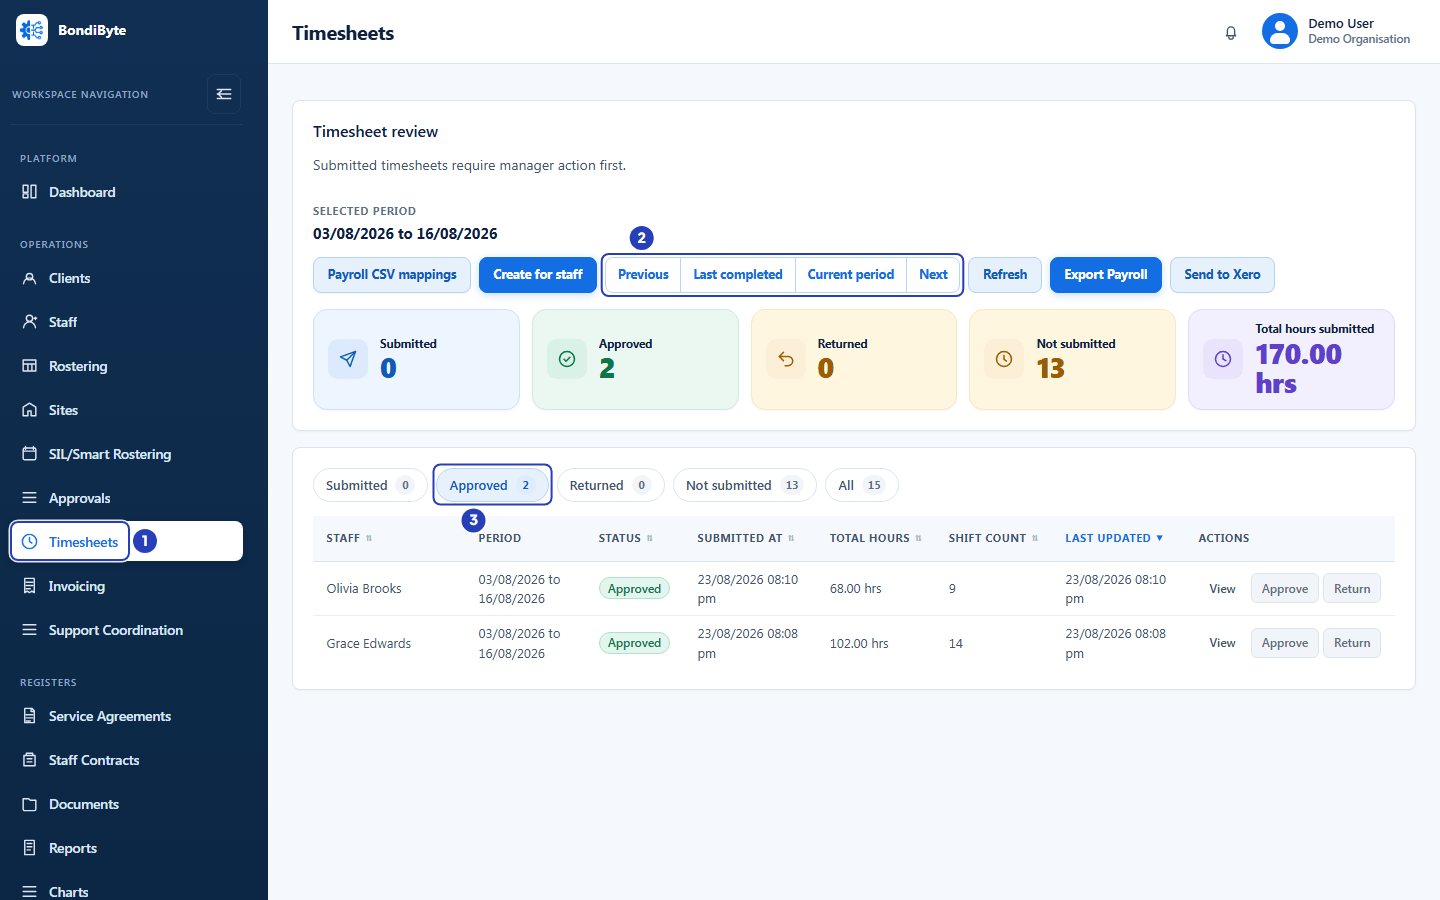
Choose Timesheets in the left menu (1), use the period buttons to reach the pay period (2) and choose Approved (3). -
Check the approved timesheets
1 Read the summary cards. Approved counts the timesheets that will be in the file. If Submitted, Returned or Not submitted are not zero, those timesheets will not be in the file. Approve them or follow them up first. See Review timesheets.
2 Check the rows of the approved timesheets: who they are for, the hours and when they were last updated. These are the people and hours that go into the file.
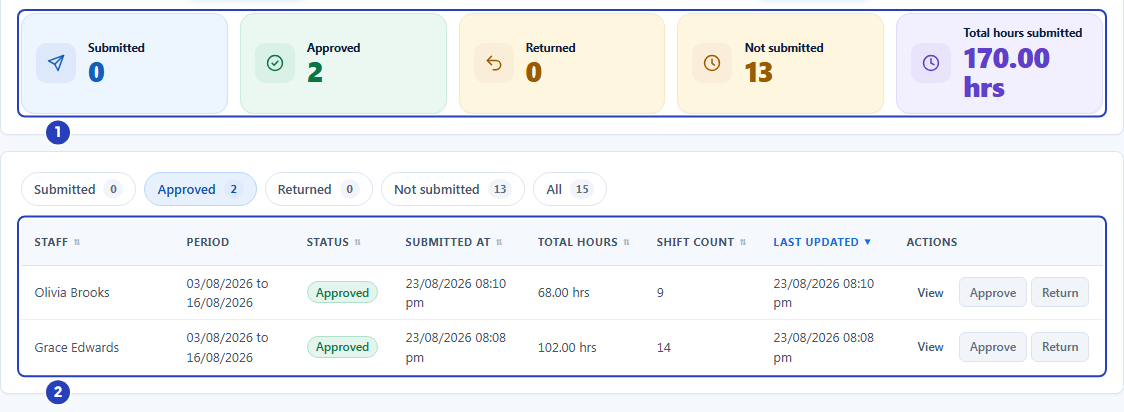
Read the summary cards (1) and check the approved rows (2). -
Enter your payroll IDs if the file will have amounts
Skip this step when you export approved hours only. For a file with dollar amounts, your payroll system needs its own ID for every person, site and pay category in the file. Choose Payroll CSV mappings at the top of the screen. The Payroll CSV mappings window opens.
1 In CSV format, choose MYOB or Employment Hero. Each format keeps its own IDs.
2 Choose Staff, Sites or Pay categories to switch between the three lists. Use the search box above the list, Search staff, Search sites or Search pay categories, to find a name, and Previous and Next below it to move through the pages.
3 In Payroll external ID, type the ID your payroll system uses for that person, site or pay category. Leave a row blank if it is not needed.
4 Choose Publish new mapping version to save your IDs. A message says New mapping version published. Existing saved export batches are unchanged. Publishing does not send anything to a payroll system.
5 Choose Close to leave the Payroll CSV mappings window. Close is at the top right of the window, and again at the bottom beside Publish new mapping version. The window does not close by itself after you publish. Closing without publishing saves nothing.
Fields in step 3 Field What it means CSV format Required. MYOB or Employment Hero. It starts as MYOB. Changing it loads the IDs saved for that format. Mapping version New mapping version, or a saved set, shown as Saved with a date and time and (latest) on the newest. New mapping version opens with the IDs from the latest saved version filled in. Change only what you need and choose Publish new mapping version. A saved set is read only. Choose Use as a new version to copy it into a new one and change it. Staff, Sites, Pay categories Three buttons, one for each list. Staff lists people, Sites lists sites and Pay categories lists kinds of pay, each with its name and short code. Search staff, Search sites, Search pay categories Optional. The search box above the list, named for the list you are on. Type part of a name to narrow the list. The list shows 25 rows at a time, with Page and a count under it. BondiByte record The person, site or pay category the row is for. Payroll external ID The ID in your payroll system for that record, up to 200 characters. Plain letters, numbers and symbols are fine. An ID cannot start with the signs =, +, - or @. A blank row is left unmapped. Publish new mapping version Saves the IDs as a new version for the chosen format. The newest version is the one used for the next export. Earlier exports are not changed. Close Leaves the Payroll CSV mappings window. It never closes by itself, not even after you publish. IDs you typed and did not publish are not saved. Important: A file with amounts needs an ID for every person, site and pay category in it. If one is missing the export stops with A payroll staff, site or pay-category ID is missing. Complete the CSV mappings before monetary export.
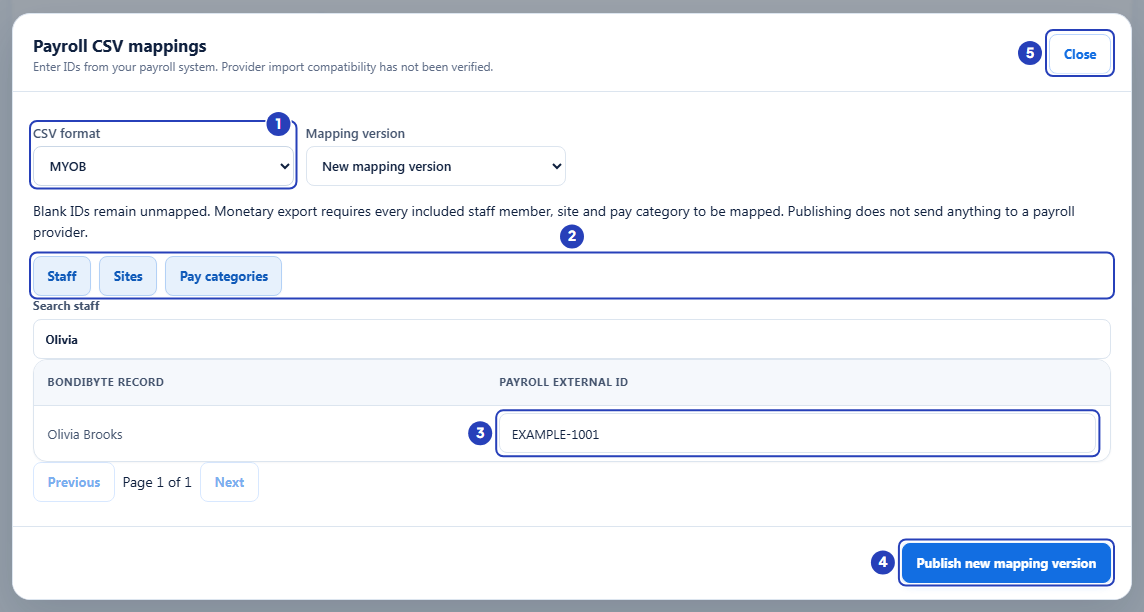
Choose the CSV format (1), choose Staff, Sites or Pay categories (2), type the ID from your payroll system (3), choose Publish new mapping version (4) and choose Close (5) to leave the window. -
Choose Export Payroll
1 Choose Export Payroll at the top of the screen. A window titled Choose payroll export format opens. While a file is being made the button reads Exporting....
2 Send to Xero, beside it, is a different action. It sends the approved timesheets to Xero Payroll as draft timesheets instead of making a file. See the Xero Payroll guide.
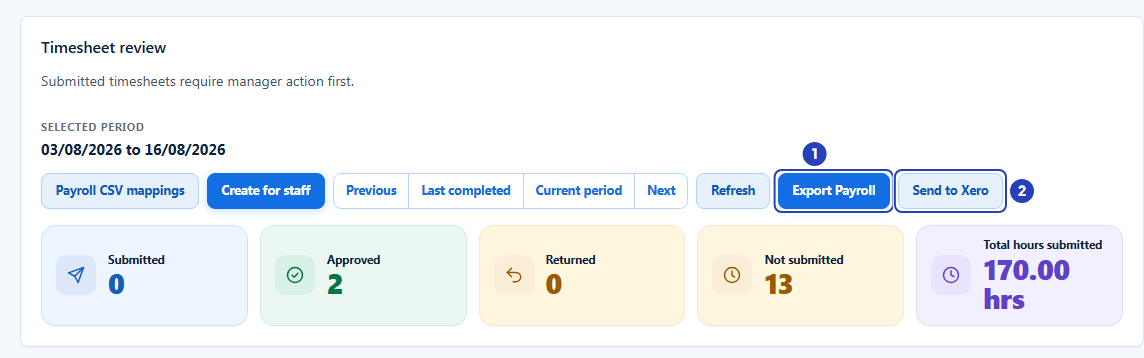
Choose Export Payroll (1). Send to Xero (2) is a different action. -
Choose what the file holds and the format
The window says Only approved timesheets from the selected period will be exported. Near the bottom it names the period and says that draft, submitted, returned, rejected and unsubmitted timesheets are not included.
1 Decide about Export approved hours only (leave all monetary totals blank). Leave it unticked for a file with dollar amounts. Tick it for a file of hours only. The sentence under the box changes to say which kind of file you will get.
2 Choose MYOB for a file in the MYOB layout. The file is made and your browser downloads it.
3 Choose Employment Hero for a file in the Employment Hero layout. The file is made and your browser downloads it.
4 Choose Cancel to close the window without exporting.
Fields in step 5 Field What it means Export approved hours only (leave all monetary totals blank) Tick box, not ticked the first time you open the window. The tick stays as you left it until you leave the Timesheets screen, so check it each time you open the window. Ticked: every row has the hours and the Total column is empty, and no payroll IDs are needed. Unticked: each row has the approved dollar amount, every person, site and pay category needs a payroll ID, and the export is refused if any amount is unresolved. MYOB Makes the file in the MYOB layout. See Export a MYOB payroll file for every column. Employment Hero Makes the file in the Employment Hero layout. See Export an Employment Hero payroll file for every column. Cancel Closes the window. It is greyed out while a file is being made. Download the same saved batch again Appears only after an export, when you open the window again for the same period without leaving the Timesheets screen. It downloads exactly the same file again. Warning: There is no preview. Choosing MYOB or Employment Hero makes the file and downloads it at once. Check the period and the tick box first.
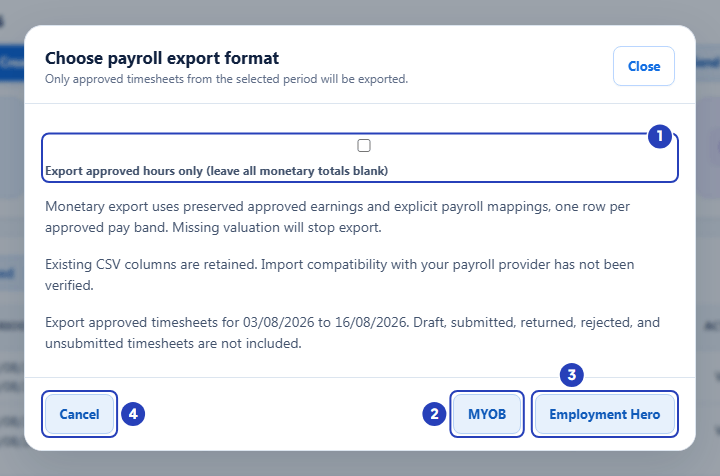
Decide about approved hours only (1), then choose MYOB (2) or Employment Hero (3). Cancel (4) closes the window. -
Check the downloaded file
1 A message says Preparing payroll export... and then Payroll export downloaded. Your browser saves a file whose name starts with myob-timesheets- or employment-hero-timesheets-, followed by the first and last dates of the period, for example myob-timesheets-2026-08-03-to-2026-08-16.csv.
2 Open the file in a spreadsheet. The first row holds the column headings. Each following row is one part of a shift that is paid in one way. A sleepover, for example, takes more than one row: the hours before it, the sleepover allowance and the hours after it.
3 Check that the people, dates and hours match the approved timesheets. If a person is missing, their timesheet is not approved, is in another period, or is outside the people you are allowed to see.
Important: BondiByte only prepares the file. The window says Import compatibility with your payroll provider has not been verified. Check the file against your payroll system's import, for example with one person first, before you rely on it.
-
Download the same file again if you need it
1 If you need the file again, for example because it was lost, choose Export Payroll again without leaving the Timesheets screen, for the same period. Check Export approved hours only (leave all monetary totals blank) each time you open the window, because the tick stays as you left it until you leave the Timesheets screen.
2 Choose Download the same saved batch again. You get exactly the same file as before, even if more timesheets have been approved since.
If you leave the screen and come back, the button is gone. A new export then makes a new file from the timesheets that are approved at that moment.
What happens next
Your browser saves the file. Take it to your payroll system and import it with that system's own import. BondiByte does not send it.
The approved timesheets do not change when you export. You can export the same period again, and each export is a separate file.
To send approved timesheets to Xero Payroll instead of making a file, choose Send to Xero. See the Xero Payroll guide.
Important notes
Important: Only approved timesheets are exported. A timesheet that is Submitted, Returned, Draft or not submitted at all is left out of the file.
Note: A file is made from the timesheets that are approved at the moment you export. Timesheets approved later are not in an earlier file. Export again after approving more, and import only the file you need, so that nobody is paid twice.
Good practice
- Check the Submitted, Returned and Not submitted cards before you export. A person missing from the file almost always has a timesheet that is not approved yet.
- Export once for each pay run, when everything is approved. Importing two files for the same period into payroll pays the same hours twice.
- If you lose the file, use Download the same saved batch again rather than exporting afresh, so the second file is the same as the first.
- Enter your payroll IDs in Payroll CSV mappings before the pay run, not on the day. Publishing a new version does not change files you already exported.
- Try your payroll system's import with one person or a short period first. The window says import compatibility has not been verified, and a small test shows any difference early.
- Use approved hours only when the pay is not resolved yet. The Total column is then blank, and your payroll system works out the pay from the hours.
Troubleshooting
I cannot use Export Payroll. It is greyed out and pointing at it says Payroll export permission is required.
Why it happens: Your role does not include Can export payroll timesheets.
What to do: Ask an Owner or Admin to add the permission to your role in Configuration > Roles & Permissions.
A message says No approved timesheets were found for the selected period.
Why it happens: No timesheet is approved in the period under Selected period, or the approved ones belong to staff you are not allowed to see.
What to do: Check the dates under Selected period and the Approved card. Approve the timesheets first, or move to the right period. See Approve timesheets.
A message says Approved earnings are incomplete or historically unknown. Resolve the outstanding decisions, or deliberately select approved hours only.
Why it happens: At least one approved timesheet has pay that is not resolved, or was approved before pay was kept with it, so a file with dollar amounts cannot be made.
What to do: Resolve the pay on those timesheets if you can, or tick Export approved hours only (leave all monetary totals blank) and choose the format again.
A message says Configure payroll CSV mappings before exporting monetary earnings.
Why it happens: No payroll IDs have been saved for the format you chose, and a file with amounts needs them.
What to do: Choose Payroll CSV mappings, enter your IDs for that format and choose Publish new mapping version, or tick approved hours only.
A message says A payroll staff, site or pay-category ID is missing. Complete the CSV mappings before monetary export.
Why it happens: Someone in the file, or their site, or a kind of pay, has no payroll ID in the saved mapping for that format.
What to do: Open Payroll CSV mappings, choose the same format, fill the blank rows on Staff, Sites and Pay categories, and publish a new version.
A message says an item's rate is managed in Xero and cannot be included in a monetary export.
Why it happens: One of the pay items is priced in Xero Payroll, so BondiByte does not put a dollar amount for it in a file.
What to do: Tick approved hours only, or send the timesheets to Xero Payroll with Send to Xero.
The employee ID column of the file holds email addresses, or the Total column is empty.
Why it happens: You exported approved hours only. That file has no payroll IDs and no amounts.
What to do: For a file with IDs and amounts, leave the tick box empty, resolve the pay, and enter your IDs in Payroll CSV mappings.
A message in the Payroll CSV mappings window says External IDs must be plain identifiers, up to 200 characters.
Why it happens: A Payroll external ID is longer than 200 characters, starts with =, +, - or @, or contains a line break or tab.
What to do: Correct the ID so it is plain text of up to 200 characters, then choose Publish new mapping version again.
Payroll CSV mappings is missing.
Why it happens: Your role does not include Can manage pay levels.
What to do: Ask an Owner or Admin to add the permission to your role, or to enter the IDs for you.
Questions and answers
Does exporting change the timesheets?
No. The timesheets stay approved and nothing is marked as paid or sent. You can export the same period again, and each export is a separate file.
Does BondiByte send the file to MYOB or Employment Hero?
No. BondiByte makes the file and your browser saves it. You import it with your payroll system's own import. The window says import compatibility with your payroll provider has not been verified.
Can I choose the dates for the export?
No. The file covers the period under Selected period. Use Previous, Next, Last completed or Current period to change it.