

Who this is for
This guide is written for Support Worker.
Before you begin
- To build your timesheet with one tap, using Generate timesheet, an Owner or Admin must have switched on Staff smart-generate timesheets in Account settings > Automation & Capacity Controls. Without it you add your shifts by hand, as in step 2. The Owner or Admin steps are in Timesheets overview.
- You are signed in to the Staff App. See Sign in to the Staff App.
- You have worked shifts in the period. Timesheets are made from your shifts.
Steps
The screenshots show a demonstration organisation with made-up names. Your own screens show your organisation's details. Select a screenshot to open it full size.
-
Open BondiByte Staff > Timesheets
1 In the menu at the bottom of the screen, tap Timesheets. The screen says Review and submit your hours.
2 The box at the top shows the Period you are looking at, the Status of your timesheet, your Total hours and the number of Lines. It opens on the current period.
Note: If there is no timesheet for the period yet, Status says Not generated and the list at the bottom says No timesheets yet.
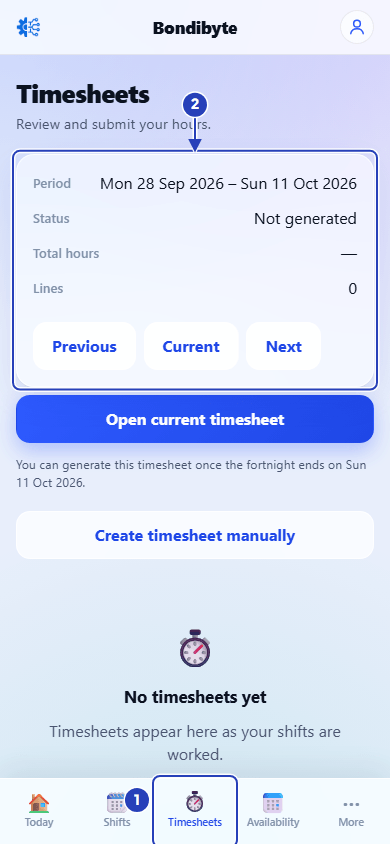
Tap Timesheets (1). The box at the top shows the period, its status and your hours (2). -
Add your shifts if the timesheet is not there yet
Skip this step if you already have a timesheet for the period.
Tap Create timesheet manually. A box opens that says Add each shift you worked this period, then open the timesheet to adjust hours and submit.
1 In Shift, choose a shift you worked.
2 Tap Add shift. The message Shift added to your timesheet. shows. Do the same for each shift you worked.
When you already have a timesheet and need to add another shift, the button says Add a shift manually. Tap Close manual builder when you have finished.
Once the period has ended, you may see Generate timesheet instead, or Re-generate when you already have a draft. Tap it and the timesheet opens with your shifts on it. Re-generate updates a draft from your latest shifts. These buttons show only when your organisation lets staff generate their own timesheets. Until the period ends, the screen says You can generate this timesheet once the fortnight ends and gives the date.
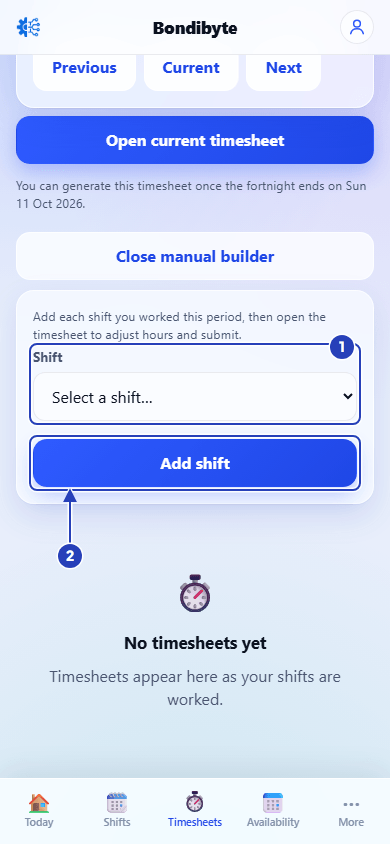
Choose a shift you worked in Shift (1), then tap Add shift (2). -
Choose the period you want
1 Tap Previous to go back one period. Tap it again to go back further.
2 Tap Current to come back to the current period.
3 Tap Next to go forward.
Under the buttons, each timesheet for the period is a card with its dates, your hours and its status, such as Draft or Approved.
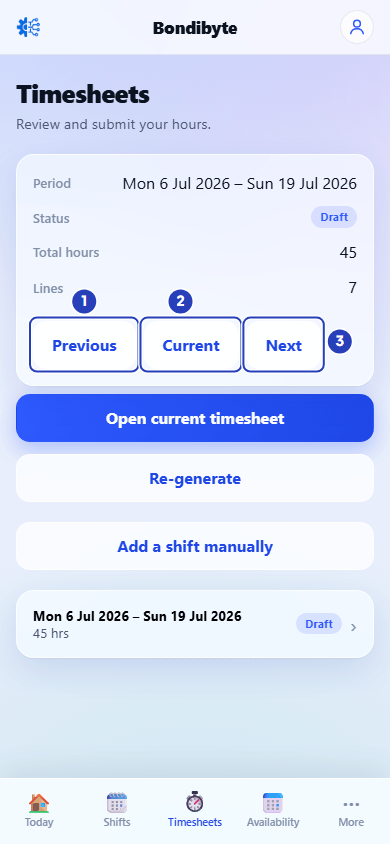
Tap Previous (1) to go back, Current (2) to return to this period, or Next (3) to go forward. -
Open the timesheet
Tap the timesheet card. For the current period you can also tap Open current timesheet. The Timesheet screen opens.
1 The box at the top shows the period, the status and your hours. The status is Draft, Ready to submit, Awaiting approval, Returned or Approved.
2 Under Shifts, each shift you worked is a card with the shift name, the site, the date and the times, then its lines, such as Worked hours.
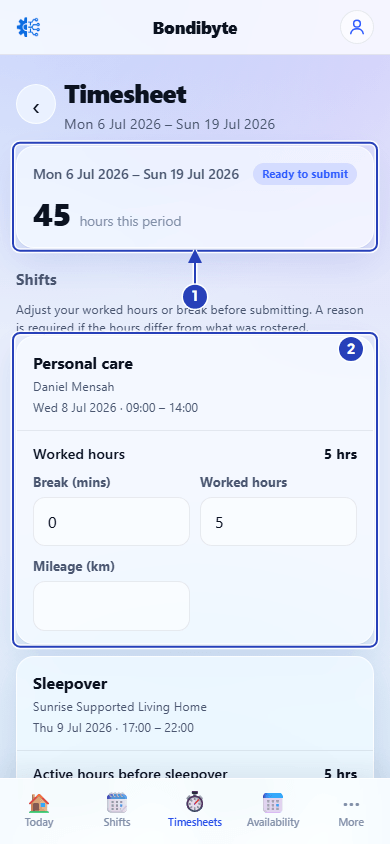
The top box shows the period, the status and your hours (1). Each shift is a card (2). -
Check your hours and change them if needed
You can change a timesheet while its status is Draft, Ready to submit or Returned.
1 On each shift, check Worked hours. Change it if it is wrong. Check Break (mins) and Mileage (km) too.
2 If you change Worked hours, the line says changed and Reason for change (required) appears. Type why the hours are different from what was rostered.
Fields in step 5 Field What it means Break (mins) Your break, in minutes. Worked hours The hours you worked on the shift, for example 4.5. Mileage (km) Kilometres you travelled for the shift. Leave it empty if there were none. Reason for change (required) Why your hours are different from what was rostered. It appears when you change Worked hours. Note: Some lines show a count, such as x 1 for Sleepover allowance. They have no boxes to change.
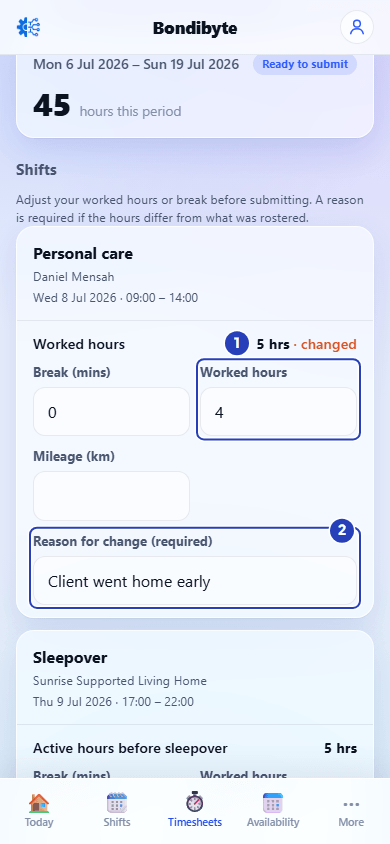
Check the worked hours (1). If you change them, type the reason (2). -
Add a note, then submit
Under Notes, type anything your coordinator should know. This is optional.
1 Tap Save changes to keep your changes without submitting. The message Changes saved. shows. Unsaved changes shows beside the button until you save.
2 When the box at the bottom says Ready to submit., tap Submit timesheet. The message Timesheet submitted. shows.
Important: You cannot submit a timesheet that includes shifts that have not been worked yet. The box at the bottom says This timesheet includes future shifts. Submit it after those shifts have been worked.
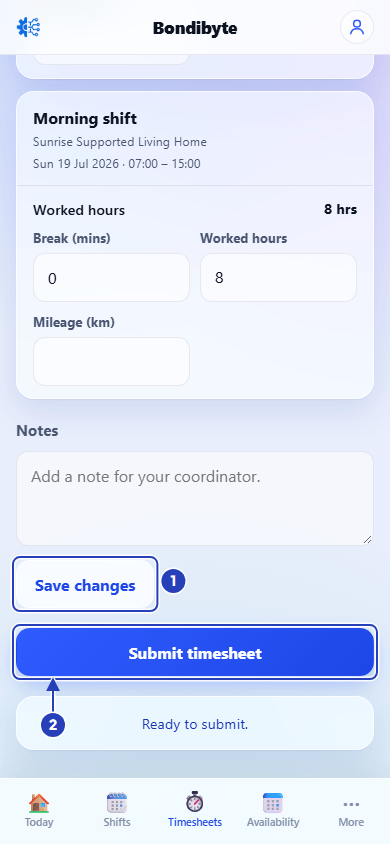
Tap Save changes (1) to keep your changes, or tap Submit timesheet (2) to send the timesheet for approval. -
See what happens after you submit
The status changes to Awaiting approval and the box at the bottom says Awaiting manager approval. You cannot change the timesheet now.
If your manager returns it, the status is Returned, a Manager note shows at the top and the box says Returned for changes. Update and resubmit. Make the changes and tap Submit timesheet again.
When your manager approves it, the box says Approved. This timesheet is locked.
What happens next
Your manager or office reviews the timesheet in BondiByte. See Timesheets overview for how the office side works.
Next, see View your shifts and Notifications.
Important notes
Important: A timesheet is locked once it is approved. Check your hours and add a reason for any change before you submit.
Good practice
- Check each shift against your own record of the hours you worked before you submit, and give a reason for every change.
- Use the Notes box to tell your coordinator about anything unusual, such as a shift that ran over.
- Submit as soon as the period has ended, so your manager can approve it sooner.
Troubleshooting
Generate timesheet is missing.
Why it happens: The period has not ended yet, or your organisation has not switched on Staff smart-generate timesheets, or its automation capacity is used up.
What to do: Until the period ends, the screen shows the date you can generate it. After that, use Create timesheet manually to add your shifts. Ask an Owner or Admin to check Staff smart-generate timesheets in Account settings > Automation & Capacity Controls. See Timesheets overview.
A message says No timesheet exists for the current period yet. Add your worked shifts with the manual builder below.
Why it happens: You tapped Open current timesheet and no timesheet has been made for the period.
What to do: Tap Create timesheet manually and add your shifts, as in step 2.
The list of shifts says No more shifts are available to add for this period.
Why it happens: Every shift you can add is already on your timesheet, or there are none to add.
What to do: If a shift is missing, ask your coordinator to check that you are rostered on it.
A message says Add a reason for the changed hours.
Why it happens: You changed Worked hours on a shift and left Reason for change (required) empty.
What to do: Type why the hours are different, then tap Save changes or Submit timesheet again.
Submit timesheet is greyed out, or a message says This timesheet has no shift lines yet.
Why it happens: The timesheet has no shifts on it, or it includes shifts that have not been worked yet, or a changed shift has no reason.
What to do: Read the box at the bottom, it says which. Add your shifts, wait until the shifts have been worked, or add the missing reason.
A message says Mileage cannot be negative. or Mileage must be 9999.99 km or less.
Why it happens: The number in Mileage (km) is not allowed.
What to do: Type the kilometres as a number that is zero or more, up to 9999.99, or leave the box empty if there was no travel. Then tap Save changes or Submit timesheet again.
The screen says This timesheet is read-only.
Why it happens: The timesheet is waiting for approval or has been approved, so it cannot be changed.
What to do: If something is wrong, ask your coordinator to return the timesheet to you.
A message says No worked shifts could be added for this period.
Why it happens: You tapped Generate timesheet and there are no worked shifts for you in the period.
What to do: Check the period with Previous and Next. Ask your coordinator if you expected a shift.