

Who this is for
This guide is written for Owner, Admin and Manager.
Before you begin
- Timesheets is in your left menu, under Operations. It shows for roles that include Can view timesheets. An Owner or Admin can add that permission to a role in Configuration > Roles & Permissions. See Roles and permissions basics.
- You are signed in to BondiByte on a computer.
- A staff member has submitted a timesheet for the period you want to review. You can read a draft, but you cannot change it until the staff member submits it. See Timesheets overview for what each status means.
- Optional: the Pay interpretation section on a timesheet appears only when Pay Levels is switched on. An Owner or Admin switches it on in Account settings > Automation & Capacity Controls > Pay Levels and automatic interpretation, by choosing Enable and then Enable and prepare. The card shows Preparing and then Ready to confirm. Choose Review and confirm, look over the setup on the Pay Levels page and choose I've reviewed the setup: enable interpretation. The section appears when the card says On. See Pay Levels. Without it the review window shows hours only.
Steps
The screenshots show a demonstration organisation with made-up names. Your own screens show your organisation's details. Select a screenshot to open it full size.
-
Go to Timesheets > choose the period
1 In the left menu, under Operations, choose Timesheets. The Timesheet review screen opens on the last period that has finished.
2 Check the dates under Selected period. The screen shows only the timesheets of that period.
3 To look at another period, choose Previous or Next, Last completed, or Current period. Choose Refresh to load the timesheets again and see changes other people have made.
Note: Each period is one period of your organisation's roster cycle, Fortnightly or Monthly. An Owner or Admin sets it in Configuration > Rostering rules > Organisation Settings. You cannot choose other dates.
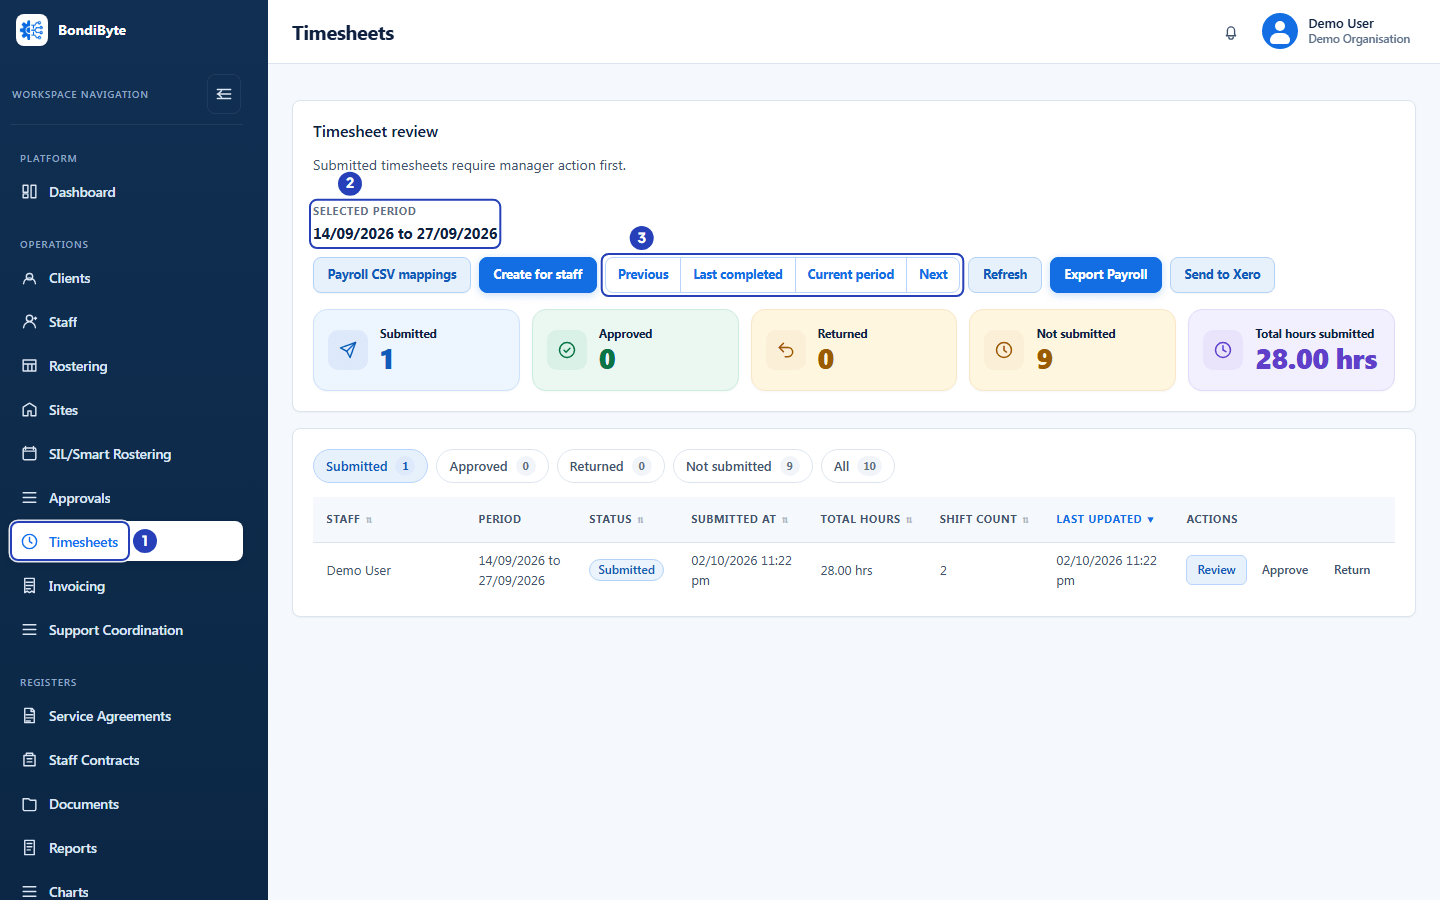
Choose Timesheets in the left menu (1), check the dates under Selected period (2) and use the period buttons if you need another period (3). -
Read the summary cards and open a timesheet
1 Read the five summary cards. The first four count the timesheets of the period. Total hours submitted adds up the hours of the submitted and approved ones.
2 Choose a status button to show only those timesheets. The number on each button is how many there are. The screen opens on Submitted.
3 To sort the table, choose a column heading, and choose it again to reverse the order. Period and Actions cannot be sorted. The table starts with Last updated, newest first.
4 On the person's row, choose Review if the status is Submitted, or View for any other status. The review window opens.
Fields in step 2 Field What it means Submitted Button and card. Timesheets staff have submitted that wait for a manager. Check this first. Approved Button and card. Timesheets a manager has approved. Only these go into a payroll export. Returned Button and card. Timesheets sent back to the staff member for changes. They show under Submitted again when the person submits them again. Not submitted Button and card. Staff who have shifts in the period but no submitted timesheet. It has its own table, described in step 8. All Button only. Every timesheet of the period in every status, including drafts and any older Rejected timesheets. Total hours submitted Card only. The hours of the submitted and approved timesheets added together. Table columns Staff, Period, Status (Draft, Submitted, Approved or Returned), Submitted at (a dash until submitted), Total hours, Shift count and Last updated (when it last changed). Actions Review or View opens the timesheet. Approve and Return work only while the status is Submitted. Without Can approve or return timesheets you see only Review or View. 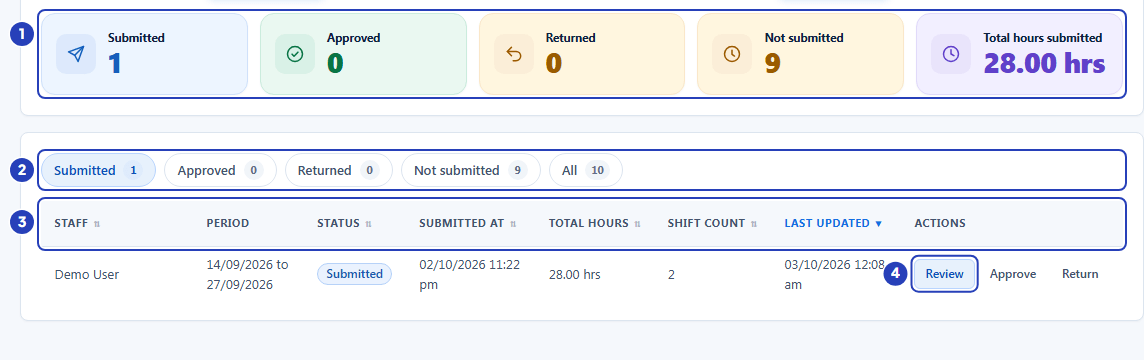
Read the summary cards (1), choose a status button (2), sort with a column heading (3) and choose Review on the person's row (4). -
Read the top of the review window
The review window opens over the screen. Opening and closing it change nothing. Nothing is saved until you choose a button at the bottom.
1 At the top, read the person's name. Under it are the dates after Timesheet, and the status label is on the right.
2 Read the five tiles under it.
If the timesheet was returned before, a box headed Returned by shows who returned it and the Return reason.
Fields in step 3 Field What it means Total hours All the hours on the timesheet. Shift count The number of shifts. It can be lower than the number of cards under Shift lines, because a sleepover can take several cards. Submitted When the staff member submitted it. After a return, it shows the latest submission. Approved by The manager who approved it. A dash until it is approved. Total mileage The kilometres on all the cards added together, for example 52.25 km. A dash means none. 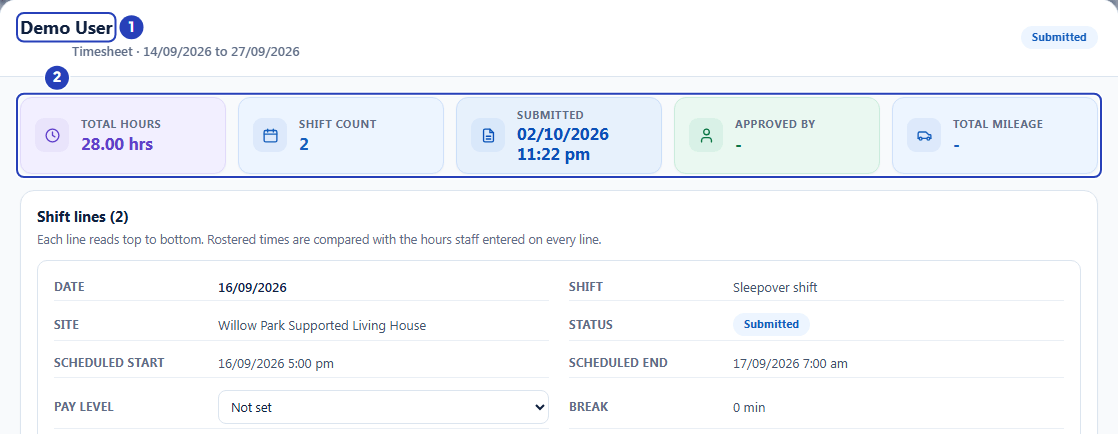
Read the person's name, the period and the status label (1), then the five tiles (2). -
Check each shift line
Under Shift lines each shift, or part of a shift, has its own card. A sleepover can take several cards: the hours before it, the sleepover itself, shown as x 1, and the hours after it.
1 Check Date, Shift and Site to confirm the work. Then compare Scheduled start and Scheduled end, the rostered times, with the staff member's entries.
2 Read Hours / unit. It shows the hours the staff member entered, or x and a number for an allowance, such as x 1 for one sleepover allowance.
3 Read Hours check, then Staff notes and Adjustment reason under it. If the entered hours match the roster it says Roster hours: and the hours. If they differ it says different from entered hours, with both numbers, and the card is highlighted. Staff must give a reason when they change hours.
Fields in step 4 Field What it means Date, Shift, Site The day, the title of the shift and the site where it happened. Status The status of this card. It matches the timesheet, for example Submitted. Scheduled start, Scheduled end When the shift was rostered to start and finish, in the time of the site. Pay level The pay item for this card. It starts as Not set. See the next step. Break Break time in minutes, for example 0 min. Staff enter it in the Staff App. Hours / unit The hours entered, such as 8.00 hrs, or x and a number for an allowance. Mileage (km) Kilometres driven on this shift. See the next step. Hours check Compares the rostered hours with the entered hours. It says Roster hours not applicable for an allowance, and Roster hours unavailable when the rostered times are missing. Staff notes, Adjustment reason What the staff member typed about the shift, and why they changed the hours. A dash means none. 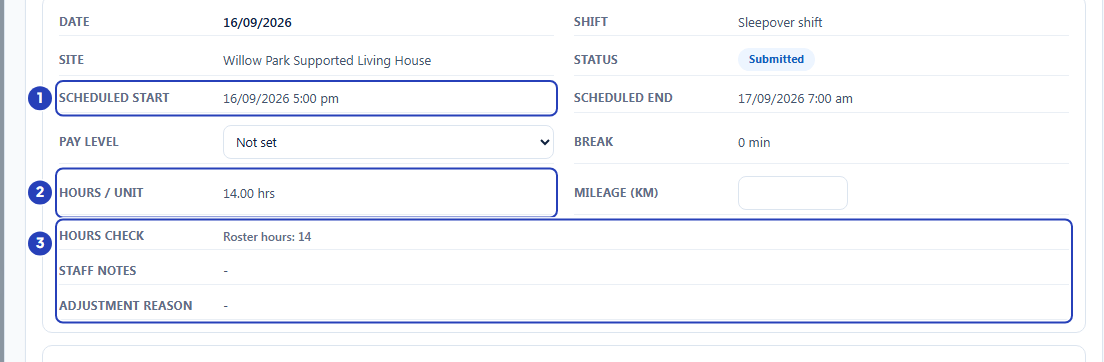
Compare the scheduled times with the staff member's entries (1), read the hours (2), then read the hours check and the notes (3). -
Add mileage, a Pay Level or manager notes and save
You can make changes only while the status is Submitted or Returned and you have Can generate timesheets. Without that permission the Pay Level and mileage show as plain text. In any other status the boxes are greyed out. Either way Manager notes is read only. The changes are saved together.
1 In Pay level on a card, choose the pay item that applies, or leave Not set. The list shows the items of the staff member's Pay Level with their rates. The box is greyed out without Can manage pay levels, and when Pay Rules are in use. Then it says to use Pay interpretation instead.
2 In Mileage (km), type the kilometres driven on that shift, from 0 to 9999.99. Leave it blank for none.
3 In Manager notes, under Manager review, write anything payroll, audit or the staff member should know.
4 Choose Save manager notes at the bottom left. A message says Timesheet saved (notes, pay levels and mileage).
Fields in step 5 Field What it means Pay level Optional. Not set, or an item of the staff member's Pay Level shown with its rate and unit. Starts as Not set, or as the item already chosen. Mileage (km) Optional. A number from 0 to 9999.99. After you save, it counts in Total mileage at the top. Staff usually enter it in the Staff App. Manager notes Optional free text for the whole timesheet. Starts empty. Read only once the timesheet is approved. Save manager notes Saves the notes, pay selections and mileage together. It does not approve or return the timesheet. Warning: Manager notes are locked once a timesheet is approved. Save them before you approve.
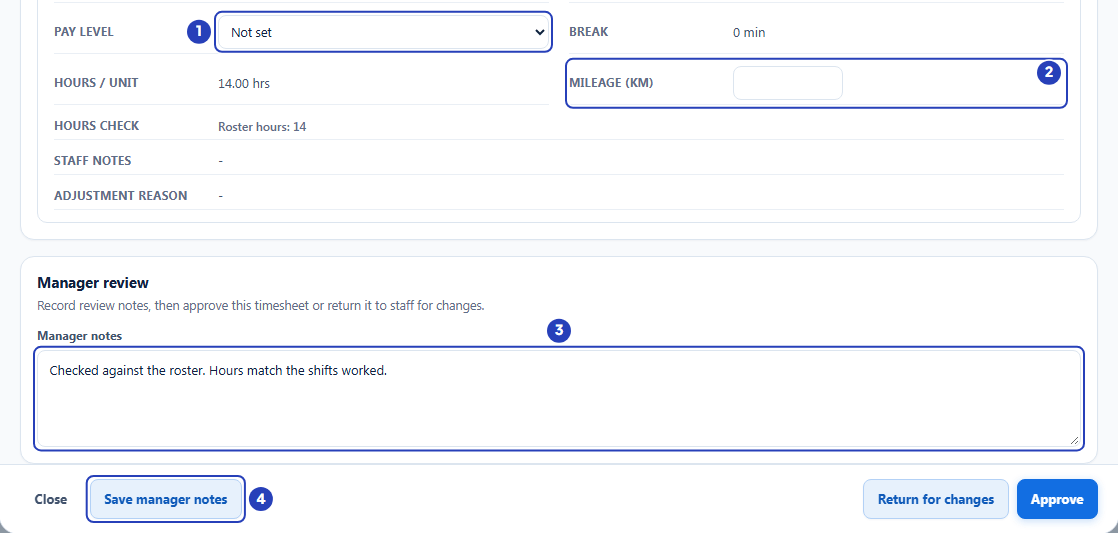
Choose a Pay Level (1), type the mileage (2), write your manager notes (3) and choose Save manager notes (4). -
Read the Pay interpretation section
If Pay Levels is switched on, a Pay interpretation section sits under Manager review. It shows how BondiByte has worked out the pay for each part of the shift lines from your Pay Rules. It helps you see what is priced and what needs a decision. Your organisation checks the result.
1 Read the first line: Revision and a number, then RESOLVED or UNRESOLVED, then Total in dollars or Unresolved.
2 Read the list under it. Each line says in plain words why something could not be priced.
3 For each work part, read the table: Local interval, Item, Quantity, Rate, Amount and Explanation. A blank Rate and Amount means it could not be priced.
4 To record a decision, use Manager selection and allocation under the table.
Fields in step 6 Field What it means Pay item Optional. Starts as Keep configured selection. Choose another item to price that part with it. Allocate a recorded break Optional button. Adds a row with Break start and Break end for a break that was taken. The end must be after the start. Reason Required. Why you chose that item or allocated that break. It is kept with the timesheet. Save pay review Greyed out until there is a Reason and a Pay item or a break. A message says Pay review saved with its reason and reviewed version. Needs Can generate timesheets and Can manage pay levels. Important: Unresolved amounts stay blank. You can approve a timesheet with unresolved amounts, but the pay cannot be changed after approval, and a payroll export with dollar amounts is refused until they are resolved.
Note: Without Can view pay levels this section says Detailed pay interpretation requires Staff Pay view permission; hours review remains available.
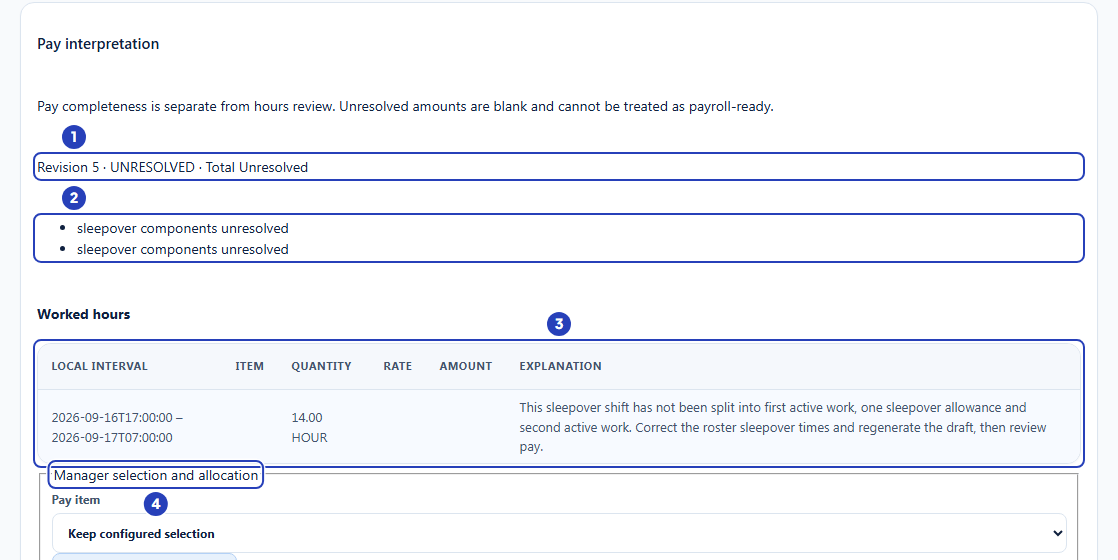
Read the revision and total (1), the list of problems (2), the table for each work part (3) and the manager selection box (4). -
Check the approval history and close the window
1 Scroll to Approval history. Each line reads like Draft to Submitted with the date, time and the person who made the change, and the reason when there is one.
Choose Close at the bottom left of the window to leave it. Closing saves nothing.
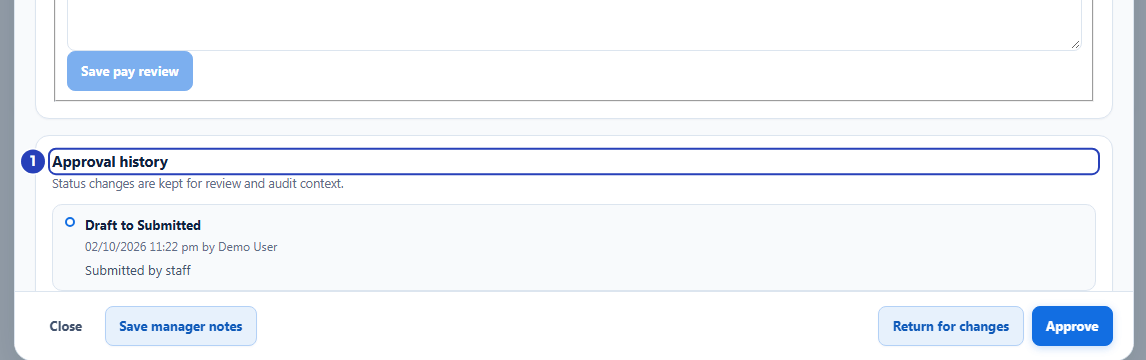
Read the approval history (1). The Close button is at the bottom left of the window. -
Follow up staff who have not submitted
1 Choose Not submitted. The table changes to Staff, Period, Eligible shifts, Status and Actions.
2 Read Eligible shifts, the number of the person's shifts in the period that can go on a timesheet. Status says Draft when a draft exists, or Not submitted when there is none.
3 Choose View on a row with a draft to read it. A manager cannot submit a timesheet for someone else, so ask the person to submit it in the Staff App. A row with no draft says Waiting for staff submission.
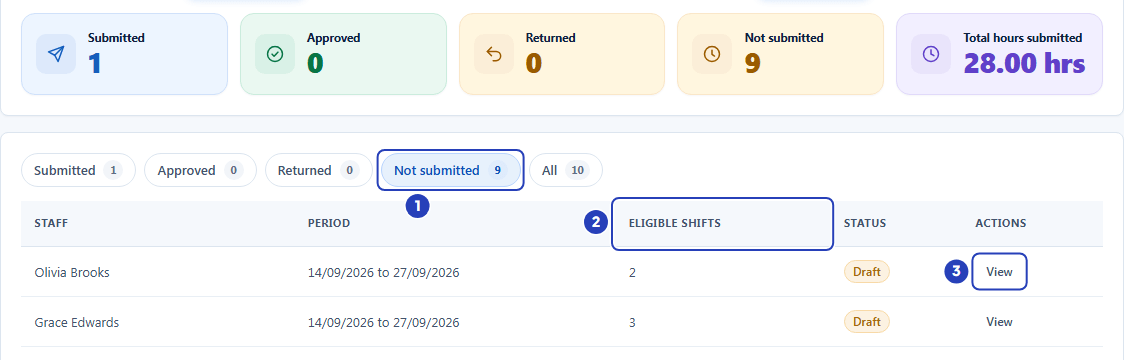
Choose Not submitted (1), read the Eligible shifts column (2) and choose View to read a draft (3). -
Create a draft for a staff member if one is missing
If a staff member has not generated their timesheet, you can create the draft for them. They still have to check and submit it.
1 Choose Create for staff at the top of the screen. In Date within pay period of the Create timesheet for staff window, choose any date inside the period.
2 In Staff member, choose the person. The list shows only the people you are allowed to see.
3 Choose Preview shifts. The window lists Eligible assigned shifts with a count, and Excluded shifts with the reason for each shift that cannot be used.
4 Check the list. If a timesheet already exists, the window says so, for example An existing Draft timesheet was found. Opening it does not regenerate it.
5 Choose Create draft. When a draft already exists the button says Regenerate eligible draft, and Open existing timesheet appears beside it. A message says Draft created. Staff must still review and submit it. and the draft opens.
Fields in step 9 Field What it means Date within pay period Required. Any date inside the period you want. Pay period under the boxes shows the dates it falls in. Starts as the first day of the selected period. Staff member Required. One person within your access. The list says No staff are available within your access scope. when there are none. Preview shifts Shows what a draft would hold without making anything. Greyed out until you choose a person and a date. Create draft, Regenerate eligible draft Makes the draft, or refreshes an existing draft from the shifts that are eligible now. Greyed out until you preview, and when the timesheet is Submitted or Approved. Open existing timesheet, Cancel Opens the timesheet that already exists for that person and period, or closes the window without making anything. Important: Creating a draft does not submit it and does not tell the staff member. They must still check and submit it in the Staff App before it can be approved.
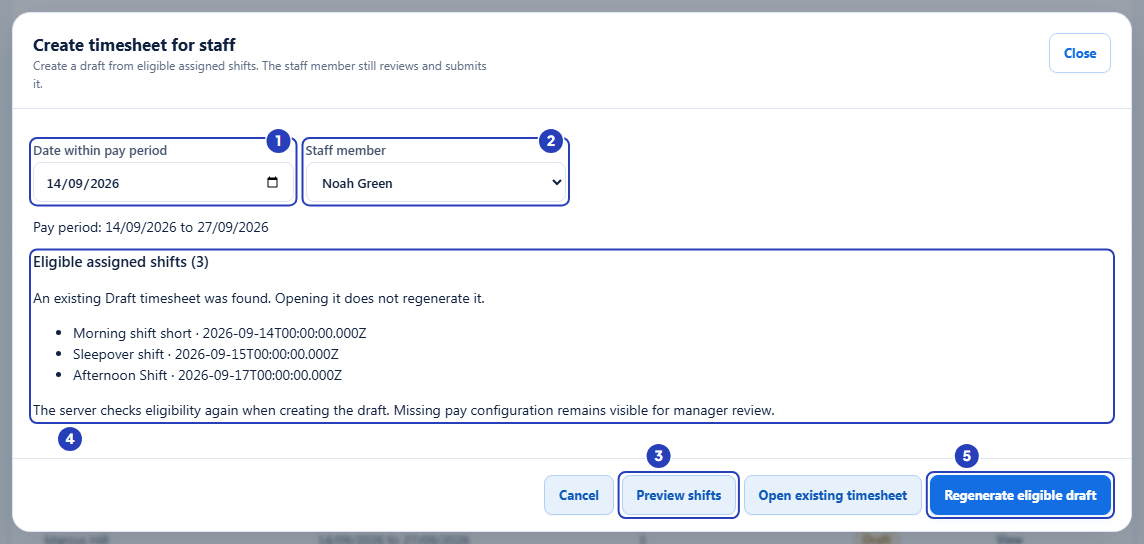
Choose a date (1) and a staff member (2), choose Preview shifts (3), check the eligible shifts (4) and choose Create draft (5). The button reads Regenerate eligible draft when the person already has a draft, as shown here.
What happens next
A submitted timesheet stays under Submitted until a manager approves it or returns it. See Approve timesheets.
Saving manager notes, mileage or a pay selection does not change the status and does not tell the staff member.
When every timesheet in the period is approved, you can export them for payroll. See Export payroll.
Important notes
Important: Looking at a timesheet is safe. Only Save manager notes, Save pay review, Approve, Return and Create draft change anything.
Note: A Manager sees the timesheets of staff whose Manager / supervisor is that Manager. If a timesheet seems to be missing, check that field on the staff record and the dates under Selected period.
Good practice
- Read Hours check on every card before you approve. A highlighted card means the hours differ from the roster, so ask what happened or return the timesheet with the shift and time to fix.
- Look at Not submitted before each payroll cut-off. People with shifts but no submitted timesheet are the usual reason a pay run is late.
- Make your changes in one go and choose Save manager notes once. Pay selections, mileage and notes are saved together, and they cannot be changed after approval.
- Write Manager notes as if payroll or an auditor will read them later: what you checked and any decision you made.
Troubleshooting
I cannot see Timesheets in the left menu.
Why it happens: Your role does not include Can view timesheets.
What to do: Ask an Owner or Admin to add the permission to your role in Configuration > Roles & Permissions.
A person has submitted their timesheet but I cannot see it.
Why it happens: It is in another period, or you are a Manager and the person's Manager / supervisor is not you.
What to do: Check the dates under Selected period. Ask an Owner or Admin to check the person's Manager / supervisor.
The Save manager notes button is missing, or the boxes cannot be changed.
Why it happens: The status is not Submitted or Returned, or your role does not include Can generate timesheets.
What to do: Wait for the staff member to submit a draft, or ask an Owner or Admin to check your role.
A message says This timesheet cannot be edited in its current status.
Why it happens: The status changed while the window was open, for example someone else approved the timesheet.
What to do: Close the window, choose Refresh and open the timesheet again.
A message says Mileage must be a valid number., Mileage cannot be negative. or Mileage must be 9999.99 km or less.
Why it happens: Mileage (km) is not a number from 0 to 9999.99.
What to do: Type a plain number in that range, or clear the box.
The Pay interpretation section is missing.
Why it happens: Pay Levels is not switched on, or its setup is not confirmed yet.
What to do: An Owner or Admin switches it on in Account settings > Automation & Capacity Controls > Pay Levels and automatic interpretation. If the card says Ready to confirm, finish the setup on the Pay Levels page.
The Create for staff button is missing, or Create draft is greyed out.
Why it happens: Your role does not include Can generate timesheets, or the person's timesheet for that period is already Submitted or Approved. The window then says This timesheet is submitted or approved. Open the existing record.
What to do: Ask an Owner or Admin to check your role, or choose Open existing timesheet.
Preview shifts says No eligible assigned shifts were found for this staff member and period.
Why it happens: No shift in that period can go on a timesheet, or the date is in another period.
What to do: Check Pay period and Date within pay period. Read any Excluded shifts.
A message says The shifts or timesheet changed. Preview again before creating the draft.
Why it happens: Someone changed the shifts or timesheet after Preview shifts.
What to do: Choose Preview shifts again, then Create draft.