

Who this is for
This guide is written for Owner, Admin, Manager and Compliance Officer.
Before you begin
- Read the Audit Centre overview for what an audit session is.
- Audit Centre automation is on in Account settings > Automation & Capacity Controls. It is on unless an Owner or Admin has switched it off. While it is off, Generate selected and Download evidence pack (ZIP) do not work. See Automation Capacity.
- You know when the audit will run and when the auditor's access should open and close.
Steps
The screenshots show a demonstration organisation with made-up names. Your own screens show your organisation's details. Select a screenshot to open it full size.
-
Go to Audit Centre > Audit sessions > Create session
1 In the left menu, under Administration, choose Audit Centre, then choose the Audit sessions tab.
2 Choose Create session at the top right of the list. The Create audit session window opens. The next two steps fill it in.
3 Each existing session is a card with its name, its type, a status label such as Draft, and Expires, the time its auditor access ends. Choose a card to open that session.
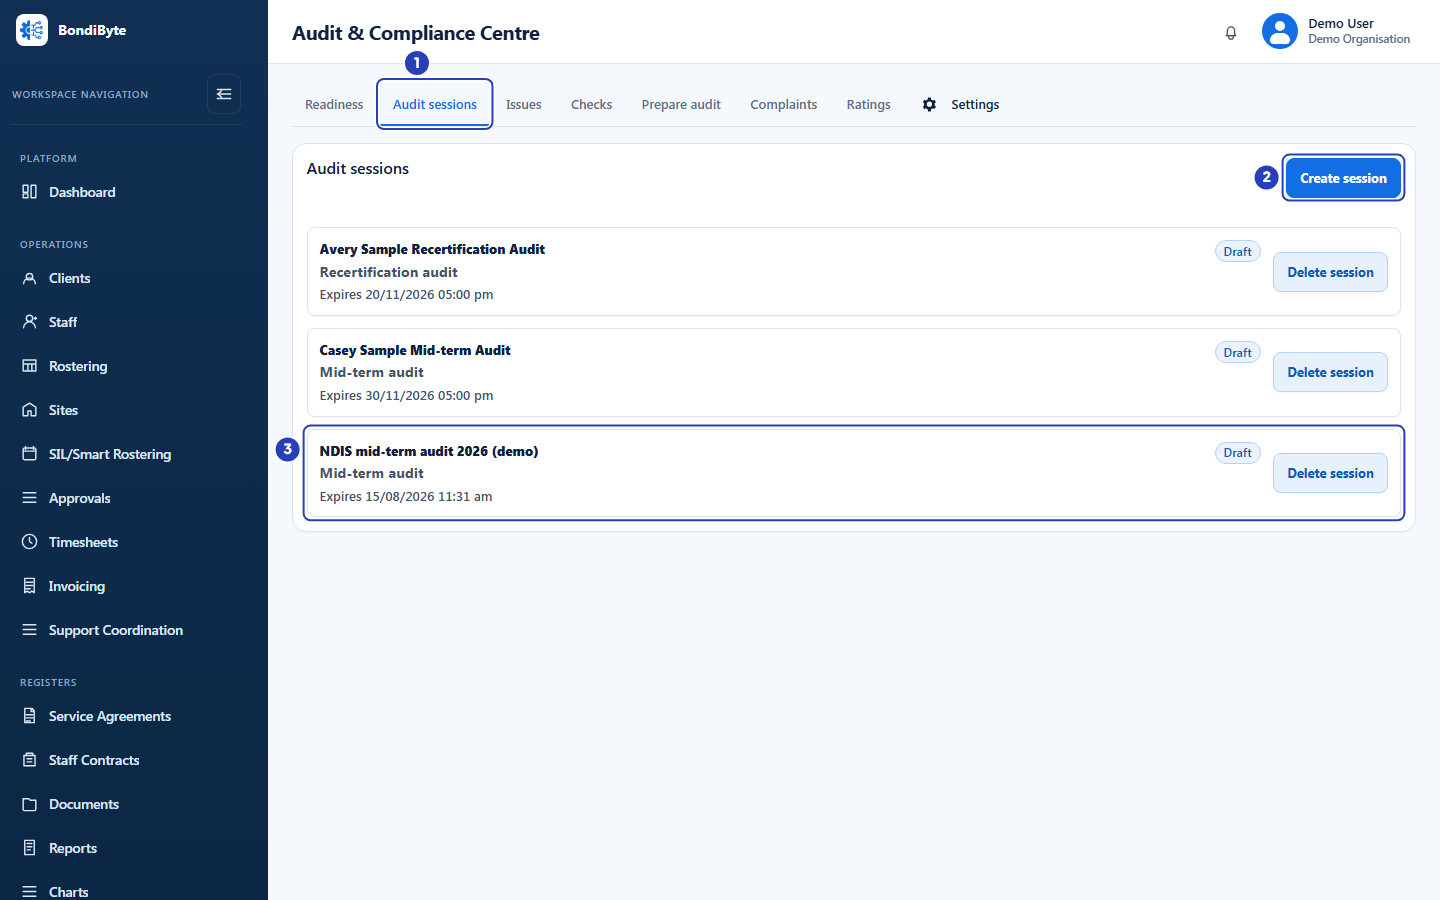
Choose the Audit sessions tab (1), then Create session (2). Each session is a card (3). -
Describe the session
1 In Audit name, type a name you will recognise. This is required.
2 In Audit type, choose the closest type.
3 In Auditor organisation, type the audit firm, if you know it.
4 In Audit start date and Audit end date, choose the days the audit is expected to run.
Fields in step 2 Field What it means Audit name Required. Shown on the session card and at the top of the session. A name with the year in it is easier to find later. Audit type Starts as Verification audit. Shown on the session card. Auditor organisation Optional. The name of the audit firm, for your own records. Audit start date, Audit end date Optional. The days the audit is expected to run. They appear in the invitation email the auditor receives. 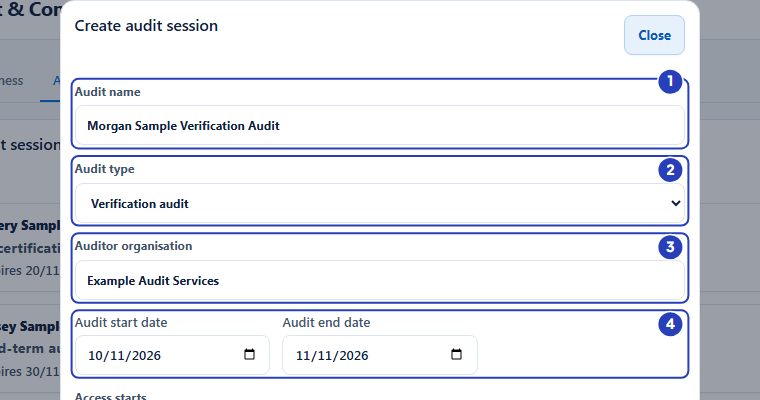
Type the audit name (1), check the audit type (2), add the auditor organisation (3) and choose the audit dates (4). -
Set the auditor's access, then create the session
1 In Access starts, choose the date and time the auditor's access opens. This is required.
2 In Access expires, choose when access ends. This is required, and it must be later than Access starts.
3 In Scope notes, describe what the audit covers.
4 Tick Allow downloads by default if auditors may open and download the registers you generate. It is not ticked to start. You can change it for each file later.
5 Leave Allow auditor requests ticked if auditors may ask you for more files.
6 Choose Create session. Choose Cancel, or Close at the top of the window, to leave without saving.
A message confirms Audit session created. Upload the files you want the auditor to see. The new session opens on its Evidence tab with the status Draft. BondiByte opens and closes the auditor's access at the times you set.
Note: The note under Access starts says Login details are emailed to the auditor when it opens. If you add the auditor before that time, check their card when access opens. See Give an auditor access.
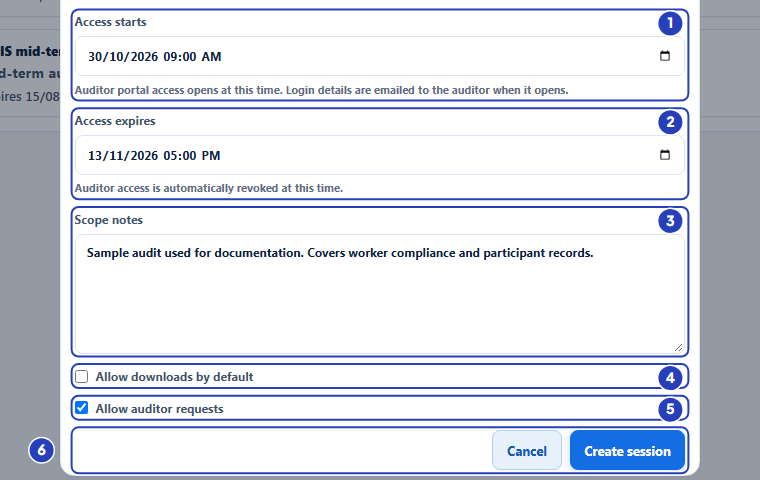
Choose when access starts (1) and expires (2), add scope notes (3), set the two tick boxes (4 and 5), then choose Create session (6). -
Upload your own files
You can upload your own files, generate registers from your records in the next steps, or do both.
1 On the Evidence tab, Uploaded files lists every file in the session. A new session says No files uploaded.
2 In Upload file evidence, type an Evidence title, or leave it blank to use the file name.
3 In Description, say what the file is.
4 Under File, choose Choose File and pick the file from your computer.
5 Leave the two tick boxes as they are unless you need to change them. Neither one shares the file.
6 Choose Upload to audit. A message says File uploaded to the audit evidence list. and the file appears in Uploaded files.
Fields in step 4 Field What it means Show this file to the auditor Ticked to start. A new file always starts as Draft (private) until you choose Share with auditor. Allow auditor download Ticked to start. Whether an auditor can open and download the file once it is shared. 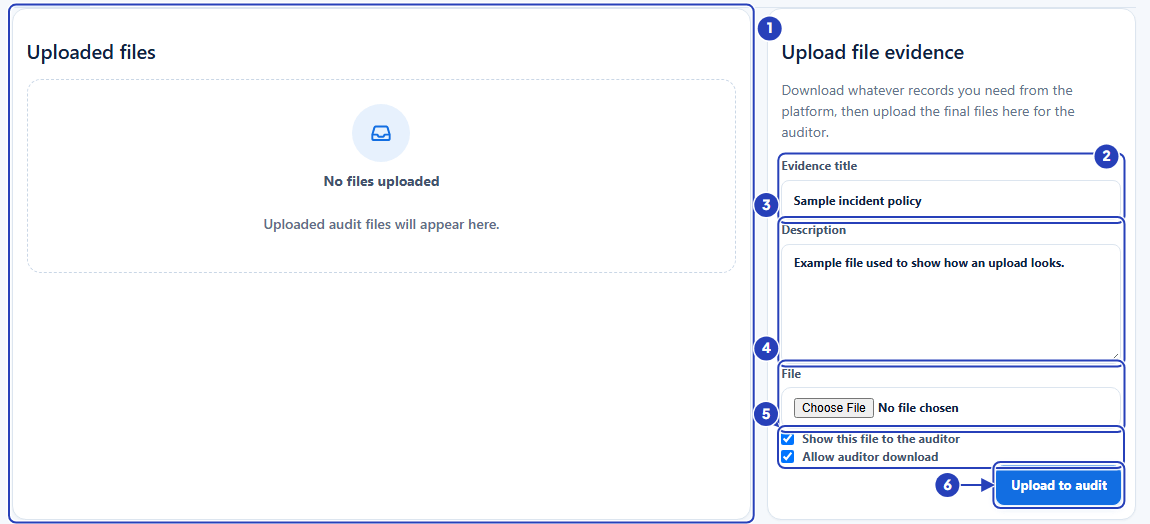
The Uploaded files panel (1), the evidence title (2), the description (3), the file (4), the two tick boxes (5) and Upload to audit (6). -
Go to Prepare audit and choose the session
1 Choose the Prepare audit tab. Five numbered buttons run across the top: 1. Engagement, 2. Scope, 3. Readiness, 4. Evidence and 5. Share. Choose any of them to move between steps.
2 In Audit session, choose the session you created. It starts on the first session in the list, so check it is the right one.
3 In Evidence period from, choose the first day the Incident register and the Service delivery reconciliation should cover.
4 In Evidence period to, choose the last day.
5 Tick Require auditors to verify with an emailed code if each auditor must enter a code sent to their email address. It is not ticked for a new session.
6 Choose Save and continue. If your role cannot edit sessions, the button reads Next and nothing is saved.
On 2. Scope, leave every list (Sites, Participants and Workers) unticked to cover the whole organisation, then choose Save and continue. 3. Readiness is optional: Run scoped assessment saves a readiness result with the session. Choose Save and continue again to reach 4. Evidence.
Fields in step 5 Field What it means Evidence period from, Evidence period to The days covered by the Incident register and the Service delivery reconciliation. The other registers show your records as they stand when you generate them. Starts as the last six months. 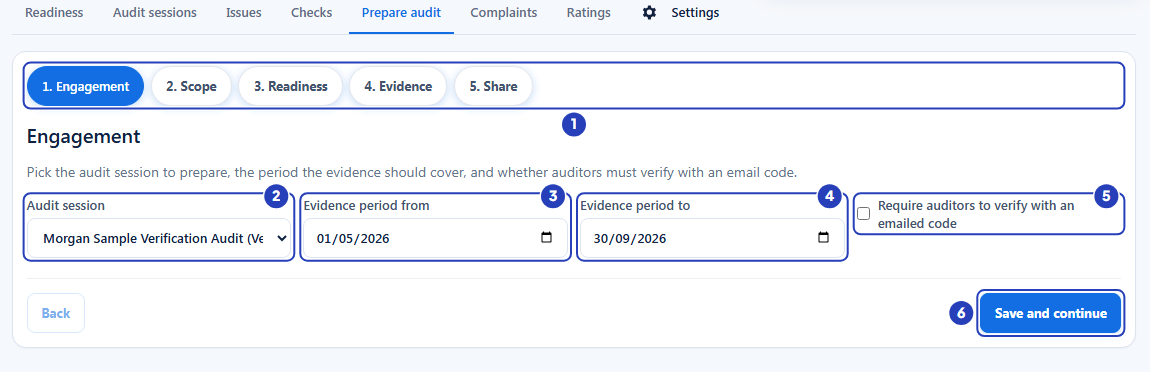
The five steps (1), the audit session (2), the evidence period from (3) and to (4), the emailed code tick box (5) and Save and continue (6). -
Generate evidence
1 On the 4. Evidence step, under Generate evidence, tick the registers you want: Worker compliance register (CSV), Participant records register (CSV), Incident register (CSV), Policy and document register (CSV), Service delivery reconciliation (CSV) and Audit readiness report (PDF). All six are ticked to start. The screenshot shows three unticked.
2 Choose Generate selected. The button reads Generating... while it works, and a message says Generated followed by the number of items.
3 The line under the button counts the generated items and says Regenerating replaces unshared drafts.
Important: Each register is made from your current records and saved as a draft. Nothing is visible to the auditor until you share it.
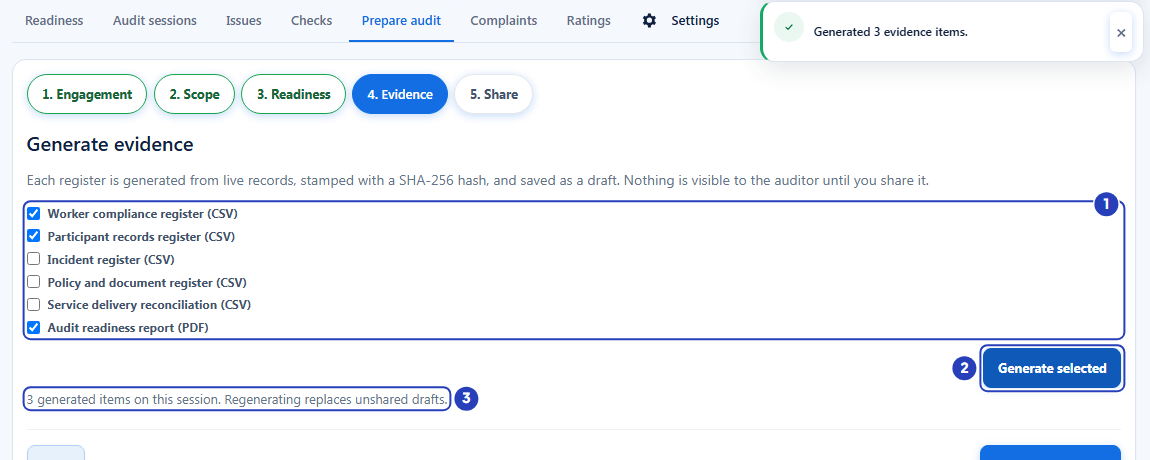
The registers to generate (1), with three unticked here, then Generate selected (2) and the note that counts the generated items (3). -
Share files with the auditor
1 On the 5. Share step, each generated or uploaded item is listed with its status: Draft (private), Shared with auditor or Sharing revoked.
2 Choose Share with auditor on an item to release it. A message says Shared with the auditor.
3 To take an item back, choose Stop sharing. A message says No longer visible to the auditor.
4 Choose Download evidence pack (ZIP) to download every shared file with a list of the files. It does not include files you have not shared.
The Evidence tab of the session has the same buttons on each file's card, and three more. Tick Auditor can download to let the auditor open and download that file, choose Download to save the file yourself, and choose Remove to take it out of the session.
Important: An auditor can open a shared file only while downloads are allowed for it. A register you generate follows Allow downloads by default, which is not ticked to start. If the auditor needs to open it, tick Auditor can download on the file's card on the Evidence tab.
Warning: Remove does not ask you to confirm. If you remove a shared file, the auditor can no longer see it. Use Stop sharing instead if you only want to hide a file for now.
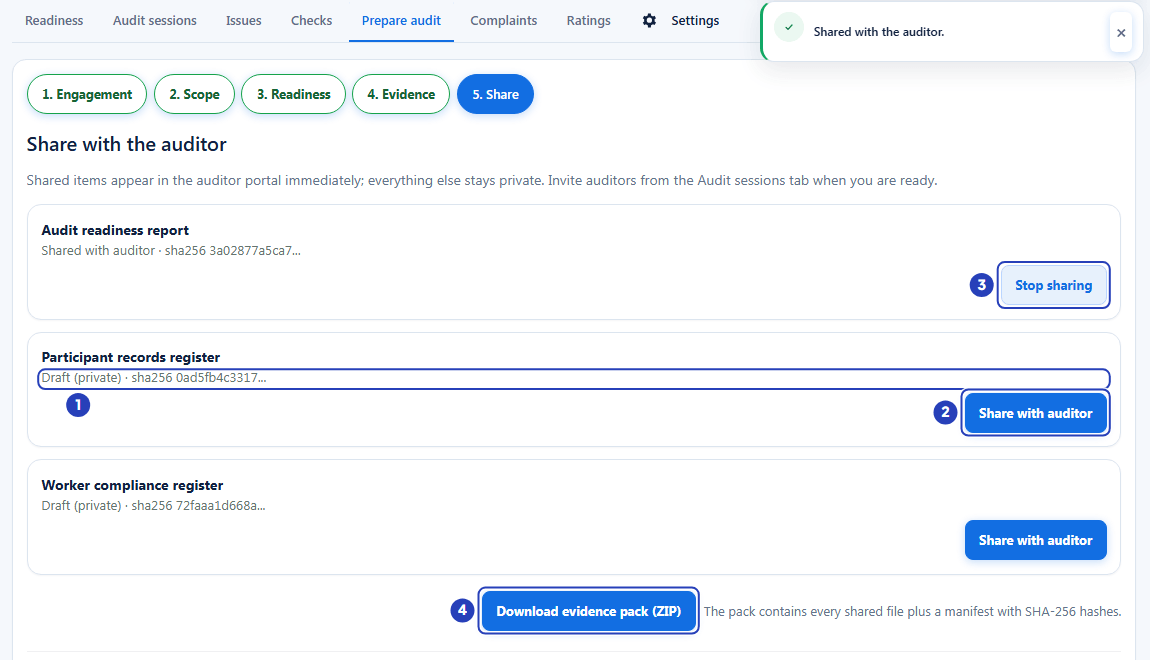
Each item shows its status (1). Choose Share with auditor (2) to release an item and Stop sharing (3) to take it back. Download evidence pack (ZIP) downloads the shared files (4).
What happens next
Files stay Draft (private) until you share them. An auditor sees only the files you have shared, and only between Access starts and Access expires.
To add the auditor, see Give an auditor access. To link your files to the standards before you share, see Practice Standards mapping.
While the audit runs, answer the auditor's requests (Manage evidence requests) and check what they looked at (Review auditor access history).
Important notes
Important: The Audit Centre helps you prepare and organise evidence and share it with an auditor. It does not decide the outcome of an audit, and it does not replace advice from your auditor or the NDIS Quality and Safeguards Commission.
Good practice
- Name each session so you can find it later, for example the audit type, the year and the audit firm, and fill in Scope notes. Set Access expires a little after the planned end of the audit, so there is room for follow-up requests.
- Fix critical issues on Readiness before you generate registers, then generate them close to the audit so they show your current records. See Check audit readiness.
- Check each file before you share it, and share only what the auditor needs. Before you tell the auditor their access is ready, use Preview portal to check they can open each file. See Give an auditor access.
Troubleshooting
I cannot see Create session, or I cannot see Prepare audit.
Why it happens: Create session needs Can create audit session. Prepare audit needs Can prepare audit evidence as well as Can view audit centre.
What to do: Ask an Owner or Admin to check your role in Configuration > Roles & Permissions.
Account settings has no Automation & Capacity Controls card.
Why it happens: Your role is not Owner or Admin, or your multi-factor authentication set-up is not finished.
What to do: Ask an Owner or Admin to switch on Audit Centre automation, or finish the multi-factor authentication set-up and reload the page.
A message says Audit Centre automation is turned off for your organisation. when I generate evidence or download the evidence pack.
Why it happens: Audit Centre automation is switched off.
What to do: An Owner or Admin switches it on. Open the account menu at the top right, choose Account settings, scroll to Automation & Capacity Controls, find Audit Centre automation in Automation controls, choose Enable, then choose Resume in the window Resume automatic handling? A message confirms Audit Centre automation enabled. Existing sessions and files stay visible. Download evidence pack (ZIP) shows the same wording in the new browser tab instead of a file.
A message begins Paused - Automation Capacity exhausted.
Why it happens: Your organisation has used its automation capacity for now.
What to do: Generation and the evidence pack resume when capacity is available again. Existing files stay visible.
The message Access expiry must be after access start. appears.
Why it happens: Access expires is the same as, or earlier than, Access starts.
What to do: Choose a later Access expires, then choose Create session again.
Prepare audit says No open audit sessions, or a message says Choose an audit session first (create one under Audit sessions).
Why it happens: You have not created a session yet, or none is chosen in Audit session.
What to do: Create a session on the Audit sessions tab, then choose it in Audit session on the Engagement step.
My new file is not visible to the auditor.
Why it happens: Generating or uploading a file does not release it. The card still says Draft (private).
What to do: Choose Share with auditor on the file's card, on the Evidence tab or in the Share step of Prepare audit.