

Who this is for
This guide is written for Owner and Admin.
Before you begin
- Pay Levels must be switched on first. An Owner or Admin switches it on in Account settings > Automation & Capacity Controls > Pay Levels and automatic interpretation, by choosing Enable. See Enable Pay Levels. Until it is on, the Pay Levels page says Pay Levels are not enabled for this organisation.
- The starter setup has been prepared. See Use the starter setup.
- You are signed in to BondiByte on a computer.
- You have your industrial instrument or pay agreement to hand, so you can compare it with the rates on screen.
Steps
The screenshots show a demonstration organisation with made-up names. Your own screens show your organisation's details. Select a screenshot to open it full size.
-
Go to Administration > Pay Levels
1 In the left menu, under Administration, choose Pay Levels. The Staff Pay Levels page opens.
2 At the top of the page, look for the line Interpretation enabled on, followed by a date and time. It shows when the Pay Levels setup was confirmed.
Note: The page shows Pay Levels are not enabled for this organisation. when Pay Levels has not been turned on. If your organisation has no Pay Levels yet, that message is all the page shows. An Owner or Admin can turn it on in Account settings > Automation & Capacity Controls. See Enable Pay Levels.
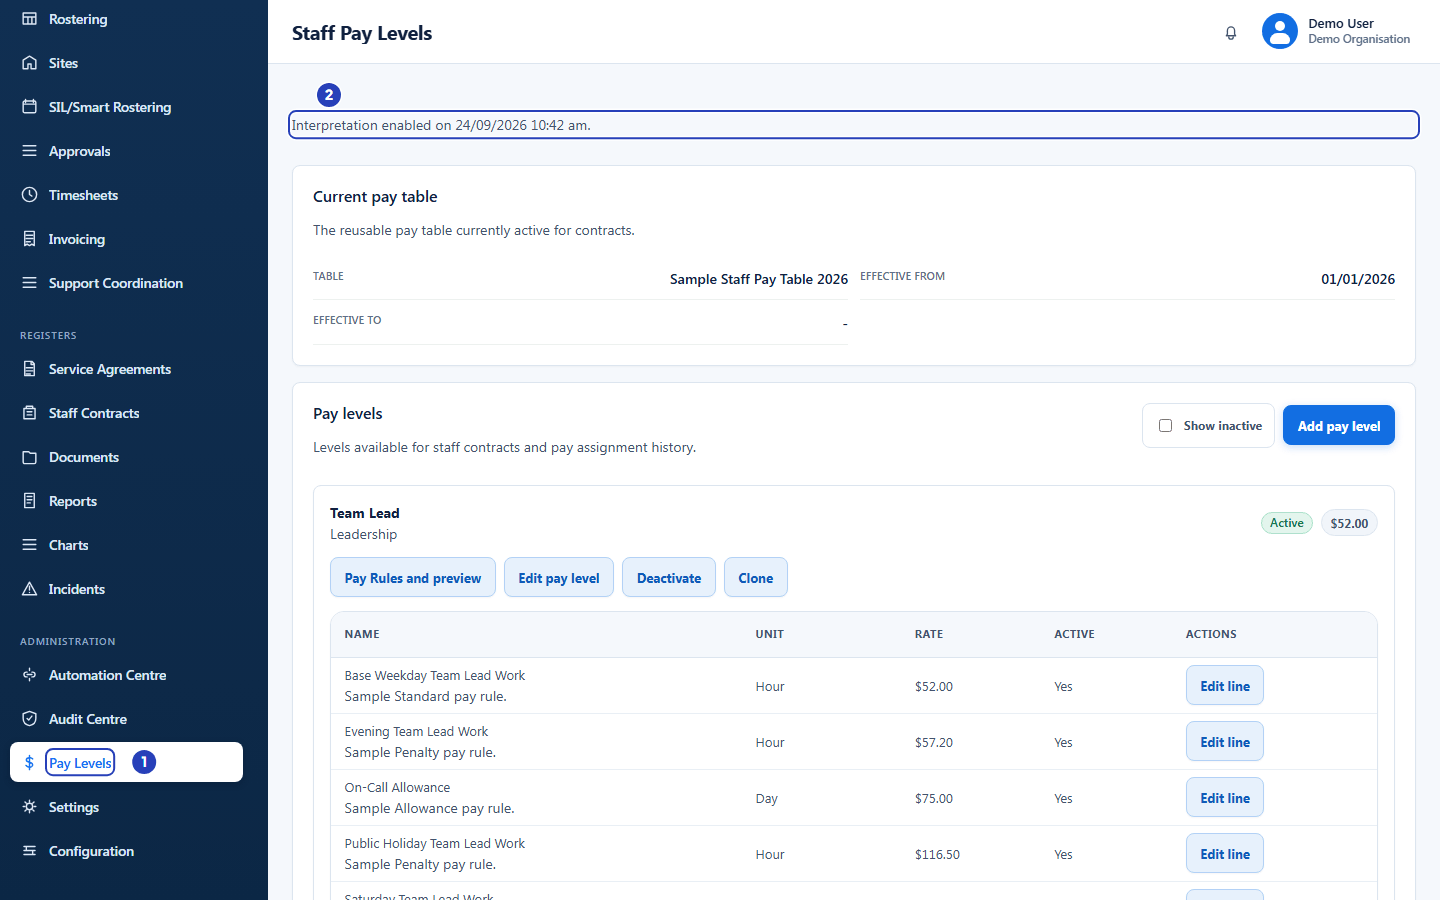
Choose Pay Levels under Administration (1). The line at the top shows when the setup was confirmed (2). -
Check the current pay table
1 In Current pay table, read the Table name. The starter setup names its table Sample Staff Pay Table 2026.
2 Check Effective from, the date the table starts.
3 Check Effective to. A dash means the table has no end date.
Note: Every Pay Level belongs to the current pay table. If your organisation has no current pay table, the page offers Create pay table instead, and you cannot add Pay Levels until one exists.
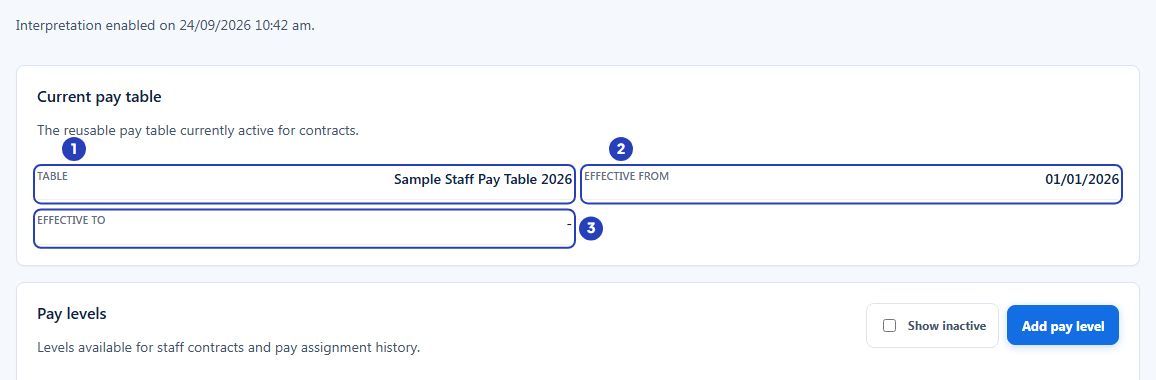
Read the table name (1), the date it starts (2) and the date it ends, if any (3). -
Look at each Pay Level
1 Read the level name. The group it belongs to is shown under the name, for example Team Lead in Leadership. The starter setup prepares six levels: Support Worker Level 1, Support Worker Level 2, Support Worker Level 3, Team Lead, Coordinator and Manager.
2 Check the badge. Active means the level is available for new staff contracts; Inactive means it is not.
3 The grey figure is the base hourly rate of the level.
4 The buttons under the name are Pay Rules and preview, Edit pay level, Deactivate (or Activate) and Clone. You see Edit pay level, Deactivate and Clone only if you can manage Pay Levels.
5 Tick Show inactive to include levels that have been deactivated. They are hidden until you do.
Important: The rates in the starter setup are sample figures, labelled in the product as a starter example to review for your organisation. They are not a copy of any Award or agreement. Your organisation is responsible for checking every rate against its industrial instrument.
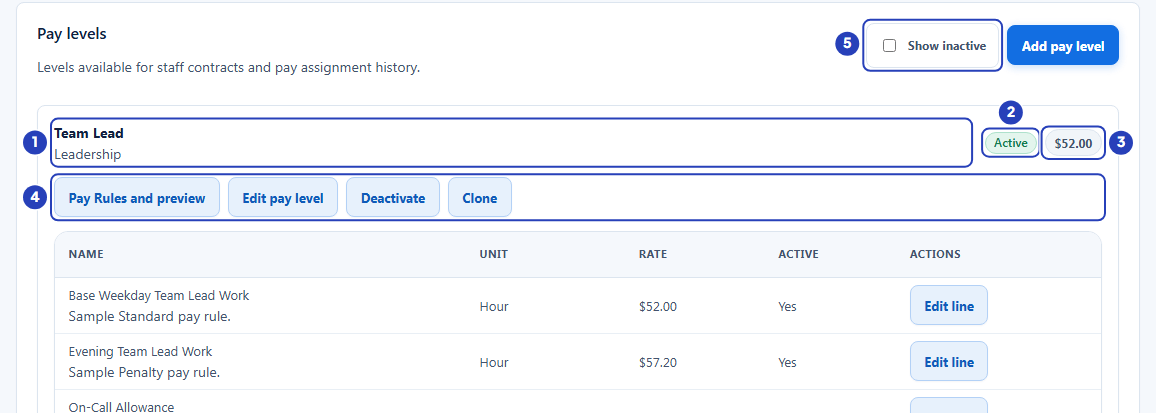
The level name and group (1), its badge (2) and base hourly rate (3), the level buttons (4) and the Show inactive tick box (5). -
Check the rate lines of a level
1 In the Name column, read each line. The starter setup adds a short note under the name, such as Sample Standard pay rule., to show the line came from the starter examples.
2 Check the Unit, for example Hour, Day or Kilometre.
3 Check the Rate against your industrial instrument or pay agreement.
4 Check Active. Yes means the line can be used; No means it is switched off.
5 Edit line opens a line so you can change it. It appears only if you can manage Pay Levels.
Fields in step 4 Field What it means Name The pay item, such as a base weekday, evening, Saturday, Sunday or public holiday line, plus the starter note. Unit What the rate is paid per, such as hour, day or kilometre. Rate The dollar amount for one unit. Active Yes or No. Warning: A rate line that has its own published Pay Rule is locked on this page, and so is the base weekday line of a level once the level has any published rule. To change a locked rate, publish a new dated version in Pay Rules and preview. See Edit rates on a Pay Level.
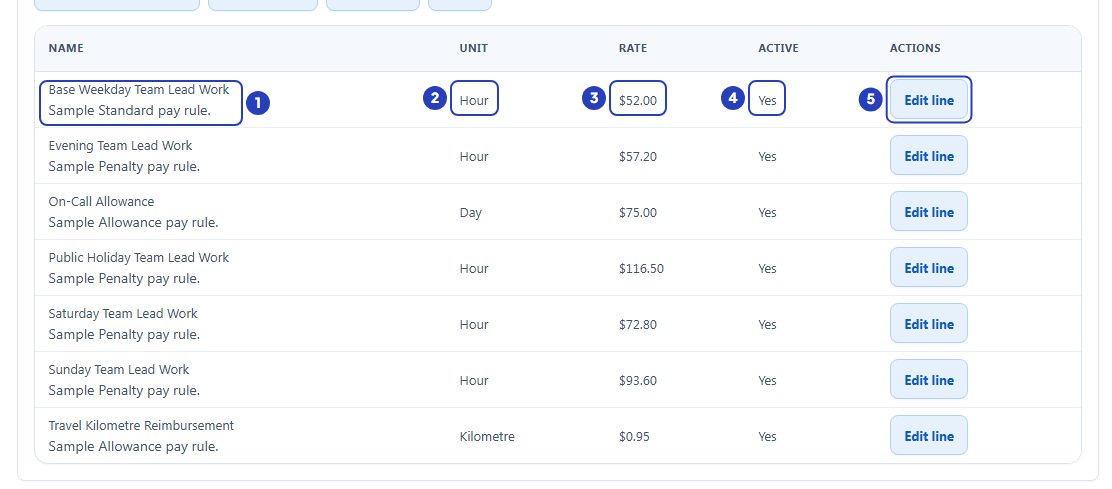
Read the name and starter note (1), the unit (2), the rate (3) and whether the line is active (4). Edit line (5) changes a line. -
Open the Pay Rules for a level
On a level, choose Pay Rules and preview. The Pay Rules window opens with the name of the level in its title.
1 Read the title and the sentence under it. The sentence says the window is for configuring dated rules, confirming staff assignments and previewing the supported calculation, and that it is not a complete award interpreter.
2 Use the Rules, Staff assignment and Preview buttons to move between the parts of the window. Stay on Rules for this review.
3 On Rules, a heading says Interpretation enabled or Interpretation disabled for this level. Under it, the table lists each rule with its item, its conditions and its rate and unit.
4 Check the Effective dates of each rule: the date it starts and, if it has one, the date it ends. A rule with no end date reads Open ended.
5 Choose Close when you have finished. Reviewing changes nothing.
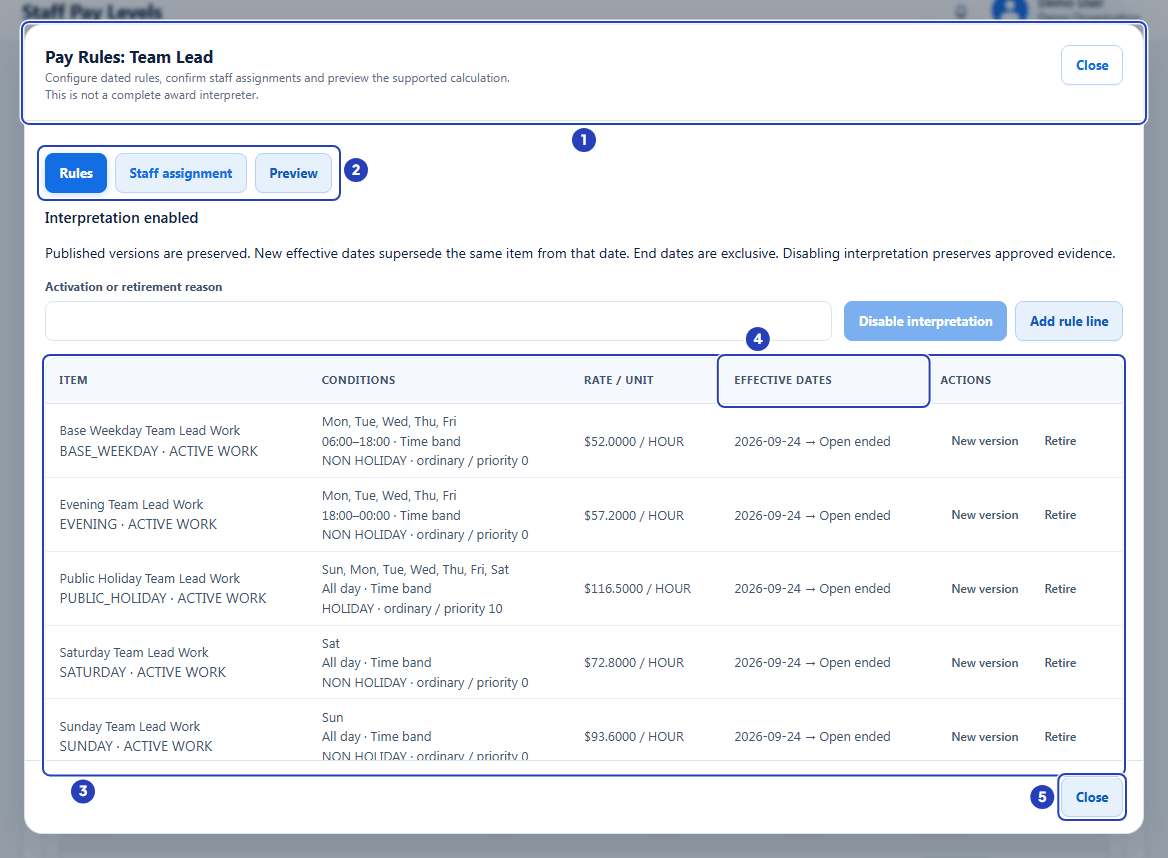
The title and statement (1), the Rules, Staff assignment and Preview buttons (2), the rules table (3, 4) and Close (5).
What happens next
Reviewing does not change anything. Nothing is saved until you choose a save button, and every window here has Cancel or Close.
When a rate is wrong for your organisation, change it on the Pay Level, or copy a level that is close to what you need and adjust the copy. See Edit rates on a Pay Level and Clone a Pay Level.
A staff member's Pay level field, in the Edit staff window and on their staff contract, records their Pay Level. For BondiByte to work out pay automatically, the level must have interpretation turned on and the staff member needs a dated assignment to it. You record assignments in Pay Rules and preview > Staff assignment.
Important notes
Important: BondiByte applies the Pay Levels and Pay Rules that your organisation configures. It is not a complete Award interpreter, and it does not check your rates against an Award or agreement. Your organisation is responsible for checking its rates against its industrial instrument.
Good practice
- Write down every rate that does not match your industrial instrument while you review, then change them all before you confirm the setup. Rates on lines that have a published rule are locked after you confirm, so a correction is easiest first.
- Open Pay Rules and preview on every level, not only one. Each level has its own rules and its own Effective dates.
- Tick Show inactive before you finish the review, so you also see any level that has been switched off. Inactive levels are hidden until you do.
- The starter rules cover weekday hours from 06:00 to midnight, Saturdays, Sundays and public holidays. They do not cover weekday hours from 00:00 to 06:00, so decide what should apply to those hours.
Troubleshooting
I cannot see Pay Levels in the left menu.
Why it happens: Your role does not include the Can view pay levels permission, or your organisation's subscription is not active.
What to do: Ask an Owner or Admin to check your role and Billing & subscription.
The page says Pay Levels are not enabled for this organisation.
Why it happens: Pay Levels has not been turned on. If your organisation has no Pay Levels yet, this message is all the page shows. If it already has some, they stay visible with the line Automatic interpretation is off. Existing pay levels remain visible and editable.
What to do: An Owner or Admin can turn it on in Account settings > Automation & Capacity Controls > Pay Levels and automatic interpretation. See Enable Pay Levels.
The page shows Preparing your Pay Levels.
Why it happens: The starter setup is still being prepared in the background. The list under the heading shows which parts are done.
What to do: You can keep using BondiByte. Come back to the page in a little while and the setup will be ready to review.
A Pay Level I expect is not in the list.
Why it happens: The level is probably inactive. Inactive levels are hidden.
What to do: Tick Show inactive above the list. To use the level again, choose Activate on its card.
The page says No pay levels or No pay levels have been set up yet.
Why it happens: There are no Pay Levels to show for your organisation yet.
What to do: If you can manage Pay Levels, use Add pay level to create the first one. Otherwise ask an Owner or Admin.