

Who this is for
This guide is written for Owner and Admin.
Before you begin
- Pay Levels must be switched on first. An Owner or Admin switches it on in Account settings > Automation & Capacity Controls > Pay Levels and automatic interpretation, by choosing Enable. See Enable Pay Levels. Until it is on, the Pay Levels page says Pay Levels are not enabled for this organisation. and timesheets show no Pay interpretation section.
- You are signed in to BondiByte on a computer as an Owner or Admin, or as someone with the Can manage pay levels permission.
- The Pay Level already exists and has a rate line for the rule. See Create a Pay Level and Edit rates on a Pay Level. You can also add a new rate line while you publish the rule (step 3).
- You have your pay agreement to hand, with the rates, days and times it sets for weekdays, weekends and public holidays. BondiByte does not check them for you.
- Every person whose timesheets will be priced has a payroll jurisdiction on an Active contract. See Payroll jurisdiction.
Steps
The screenshots show a demonstration organisation with made-up names. Your own screens show your organisation's details. Select a screenshot to open it full size.
-
Go to Administration > Pay Levels > Pay Rules and preview
1 In the left menu, under Administration, choose Pay Levels. The Staff Pay Levels page opens.
2 Find the Pay Level you want to add a rule to and choose Pay Rules and preview on its card. In this guide we use a new Pay Level called Sample Level 1, which has no rules yet. The Pay Rules window opens.
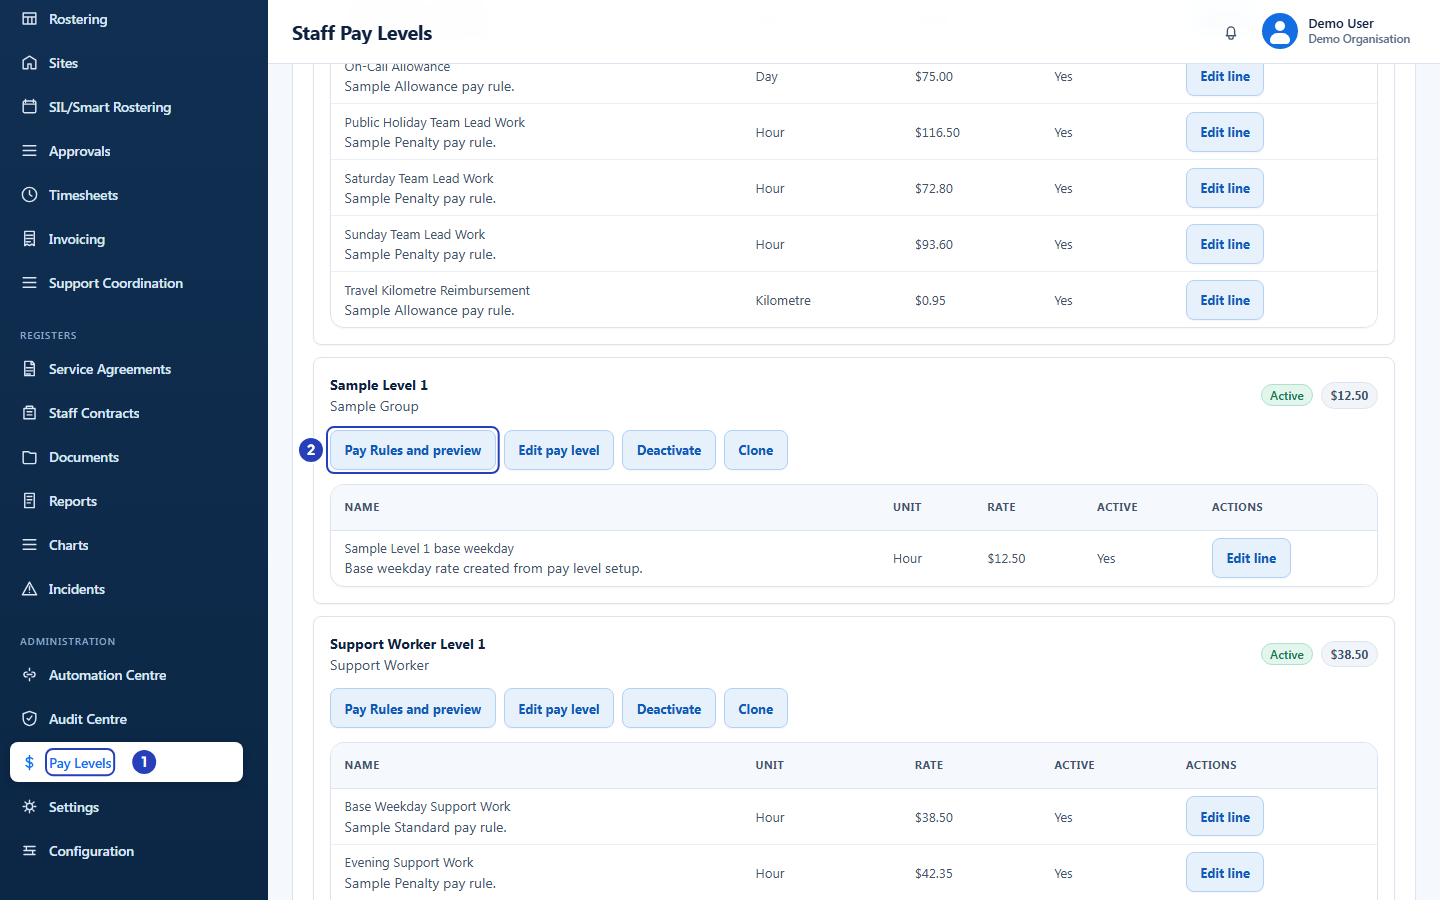
Choose Pay Levels under Administration (1), then Pay Rules and preview (2) on the level you want. -
Look at the rules the level already has
1 At the top of the window, check that Rules is selected. The other two parts are Staff assignment and Preview.
2 Read the heading under them. It says Interpretation enabled or Interpretation disabled. Interpretation is switched on or off for each level separately, and a level only prices timesheets while it says Interpretation enabled.
3 Read the table of rules. A level with no rules shows the message No configured rule versions. followed by a reminder that the names of rate lines do not automatically become rules.
4 Choose Add rule line. A blank form opens for a new dated rule, and you choose which rate line it prices. To publish a new rate or new conditions for a rule that is already listed, use New version on its row instead (see What happens next).
Note: If you cannot see Add rule line, the window shows the line Read-only access. Managing rules and staff payroll configuration requires Staff Pay management permission. Ask an Owner or Admin to give you the Can manage pay levels permission.
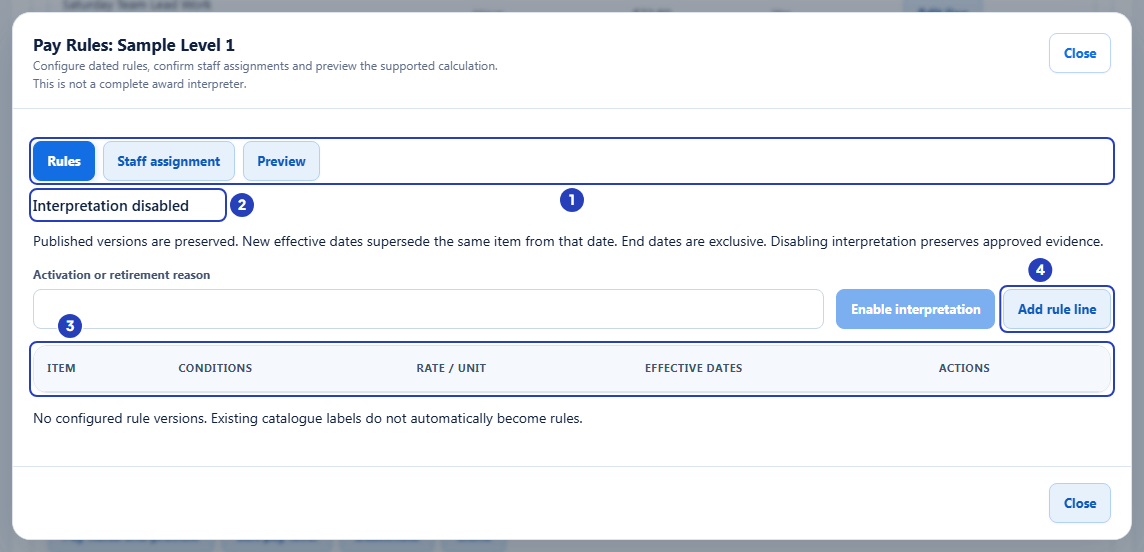
The Rules part (1), the interpretation heading (2), the table of rules, empty for a new level (3) and Add rule line (4). -
Choose the rate line
A form titled Publish dated rule version opens under the table. It starts with the line Pick one of this pay level's rate lines, then say when it applies.
1 In Pay level rate line, choose the rate line this rule is for. Choosing a line fills in its code, unit and rate.
2 Check Selected rate line. It repeats the line's name, code and unit so you can see that you picked the right one.
If the level has no line for this rule yet, choose New rate line for this pay level instead. Three extra boxes appear for it: Stable item code, Display name and Calculation unit.
Fields in step 3 Field What it means Pay level rate line Required. The rate line this rule prices. The list shows every active rate line on the level, written as its name, unit, rate and code. Starts on Choose a rate line. The last choice, New rate line for this pay level, creates a new rate line as you publish. The display name is shown in the Pay item list and the Rules table; the tables on a timesheet show the code. Selected rate line Appears after you choose an existing line. You cannot type in it. It repeats the line's name, code and unit. Stable item code Appears only for a new rate line. Required. Capital letters, numbers and underscores only, up to 80 characters. It identifies the line, so choose it carefully. Display name Appears only for a new rate line. Required. Up to 200 characters. This is the name shown for the line in the Pay item list and the Rules table. The tables on a timesheet show the item code instead. Calculation unit Appears only for a new rate line. Hour pays for each hour worked. Unit is paid once, as an allowance. Starts as Hour. 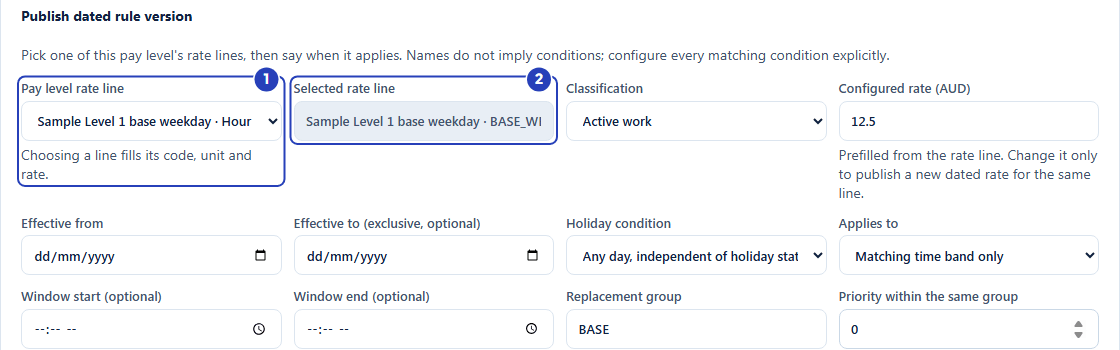
Choose the rate line (1) and check the selected rate line (2). -
Set the classification, rate and dates
1 Check Classification. Leave it as Active work for ordinary paid hours. Sleepovers have their own guide, Sleepovers.
2 Check Configured rate (AUD). It is filled in from the rate line. Change it only if you are publishing a new dated rate for the same line.
3 In Effective from, choose the first day the rule applies.
4 In Effective to (exclusive, optional), choose the day the rule stops applying, or leave it blank if the rule has no end date. The rule applies up to, but not including, that day.
Fields in step 4 Field What it means Classification Active work is ordinary paid hours, priced per hour; use it on a rate line whose unit is Hour. Sleepover, whose full label ends with the words one existing allowance component, is the single allowance for a sleepover; use it on a rate line whose unit is Unit. Separate allowance is an extra amount added on top of ordinary pay: a line whose unit is Unit is paid once, and any other line is priced per hour. Starts as Active work. The classification must suit the rate line's unit or the rule cannot be published. Configured rate (AUD) Required. The dollars for one unit, with up to four decimal places and no dollar sign. A missing rate is not treated as zero. It is filled in from the rate line. Effective from Required. The first day the rule applies. Starts blank. A rate line can have only one version starting on any one date, and a published date can never be used again for a different rate. Effective to (exclusive, optional) The day the rule stops applying. That day is not covered by the rule. It must be after Effective from. Leave it blank for a rule with no end date, which the table shows as Open ended. 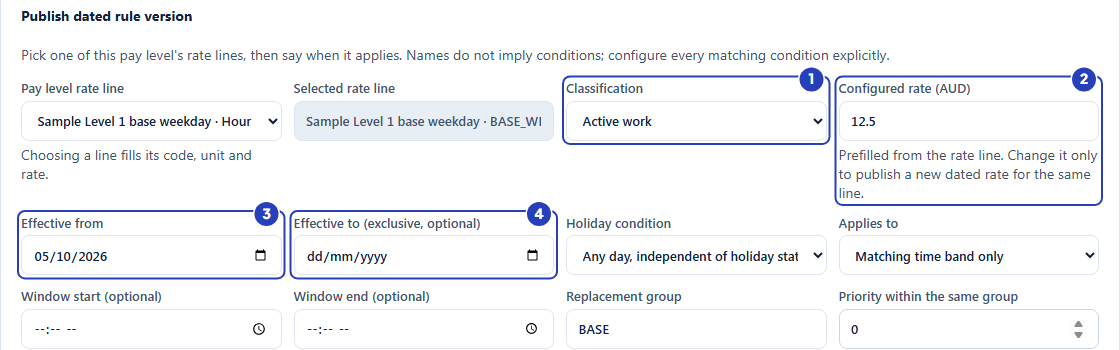
Check the classification (1) and the rate (2), then set Effective from (3) and, if needed, Effective to (4). -
Choose the holiday condition and what the rule applies to
1 In Holiday condition, choose whether the rule depends on public holidays. For a weekday rule choose Verified non-holiday, for a public holiday rule choose Verified public holiday, and for a rule that does not care choose Any day, independent of holiday status.
2 In Applies to, choose Matching time band only to price just the hours that fall inside the days and times you set, or Whole shift to price the whole shift.
If you chose Whole shift, a further box named Whole-shift condition appears next to it. Choose Shift starts within window or Entire shift within window.
Fields in step 5 Field What it means Holiday condition Any day, independent of holiday status applies the rule on public holidays and on other days alike. Verified public holiday applies it only on a public holiday for the staff member's payroll jurisdiction. Verified non-holiday applies it only on days confirmed as not public holidays. Starts as Any day, independent of holiday status. The two verified choices rely on the staff member's payroll jurisdiction and BondiByte's public holiday information; without them the hours stay unresolved. Applies to Matching time band only prices only the hours that fall inside the days and window, so a shift that crosses a boundary is split and priced in parts. Whole shift checks the rule once, when the shift starts, and prices the whole shift at this rule. Starts as Matching time band only. Whole-shift condition Appears only when Applies to is Whole shift. Shift starts within window matches when the shift starts inside the window. Entire shift within window matches only when every minute of the shift is inside the window. Starts as Shift starts within window. 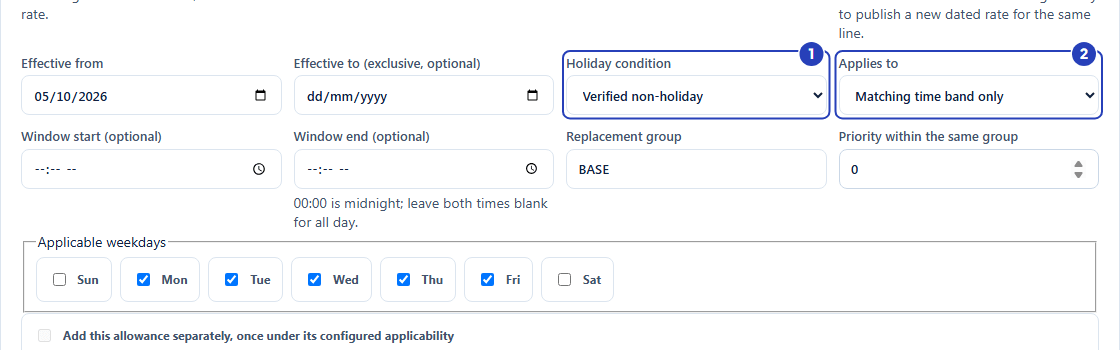
Choose the holiday condition (1) and what the rule applies to (2). -
Set the days and times
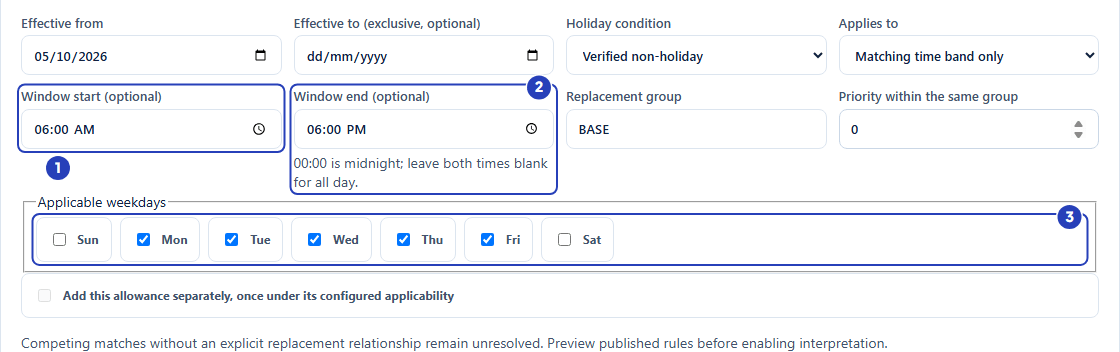
1 In Window start (optional), set the time of day the rule starts. Leave both time boxes blank if the rule covers the whole day.
2 In Window end (optional), set the time of day the rule ends.
3 Under Applicable weekdays, tick every day the rule covers.
Fields in step 6 Field What it means Window start (optional) A time of day. Fill in both window boxes or neither, and make them different times. The boxes use the time format of your browser, for example 06:00 AM. Window end (optional) A time of day. 00:00 means midnight, shown as 12:00 AM in some browsers. An end time earlier than the start time carries the window past midnight. Leave both boxes blank to cover the whole day. Applicable weekdays Tick boxes for Sun, Mon, Tue, Wed, Thu, Fri and Sat. Tick at least one. Monday to Friday start ticked. A part of a shift that falls after midnight is judged by the day it falls on. Important: Names do not carry conditions. A rate line called Saturday only applies on Saturday if its own rule has Sat ticked and nothing else. The form reminds you to configure every matching condition explicitly.
Set the window start (1) and end (2), and tick the weekdays (3). -
Say how the rule competes with other rules
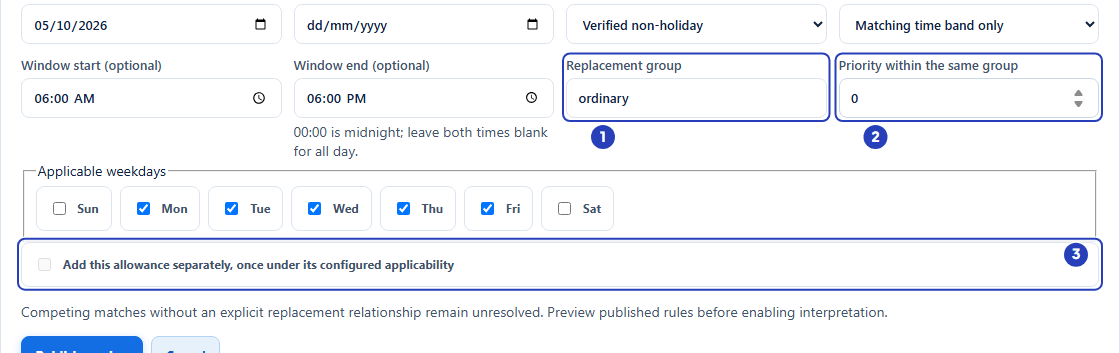
1 In Replacement group, type a short name shared by every rule that competes for the same hours, for example ordinary. It starts as BASE.
2 In Priority within the same group, type a whole number. The rule with the highest number wins. It starts at 0.
3 Leave Add this allowance separately, once under its configured applicability unticked. It is only available when Classification is Separate allowance.
For a public holiday rule, use the same replacement group as your weekday and weekend rules, a higher priority (the starter setup uses 10), and Verified public holiday.
Fields in step 7 Field What it means Replacement group Required for an ordinary rule. Rules in the same group replace each other. If two matching rules are in different groups, the hours stay unresolved. Greyed out for a separate allowance. Priority within the same group Required whole number, starting at 0. The highest number wins. Two matching rules in the same group with the same number leave the hours unresolved. Greyed out for a separate allowance. Add this allowance separately, once under its configured applicability Only available for Separate allowance. When ticked, the amount is added on top of ordinary pay instead of replacing it. Note: The form ends with a reminder that competing matches without an explicit replacement relationship remain unresolved. Preview only runs for a staff member whose assigned level already says Interpretation enabled, so use it after step 11.
Type a replacement group (1) and a priority (2). Leave the allowance tick box (3) alone for ordinary hours. -
Check the rule against your pay agreement
Read the form once from top to bottom before you publish. A published rule cannot be edited, so a mistake costs you a new dated version.
1 Check that the rate, the unit and the dates match your pay agreement.
2 Check the holiday condition, the window and the weekdays. A rate line's name sets no conditions.
3 Check that the replacement group and priority cannot clash with another rule that matches the same hours.
-
Choose Publish version
1 Choose Publish version. The window shows Published a dated rule version. Existing approved earnings remain unchanged.
2 Choose Cancel instead to close the form without publishing anything.
Warning: A published rule cannot be edited or deleted. To change it, publish a new dated version, or retire the rule. Choose the dates carefully before you publish.
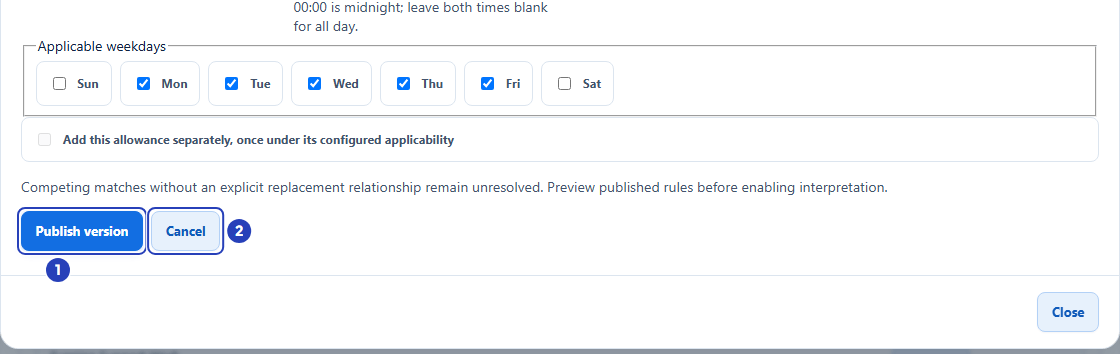
Choose Publish version (1) to publish the rule, or Cancel (2) to close the form without publishing. -
Repeat for each band you pay
Publish one rule for each band you pay, each on its own rate line. Go back to the step Choose the rate line and repeat the steps for every band, with the rates, days and times your pay agreement sets. The starter setup uses the values below, so they show how the bands fit together.
In every band, leave Classification as Active work, choose Matching time band only in Applies to, and type ordinary in Replacement group. Leave Priority within the same group at 0 unless the list says otherwise.
Nothing is covered from 00:00 to 06:00 on weekdays unless you add a rule for it.
Fields in step 10 Field What it means Weekday Tick Mon, Tue, Wed, Thu and Fri. Set Window start (optional) to 06:00 and Window end (optional) to 18:00. Choose Verified non-holiday in Holiday condition. Priority 0. Weekday evening Tick Mon, Tue, Wed, Thu and Fri. Set Window start (optional) to 18:00 and Window end (optional) to 00:00. Choose Verified non-holiday. Priority 0. Saturday Tick Sat only. Leave both window boxes blank. Choose Verified non-holiday. Priority 0. Sunday Tick Sun only. Leave both window boxes blank. Choose Verified non-holiday. Priority 0. Public holiday Tick all seven days. Leave both window boxes blank. Choose Verified public holiday. Priority 10, so it replaces the weekday, Saturday or Sunday rule on a public holiday. -
Check the published rules and turn interpretation on for the level
After you publish, the form closes and the rule appears in the table. The screenshot shows the starter Team Lead level, which already has published rules, so you can see how each part is written.
1 Read the table. Each row is one published rule, and the columns are listed below.
2 When the level has all its rules, type a reason in Activation or retirement reason and choose Enable interpretation. The window shows Interpretation setting updated. and the heading changes to Interpretation enabled. Enabling prices nothing until a staff member has a dated assignment to the level.
Once a staff member is assigned, use Preview to test example shifts. Preview only runs for a staff member whose current assignment is to a level that already says Interpretation enabled. See Understand Pay Rules.
Fields in step 11 Field What it means Item The name of the rate line, and under it its code and type: ACTIVE WORK, SLEEPOVER or ALLOWANCE. Conditions The weekdays, the time window (or All day), Time band or Whole shift, then the holiday condition (ANY, HOLIDAY or NON HOLIDAY) and the group with its priority, or Additional allowance. Rate / unit The rate with four decimal places and the unit, HOUR or UNIT. Effective dates The first day, an arrow and the last day, or Open ended. The last day is not covered. Actions New version and Retire, shown only to people who hold Can manage pay levels. Note: Enable interpretation stays unavailable until you have typed a reason, and it shows the message Publish explicit rules before activation. if the level has no published rule.
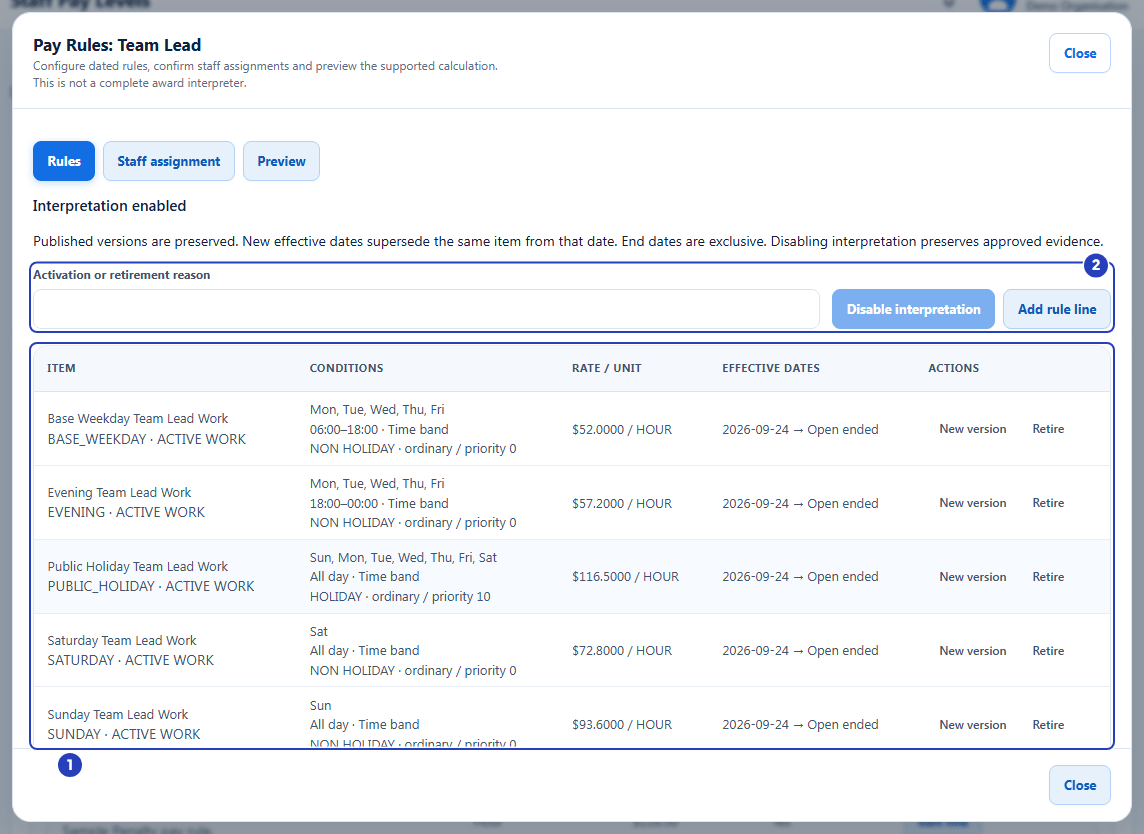
The table of published rules (1), with the reason box and the interpretation button above it (2).
What happens next
A published rule is saved with its dates and cannot be edited or deleted. To change a rate or a condition from a later date, choose New version on the rule's row and publish the form with the new date. To stop a rule, type a reason in Activation or retirement reason, choose Retire on its row, pick the date in Stop applying from (exclusive end) and choose Record retirement. The window shows Retirement boundary recorded; original evidence preserved.
A timesheet is priced by these rules only when interpretation is enabled for the level, the person has a dated assignment to the level, and the person has a payroll jurisdiction on an Active contract. See How pay interpretation works and Payroll jurisdiction.
Timesheets that are already approved keep the pay they were approved with. Publishing a rule does not change them. See Approval and frozen interpretation.
Important notes
Important: BondiByte applies the rules your organisation configures. It is not a complete Award interpreter, and it does not check your rates or times against an Award or agreement. Your organisation is responsible for checking every rule against its pay agreement.
Good practice
- Publish a rule for every day and time band you pay. The starter rules cover weekdays from 06:00 to midnight, Saturday, Sunday and public holidays, but not weekdays from 00:00 to 06:00. Hours that match no rule stay unresolved until you add one.
- Make a public holiday rule replace the normal rule instead of adding to it. Give it the same Replacement group as the weekday rules and a higher Priority, and set the weekday rules to Verified non-holiday so the two never match the same hours.
- Choose an Effective from date that starts a pay period. A date in the middle of a period splits that period's hours between the old and the new rate.
- After you enable interpretation and assign a staff member, use Preview to test a few example shifts, including one that crosses midnight. Preview can say Holiday coverage is unknown for the confirmed payroll jurisdiction. for rules that depend on public holidays, so also check one real timesheet.
- After you publish or change a rule, open one timesheet it should affect and check the Item, Rate and Amount in its Pay interpretation section before you approve. Remember that a rate line's name sets no conditions; only the days, times and holiday condition on the rule decide when it applies.
Troubleshooting
The Pay Levels page says Pay Levels are not enabled for this organisation., or Pay Levels is missing from the left menu.
Why it happens: Pay Levels is not switched on, or your organisation's subscription is not active.
What to do: An Owner or Admin switches it on in Account settings > Automation & Capacity Controls > Pay Levels and automatic interpretation. See Enable Pay Levels. If the menu item is still missing, an Owner or Admin checks Billing & subscription and contacts BondiByte support.
I cannot see Add rule line, New version or Retire.
Why it happens: Your role does not have the Can manage pay levels permission. The window shows Read-only access. Managing rules and staff payroll configuration requires Staff Pay management permission.
What to do: Ask an Owner or Admin to give you the permission, or to publish the rule for you.
A message says A pay rate for this item is already published effective from this date, and a published date can never be reused for a different rate. Choose a later effective date for this change, or wait until tomorrow to republish.
Why it happens: A version of this rate line already starts on the Effective from date you chose. A date that has been used cannot be used again, even if that version was later retired.
What to do: Choose a later Effective from date and publish again.
A message says Choose one of the rate lines on this pay level, or add a new rate line., Enter a non-negative rate with up to four decimal places. A missing rate is not zero., Choose an effective start date. or The exclusive end date must be after the start date.
Why it happens: Pay level rate line is empty, Configured rate (AUD) is empty, negative or has more than four decimal places, Effective from is empty, or Effective to is on or before Effective from.
What to do: Choose a rate line, or New rate line for this pay level and fill in its code and name. Type the rate as a number such as 38.5 without a dollar sign. Choose a valid start date, and an end date after it, or clear Effective to.
A message says Select at least one weekday., Provide both different window times, or leave both blank for all day. or Replacement rules require an explicit group and integer priority.
Why it happens: Every box under Applicable weekdays is unticked, only one of the two window boxes is filled in (or both are the same time), or Replacement group or Priority within the same group is empty.
What to do: Tick each day the rule covers, fill in both window boxes with different times or clear both, and type a group name and a whole number such as 0.
A general message says We could not complete that request. Please try again, or contact support if it keeps happening. when I choose Publish version.
Why it happens: The classification does not suit the rate line's unit. For example, Active work on a line whose unit is Unit, or Sleepover on a line whose unit is not Unit.
What to do: Choose the classification that matches the line, or choose a different rate line. If the line's unit is wrong, correct it first on the Pay Levels page, as long as the line has no published rule. See Edit rates on a Pay Level.
A message says Publish explicit rules before activation. or Activation changed. Refresh and review. when I choose Enable interpretation.
Why it happens: The level has no published rule yet, or someone else changed the interpretation setting after you opened the window.
What to do: Publish at least one rule, or close the window, open Pay Rules and preview again and choose the button again if it is still needed.
A timesheet does not use a rule I published, or still shows unresolved amounts such as pay rule gap or pay rule conflict.
Why it happens: A rule prices a timesheet only when the level says Interpretation enabled, the person has a dated assignment to the level and a payroll jurisdiction on an Active contract, and the timesheet has not already been submitted or approved with its earlier pay. Hours that match no rule, or more than one rule in the same group at the same priority, stay unresolved.
What to do: Check each of those. A submitted timesheet keeps its pay, so return it for changes and let the staff member submit it again. See Troubleshoot an unresolved interpretation.