

Who this is for
This guide is written for Owner and Admin.
Before you begin
- Pay Levels must be switched on first. An Owner or Admin switches it on in Account settings > Automation & Capacity Controls > Pay Levels and automatic interpretation, by choosing Enable. See Enable Pay Levels. Until it is on, the Pay Levels page says Pay Levels are not enabled for this organisation.
- You are signed in to BondiByte on a computer.
- Your organisation has a current pay table. The Current pay table section of the Pay Levels page shows its name.
- You have the name you want to use for the level, and its base hourly rate from your own industrial instrument or pay agreement.
Steps
The screenshots show a demonstration organisation with made-up names. Your own screens show your organisation's details. Select a screenshot to open it full size.
-
Go to Administration > Pay Levels > Add pay level
1 In the left menu, under Administration, choose Pay Levels. The Staff Pay Levels page opens.
2 In the Pay levels section, choose Add pay level. The Add new pay level window opens with a blank form.
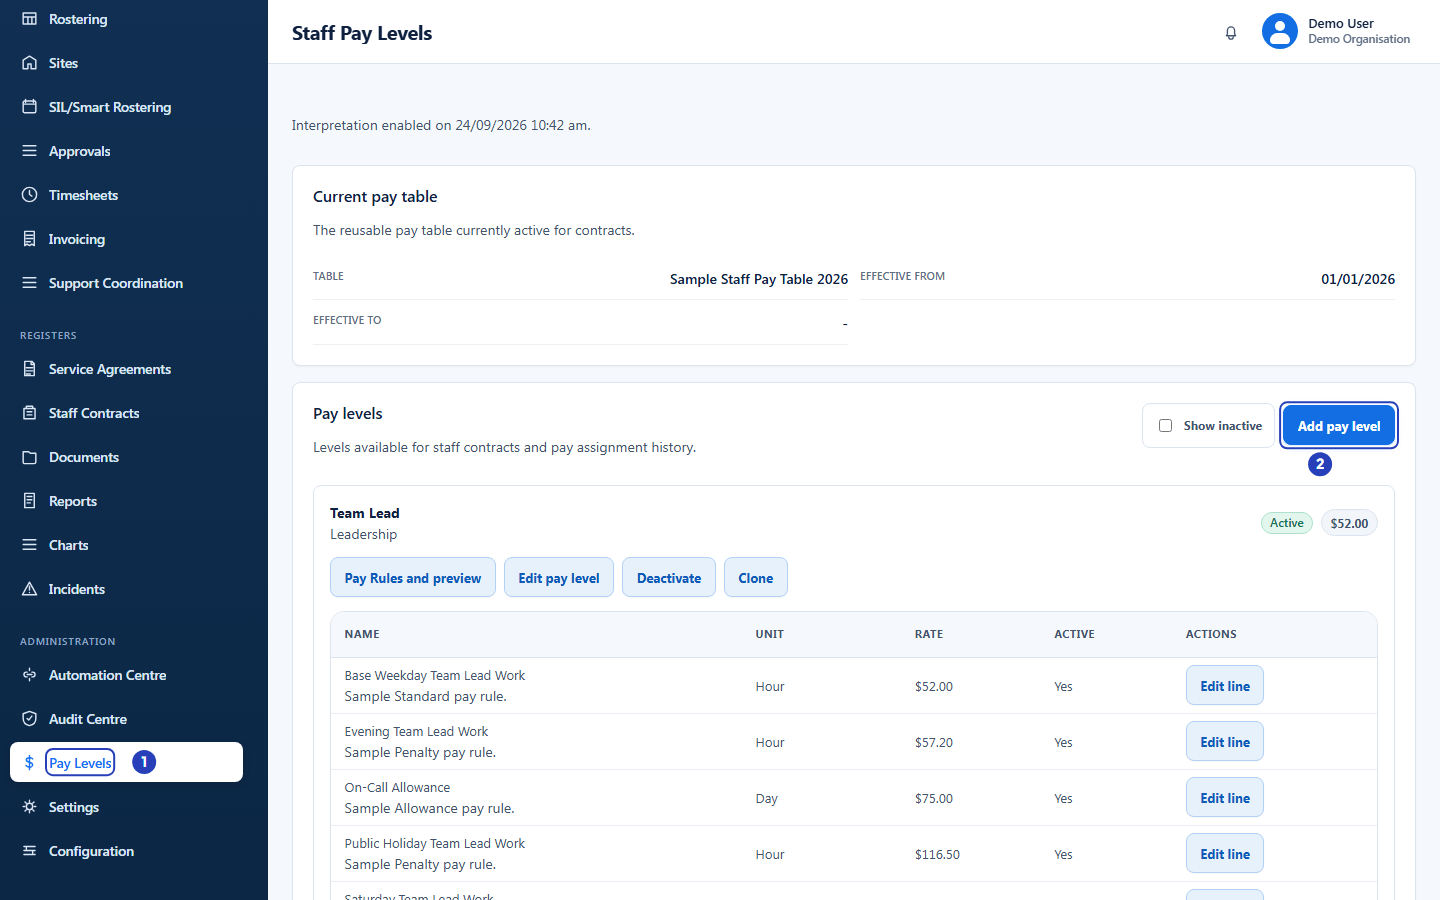
Choose Pay Levels under Administration (1), then Add pay level (2). -
Enter the code, name and group
1 In Pay level code, type a short code for the level, such as
LEVEL_1.2 In Pay level name, type the name people will see, such as
Support Worker Level 1.3 In Group, type a group if you want similar levels listed together, such as
Support Worker.4 In Sort order, type a number if you want to control the order inside the group. Leave it as
0otherwise.Fields in step 2 Field What it means Pay level code Required. A short code that identifies the level. It is saved in capital letters, and each code can be used only once in the current pay table. Pay level name Required. The name shown on the Pay Levels page and when you choose a level for a staff member. Group Optional. Levels are listed by group, then by sort order, then by name. Sort order A whole number. Inside a group, lower numbers are listed first. 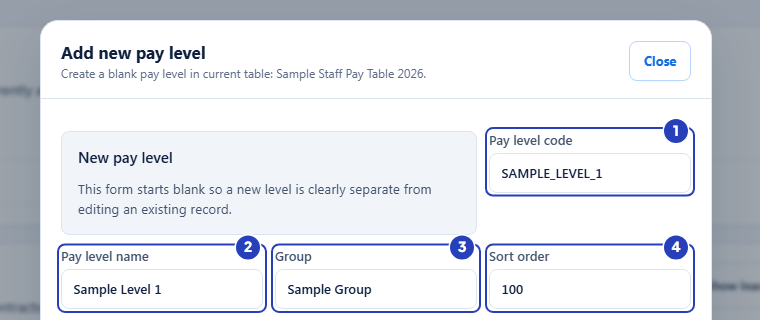
Type the code (1), the name (2), the group (3) and, if you want, a sort order (4). -
Set the base hourly rate, then choose Create pay level
1 In Base hourly rate, type the standard weekday hourly rate in dollars, for example
10.00.2 Leave Active ticked if the level should be available when you set up new contracts. Untick it to create the level switched off.
3 Check the details, then choose Create pay level.
4 Choose Cancel instead to close the window without saving.
Fields in step 3 Field What it means Base hourly rate Optional. Creates the level's first rate line, named after the level, at this rate per hour. Leave it empty to create the level with no rate lines and add the rate later with Edit pay level. Active Ticked by default. An inactive level is hidden from the list until you tick Show inactive. Important: Type the rate your organisation has worked out from its own industrial instrument or pay agreement. BondiByte does not check the rate you enter against an Award or agreement.
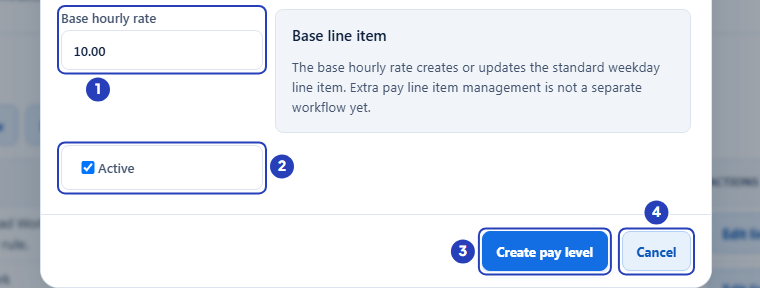
Type the base hourly rate (1), leave Active ticked (2), then choose Create pay level (3) to save, or Cancel (4) to close the window without saving. -
Check the new Pay Level
1 A message confirms Pay level added.
2 The window closes and the new level appears in the list, under its group, with the Active badge and its base hourly rate.
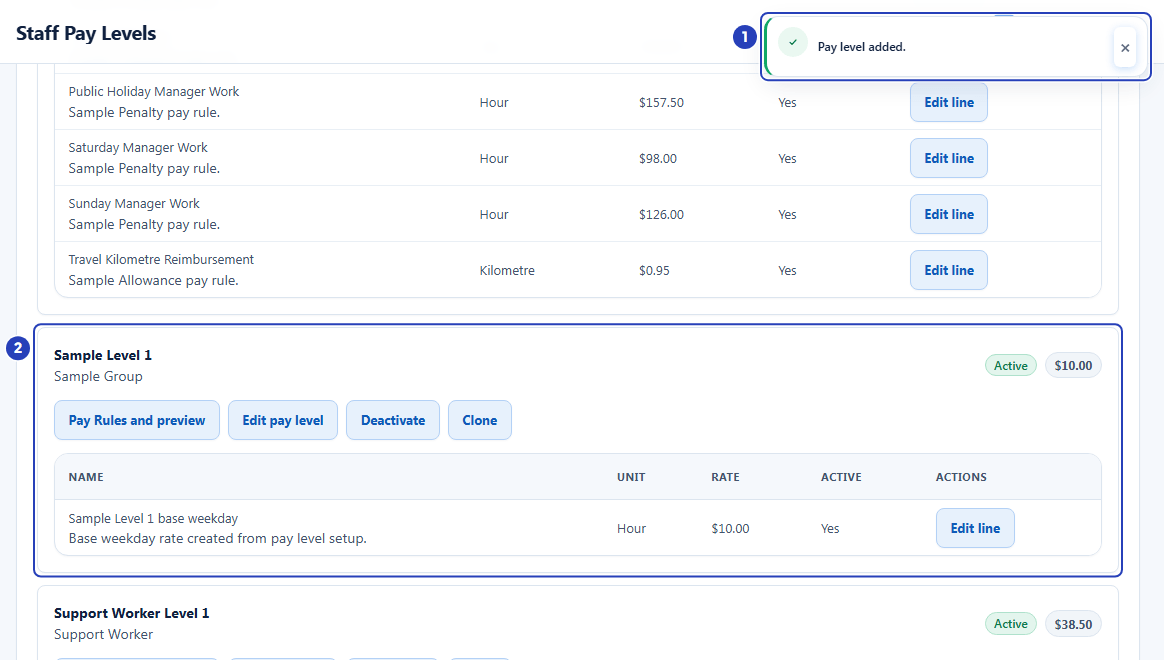
The confirmation message (1) and the new Pay Level in the list (2).
What happens next
The new Pay Level appears in the Pay levels list with the Active badge, its group and its base hourly rate. If you typed a base rate, the level has one rate line, named after the level, with the unit Hour.
A new Pay Level starts with no Pay Rules, and interpretation is off for it. If you choose Pay Rules and preview on the level, it shows Interpretation disabled and No configured rule versions. The rate line does not become a rule on its own.
Choose Edit pay level to change the code, name, group, sort order or base rate, or Deactivate to switch the level off. See Edit rates on a Pay Level.
Give the level to a staff member in the Pay level field when you edit their staff record or set up their staff contract. See Create a staff member. For BondiByte to work out their pay automatically, also record a dated assignment to the level in Pay Rules and preview > Staff assignment.
Important notes
Important: BondiByte applies the Pay Levels and Pay Rules that your organisation configures. It is not a complete Award interpreter. Your organisation is responsible for checking the rates it enters against its industrial instrument.
Note: Pay Levels belong to your organisation as a whole. They are not set up for each site.
Good practice
- Use the same code pattern for every level, such as
LEVEL_1,LEVEL_2andLEVEL_3. Codes are saved in capital letters and each can be used only once in the current pay table, so a pattern avoids clashes. - Start from a copy when a level is close to what you need. A copy brings its rate lines and rules with it, so you only adjust what differs. See Clone a Pay Level.
- Check the Base hourly rate before you choose Create pay level. If you leave it empty the level has no rate lines. A rate you type here can be changed later with Edit pay level until a published Pay Rule locks it.
Troubleshooting
The page says Pay Levels are not enabled for this organisation. and there is no Add pay level button.
Why it happens: Pay Levels has not been turned on and your organisation has no Pay Levels yet, so the page hides Current pay table and the Pay levels list. If your organisation already has Pay Levels, they stay on the page with the line Automatic interpretation is off. Existing pay levels remain visible and editable. and Add pay level is still there.
What to do: An Owner or Admin turns Pay Levels on in Account settings > Automation & Capacity Controls > Pay Levels and automatic interpretation. See Enable Pay Levels.
I cannot see Pay Levels in the left menu.
Why it happens: Your role does not include the Can view pay levels permission, or your organisation's subscription is not active.
What to do: Ask an Owner or Admin to check your role and Billing & subscription.
The Add pay level button is greyed out.
Why it happens: Your organisation has no current pay table yet. The page says Add Pay Level is available after a current pay table exists.
What to do: In Current pay table, choose Create current pay table. Type a Pay table code, a Pay table name and an Effective from date, leave Make this the current pay table ticked and choose Create pay table. Then add the level.
I cannot see Add pay level.
Why it happens: Your role does not include the Can manage pay levels permission.
What to do: Ask an Owner or Admin to check your role, or to add the level for you.
A message says That pay level code is already in use.
Why it happens: Each Pay Level code can be used once in the current pay table. Codes are saved in capital letters, so level_1 and LEVEL_1 are the same code.
What to do: Type a different code in Pay level code, then choose Create pay level again.
The new level is not in the list.
Why it happens: You may have unticked Active, which hides the level, or the level may be listed under a different group.
What to do: Tick Show inactive above the list, and look under the group you typed. To use an inactive level again, choose Activate on its card.