

Who this is for
This guide is written for Owner, Admin, Manager and Coordinator.
Before you begin
- The participant already exists as a client and is active. See Create a client.
- The person who will coordinate their supports is an active staff member. See Create a staff member.
- For the budget to show, the participant has an active Service Agreement with line items. See Create a Service Agreement.
Steps
The screenshots show a demonstration organisation with made-up names. Your own screens show your organisation's details. Select a screenshot to open it full size.
-
Go to Support Coordination > a participant in the Caseload list
Support Coordination keeps a participant's plan budget, activities, tasks, goals, referrals and reports in one place. The Caseload list is on the left. The participant you choose opens on the right.
1 In the left menu, under Operations, choose Support Coordination.
2 My caseload lists the participants you coordinate. All participants lists everyone on the caseload. The number in brackets is how many people each holds.
3 Type part of a name in Search participants... to narrow the list.
4 Tick Include inactive to also list participants who were taken off the caseload.
5 Add participant adds someone new. The third step covers it.
6 Choose a participant's row to open their record.
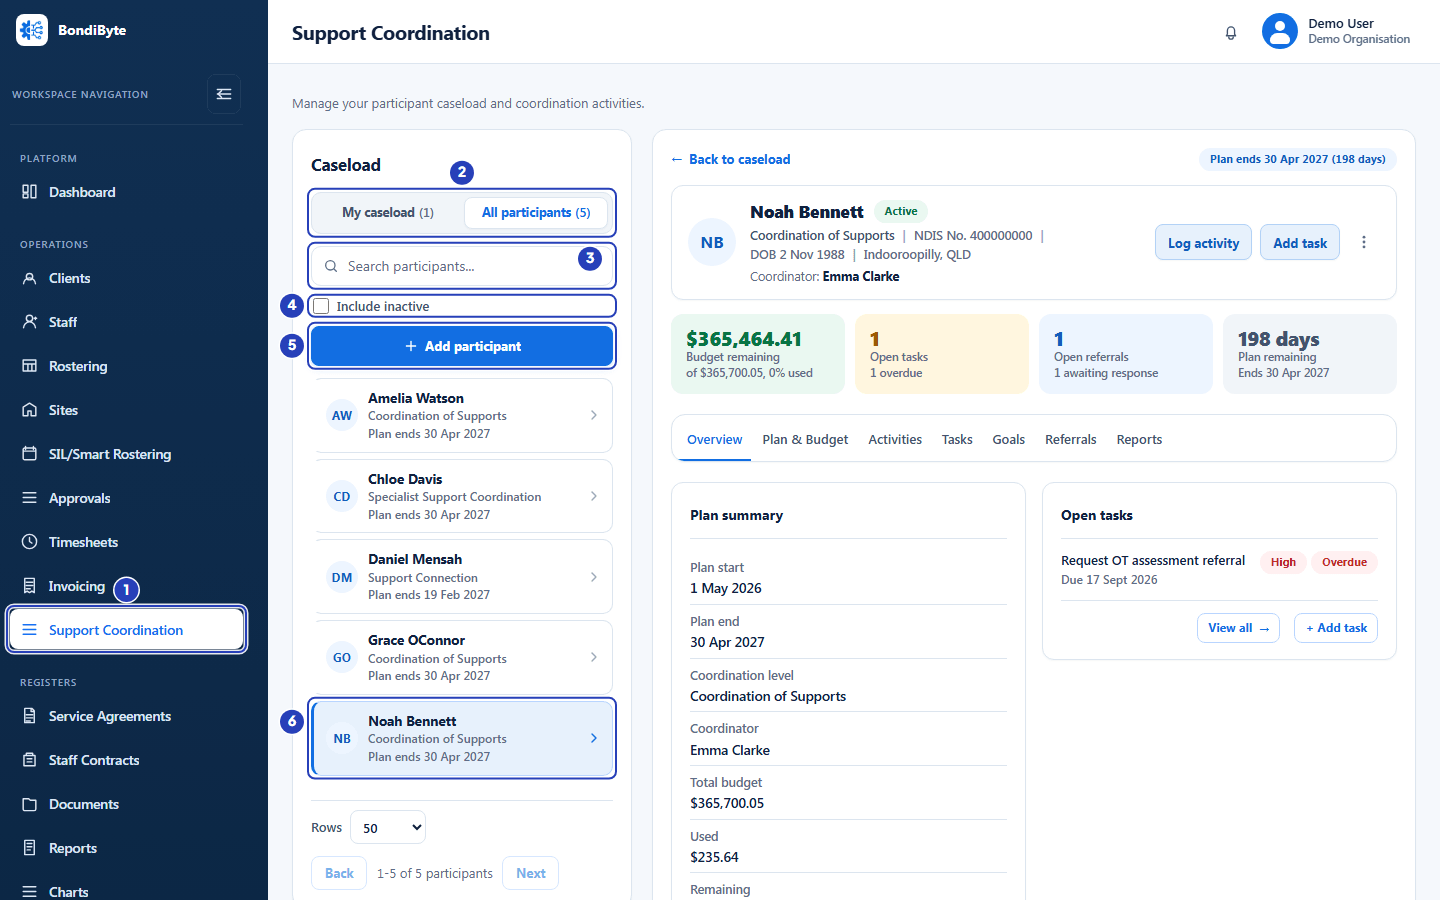
Choose Support Coordination in the left menu (1), then use the caseload scope buttons (2), the search box (3), Include inactive (4) and Add participant (5). Choose a participant's row (6) to open their record. -
Know what the caseload list shows
Owners, Admins and Managers usually open on All participants. A coordinator whose role is limited to Support Coordination opens on My caseload. Whichever you choose, the participant whose record is open is highlighted in the list, and the search and Include inactive apply to both lists.
Each row shows the participant's initials and name, their coordination level (or Level not set), and either Plan ends with the date, what is left of the budget, or No funded supports yet. A grey Inactive label marks someone removed from the caseload. An amber Unassigned label means nobody coordinates them yet.
A row with no plan end date but a budget shows what is left, such as $1,000.00 remaining of $2,000.00. The numbers in brackets on My caseload and All participants follow your search and Include inactive, so they always match what you see.
If nobody matches your search, the list says No participants match and what you typed, and Clear search brings everyone back. With nobody on the caseload it says No participants yet, and under My caseload it suggests switching to All participants. The list shows 50 people at a time. Rows, Back and Next under it show more. On a narrow screen the list and the record take turns on the screen.
-
Add a participant to the caseload
A participant joins the caseload when you choose who coordinates their supports. Choose Add participant. The Add participant window opens.
1 In Participant, search for the client and choose them. Only active clients who are not already on the caseload are listed. To add someone who is not listed, create them as a client first.
2 In Coordinator, search for the staff member and choose them. Only active staff are listed.
3 In Support Coordination level, choose Support Connection, Coordination of Supports or Specialist Support Coordination.
4 Choose Add to caseload. It stays greyed out until all three are filled in. A message confirms Participant added to the caseload. and the record opens. Cancel closes the window without adding anyone.
Note: A participant needs a coordinator before you can log an activity or send an email for them. Adding them with a coordinator takes care of that.
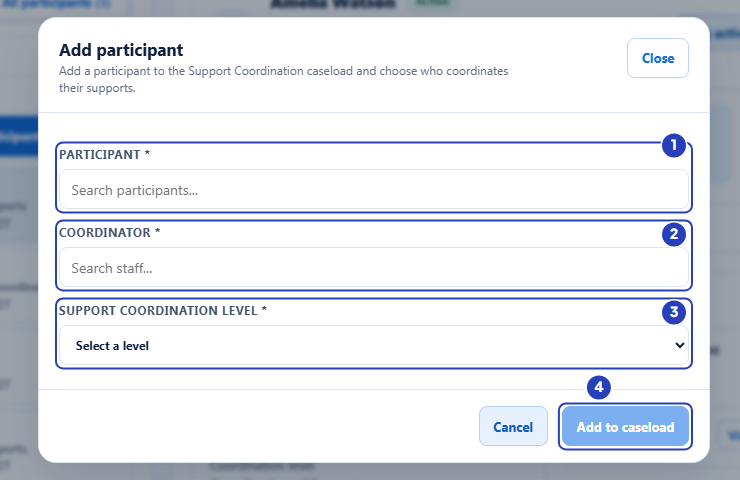
Choose the participant (1), the coordinator (2) and the Support Coordination level (3), then choose Add to caseload (4). -
Read the participant header
The header stays on screen on every tab, so you always see who you are working on.
1 Back to caseload returns you to the list. On a narrow screen it switches from the record to the list.
2 The plan pill reads Plan ends with the date and the days left. It turns amber at 60 days or fewer and red once the plan has ended. It reads No plan end date when there is no funded plan.
3 The name is followed by Active, or Inactive for a participant removed from the caseload.
4 The line under the name shows the coordination level, NDIS No., DOB and the suburb and state. Each part shows only when it is recorded on the client's record.
5 Coordinator: shows who coordinates the participant, or Unassigned.
6 Log activity and Add task are quick actions, and the three-dot button opens the header menu. These three show only when you can manage support coordination.
Note: Log activity opens the Activities tab with the form ready. See Log activities, referrals and reports.
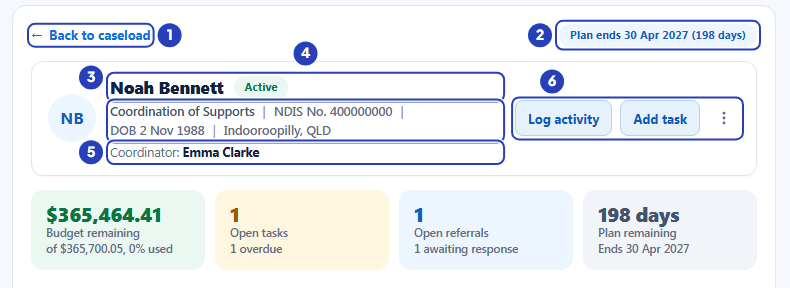
The header holds Back to caseload (1), the plan pill (2), the name and status (3), the identity line (4), the coordinator (5) and the action buttons (6). -
Read the four tiles
The tiles show the state of the plan at a glance and update as soon as you save a change.
1 Budget remaining is the money left across the participant's funded supports, with the total and the % used under it, or No funded supports. It is green normally, amber once 85% is used and red when the budget is over.
2 Open tasks counts tasks that are not completed or cancelled, with how many are overdue under it. The tile turns amber when any are overdue.
3 Open referrals counts referrals that are not accepted, declined or closed, with how many are awaiting response under it. That count includes referrals marked Sent. The tile turns blue when any are waiting.
4 Plan remaining is the days until the plan ends, such as 198 days, then the end date. It reads Ended after the end date and No plan when there is none. It follows the colours of the plan pill.
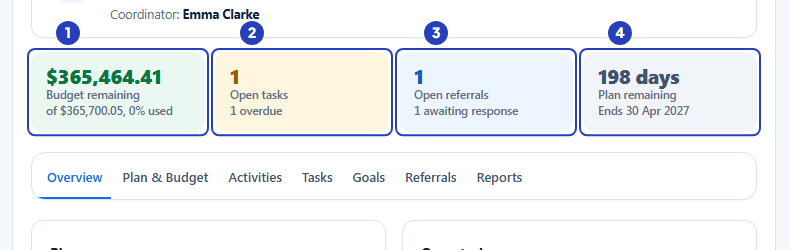
Budget remaining (1), Open tasks (2), Open referrals (3) and Plan remaining (4). -
Read the Overview tab
The record opens on the Overview tab. The tab strip has seven tabs: Overview, Plan & Budget, Activities, Tasks, Goals, Referrals and Reports. The Overview only shows the latest of everything.
1 Plan summary lists Plan start, Plan end, Coordination level, Coordinator, Total budget, Used and Remaining. Remaining turns red when the budget is over. View plan & budget opens that tab.
2 Open tasks shows up to five open tasks with the due date, a priority label and a status label. A task past its due date shows Overdue.
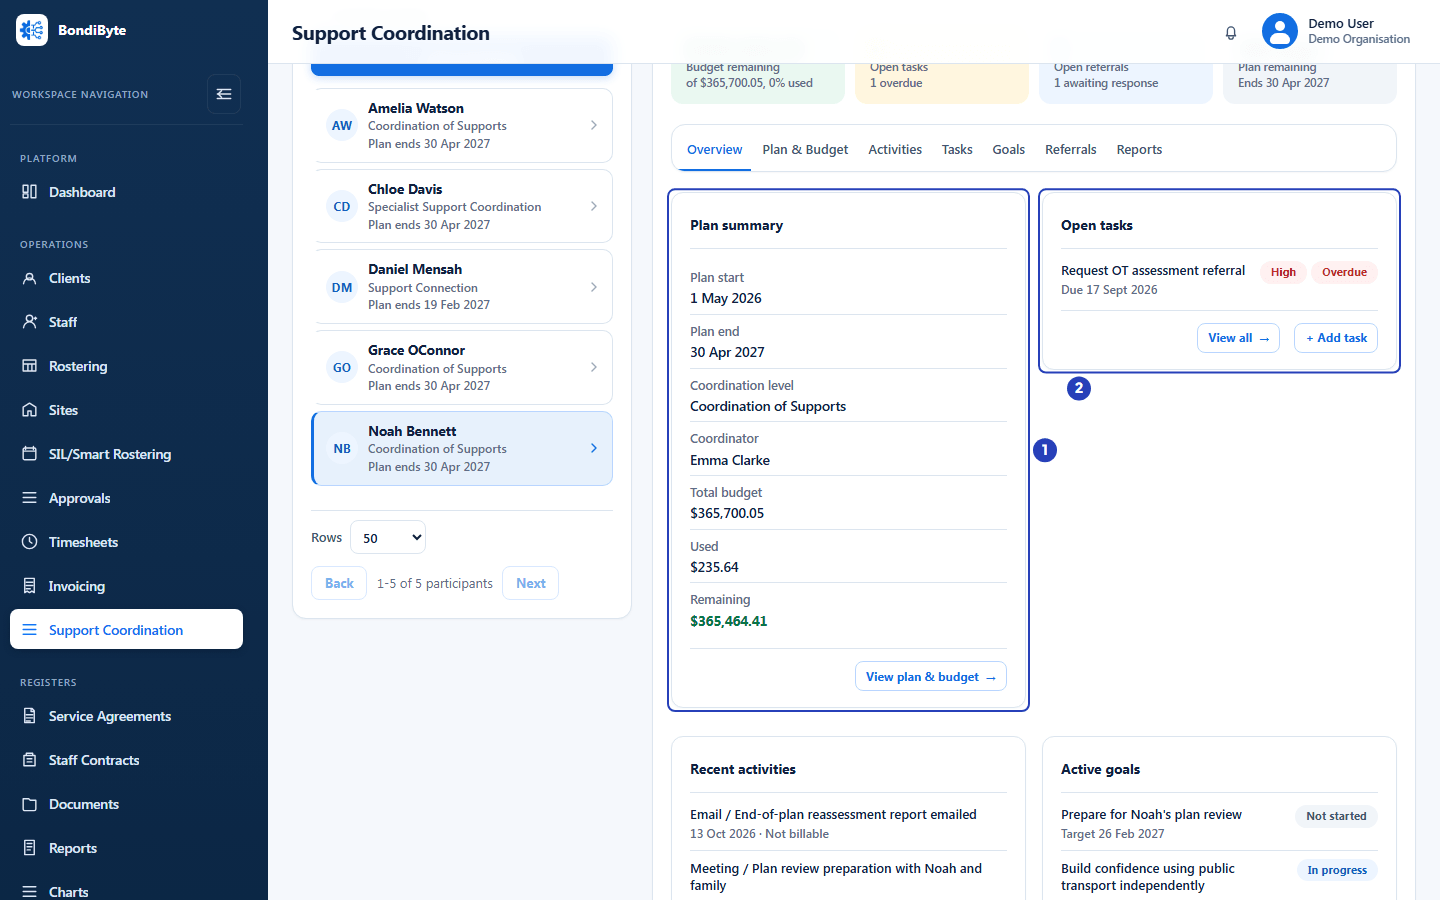
The Plan summary (1) and Open tasks (2) cards at the top of the Overview tab. The other cards are below them. -
Read the rest of the Overview
Scroll down for four more cards. Recent activities shows the latest five, newest first, as the type and subject, then the date, the minutes and Billable or Not billable. Active goals shows goals that are not started or in progress, with the target date, the latest progress note and a status label.
Open referrals lists referrals still open, with the provider, the service type, the follow-up date and the status. Reports lists the latest stored reports with the date created and the status Final. An empty card says so, for example No activities logged yet. or No reports yet.
Every card has View all, which opens its tab. Most also have a plus action: + Add task, + Log activity, + Add goal, + Add referral or + Create report. It opens the same form as the matching tab and shows only when you can manage support coordination.
-
Check the budget on the Plan & Budget tab
Choose the Plan & Budget tab to see where the participant's money is going. It only shows figures. The budget comes from the participant's active Service Agreement.
1 Four tiles repeat the money: Total budget, Used, Remaining and Utilisation, which shows the percentage used with a bar.
2 Create claim gathers the billable activities that are not claimed yet into one claim.
3 Download claim CSV saves the claim as a file you can review and lodge yourself.
4 The Budget breakdown table lists each funded support and what has been used against it.
5 Coordinator history records who was assigned, changed, removed or made inactive, and when. In its corner, Edit coordination details is a shortcut to the window described under the header menu, and shows only when you can manage support coordination. Show history, with the number of changes in brackets, lists every change and then reads Hide history.
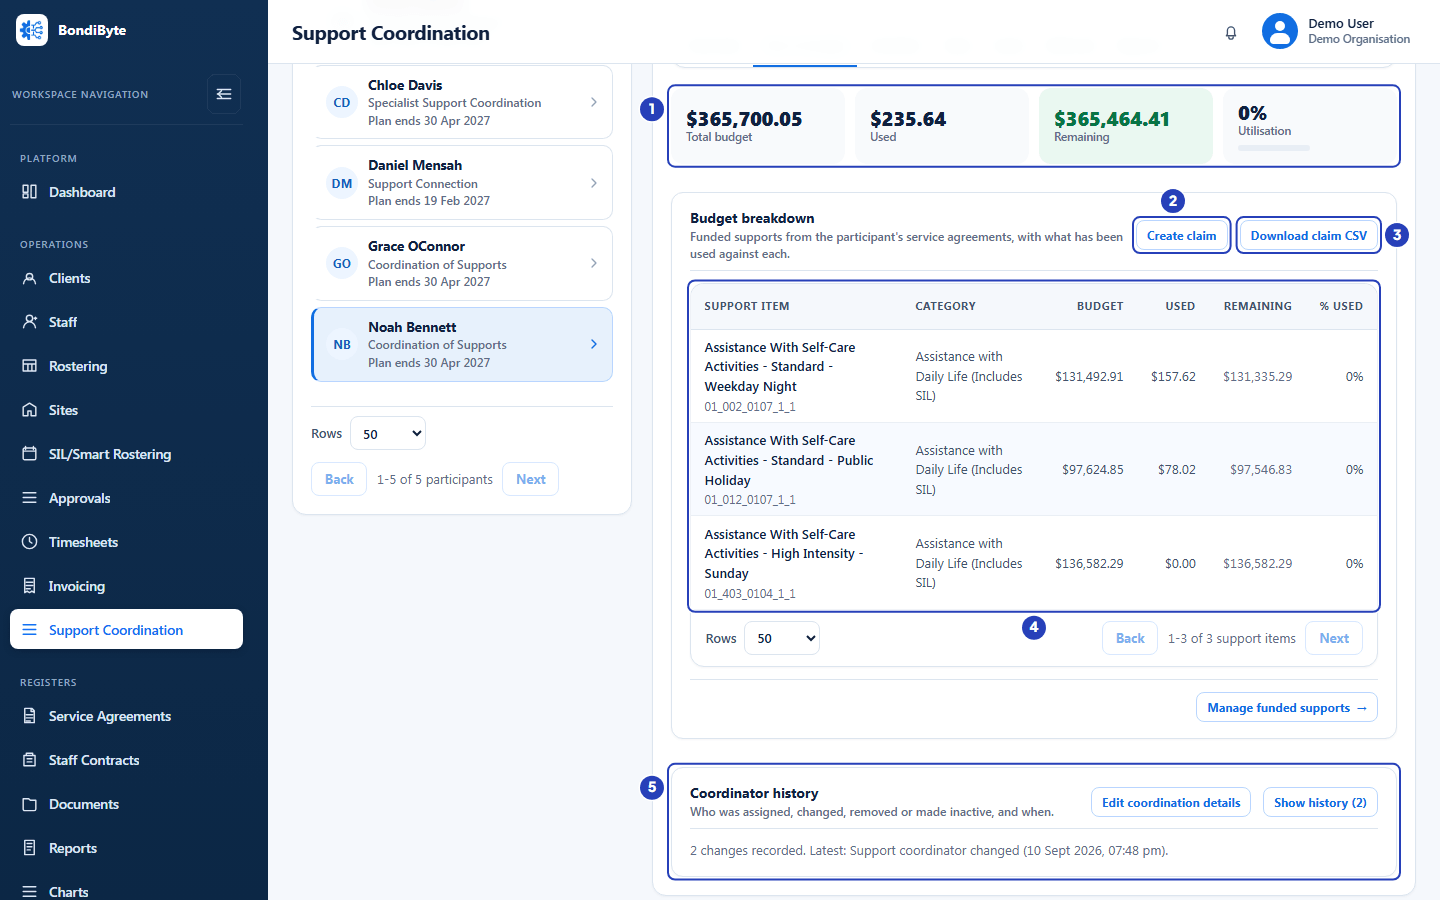
The budget tiles (1), Create claim (2), Download claim CSV (3), the Budget breakdown table (4) and Coordinator history (5). -
Read the budget table and the claim buttons
In the Budget breakdown table, Support item gives the support's name and code. Category shows only when at least one support has a category. Budget is the money set aside in the Service Agreement. Used is the value of the billable activities logged against it. Remaining is Budget less Used, in red when a line is over budget. % used is Used as a percentage of Budget. Manage funded supports below the table opens the participant's agreements.
Create claim opens a window titled Create claim? that shows the amount and the number of activities. Claimed activities are locked and can no longer be edited or deleted. A message then confirms Claim created: with the amount and the number of activities. If there is nothing to claim, a message says There are no unclaimed billable activities to claim. Download claim CSV confirms Claim CSV downloaded. BondiByte does not send claims to the NDIA. You lodge the file from Download claim CSV yourself.
Coordinator history says how many changes are recorded and the latest one, or No coordinator changes recorded. when there are none. Show history lists them all with the time and who made each change, and then reads Hide history. Choose Hide history to fold the list away again. Edit coordination details in the same corner opens the same window as the header menu item of that name, so you can change the coordinator or the level without opening the header menu. If the tab says No funded supports recorded for this participant., the participant has no active Service Agreement with line items yet. See Add line items.
-
Add a task
Tasks are the follow-ups for a participant and who is responsible for each. Choose Add task in the header, + Add task on the Overview, or Add task on the Tasks tab. The Add task window opens.
1 In Task, type what needs doing. This is required.
2 In Assigned to, choose the staff member responsible. It starts as the participant's coordinator. This is required.
3 In Due date, choose a date if there is one. It is optional. An open task is overdue the day after its due date.
4 In Priority, choose Low, Normal or High. It starts as Normal.
5 In Status, choose Open, In progress, Completed or Cancelled. It starts as Open.
6 Choose Add task. It stays greyed out until Task and Assigned to are filled in. A message confirms Task added.
Notes is optional. Add anything the assignee needs to know.
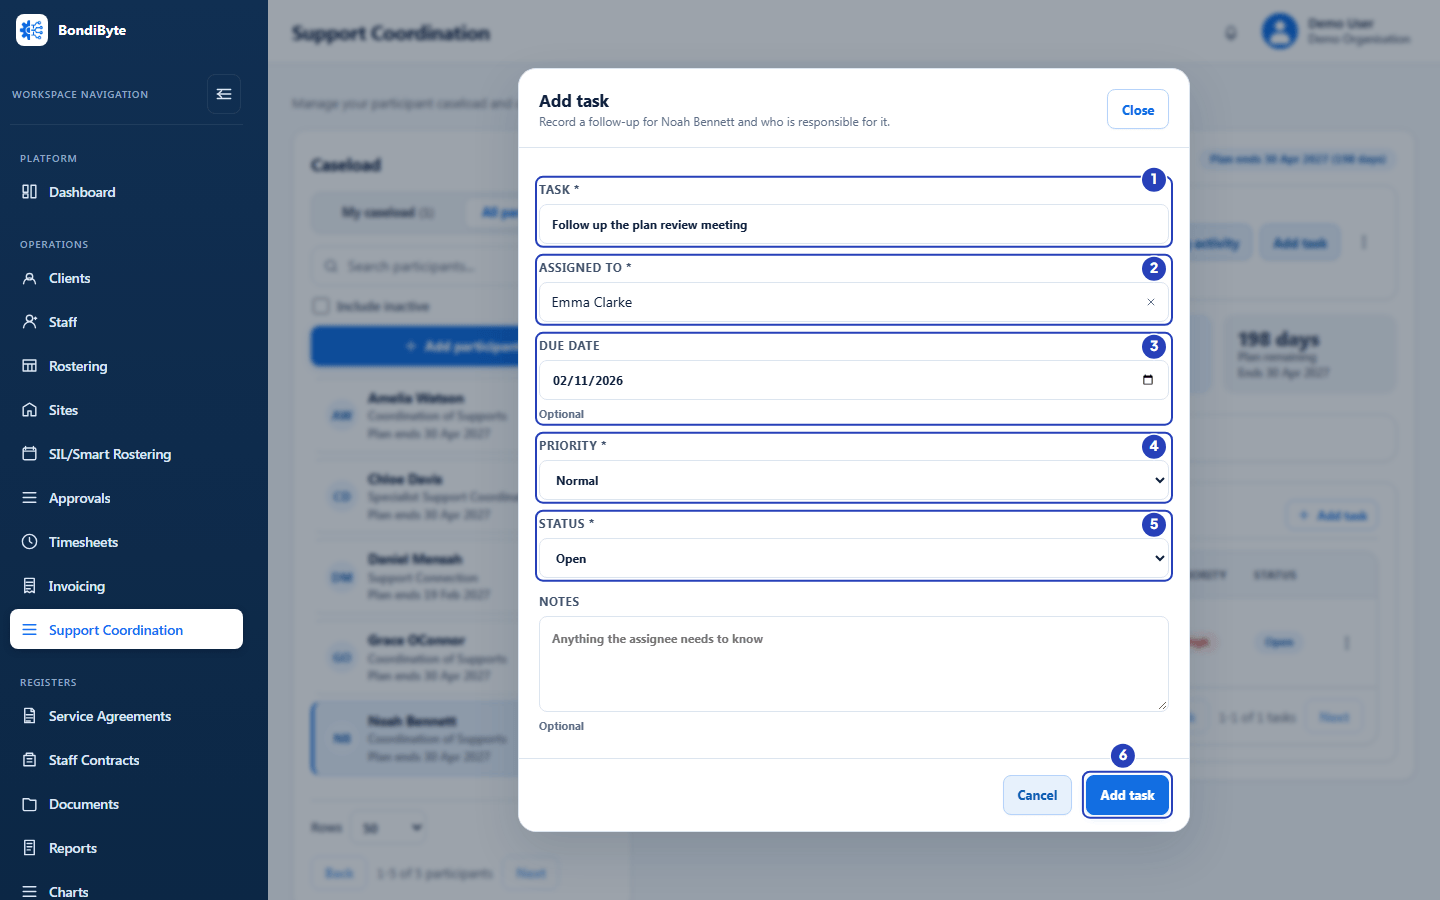
Type the task (1), check who it is assigned to (2), choose a due date (3), the priority (4) and the status (5), then choose Add task (6). -
Read the Goals tab
Goals record what the participant is working towards.
1 Add goal opens the goal form.
2 The table shows each Goal, its Target date, its Status and the Latest progress note. With no goals it says No goals recorded yet. and Add a goal to track what the participant is working towards.
3 A goal's three-dot menu has Edit, Mark achieved and Delete.
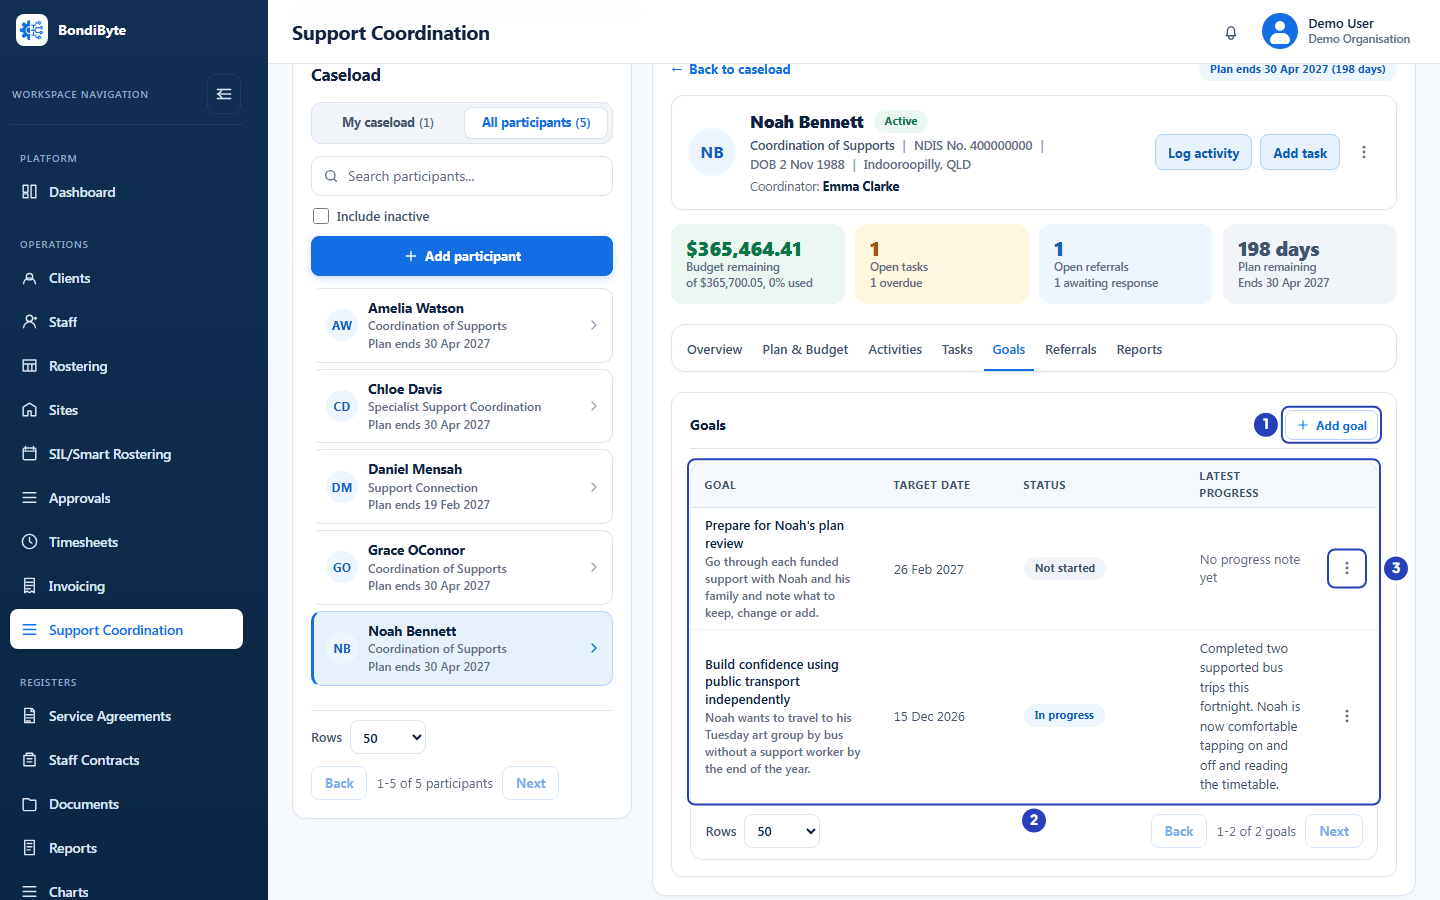
Choose Add goal (1) to record a goal. The table (2) lists each goal with its target date, status and latest progress, and the row menu (3) edits it. -
Know the Tasks and Goals tabs
In the goal form, Goal is required. Description, Target date and Progress note are optional. Status is required and starts as In progress. The choices are Not started, In progress, Achieved and On hold, coloured grey, blue, green and amber. When you edit a goal, the progress note you type replaces the current one, and clearing it removes it.
The Tasks tab lists each task with its Task, Assigned to, Due, Priority and Status. Open tasks come first, with the nearest due date at the top. With no tasks it says No tasks recorded yet and Follow-ups for this participant and who is responsible for them appear here. If you can manage support coordination, an Add task button sits under it. A row's three-dot menu has Edit, Mark complete (or Reopen for a finished task) and Delete. Delete asks you to confirm because it cannot be undone.
Activities, Referrals and Reports hold the participant's case notes, their referrals to providers and their stored reports. See Log activities, referrals and reports.
-
Open the header menu
1 Choose the three-dot button at the right of the header. It shows only when you can manage support coordination.
2 The menu lists Edit coordination details, Change coordinator and Remove from caseload.
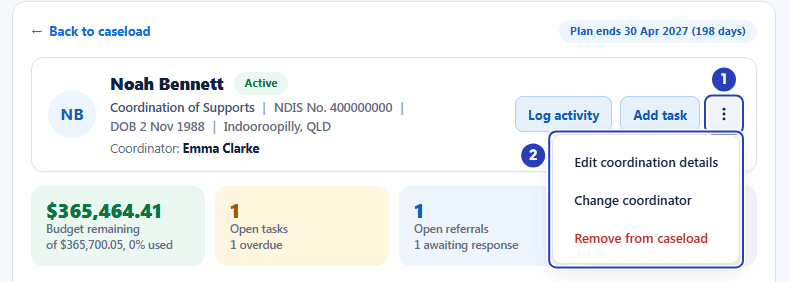
Choose the three-dot button (1) to open the menu (2) with Edit coordination details, Change coordinator and Remove from caseload. -
Change the coordinator or remove a participant
Edit coordination details opens a window to change the Coordinator and the Support Coordination level. The coordinator is required. If the participant already has a level, it is required too. Save changes stays greyed out until you change something. A message confirms Coordination details updated.
Change coordinator opens the same window with the Coordinator field ready to type in.
Unassign coordinator is in that window, under Need to remove the coordinator without choosing a new one? A window titled Unassign coordinator? asks you to confirm. The participant stays on the caseload with an amber Unassigned label until you choose a new coordinator.
Remove from caseload takes the participant off the caseload after you confirm in the window titled Remove from caseload? Their activities, tasks, goals, referrals and reports remain available. They leave the list unless Include inactive is ticked. For a removed participant the menu shows Reactivate on caseload instead.
Each change of coordinator is recorded in Coordinator history on the Plan & Budget tab.
Important: Removing a participant from the caseload keeps all their records, and Reactivate on caseload brings them back.
What happens next
Your changes show straight away in the header tiles, the Overview and the matching tab.
To log case notes, send referrals to providers and create reports, continue with Log activities, referrals and reports.
The budget and the plan dates come from the participant's Service Agreement. To change what is funded, change its line items. See Add line items.
Important notes
Note: The screens in this guide show a demonstration organisation with made-up participants. Your own caseload will show your participants.
Important: The figures in the header and on the Plan & Budget tab are based on the work you record in BondiByte against the participant's Service Agreement. They are not the participant's official NDIS balance, and spending with other providers is not visible here.
Good practice
- Choose the Support Coordination level when you add a participant. It shows on their row, in the header and in their reports.
- Check the amber Unassigned label on the caseload often. A participant with no coordinator cannot have activities logged against them.
- Give every task an owner and a due date. The Open tasks tile and the Overdue label then show what needs attention.
- Look at Plan remaining early. The pill turns amber 60 days before the plan ends, which leaves time for the end-of-plan reassessment report.
- Remove a participant from the caseload when you stop coordinating for them, rather than deleting records. Everything stays available.
Troubleshooting
Support Coordination is not in my left menu.
Why it happens: Your role does not include Can view support coordination.
What to do: Ask an Owner or Admin to check your role.
I cannot see Add participant, Log activity, Add task or the three-dot menu.
Why it happens: Your role does not include Can manage support coordination.
What to do: Ask an Owner or Admin to add that permission to your role.
My caseload is empty.
Why it happens: No participants are assigned to you as their coordinator.
What to do: Choose All participants, or ask a manager to assign participants to you.
The person I want is not in the Participant list.
Why it happens: Only active clients who are not already on the caseload are listed.
What to do: Tick Include inactive to check whether they are already there, then choose Reactivate on caseload. If they are not a client yet, create them first. See Create a client.
Budget remaining shows No funded supports, or Plan remaining shows No plan.
Why it happens: The participant has no active Service Agreement with line items, or the funded supports have no end date.
What to do: Open Manage funded supports on the Plan & Budget tab and check the agreement. See Create a Service Agreement.
Add task is greyed out.
Why it happens: Task and Assigned to are both required.
What to do: Type the task and choose who it is assigned to.
Questions and answers
Does BondiByte lodge claims with the NDIA?
No. Download claim CSV gives you a file to review and lodge through your usual NDIS claiming process.